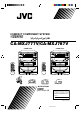
COMPACT COMPONENT SYSTEM CA-MXJ777V/CA-MXJ787V CA-MXJ777V CA-MXJ787V CD3 STANDBY COMPACT CD3 STANDBY COMPACT CD2 CD 3 CD 2 CD 2 CD1 CD 1 PLAY & EXCHANGER NTSC / PAL COMPABILITY NTSC / PAL COMPABILITY VOLUME PHONES VOLUME + PHONES – PANEL OPEN / CLOSE – PANEL OPEN / CLOSE MIC LEVEL MIC LEVEL SELECT TAPE CD AUX FM / AM SELECT MAX 1 MIN MIC SOUND MODE VOCAL MASKING ECHO TAPE B REC PAUSE SHIFT PREV 3 STEREO SOUND MODE SLEEP TAPE A CENTER LEVEL + CENTER MODE TAPE
Warnings, Cautions and Others Avisos, precauciones y otras notas Advertências, precauções e outras notas Caution –– switch! Disconnect the mains plug to shut the power off completely. The switch in any position does not disconnect the mains line. The power can be remote controlled. ! Precaución –– Interruptor Desconectar el cable de alimentación para desactivar la alimentación totalmente. Cualquier que sea la posición , la alimentación no es de ajuste del interruptor cortada completamente.
CAUTION To reduce the risk of electrical shocks, fire, etc.: 1. Do not remove screws, covers or cabinet. 2. Do not expose this appliance to rain or moisture. PRECAUCIÓN Para reducir riesgos de choques eléctricos, incendio, etc.: 1. No extraiga los tornillos, los cubiertas ni la caja. 2. No exponga este aparato a la lluvia o a la humedad. PRECAUÇÃO Para reduzir riscos de choques elétricos, incêndio, etc.: 1. Não remova parafusos e tampas ou desmonte a caixa. 2.
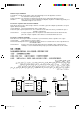
Caution: Proper Ventilation To avoid risk of electric shock and fire, and to prevent damage, locate the apparatus as follows: 1 Front: No obstructions and open spacing. 2 Sides/ Top/ Back: No obstructions should be placed in the areas shown by the dimensions below. 3 Bottom: Place on the level surface. Maintain an adequate air path for ventilation by placing on a stand with a height of 10 cm or more.
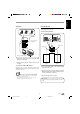
IMPORTANT FOR LASER PRODUCTS / IMPORTANTE PARA PRODUCTOS LÁSER / IMPOTANTE PARA PRODUTOS LASER / / REPRODUCTION OF LABELS / REPRODUCCIÓN DE ETIQUETAS / REPRODUÇÃO DE ETIQUETAS / 1 CLASSIFICATION LABEL, PLACED ON REAR ENCLOSURE 2 WARNING LABEL, PLACED INSIDE THE UNIT 1 ETIQUETA DE CLASIFICACIÓN, PEGADA EN LA PARTE POSTERIOR DE LA CAJA 2 ETIQUETA DE ADVERTENCIA, PEGADA EN EL INTERIOR DE LA UNIDAD 1 ETIQUETA DE CLASSIFICAÇÃO LOCALIZADA NA PARTE POSTERIOR DA CAIXA DO APARELHO.
English Introduction We would like to thank you for purchasing one of our JVC products. Before operating this unit, read this manual carefully and thoroughly to obtain the best possible performance from your unit, and retain this manual for future reference. About This Manual Moisture condensation This manual is organized as follows: • The manual mainly explains operations using the buttons and controls on the unit.
English Table of Contents Getting Started ............................................... 3 Listening to FM and AM Broadcasts ......... 17 Unpacking .................................................................. 3 Putting the Batteries into the Remote Control ........... 3 Connecting Antennas ................................................. 3 Connecting Speakers .................................................. 4 Connecting Auxiliary Equipment ...............................
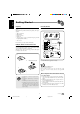
English Getting Started Unpacking Connecting Antennas After unpacking, check to be sure that you have all the following items. The number in the parentheses indicates the quantity of the pieces supplied. FM antenna 1 AM loop antenna (1) FM antenna (1) Remote control (1) Batteries (2) AC plug adaptor (except for Vietnam, Hong Kong and The People's Republic of China: 1) • Video cord (1) 2 3 • • • • • ANTENNA FM antenna (supplied) If any is missing, consult your dealer immediately.
1 English Connecting Speakers AM antenna 2 You can connect a pair of front speakers, one center speaker, a pair of rear speakers and one subwoofer. 3 To connect front speakers 1 2, 3 ANTENNA AM LOOP Vinyl-covered wire (not supplied) AM EXT Red FM Speaker cord Speaker cord FM (75 ) SPEAKERS RIGHT LEFT Black AM loop antenna (supplied) 1 Connect the AM loop antenna to the AM LOOP terminals as illustrated. 2 Turn the AM loop antenna until you have the best Right speaker reception.
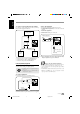
English To connect a center speaker and rear speakers VCR or other equipment By connecting a center speaker and rear speakers, you can enjoy Dolby Surround equipped with this unit. You can connect the following equipment to this system. • TV with a video input jack: used as a monitor of video CD playback. • Audio/Video equipment. Center speaker To listen to this source, press AUX p, !. Auxiliary Equipment CD OPTICAL DIGITAL OUTPUT TV VIDEO OUT STEREO RECEIVER MODEL NO. MX - J777V UNIT NO.
English To connect audio equipment with an optical digital input terminal • DO NOT plug in before setting the voltage selector on the rear of the unit and all connection procedures are complete. You can record CD sound onto the connected digital equipment. CD OPTICAL DIGITAL OUTPUT CD OPTICAL DIGITAL OUTPUT VIDEO OUT STEREO RECEIVER MODEL NO. MX - J777V UNIT NO.
English Common Operations Setting the Clock Setting the AM Tuner Interval Spacing Before operating the unit any further, first set the clock built in this unit. Some countries space AM stations 9 kHz apart, and some countries use 10 kHz spacing. 1 On the unit ONLY: PANEL OPEN / CLOSE Press PANEL OPEN/CLOSE 5. You can only change the AM tuner interval spacing while tuning into an AM station. The unit is turned on and the Powered Rolling Panel opens automatically.
English Adjusting the Volume Reinforcing the Bass Sound You can adjust the volume level only while the unit is turned on. The Signal Adaptive Bass function provided for this unit can enhance the bass sound while listening to any source at low volume. You can use this effect only for playback. Turn VOLUME t clockwise to increase the volume or counterclockwise to decrease it. VOLUME When using the remote control, press VOLUME + ™ to increase the volume or press VOLUME – ™ to decrease it.
English 2 Surround modes *: D.CLUB: HALL: STADIUM: Increases resonance and bass. Adds depth and brilliance to the sound. Adds clarity and spreads the sound, like in an outdoor stadium. SEA modes: ROCK: POP: CLASSIC: Adjust the SEA pattern. PRESET 1) Press 4 ; or ¢ ; to select the frequency range to adjust (LOW, MID, HIGH). 2) Press 1 x or ¡ x to adjust the level (–3 to +3) of the selected frequency range. 3) Repeat steps 1) and 2) to adjust the level of the other frequency ranges.
Placing CDs Playing Back the Entire Discs — Continuous Play 1 You can play CDs continuously. Press 0 e for the disc tray (CD 1 to 3) you want to load a CD onto. The unit automatically turns on and the disc tray comes out. The Powered Rolling Panel also opens automatically. 2 Place a disc correctly on the circle of the disc tray, with its label side up. 1 Place CDs. 2 Press one of the disc number buttons (CD 1, CD 2, and CD 3) r, 1 for the disc you want to play.
English To locate a particular point in a track • Each time you press the button, CD play mode changes as follows: TUNING During play, press and hold 1 x or ¡ x. • 1: Fast reverses the disc. • ¡: Fast forwards the disc. When using the remote control, press and hold 1 / 4 0 or ¢ / ¡ (. Continuous Play 3 To go to another track Press 4 ; or ¢ ; repeatedly before or during playback. • 4: Goes back to the beginning of the current or previous tracks.
To exit from Random play mode, press PROGRAM/RANDOM v repeatedly again before or after play so that the unit enters another play mode. Before playing, you can check the program contents by pressing 1 / 4 0 or ¢ / ¡ ( on the remote control. • ¢ / ¡: Shows the programmed tracks in the programed order. • 1 / 4: Shows them in the reverse order.
English Playing Back Video CDs/SVCDs 3 Selecting Video Out Press 0 e to close the tray. "CD CLOSE" appears on the display. To playback images correctly on your TV, select the video out according to your TV system, select the proper video out using the buttons on the Unit before you play a disc. 4 1 At standby mode. 2 Press disc number r, 1 button for more than 2 sec. Repeat steps 1 to 3 to insert other discs onto the other trays.
This System provides a Playback Control (PBC) function which utilizes a procedure (menu selection) programmed in a video CD. The playback operation procedure may differ depending on the disc you use. Turn on the TV and select the video input so that you can view the pictures from the CD Player. Refer also to the manual supplied for your TV. 2 Prepare a CD Refer to "Placing CDs" on page 13. 3 For Menu Play, use the folowings buttons: Start playback of the CD.
English 2 Press CD 6 y, _ button to continue playback from the last scene that you have stop. • When a menu is shown for about 10 minutes, the screen background automatically fades out to prevent screen burn-in while the setting is suspended. NOTE: 1 Resume play will not work when the CD tray has been opened. 2 It is advisable to turn off the PBC function to use resuming play if not it will resume at PBC menu.
English The TV screen will show the below: VIDEO INTRO 3 1 2 3 4 5 6 7 8 9 Press the number button & for the video intro you want to select. PRO LOGIC 3 STEREO • If a highlight scene is not selected while 9 scenes are shown on the TV, highlight scenes of the next track will appear on the display.
English Listening to FM and AM Broadcasts Tuning in a Station SEA CONTROL 2 Press SET k. 3 Press PRESET – / + ; to select a preset number. SET On the unit ONLY: 1 Press FM/AM u. The unit automatically turns on and tunes in the previously tuned station (either FM or AM). The Powered Rolling Panel automatically opens. • Each time you press the button, the band alternates between FM and AM. 2 PRESET NEXT PREV FM / AM Press and hold TUNING – / + x for more than 1 second.
English Playing Back Tapes To play both sides repeatedly — Reverse Mode You can play back type I, type II and type IV tapes without changing any settings. Reverse Mode works for both decks at the same time. When it is in use, the tape automatically reverses at the end of a side and the unit starts playing the other side of the tape, and repeats the same process.
English Using Dolby Surround Preparing for Dolby Surround Dolby Surround has been developed to reproduce the important elements of the acoustic surround at home. To listen to the sound of video software bearing the mark DOLBY SURROUND * which includes the same encoded surround information as found in Dolby Stereo films, the unit can provide you with Dolby Surround decoder. This unit features two ways to decode a Dolby Surround encoded signal, Dolby Pro Logic and Dolby 3 Stereo.
ONLY FOR “PRO LOGIC” Press DELAY TIME repeatedly to select the proper delay time of the rear speaker output. Enjoying Playback with Dolby Surround DELAY TIME You can use the settings you have already stored in memory. On the unit: • Each time you press the button, the delay time changes as follows. DELAY1 DELAY2 DELAY4 DELAY3 1 Press TEST TONE to check the speaker output balance.
English Recording IMPORTANT: Recording Tapes on Deck B • It may be unlawful to record or play back copyrighted material without the consent of the copyright owner. • The recording level is automatically set correctly, so it is not affected by the VOLUME control. Thus, during recording you can adjust the sound you are actually listening to without affecting the recording level. • While recording, you can hear sound modes and/or the Signal Adaptive Bass effect through the speaker or headphones.
CD Direct Recording REVERSE MODE Press REVERSE MODE a so that the Reverse Mode indicator lights up as — Everything on the CD goes onto the tape in the order it is on the CD, or according to the order you have made for Program play. • When using the Reverse Mode for recording, start recording in the forward (3) direction first. Otherwise, recording will stop when recording is done only on one side (reverse) of the tape.
English Auto Edit Recording 4 By using Auto Edit Recording, you can record the CD tracks to fit the tape. Auto Edit Recording makes a program by selecting the CD tracks in numerical order. However, to prevent the end of the last track on the front side from being cut off, the last track is selected so as to fit on the remaining tape length. Put a recordable cassette of appropriate length into deck B. 5 Press REVERSE MODE a so that the Reverse Mode indicator lights up as .
You can enjoy singing along and microphone mixing by using two microphones. • The MIC LEVEL 8 control adjustment is valid for both microphone connected the MIC 1 9 and MIC 2 9 jacks. If howling or squealing (feedback) occurs while using the microphone(s) Take the following actions to prevent these noises. • Adjust the MIC LEVEL 8 and VOLUME t controls. • Avoid pointing the microphone(s) towards the speakers. • When two microphones are connected, turn off the On/Off switch on the unused microphone.
English 5 6 Turn MIC LEVEL 8 and VOLUME t to adjust the microphone level and the speaker output level. Microphone mixing Sing into the microphone. On the unit ONLY: To apply echo to your voice, see " To apply an echo to your voice" in this page. To adjust the music key, see " Adjust the Music Key Control" in this page. To record your singing along, see "Microphone Mixing" in this page. When finish singing restore the stereo effect by pressing MPX until "NORMAL" appears on the display.
3 There are three timers available — Recording Timer, Daily Timer, and Sleep Timer. PRESET Set the on-time you want the unit to turn on. Using Daily Timer 4 With Daily Timer, you can wake to your favourite music or radio program. The unit automatically turns on, set the volume level to the preset level, and starts playing the specified source when the on-time comes (the indicator flashes just before the on-time, and continues flashing while the timer is operating).
English 6 1) Press 4 ; or ¢ ; to select the disc number, then press SET k. 2) Press 4 ; or ¢ ; to set the track number, then press SET k. The unit enters volume setting mode. Using Recording Timer PRESET When selecting “– CD – – –”. NEXT PREV With Recording Timer, you can make a tape of a radio broadcast automatically.
PRESET Set the on-time you want the unit to turn on. PREV 1) Press 4 ; or ¢ ; to set the hour, then press SET k. 2) Press 4 ; or ¢ ; to set the minute, then press SET k. “OFF TIME” appears for 2 seconds, then the unit enters off-time setting mode. Using Sleep Timer NEXT With Sleep Timer, you can fall asleep to music. You can set Sleep Timer when the unit is turned on. How Sleep Timer actually works SEA CONTROL SET The unit automatically turns off after the specified time length passes.
English Maintenance To get the best performance of the unit, keep your discs, tapes, and mechanism clean. Handling discs Handling cassette tapes • Remove the disc from its case by holding it at the edge while pressing the center hole lightly. • Do not touch the shiny surface of the disc, or bend the disc. • Put the disc back in its case after use to prevent warping. • If the tape is loose in its cassette, take up the slack by inserting a pencil in one of the reels and rotating.
Remote Control 1 Disc number buttons (CD 1, CD 2, and CD 3) (10–11, 13–16, 22–23) Pressing one of these buttons also turns on the unit. 1 2 SOUND MODE button (8) 2 3 VOCAL MASKING button (24) 3 4 ON SCREEN button (15) 4 5 5 V.
English Display Window 1 2 3 4 5 SOUND MODE PRO LOGIC 3 STEREO 1 2 REPEAT ALL 1CD PROGRAM RANDOM 1 5 9 13 3 SLEEP DAILY REC STEREO MONO A B REC kHz MHz q p 9 8 7 2 6 10 14 3 7 11 15 4 8 12 16 6 See pages in the parentheses for details. Front Panel 1 Disc trays (standby/on) button and STANDBY lamp (7, 27– 2 28) 3 Display window 4 Remote sensor 5 PANEL OPEN/CLOSE button (7) Pressing this button also turns on the unit.
English Become familiar with the buttons and controls on your unit. Powered Rolling Panel ; a z x c PANEL OPEN / CLOSE PRESET REC TUNING PROGRAM / RANDOM START/STOP s DUBBING REVERSE MODE SEA CONTROL TIMER /CLOCK d CD REC START DECK A/B Press PANEL OPEN/CLOSE f 5 to open the panel. g To close the panel, press h the button again. v NEXT PREV SET SUBTITLE j MPX PRO LOGIC / 3 STEREO DEMO SOUND MODE CANCEL – kl EDIT VCD NUMBER + b S. A. BASS REPEAT n m , .
English Specifications Center unit section – CA-MXJ777V/MXJ787V CD player CD Capacity: Dynamic range: Signal-to-noise ratio: Wow and flutter: Amplifier Output Power Front: 75 watts per channel, min. RMS, both channels driven into 6 ohms at 1 kHz with no more than 0.9% total harmonic distortion. Center: 25 watts, min. RMS, driven into 8 ohms at 1 kHz with no more than 0.9% total harmonic distortion. Rear: 12.5 watts per channel, min. RMS, both channels driven into 16 ohms at 1 kHz with no more than 0.
Mains (AC) Line Instruction (not applicable for Europe, U.S.A., Canada, Australia, and U.K.