JE3_Cover[U].
JE3_Safty[U].fm Page 1 Thursday, January13, 2005 3:32 PM Warnings, Cautions and Others Caution–– (STANDBY/ON) button! Disconnect the mains plug to shut the power off completely. The (STANDBY/ON) button in any position does not disconnect the mains line. The power can be remote controlled. CAUTION To reduce the risk of electrical shocks, fire, etc.: 1. Do not remove screws, covers or cabinet. 2. Do not expose this appliance to rain or moisture. CAUTION • Do not block the ventilation openings or holes.
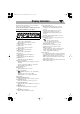
MX-JE3.book Page 1 Thursday,January13, 2005 3:32 PM Introduction Precautions Contents Installation Connections .............................................................3 • Install the System in a location with adequate ventilation to prevent internal heat buildup in the System. Display Indication ...................................................6 DO NOT install the System in a location near heat sources, or in a place subject to direct sunlight, excessive dust or vibration.
MX-JE3.book Page 2 Thursday,January13, 2005 3:32 PM Playable Disc Types INFO DIGITAL VIDEO COMPACT DIGITAL AUDIO DVD Logo is a trademark of DVD Format/Logo Licensing Corporation. • CD-R/RW: Recorded in the Audio CD, Video CD, SVCD, MP3, WMA, and JPEG formats. • DVD-R/-RW: Recorded in the DVD Video format. In addition to the above discs, this system can play back audio data recorded on CD Text, CD-G (CD Graphics), and CD-Extra.
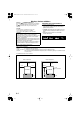
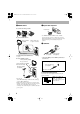
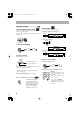
MX-JE3.book Page 3 Thursday,January13, 2005 3:32 PM Connections Do not connect the AC power cord until all other connections have been made. • Connect VIDEO OUT directly to the video input of your TV. Connecting VIDEO OUT to a TV via a VCR may cause a monitor problem when playing back a copy-protected disc. You may also have a monitor problem when connecting the player to an integrated TV/Video system. ~ From AM/FM antenna See page 4.
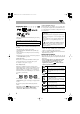
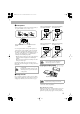
MX-JE3.book Page 4 Thursday,January13, 2005 3:32 PM ~ AM/FM antenna Ÿ Digital audio component To assemble the AM loop antenna OPT DIG ICAL OUTITAL PUT Protective cap To connect AM/FM antenna AM loop antenna (supplied) Turn it until the best reception is obtained. • Set “DIGITAL AUDIO OUTPUT” in the “AUDIO” preference display correctly according to the connected digital audio equipment (see page 32). If setting is incorrect, loud noise may be generated causing damage to the speakers.
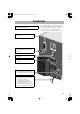
MX-JE3.book Page 5 Thursday,January13, 2005 3:32 PM ⁄ Front speakers • When connecting the speaker cords, match the polarity of the speaker terminals: (+) to (+) and (–) to (–).
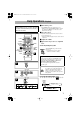
MX-JE3.book Page 6 Thursday,January13, 2005 3:32 PM Display Indication This indications on the display teach you a lot of things while you are operating the system. Before operating the System, be familiar with when and how the indicator illuminates on the display. 1 DVD DIGITAL DTS PCM w 2 3 4 5 6 7 8 TITLE GROUP CHAP.
MX-JE3.book Page 7 Thursday,January13, 2005 3:32 PM Daily Operations—Playback In this manual, the operation using the remote control is mainly explained; however, you can use the buttons and controls on the main unit if they have the same (or similar) name and marks. ¥ Turn on the power. The STANDBY lamp on the main unit goes off. • Without pressing (STANDBY/ON), the System also turns on by pressing one of the source select buttons in the next step. ø Select the source.
MX-JE3.book Page 8 Thursday,January13, 2005 3:32 PM Listening to the Radio INFO Main Unit ONLY To select the AM tuner interval spacing Some countries space AM stations 9 kHz apart, and other countries use 10 kHz spacing. You can change the AM tuner intervals during the unit is on standby mode. To preset Stations Main Unit ONLY You can preset 30 FM and 15 AM stations. 1 Tune in to a station you want to preset. SET /DISPLAY ST 2 Select a preset number. PRESET (holding then...
MX-JE3.book Page 9 Thursday,January13, 2005 3:32 PM Playing Back a Disc INFO On-screen guide icons Before operating a disc, be familiar how a disc is recorded. • DVD Video comprises of “Titles” which includes “Chapters,” MP3/WMA comprise of “Groups” which includes “Tracks,” JPEG comprises of “Groups” which includes “Files,” and CD/SVCD/VCD comprise of only “Tracks.” • For JPEG playback, see “Operations on the CONTROL Screen” on page 25.
MX-JE3.book Page 10 Thursday,January13, 2005 3:32 PM To select an item directly Remote ONLY You can select a title/chapter/track directly and start playback. For DVD Video, you can select a title before starting playback, while you can select a chapter after starting playback. Examples: To select number 5, press 5. To select number 15, press +10, then 5. To select number 30, press +10, +10, then 10. To play back by using the disc menu When disc menu appears on the TV screen, select an item on the menu.
MX-JE3.book Page 11 Thursday,January13, 2005 3:32 PM Playing Back a Tape INFO To insert a tape You can play back type I tapes. • The use of C-120 or longer tape is not recommended. Push To change the tape running direction (deck B only) 3 (forward) 2 (reverse) To reverse the tape automatically (deck B only) Tape is reversed, and playback repeats until you stop it. Insert Tape is not reversed. When the current side of the tape reaches its end, playback stops. Tape is reversed once.
MX-JE3.book Page 12 Thursday,January13, 2005 3:32 PM Daily Operations—Sound&Other Adjustments Adjusting the Volume Remote Control INFO The volume level can be adjusted in 32 steps (VOLUME MIN, VOLUME 1 – VOLUME 30, and VOLUME MAX). Main unit: Remote control: VOLUME VFP SLEEP DIMMER 3/2/5/∞ ENTER SOUND MODE 3D PHONIC ACTIVE BASS LEVEL +/- Remote ONLY To drop the volume in a moment To restore the volume, press again, or adjust the volume level.
MX-JE3.book Page 13 Thursday,January13, 2005 3:32 PM 3 Adjust the SEA pattern. Surround Modes* 1 Select one of the tone—BASS or TRE (treble). DANCE Increases resonance and bass. HALL Adds depth and brilliance to the sound. STADIUM Adds clarity and spreads the sound, as in an outdoor stadium. SEA (Sound Effect Amplifier) modes ROCK Boosts low and high frequency. Good for acoustic music. POP Good for vocal music. CLASSIC Good for classical music.
MX-JE3.book Page 14 Thursday,January13, 2005 3:32 PM Presetting Automatic DVD Video Sound 2 Select a parameter you want to adjust. Increase Level The DVD Video sound is sometimes recorded at a lower level than for other discs and sources. You can set the increase level for the currently loaded DVD Video, so you do not have to adjust the volume when you change the source. GAMMA Adjust if the neutral color is bright or dark (–3 to +3).
Basic_op.fm Page 15 Thursday,January13, 2005 3:39 PM Setting the Clock INFO Main Unit ONLY Without setting the built-in clock, you cannot use Daily/ Recording Timers (see page 29) and Sleep Timer (see below). • To exit from the clock setting, press CLOCK/TIMER as required. • To go back to the previous step, press CANCEL/DEMO. To check the time remaining until the shut-off time • If you press the button repeatedly, you can change the shut-off time. 1 Activate clock setting mode.
MX-JE3.book Page 16 Thursday,January13, 2005 3:32 PM Unique DVD/VCD Operations Selecting the Sound Track Remote ONLY INFO Remote Control SUB TITLE AUDIO ZOOM 10 Keys ANGLE For DVD Video: While playing back a chapter containing audio languages, you can select the language to listen to. For SVCD/VCD: When playing back a track, you can select the audio channel to play. • You can also select the audio track using the on-screen bar (see page 22). While playing a DVD Video...
MX-JE3.book Page 17 Thursday,January13, 2005 3:32 PM Remote ONLY Selecting the Subtitle Language For DVD Video: While playing back a chapter containing subtitles in different languages, you can select the subtitle language to display on the TV screen. For SVCD: While playing, you can select the subtitles even if no subtitles are recorded on the disc. • You can also select the subtitle language using the onscreen bar (see page 22).
MX-JE3.book Page 18 Thursday,January13, 2005 3:32 PM Remote ONLY Slow-motion playback Zoom 1 While playing... 1 While playing back... ZOOM 1 ZOOM 2 ZOOM 3 ZOOM 4 ZOOM OFF Still picture playback starts. 2 Select slow motion speed. ZOOM 6 ZOOM 5 (holding then...) As the number increases, magnification also increases. 2 Move the zoomed-in position. 1/32 1/16 1/8 1/4 1/2 1/32 1/16 1/8 1/4 1/2 *Not available for SVCD/VCD. To resume normal playback, press DVD/CD 3.
MX-JE3.book Page 19 Thursday,January13, 2005 3:32 PM Advanced Disc Operations Programming the Playing Order Remote Control Remote ONLY —Program Play INFO You can arrange the playing order of the chapters or tracks (up to 99) before you start playback. 1 Before starting playback, activate Program Play.
MX-JE3.book Page 20 Thursday,January13, 2005 3:32 PM To skip a track: To pause: To stop: Playing at Random—Random Play Remote ONLY You can play the contents of all tracks at random. • Random play cannot be used for some DVDs. 1 Before starting playback, activate Random Play. To release, press DVD/ CD 3. PROGRAM RANDOM Canceled To check the programmed contents Remote ONLY Before or after playback... RANDOM in the reverse order 2 Start playback. Playback starts in a random order.
MX-JE3.book Page 21 Thursday,January13, 2005 3:32 PM Playing Repeatedly Prohibiting Disc Ejection Remote ONLY Main Unit ONLY • You can also select the repeat mode using the on-screen bar (see page 22). —Child Lock Repeat Play You can repeat playback. You can lock the disc tray so that no one can eject the loaded disc. • This is possible while the System is on standby. • For DVD Video: While playing... While the disc tray is closed...
Onscreen.fm Page 22 Thursday,February3, 2005 5:55 PM On-Screen Disc Operations On-screen Bar Information Remote control INFO You can check the information on disc (except for MP3/ WMA/JPEG disc) and use some functions through the onscreen bar. ZOOM 10 keys 1 Disc type 2 Playback information 3/2/5/∞ ENTER 8 REPEAT On-screen bars DVD Video 1 2 3 TOTAL 1:25:58 1:01:58 CHAP233 TOTAL TITLE TITLE 14 2CHAP DVD-VIDEO 8.5Mbps OFF OFF 1/3 1/3 CHAP.
MX-JE3.book Page 23 Thursday,January13, 2005 3:32 PM Operations Using the For detailed operations of the following functions, see also “Operations Using the On-screen Bar” on the left. Remote ONLY On-screen Bar INFO Basic operation procedure through the on-screen bar is as follows: Ex.: Selecting a subtitle (French) for DVD Video: While a disc is selected as the source... 1 Display the on-screen bar with the pull-down menu.
Onscreen.fm Page 24 Tuesday,February15, 2005 1:21 PM 4 Select the repeat mode you want. ALL To erase the on-screen bar Repeats the disc (except for DVD). A-B Repeats a desired portion (see below). TITLE Repeats the current title. GROUP Repeats the current group. CHAPTER Repeats the current chapter. Time Search TRACK* Repeats the current track. OFF Cancels Repeat Play. You can move to a particular point by specifying the elapsed playing time from the beginning.
MX-JE3.book Page 25 Thursday,January13, 2005 3:32 PM Chapter/Track Search You can search for the chapter (DVD Video) number to play. 1 While playing, display the on-screen bar with the pulldown menu. 2 Select CHAP. or TRACK . 3 Display the pop-up window. TOTAL 1:25:58 1:01:58 CHAP233 TOTAL TITLE TITLE 14 2CHAP DVD-VIDEO 8.5Mbps TIME TIME OFF OFF 1/3 1/3 CHAP. CHAPTER 1/1/3 3 Remote ONLY Screen INFO The CONTROL screen automatically appears on the TV screen when you load an MP3, WMA, or JPEG disc.
MX-JE3.book Page 26 Thursday,January13, 2005 3:32 PM To move the highlight bar between group list and track list To repeat slide-show for JPEG Before starting playback... REPEAT GROUP Moves the bar to the track list. REPEAT ALL Canceled Moves the bar to the group list. To select a group/track in the list Move the highlight bar to a desired item. • If you move the highlight bar while playing back an MP3/ WMA disc, the selected track starts playback automatically. GROUP Repeats the current group.
MX-JE3.book Page 27 Thursday,January13, 2005 3:32 PM Recording Operations IMPORTANT It may be unlawful to record or play back copyrighted material without the consent of the copyright owner. Main unit Recording on a Tape INFO Main Unit ONLY You can use type I tapes for recording. • To play a tape, see page 11. DVD/CD 3 TAPE-B2 3 REVERSE MODE 7 DISC REC START REC START/STOP 0 PUSH OPEN 1 Insert a recordable cassette in deck B.
MX-JE3.book Page 28 Thursday,January13, 2005 3:32 PM 3 Start playing the source—“FM,” “AM,” “DVD/CD,” “TAPE-A” or “AUX.” • When recording a disc, you can also use “Synchronized Disc Recording” (see the right column). 4 Start recording. INFO You can start and stop both disc play and tape recording at the same time. • If the current playing source is not the disc player, press DVD/CD 3, then 7. 2 Check the tape running direction and Reverse Mode To stop recording settings on the display.
MX-JE3.book Page 29 Thursday,January13, 2005 3:32 PM Timer Operations Setting the Timer Main unit INFO Main Unit ONLY Using Daily Timer, you can wake up with your favorite song. On the other hand, with Recording Timer, you can make a tape of a radio broadcast automatically. • To correct a misentry during the process, press CANCEL/ DEMO. You can return to the previous step. 1 Select one of the timer setting modes—TIMER(ON) 4/¢ CLOCK /TIMER CANCEL /DEMO SET /DISPLAY for Daily Timer or Recording Timer.
MX-JE3.book Page 30 Thursday,January13, 2005 3:32 PM 3 Turn off the System (on standby) if you have set the timer with the System turned on. To turn off the Timer after the setting is done You can turn off the timer after it has been set. • Since Daily Timer is activated at the same time everyday, you may need to cancel it on some particular days. 1 Select the timer you want to cancel (DAILYTIMER or REC TIMER) you want to cancel.
CHOICE.fm Page 31 Thursday,January13, 2005 3:39 PM Setup Menu Operations Initial Settings INFO Some items in the menus cannot be changed during playback. How to set the Initial settings 1 Press SET UP. LANGUAGE MENU LANGUAGE ENGLISH AUDIO LANGUAGE ENGLISH SUBTITLE ENGLISH ON SCREEN LANGUAGE ENGLISH Press 3 (or 2) to select the menu. Press ∞ (or 5) to move to select the item. Press ENTER. Press ∞ (or 5) to select the options, then press ENTER.
CHOICE.fm Page 32 Tuesday, February15, 2005 1:21 PM Item FILE TYPE Contents You can select the file type to play. AUDIO: To play MP3/WMA files. STILL PICTURE: To play JPEG files. AUDIO menu Item DIGITAL AUDIO OUTPUT DOWN MIX D. RANGE COMPRESSION Contents Set this item correctly when using the OPTICAL DIGITAL OUTPUT terminal on the rear. PCM ONLY: When connecting to audio equipment which can decode only linear PCM signals.
MX-JE3.book Page 33 Thursday,January13, 2005 3:32 PM Operating the TV Operating TV Remote control You can operate the JVC’s TV using this remote control. To operate the TV To turn on or off the To select the input mode (either TV: TV or VIDEO): TV POWER TV/VIDEO TV CHANNEL +/- SHIFT (holding then...) To adjust TV volume: TV VOLUME +/(holding then...) To select the TV channel: (holding then...
AdditonalInfo.fmPage 34 Thursday,February3, 2005 5:55 PM Additional Information Learning More about This System Introduction (see pages 1 and 2) Playable Disc Types: • If you play back an NTSC disc with the video output selector set to “PAL,” you can watch the playback pictures (the disc will be reproduced using “PAL 60” format), but the TV screen may roll over upward and downward rapidly.
AdditonalInfo.fmPage 35 Thursday,February3, 2005 5:55 PM Operations on the CONTROL Screen: • For JPEG files playback... – It is recommended that you record a file at 640 x 480 resolution. (If a file has been recorded at a resolution of more than 640 x 480, it will take a long time to be shown.) – This System can play only baseline JPEG files*. Progressive JPEG files* or lossless JPEG files* cannot be played. * Baseline JPEG format: Used for digital cameras, web, etc. Progressive JPEG format: Used for web.
MX-JE3.book Page 36 Thursday,January13, 2005 3:32 PM Maintenance To get the best performance of the System, keep your discs, tapes, and mechanism clean. Handling discs • Remove the disc from its case by holding it at the edge while pressing the center hole lightly. • Do not touch the shiny surface of the disc, or bend the disc. • Put the disc back in its case after use to prevent warping. • Be careful not to scratch the surface of the disc when placing it back in its case.
MX-JE3.book Page 37 Thursday,January13, 2005 3:32 PM Troubleshooting If you are having a problem with your System, check this list for a possible solution before calling for service. General: Adjustments or settings are suddenly canceled before you finish. ] There is a time limit. Repeat procedure again. Operations are disabled. ] The built-in microprocessor may malfunction due to external electrical interference. Unplug the AC power cord and then plug it back in.
list.
SPEC.fm Page 39 Thursday,February3, 2005 5:54 PM Specifications Amplifier section Speakers Output Power: 80 W per channel, min. RMS, driven into 6 Ω at 1 kHz with no more than 10% total harmonic distortion.
MX-JE3.book Page 40 Thursday,January13, 2005 3:32 PM OPTICAL DIGITAL OUTPUT Signals Playback disc DIGITAL AUDIO OUTPUT STREAM/PCM 48 kHz, 16/20/24 bits Linear PCM DVD VIDEO 96 kHz linear PCM DVD VIDEO DTS DVD VIDEO DOLBY DIGITAL DVD VIDEO CD/VCD/SVCD DTS CD MP3/WMA disc DOLBY DIGITAL/PCM PCM ONLY 48 kHz, 16 bits stereo linear PCM DTS bit stream 48 kHz, 16 bits stereo linear PCM 48 kHz, 16 bits stereo linear PCM DOLBY DIGITAL bit stream 44.
MX-JE3.book Page 41 Thursday,January13, 2005 3:32 PM Parts Index Remote control Main unit Button 5/2/3/∞/ENTER 4/¢ 1/¡ 7 8 3D PHONIC 10 keys ACTIVE BASS LEVEL +/– ANGLE AUDIO AUX CANCEL DIMMER DVD LEVEL DVD/CD 3 FADE MUTING FM MODE FM/AM MENU ON SCREEN PLAY MODE PREV./NEXT REPEAT RETURN REV.
MX-JE3.
M EM O .
M EM O .
M EM O .
JE3_Cover[U].fm Page 2 Thursday,January13, 2005 3:31 PM Mains (AC) Line Instruction (not applicable for Europe, U.S.A., Canada, Australia, and U.K.) MX-JE3 VOLTAGE SELECTOR COMPACT COMPONENT SYSTEM CAUTION for mains (AC) line BEFORE PLUGGING IN, do check that your mains (AC) line voltage corresponds with the position of the voltage selector switch provided on the outside of this equipment and, if different, reset the voltage selector switch, to prevent from a damage or risk of fire/electric shock.