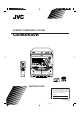
COMPACT COMPONENT SYSTEM CA-MXK50R DISC CHANGE 3 CD 1 3 CD CD ECO CD STANDBY/ON 2 STANDBY CD-R/RW PLAYBACK SOUND MODE MX-K50R CLOCK /TIMER DISPLAY STANDBY/ON ACTIVE BASS EXTENSION 1 2 4 5 6 7 8 9 10 +10 3 SLEEP ACTIVE BASS EX. LEVEL SOUND MODE AUX AUX FM /AM CD TAPE FM MODE DISPLAY MODE FM/AM – SELECT + PTY/EON TAPE TAPE A/B FADE MUTING PHONES REPEAT PROGRAM REC START /STOP RANDOM CD REC START TAPE A TAPE B ACTIVE BASS EX.
Warnings, Cautions and Others IMPORTANT for the U.K. IMPORTANT FOR LASER PRODUCTS DO NOT cut off the mains plug from this equipment. If the plug fitted is not suitable for the power points in your home or the cable is too short to reach a power point, then obtain an appropriate safety approved extension lead or consult your dealer. REPRODUCTION OF LABELS 1 CLASSIFICATION LABEL, PLACED ON EXTERIOR SURFACE BE SURE to replace the fuse only with an identical approved type, as originally fitted.
SAFETY INSTRUCTIONS “SOME DOS AND DON’TS ON THE SAFE USE OF EQUIPMENT” This equipment has been designed and manufactured to meet international safety standards but, like any electrical equipment, care must be taken if you are to obtain the best results and safety is to be assured. ✮✮✮✮✮✮✮✮✮✮✮✮✮✮✮✮✮✮✮✮✮✮✮✮✮✮✮✮✮✮✮✮✮✮✮✮✮✮✮✮✮✮✮✮✮✮✮ Do read the operating instructions before you attempt to use the equipment.
Introduction We would like to thank you for purchasing one of our JVC products. Before operating this unit, read this manual carefully and thoroughly to obtain the best possible performance from your unit, and retain this manual for future reference. About This Manual Power sources This manual is organized as follows: • When unplugging from the wall outlet, always pull the plug, not the AC power cord. • The manual mainly explains operations using the buttons and controls on the unit.
Contents Location of the Buttons and Controls ....................... 3 Front Panel ................................................................. 3 Remote Control .......................................................... 5 Getting Started ............................................................ 6 Unpacking .................................................................. 6 Putting the Batteries into the Remote Control ........... 6 Connecting Antennas .............................................
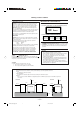
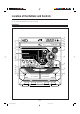
Location of the Buttons and Controls Become familiar with the buttons and controls on your unit. Front Panel o DISC CHANGE 3 CD 4 5 6 7 3 2 CD-R/RW PLAYBACK SOUND MODE MX-K50R 8 9 p q w e CD STANDBY/ON CD 1 ECO CD 1 2 3 STANDBY g CLOCK /TIMER DISPLAY h ACTIVE BASS EXTENSION AUX PHONES r t FM /AM REPEAT CD PROGRAM REC START /STOP TAPE RANDOM CD REC START TAPE A j TAPE B ACTIVE BASS EX.
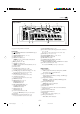
Continued Display Window 1 7 3 2 8 Front Panel 1 2 3 4 5 6 7 8 9 p q w e r t y u i o ; STANDBY/ON button and STANDBY lamp (9) ECO button (9) CLOCK/TIMER button (9, 21 – 23) DISPLAY button (9) PRESET +/– buttons (11) 4/¢ (reverse search/forward search) buttons (9, 15 – 17, 21 – 23) 7 (stop) button (14 – 20) TUNING +/– buttons (11) 1/¡ (fast rewind/fast forward) buttons (15, 18) Display window Remote sensor TAPE 3 button and lamp (9, 18, 20) Pressing this button also turns on the unit.
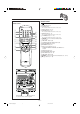
Remote Control Remote Control STANDBY/ON 1 2 1 2 3 4 5 6 7 8 SLEEP ACTIVE BASS EX. LEVEL p SOUND MODE AUX 3 q 9 FM MODE 4 5 6 7 – SELECT + PTY/EON TAPE FM/AM w e r +10 10 DISPLAY MODE TAPE A/B FADE MUTING t y u i DISC SKIP CD + VOLUME 8 o 9 VOLUME – 1 STANDBY/ON button (9) 2 SLEEP button (23) 3 AUX button (9) Pressing this button also turns on the unit. 4 Number buttons (11, 15) 5 TAPE 3 button (9, 18) Pressing this button also turns on the unit.
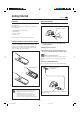
Getting Started Continued Unpacking Connecting Antennas After unpacking, check to be sure that you have all the following items. The number in the parentheses indicates the quantity of the pieces supplied. FM antenna • • • • FM antenna (supplied) A ENN AM (MW/LW) loop antenna (1) FM antenna (1) Remote control (1) Batteries (2) ANT AM ] M [75 F If any is missing, consult your dealer immediately.
Connecting Speakers AM (MW/LW) antenna 1 2, 3 1 ANTENNA FM [ 75 ] AM 2, 3 Vinyl-covered wire (not supplied) Red SPEAKER [ 6-16 ] Speaker cord (red/black) Speaker cord (red/black) Black AM (MW/LW) loop antenna (supplied) From right speaker’s terminals 1 Press and hold the clamp of the AM terminal on the rear of the unit. From left speaker’s terminals 2 Insert the end of the AM (MW/LW) loop antenna cord into the terminal.
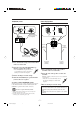
NOW, you can plug in the unit and other connected equipment FINALLY! Connecting Other Equipment You can connect both analog and digital equipment. • DO NOT connect any equipment while the power is on. • DO NOT plug in any equipment until all connections are complete. Canceling the Display Demonstration When connecting the AC power cord into a wall outlet, the unit automatically starts display demonstration.
Common Operations Turning On or Off the Power 2 Press 4 or ¢ to adjust the To turn on the unit, press STANDBY/ ON so that the STANDBY lamp goes off. hour, then press SET. STANDBY STANDBY/ON ECO SET To turn off the unit (on standby), press STANDBY/ON again so that the STANDBY lamp lights up. STANDBY STANDBY/ON The minute digits start flashing on the display. ECO • If you want to correct the hour after pressing SET, press CANCEL/DEMO. The hour digits start flashing again.
Adjusting the Volume Selecting the Sound Modes You can adjust the volume level only while the unit is turned on. This function only affects the playback sound, not your recording. Turn the VOLUME control clockwise to increase the volume or counterclockwise to decrease it. • The volume level can be adjusted in 32 steps (VOL MIN, VOL 1 — VOL 30, and VOL MAX). You can select one of the 6 preset sound modes (3 surround modes and 3 SEA—Sound Effect Amplifier—modes).
Listening to the Radio Tuning in a Station On the unit ONLY: 1 Tune in the station you want to preset (in this 1 Press FM/AM. example, of FM 87.50). The unit automatically turns on and tunes in the previously tuned station (either FM, MW or LW). • Each time you press the button, the band changes as follows: • See “Tuning in a Station.” FM /AM 2 Press SET. MW FM SET LW 2 Start searching for stations.
Receiving FM Stations with RDS RDS allows FM stations to send an additional signal along with their regular program signals. For example, the stations send their station names, as well as information about what type of program they broadcast, such as sports or music, etc. When tuned to an FM station which provides the RDS service, the RDS indicator lights up on the display.
Switching to a Traffic Announcement Temporarily How the Enhanced Other Networks function actually works: By receiving the service called “Enhanced Other Networks” function, the unit switches temporarily to a broadcast of a traffic announcement (TA) from the current FM RDS station. • The EON indicator lights up on the display while receiving a station with Enhanced Other Networks data. If there is no station broadcasting a traffic announcement The unit continues tuning in the current station.
Playing Back CDs Continued This unit has been designed to playback the following CDs: Audio CD, CD-R, and CD-RW. When playing a CD-R or CD-RW User-edited CD-Rs (CD-Recordable) and CD-RWs (CD-ReWritable) can be played back when they are already “finalized.” • You can play back your original CD-Rs or CD-RWs recorded in music CD format ONLY. (If CD-RWs have been recorded in different format, erase all the data on CDRWs completely before re-recording on the discs.
3 Press one of the disc number CD 2 1 CD CD buttons (CD 1, CD 2 or CD 3) for the disc you want to start to play from. 3 Basic CD Operations While playing a CD, you can do the following operations. To exchange CDs during playback of another CD play starts from the first track of the selected disc. • Pressing CD 6 instead of the disc number buttons starts playing back if a CD is on the trays. To stop during play, press 7. Press DISC CHANGE to change the CD and the carrousel comes out.
. Continued 5 Program other tracks you want. Programing the Playing Order of the Tracks —–Program Play You can arrange the order in which the tracks play before you start playing. You can program up to 32 tracks. • To use Repeat play (see page 17) for Program play, press REPEAT after starting Program play. • To program tracks from the same disc, repeat step 4. • To program tracks from a different disc, repeat steps 3 and 4. 6 Press CD 6. The tracks are played in the order you have programed.
The tracks of the selected CD will play at random. • To use Random play, you have to cancel the Program play. You can have all the CDs, the program or the individual track currently playing repeat as many times as you like. • Repeat play and Random play cannot be used at the same time. AM CD 1 3 Press RANDOM so that “RANDOM” CD buttons (CD 1, CD 2, and CD 3) for the disc you want to play, then press 7. CD 1 Load a CD.
Playing Back Tapes To stop during play, press 7. Playing Back a Tape To operate the other deck, press TAPE A or TAPE B (or TAPE A/B on the remote control), then TAPE 3. 1 Press EJECT (0) for the deck you want to To fast-forward the tape, press ¡ (or ¢/¡ on the remote control). The tape running indicator (3) starts flashing quickly. use. To rewind the tape, press 1 (or 4/1 on the remote control). The tape running indicator (2) starts flashing quickly.
Recording Recording a Tape on Deck B IMPORTANT: • It should be noted that it may be unlawful to re-record pre-recorded tapes, records, or discs without the consent of the owner of copyright in the sound or video recording, broadcast or cable program and in any literary, dramatic, musical, or artistic embodied therein. • The recording level is automatically set correctly, so it is not affected by the VOLUME, the ACTIVE BASS EX. LEVEL, and the SOUND MODE controls.
Dubbing Tapes CD Synchronized Recording On the unit ONLY: You can easily record a CD onto a tape. • You can also record the tracks in the order you have made the program. 1 Press TAPE 3, then 7. On the unit ONLY: 1 Put a recordable cassette into deck B. 2 Place a disc correctly on the recess of the disc TAPE tray, with its label side up. 2 Put the source cassette in deck A, and a 3 Press one of the disc number buttons (CD1, 3 CD 1 DUBBING Dubbing starts.
Using the Timers There are three timers available—Daily Timer, Recording Timer, and Sleep Timer. 2 Press CLOCK/TIMER again. CLOCK / TIMER “ON TIME” appears for 2 seconds, then the unit enters on-time setting mode. Before using the timers, you need to set the clock built in the unit. (See “Setting the Clock” on page 9.) Using Daily Timer With Daily Timer, you can wake to your favorite music or radio program. You can set the timer whether the unit is on or off.
Continued Using Recording Timer 6 Select the preset station number. With Recording Timer, you can make a tape of a radio broadcast automatically. You can set the timer whether the unit is on or off. Press 4 or ¢ to select the preset station number, then press SET. The unit enters volume setting mode.
Using Sleep Timer 4 Set the on-time you want the unit to turn on at. With Sleep Timer, you can fall asleep to music. You can set Sleep Timer when the unit is turned on. 1) Press 4 or ¢ to set the hour, then press SET. 2) Press 4 or ¢ to set the minute, then press SET. “OFF TIME” appears for 2 seconds, then the unit enters off-time setting mode. How Sleep Timer actually works SET The unit automatically turns off after the specified time length passes.
Maintenance To get the best performance of the unit, keep your discs, tapes, and mechanism clean. Handling cassette tapes Cleaning the unit • Stains on the unit Should be wiped off with a soft cloth. If the unit is heavily stained, wipe it with a cloth soaked in water-diluted neutral detergent and wrung well, then wipe clean with a dry cloth. • Avoid the following since they may cause damage to the unit. - DO NOT wipe it with a hard cloth. - DO NOT wipe it strong. - DO NOT wipe it with thinner or benzine.
Additional Information Description of the PTY codes: NEWS: News. FINANCE: AFFAIRS: Topical program expanding or enlarging upon the news — debate, or analysis. CHILDREN: Programs targeted at a young audience. INFO: Program the purpose of which is to impart advice in the widest sense. RELIGION: Religious programs. SPORT: Program concerned with any aspect of sports. PHONE IN: EDUCATE: Educational programs.
Specifications Amplifier section Output Power: 70 W per channel, min. RMS, driven into 6 Ω at 1 kHz with no more than 10% total harmonic distortion. (IEC268-3) 45 W per channel, min. RMS, driven into 6 Ω at 1 kHz with no more than 0.9% total harmonic distortion. (DIN) Audio input sensitivity/Impedance (at 1 kHz) AUX: 400 mV/50 kΩ Digital output: DIGITAL OUT (OPTICAL) Signal wave length : 660 nm Output level : –21 dBm to –15 dBm Speakers/Impedance: 6 Ω – 16 Ω Tuner FM tuning range: AM tuning range: 87.
MEMO MEMO 1 02.4.
MEMO MEMO 2 02.4.
VICTOR COMPANY OF JAPAN, LIMITED V EN CA-MXK50Rcover[B]5.pm6 J 2 02.4.
INSTRUCTIONS SPEAKER SYSTEM SP-MXK50 BEDIENUNGSANLEITUNG: LAUTSPRECHERSYSTEM MANUEL D’INSTRUCTIONS: SYSTEME DES ENCEINTES GEBRUIKSAANWIJZING: LUIDSPREKERSYSTEEM MANUAL DE INSTRUCCIONES: SISTEMA DE ALTAVOCES ISTRUZIONI: SISTEMA DI ALTOPARLANTI BRUKSANVISNING: HÖGTALARSYSTEM KÄYTTÖOHJE: KAIUTINJÄRJESTELMÄ VEJLEDNING: HØJTTALERSYSTEM Thank you for purchasing JVC speakers. Before you begin using them, please read the instructions carefully to be sure you get the best possible performance.
Connection Anschluß Raccordement Aansluiting Conexión Collegamento Ansluiting Liitäntä Tilslutning CONNECTION • DO NOT use other amplifier to operate this speaker system except for CA-MXK50R. • Turn off power to the whole system before connecting the speakers to the amplifier. • The maximum power handling capacity of the SP-MXK50 is 70 W. Excessive input will result in abnormal noise and possible damage.
ANSCHLUSS RACCORDEMENT • Verwenden Sie zum Betrieb dieses Lautsprechersystems keinen anderen Verstärker, ausgenommen CA-MXK50R. • Schalten Sie vor dem Anschluß der Lautsprecher an den Verstärker die Spannungsversorgung des gesamten Systems aus. • Die maximale Belastbarkeit von SP-MXK50 ist 70 W. Eine Überlastung führt zu Verzerrungen und möglicherweise zu Beschädigungen.
AANSLUITINGEN CONEXIÓN • Gebruik GEEN andere versterker dan de CA-MXK50R om dit luidsprekersysteem aan te sturen. • Schakel de spanning van alle aangesloten komponenten uit alvorens de luidsprekers met de versterker te verbinden. • Het maximale vermogen van de SP-MXK50 is 70 W. Te hoge ingang kan in abnormale geluidsreproduktie en in beschadigingen resulteren.
COLLEGAMENTO ANSLUTNING • NON usare un amplificatore diverso dal modello CA-MXK50R per utilizzare questo sistema di altoparlanti. • Spegnete la corrente dell’intero sistema prima di collegare gli altoparlanti all’amplificatore. • La potenza massima che può essere sopportata è 70 W nel caso del modello SP-MXK50. Un ingresso eccessivo causerà un suono anormale è possibili danni.
LIITÄNTÄ TILSLUTNING • ÄLÄ käytä muuta vahvistinta tämän kaiutinjärjestelmän käyttöön paitsi mallille CA-MXK50R. • Katkaise koko järjestelmän virta ennen kuin suoritat liitännät kaiuttimista vahvistimeen. • Mallin SP-MXK50 suurin tehonkäsittelykyky on 70 W. Liiallinen antoteho aiheuttaa epänormaalia kohinaa ja jopa vahinkoa.