COMPACT COMPONENT HDD SYSTEM CA-NXHD10R STANDBY/ON A.P.
Warnings, Cautions and Others IMPORTANT for the U.K. DO NOT cut off the mains plug from this equipment. If the plug fitted is not suitable for the power points in your home or the cable is too short to reach a power point, then obtain an appropriate safety approved extension lead or consult your dealer. BE SURE to replace the fuse only with an identical approved type, as originally fitted.
IMPORTANT FOR LASER PRODUCTS REPRODUCTION OF LABELS 1 CLASSIFICATION LABEL, PLACED ON REAR ENCLOSURE CLASS LASER 1 PRODUCT 2 WARNING LABEL, PLACED INSIDE THE UNIT 1. CLASS 1 LASER PRODUCT 2. CAUTION: Invisible laser radiation when open and interlock failed or defeated. Avoid direct exposure to beam. 3. CAUTION: Do not open the top cover. There are no user serviceable parts inside the Unit; leave all servicing to qualified service personnel. – G-2 – CA-NXHD10R[B]SAFETYf.pm6 3 02.6.
CAUTION To reduce the risk of electrical shocks, fire, etc.: 1. Do not remove screws, covers or cabinet. 2. Do not expose this appliance to rain or moisture. CAUTION • Do not block the ventilation openings or holes. (If the ventilation openings or holes are blocked by a newspaper or cloth, etc., the heat may not be able to get out.) • Do not place any naked flame sources, such as lighted candles, on the apparatus.
To keep the continuity of the recorded sounds Once you record a song into the built-in HDD, it is recorded as a “track.” Then, this unit differentiates these recorded tracks by adding a 2-second blank at the beginning of each track during playback.
Introduction We would like to thank you for purchasing one of our JVC products. Before operating this unit, read this manual carefully and thoroughly to obtain the best possible performance from your unit, and retain this manual for future reference. About This Manual About the built-in HDD This manual is organized as follows: • This manual mainly explains playback and editing operations using the remote control, and the other operations such as recording operations using the buttons on the unit.
Contents Location of the Buttons .................................. 3 Playing Back the HDD (Hard Disk Drive) .... 32 Front Panel ............................................................. 3 Remote Control ...................................................... 5 Unpacking .............................................................. 6 Connecting Antennas ............................................. 6 Connecting Speakers .............................................. 7 Connecting Other Equipment ......
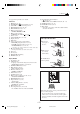
Location of the Buttons Become familiar with the buttons on your unit. Front Panel Inside of Front Door Display Window –3– EN01-09_NXHD10R[B]f.pm6 3 02.6.
Continued See pages in the parentheses for details.
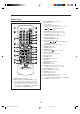
Remote Control * When using the remote control: For RDS operations, press RDS CONTROL (i) on the remote control first when using the buttons (w – t, o). • After using RDS operations, make sure to change the operation mode of the remote control to the one you want to use by pressing HDD 3/8 (4), TUNER/LINE (5), CD 3/8 (y), or CLOCK/TIMER (1). 1 CLOCK/TIMER button (11, 68 – 71) 2 A.P.
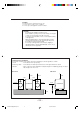
Getting Started Continued Unpacking To connect an outdoor FM antenna Before connecting it, disconnect the supplied FM antenna. After unpacking, check to be sure that you have all the following items. The number in the parentheses indicates the quantity of the pieces supplied. • • • • • FM antenna (1) AM (MW/LW) loop antenna (1) Remote control (1) Batteries (2) AC power cord (1) Outdoor FM antenna (not supplied) If any is missing, consult your dealer immediately.
Connecting Speakers AM (MW/LW) antenna You can connect the speakers using the speaker cords. 1 Use only speakers with the same speaker impedance—more than 4 Ω—as indicated by the speaker terminals on the rear of the unit. 2 1 2 Vinyl-covered wire (not supplied) Red White Black Black 3 White Speaker cord Red Red AM (MW/LW) loop antenna (supplied) Black 1 2 3 Connect the AM (MW/LW) loop antenna to the AM LOOP terminals as illustrated.
Continued Connecting Other Equipment To remove the speaker grille The speaker grilles are removable as shown below: Projections You can connect a cassette deck, etc.—used as a playback and recording device. Holes When you connect the other equipment, refer also to the manuals supplied with it. • DO NOT connect other equipment while the power is on. • DO NOT plug in any equipment until all connections are complete.
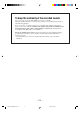
NOW, you can plug in the unit and other connected equipment FINALLY! IMPORTANT: Be sure to check all connections to be done before plugging the AC power cord into a wall outlet. Putting the Batteries into the Remote Control Insert the batteries—R6P(SUM-3)/AA(15F)—into the remote control, by matching the polarity (+ and –) on the batteries with the + and – markings on the battery compartment. When the remote control can no longer operate the unit, replace both batteries at the same time.
Basic Settings The buttons enlarged in the illustration below are used and explained in this section (pages 11 and 12). Remote control STANDBY/ON CLOCK /TIMER STANDBY/ON A.P.
Setting the Clock Before operating the unit any further, first set the clock built in this unit, then some other basic settings. You can set the clock whether the unit is turned on or in standby mode. Turning On the Power On the remote control ONLY: When you press one of the source selecting buttons— HDD 3/8, CD 3/8, TUNER/LINE, the unit automatically turns on (and starts playback if the source is ready). 1 Press CLOCK/TIMER. The day of the week starts flashing in the main display.
To adjust the clock again Changing the Display Contrast Once you have adjusted the clock, you need to press CLOCK/TIMER repeatedly until the clock setting screen appears in the main display (until the day of the week starts flashing), then follow steps 2 to 4 on the previous page. You can change the display contrast while the unit is turned on. To turn on/off the clock indication 1 Press and hold CONTRAST (DIMMER) for more than On the remote control ONLY: 2 seconds.
Basic and Common Operations The buttons enlarged in the illustration below are used and explained in this section (pages 14 and 16). Remote control STANDBY/ON A.P.
Continued Selecting the Sources and Starting Play Adjusting the Volume To select FM, AM (MW/LW) or external component as the source, press TUNER/LINE repeatedly until “FM,” “AM” or “LINE*” is selected. • If the unit is in standby mode, the power automatically comes on at the first press of the button. • Each time you press the button, the source changes as follows: FM AM You can adjust the volume level only while the unit is turned on. LINE To increase the volume, press VOLUME + .
Reinforcing the Bass Sound Adjusting the Bass and Treble Sounds The richness and fullness of the bass sound is clearly maintained regardless of how low you set the volume —Active Hyper Bass Pro. • You can use this effect only for playback. • This function also affects the sound from headphones. You can adjust bass and treble sounds to your taste and surroundings. • You can use this effect only for playback. • This function also affects the sound from headphones.
To check the current AAC sound mode, press AAC SOUND once. Using the AAC Sounds You can apply special sound modes to the tracks recorded in the AAC (Advanced Audio Coding: see the right column) format. • You can use this effect only for playback of the AAC encoded tracks. • This function also affects the sounds through the PHONES jack and the LINE OUT jacks. • To record into the HDD using the AAC format, see pages 42 to 51.
Listening to FM and AM (MW/LW) Broadcasts The buttons enlarged in the illustration below are used and explained in this section (pages 18 and 23). Remote control 1-MARK 2-ABC 3-DEF DISP/CHARA PTY STANDBY/ON 4-GHI 5-JKL A.P.
Continued Tuning in to a Station To change the FM reception mode 1 Press TUNER/LINE repeatedly until “FM” or “AM” When an FM stereo broadcast is noisy or hard to receive, you can change the FM reception mode to improve the reception. is selected. The unit automatically turns on and tunes in to the previously received station. Press FM/PLAY MODE on the remote control. • Each time you press the button, FM reception mode alternates between “FM MONO” and “FM AUTO.” See page 20.
Presetting Stations Tuning in to a Preset Station You can preset 30 FM and 15 AM (MW/LW) stations manually following the procedure below. On the remote control ONLY: 1 Press TUNER/LINE repeatedly until “FM” or “AM” In some cases, test frequencies have been already memorized for the tuner since the factory examined the tuner preset function before shipment. This is not a malfunction. You can preset the stations you want into memory by following the presetting method. is selected.
Continued Receiving FM Stations with RDS Changing the RDS Information RDS (Radio Data System) allows FM stations to send an additional signal along with their regular program signals. For example, the stations send their station names, as well as information about what type of program they broadcast, such as sports or music, etc. You can see RDS information on the display while listening to an FM station. On the remote control ONLY: 1 Press RDS CONTROL while listening to an FM station.
Switching to a Program Type of Your Choice Temporarily 2 Press PTY. “PTY SELECT” starts flashing in the main display. 3 Press PTY SELECT + or PTY SELECT – to select a PTY code while “PTY SELECT” is flashing. The Enhanced Other Networks function allows the unit to switch temporarily to a broadcast program of your choice (TA, News, and/or Info) from a different station except when you are listening to a non-RDS station—some FM stations and AM (MW/LW) stations.
Continued How the Enhanced Other Networks function actually works: Alarm function If an “Alarm!” (Emergency) signal is received from a station while listening to an RDS station sending the Enhanced Other Networks data, the unit automatically switches to the station broadcasting the “Alarm!” signal. CASE 1 If there is no station broadcasting the program you have selected Test function The unit continues tuning in the current station.
Description of the PTY codes: None: Undefined. News: News. Affairs: Topical program expanding or enlarging upon the news—debate or analysis. Info: Programs the purpose of which is to impart advice in the widest sense. Sport: Programs concerned with any aspect of sports. Educate: Educational programs. Drama: All radio plays and serials. Culture: Programs concerning any aspect of national or regional culture, including language, theater, etc.
Playing Back the External Component The buttons enlarged in the illustration below are used and explained in this section (pages 25 and 26). Remote control DISP/CHARA PTY STANDBY/ON A.P.
Selecting the External Component Adjusting the Input Level 1 Press TUNER/LINE repeatedly until “LINE*” If the sound from the component connected to the LINE IN jacks is too loud or is not loud enough when changing the source to the external component (without adjusting the volume level), you can change the input level through the LINE IN jacks. (external component) is selected. The unit automatically turns on. On the unit ONLY: AAC 128 1 When the source is “LINE*,” press and hold REC MODE.
Changing the Source Name You can change the source name of the external component according to the one connected to the unit. • You cannot change the source names while recording. On the remote control ONLY: 1 When the source is “LINE*,” press and hold TUNER/LINE until “NAME CHANGE” appears in the main display. * If you have changed the source name of the external component, the currently selected source name will appear. 2 Press SELECT ¢ or SELECT 4 to select an appropriate source name.
Playing Back CDs (CD/CD-R/CD-RW) The buttons enlarged in the illustration below are used and explained in this section (pages 28 to 31). Remote control 1-MARK 2-ABC 3-DEF DISP/CHARA STANDBY/ON 4-GHI 5-JKL A.P.
Continued Precautions on CD Playback Playing Back the Entire CD—Normal Play This unit has been designed to play back discs bearing the following logo: 1 Press 0 CD on the unit. The unit automatically turns on and the CD tray comes out. • When the source is CD, “CD OPEN” appears in the main display. Audio CD (CD-DA) In addition to the above discs, this unit can play back audio data recorded on CD Text, CD-G (CD Graphics), and CD-Extra.
To change the information shown in the main display About CD indicator CD Source is “CD,” but no CD is loaded CD CD During playback During a pause CD A CD is loaded Each time you press DISP/CHARA on the remote control, the information in the main display changes as follows: 1 2 3 4 Basic CD Operations Clock While playing a CD, you can do the following operations. To stop playback for a moment Press CD 3/8. To resume play, press CD 3/8 again.
Continued • Each time you press the button, play modes change as follows: CD PROGRAM CD RANDOM (Program play) (Random play) CD NORMAL (Normal play) 4 Press the number buttons to select the tracks you want. • For how to use the number buttons, see “To go to another track directly using the number buttons” on page 29. Step No. If you try to program a 33rd step “MEMORY FULL” will appear in the main display.
To skip the playing track, press ¢. • You cannot go back to the previous tracks by pressing 4. Prohibiting Disc Ejection—Disc Lock To stop during playback, press 7. To exit from Random play mode, press FM/PLAY MODE once or twice after stopping the playback so that the unit enters another play mode (Normal play or Program play). • Pressing one of the number buttons also starts Normal play with the track selected with the number button. You can prohibit CD ejection from the unit and can lock a CD.
Playing Back the HDD (Hard Disk Drive) The buttons enlarged in the illustration below are used and explained in this section (pages 33 to 41). Remote control 1-MARK 2-ABC DISP/CHARA 3-DEF PTY STANDBY/ON 4-GHI 5-JKL A.P.
To play back the HDD, you must record tracks yourself first. To record into the HDD, see “Recording into the HDD” on pages 42 to 51. How tracks are recorded into the HDD Once you record a song, it is recorded as a “track,” then these recorded tracks can be grouped into an “album.” For example, if you record the entire CD into the HDD, all tracks of the CD are recorded as separate tracks and the entire CD can be considered and grouped as an album.
Continued To change the information shown in the main display Each time you press DISP/CHARA on the remote control, the information in the main display changes as follows: • Before playing— 1 If assigned titles (album title or track title) are long and cannot be shown at a time The unit keeps scrolling the title to show the entire title.
To go to another track directly using the number buttons (in the same album) Playing Tracks in an Album—Album Play Pressing the number button(s) on the remote control allows you to start playing the track number you want. Ex. For track number 5, press 5. For track number 15, press +10, then 5. For track number 20, press +10, then 10. For track number 32, press +10, +10, +10, then 2. You can play back tracks in an album. • To make or edit albums, see pages 44 to 51, and 58 to 60.
Continued 3 Press LIBRARY to select a library (Library 1 – 4 Press HDD 3/8. Library 10, Library CD or Library TUNER). The tracks in the album are played. Album play ends when all the tracks in the album are played once. • If you move to another album during Album play, another Album play starts with the newly selected album. AAC 128 LIBRARY Album No. & Total track No.
Playing at Random—Random Play Repeating Tracks—Repeat Play All the tracks in the HDD will play at random and repeat endlessly. You can repeat the tracks in the HDD as many times as you like. What you can repeat differs depending on the current play mode selected—Continuous play, Album play, Library play, or Random play. On the remote control ONLY: 1 Press HDD 3/8, then 7. On the remote control ONLY: To repeat play, press REPEAT during or before play.
Continued Searching for Albums and Tracks to Play— Search Modes • Each time you press the button, Search Modes change as follows: This unit features the following four Search Modes to give you an easy access to the albums or tracks you want. • Album Number Search (ALBUM No.) : See below. To select and play an album after searching for it by its number. • Album Title Search (ALBUM T.) : See page 39. To select and play an album after searching for it by its title. • Track Title Search (TRACK T.
To search for an album or a track by entering its title —ALBUM T./TRACK T. 3 Press SET to enter the title entry screen. The first character entry position starts flashing. You can easily find and play an album or a track by entering its title (up to the first 5 characters)—Album Title Search or Track Title Search. • Capital letters and small letters are considered as different letters. So, if you enter “ABC,” you cannot search for an album or track named “abc.
Continued 3) Repeat steps 4 – 1) and 4 – 2) to enter other characters. • If the character you want to enter next is assigned to the same button you have just pressed in step 4 – 2), press once to move the character entry position to the right. For Track Title Search: When the title with the entered characters is found, a retrieved track will be shown in the main display and start playing. 5 Press ENTER. Retrieved track number “SEARCH” flashes in the main display.
To search for one of the last 10 albums recently played or recorded—LAST 10 To find and play the albums recently recorded, press SELECT ¢ or SELECT 4 to select “RECORDED?,” then SET. The last recorded album starts playing (in this example, album number 5—if the selected album has a title, it will appears in the main display instead of the album number). You can easily find and play one of the last 10 albums recently played* or recorded.
Recording into the HDD The buttons enlarged in the illustration below are used and explained in this section (pages 43 to 51). For this section, it is convenient to use the buttons on the front panel.
Before You Start Recording About the digital formats used for recordings • It should be noted that it may be unlawful to re-record pre-recorded tapes, records, or discs without the consent of the owner of copyright in the sound or video recording, broadcast or cable programme and in any literary, dramatic, musical, or artistic embodied therein. • Tracks of less than 3 seconds cannot be created (or recorded) in the HDD. • Each recording is stored as an album in a library.
Continued 3 Press SET. Using Automatic Recording Functions The SMART COMP. indicator lights up on the display. This unit features three Auto Modes—Smart Compression, CD Auto Recording, and Tuner Auto Recording. You can activate these functions whether playing a source or not (the unit must be turned on). • Smart Compression (SMART COMP.) : See below. To automatically compress linear PCM tracks into AAC formated data. • CD Auto Recording (CD AUTO REC) : See page 45.
To automatically record CDs—CD Auto Recording You can automatically make a recording when playing back a CD entirely (from the first track to the last) in Normal play. (You need to start playback by pressing CD 3/8.) The recording will be stored in a library named “Library CD.” • “AAC 128 kbps” is automatically selected as the recording format. • CD Auto Recording will not work for Program play, Random play, and Repeat play. • CD Auto Recording will be canceled when Recording Timer starts operating.
Continued If “CD AUTO REC OFF PLEASE!” appears in the main display You have tried to do the following operations while CD Auto Recording is performed. – To select recording modes or start recording – To edit recording or assign the title to an album or a track – To select Repeat play These operations cannot be accepted during CD Auto Recording. 2 Press SELECT ¢ or SELECT 4 to select “ON?” 3 Press SET to finish the setting. The TUNER and AUTO indicators light up on the display.
To change the information shown in the main display while recording Each time you press DISP/CHARA on the remote control, the information in the main display changes as follows: 1 2 1 Prepare a CD. • Press CD 3/8, then press 7 after loading a CD. • You can make a program (see page 29) or select Random play mode (see page 30) if you want. In this case, do not start playing CD manually. 4 2 Press REC MODE on the unit to select the recording mode.
Continued 4 Press LIBRARY to select a library where you store the recording just done. • Each time you press LIBRARY, the library changes— “Library 1” to “Library 10.” • If you do not select any library within one minute, the library currently flashing in the main display is automatically selected.
Recording FM/AM (MW/LW) Broadcasts * Remaining recording time is calculated based on the current setting of the recording mode. This unit is equipped with the following recording modes to record broadcast programs. 4 When the broadcast program ends, press 7 to stop recording. The following message appears in the main display. • AAC128kbps : AAC format is used at the bit rate of 128 kbps. • AAC 96kbps : AAC format is used at the bit rate of 96 kbps. 1 Tune in to a station you want (see page 18).
Continued To change the information shown in the main display while recording • Each time you press the button, the recording modes change as follows: Each time you press DISP/CHARA on the remote control, the information in the main display changes as follows: 2 1 AAC128kbps AAC 96kbps The indicator corresponding to the selected recording mode lights up on the display. 4 3 Press REC START.
7 Press SET to finish the recording. “ENTRY” flashes in the main display for a while. When no sound comes in for more than 30 seconds Recording stops automatically (after making a 30-second silence recording) and the following message appears in the main display. If “Level OVER!” appears while recording Stop recording, then adjust the input level on this unit (see page 25), or if possible adjust the output level on the external component.
Making Your Own Titles The buttons enlarged in the illustration below are used and explained in this section (pages 53 and 54). Remote control 1-MARK 2-ABC 3-DEF DISP/CHARA PTY STANDBY/ON 4-GHI 5-JKL A.P.
3 Press SET again. Assigning Titles to Albums and Tracks You can assign a title to each album and track. Once a title is assigned, it is displayed during playback. • The maximum number of the characters used for each title is 64. • When you want to change the libraries’ names, see “Changing the Library Names—LIB. NAME” on page 57. The unit enters the album title entry mode. Currently selected album number appears first.
6 Press ENTER. 3 Press TITLE/EDIT once, then press SET. The track title entry screen for the currently selected track appears. 4 Press SELECT ¢ or SELECT 4 to enter the track title entry mode (“TRACK?”). • Each time you press SELECT ¢ or SELECT 4 , the album title entry mode or the track title entry mode (“TRACK?” or “ALBUM?”) is alternately selected. • If you want to go on assigning the track titles, go to step 6 on the right column. 7 Press TITLE/EDIT again to exit from the title entry mode.
Editing the HDD The buttons enlarged in the illustration below are used and explained in this section (pages 56 to 66). Remote control 1-MARK 2-ABC 3-DEF PTY STANDBY/ON 4-GHI 5-JKL A.P.
Introducing HDD Editing Functions Track Editing This unit allows you to edit the tracks using the following functions. You can edit libraries, albums, and tracks using the following functions. ❏ Copying a Track (COPY TRACK) : Page 61 You can make a duplication of a track. Library Editing ❏ Copying a Portion of a Track (A-B COPY) : Page 62 You can copy only a portion of the track you want and store it as a track in an album newly created. You can change the library name as you like.
In the following examples of editing procedures, the processes are explained assuming that the unit is turned on. • To exit from the editing screen any time during the process, press TITLE/EDIT. • To return to the previous screen any time during the process, press CANCEL. • You cannot enter Title/Edit modes during Random play and Search Modes. • Library play, Album play, and Repeat play are canceled when you press TITLE/EDIT (Continuous play will resume). 3 Press SET again.
Continued Restoring the Libraries—RESTORE Copying an Album—COPY ALBUM If you unplug the unit or if a power failure occurs while recording, compressing (Smart Compression), or editing the data into the HDD, the Library information stored in the HDD and what has been actually recorded in the libraries may happen to become unmatched. As a result, you cannot skip tracks or albums as you expect to do in the libraries. If this happens, you can use this function and restore the libraries.
5 Press LIBRARY to select a library (“Library 1”— “Library 10,”) you want to copy the selected album into, then press SET. Album number is automatically assigned to a newly created album (the youngest unused number will be selected). 3 Press ALBUM + or ALBUM – to select the album you want to move, then press SET. The library selection screen appears. Ex. When selecting Album 15 The currently selected library flashes.
2 Press SELECT ¢ or SELECT 4 to select “MAKE ALBUM?,” then press SET. To make your best album later A newly created album has only one track. You can add other tracks into this album later using the MOVE function (see page 63). Erasing an Album—ERASE The currently selected track number of the current album flashes. 3 Select a track you want to copy to a new album. 1) Press ALBUM + or ALBUM – to select the album. 2) Press SELECT ¢ or SELECT 4 to select the track.
Erasing All Albums—ALL ERASE Copying a Track—COPY TRACK All data in the HDD will be erased. You can make a duplication of a track in the same album or in a different album. A newly duplicated track will become the last track in an album where you copy the track into. On the remote control ONLY: 1 Press TITLE/EDIT repeatedly until “ALBUM EDIT?” appears in the main display, then press SET. • The source changes to “HDD” automatically if another source has been selected.
Continued 3) Press SET. The album selection screen appears. 3 If necessary, select a track you want. 1) Press ALBUM + or ALBUM – to select an album. 2) Press SELECT ¢ or SELECT 4 to select a track. • You can select the track directly using the number buttons. In this case, the selected track starts playback repeatedly. 5 Press ALBUM + or ALBUM – to select an album where to copy the track into, then press SET.
8 If necessary, press SELECT ¢ or SELECT 4 to Moving a Track—MOVE precisely adjust the end point. The unit repeats the newly selected end point. • You can shift the end point up to ±128. This range (±128) corresponds to about ±12 seconds from the original point (ADJUST 0). You can move a track either within the same album or into a different album. Tracks are automatically renumbered in both albums— where a track has been moved from and where the track has moved to. 9 Press SET.
Continued 3 Select a track you want to move from. Dividing a Track—DIVIDE 1) Press ALBUM + or ALBUM – to select an album. 2) Press SELECT ¢ or SELECT 4 to select a track. • You can select the track directly using the number buttons. In this case, the selected track starts playback repeatedly. 3) Press SET. This function separate a track into two tracks. The subsequent tracks are automatically renumbered.
4 Press SET when you find the dividing point. Joining Tracks—JOIN The portion (of 2-second length) following the selected dividing point repeats playing. 5 If necessary, press SELECT ¢ or SELECT 4 to precisely adjust the dividing point. The unit repeats the newly selected dividing point. • You can shift the dividing point up to ±128. This range (±128) corresponds to about ±12 seconds from the original point (ADJUST 0). This function joins two adjacent tracks into a single track.
3 Select two adjacent tracks you want to join. 1) Press ALBUM + or ALBUM – to select an album. • If the album you have selected includes only one track, you cannot go to the step below. Select another album including more than one track in it. 2) Press SELECT ¢ or SELECT 4 to select tracks. • You can select a track (and its adjacent track) directly using the number buttons. In this case, the selected track starts playback repeatedly. 3) Press SET.
Using the Timers The buttons enlarged in the illustration below are used and explained in this section (pages 68 to 72). Remote control STANDBY/ON CLOCK /TIMER A.P.off STANDBY/ON SLEEP A.P.
Before using these timers, you need to set the clock built in the unit (see page 11). Continued There are three timers available—Recording Timer, Daily Timer, and Sleep Timer. In addition, you can use Auto Power Off to turn off the unit automatically. • When you use more than one timer, make sure to give the unit at least one-minute interval between timers; otherwise, the unit cannot start the timer with a later ontime.
8 Press SELECT ¢ or SELECT 4 to select the 5 Set the timer on-time. 1) Press SELECT ¢ or SELECT 4 to adjust the hour, then press SET. The minute digit starts flashing. 2) Press SELECT ¢ or SELECT 4 to adjust the minute, then press SET. The timer off-time setting screen appears. • If you have set the timer before, the previously set timer off-time will appear (instead of “– – : – –”). recording mode—“AAC128 REC?” or “AAC 96 REC?,” then press SET.
Continued Using Daily Timer 4 Set the timer off-time. 1) Press SELECT ¢ or SELECT 4 to adjust the hour, then press SET. The minute digit starts flashing. 2) Press SELECT ¢ or SELECT 4 to adjust the minute, then press SET. The playback source setting screen appears. With Daily Timer, you can wake up to your favorite music or radio program. You can set Daily Timer whether the unit is turned on or in standby mode. • To return to the previous screen any time during the process, press CANCEL.
6 Press SELECT ¢ or SELECT 4 to adjust the volume level, then press SET. • You can adjust the volume level within the range of 0 (silent) to 50 (maximum). • When you select “VOL. – –” (selectable only with the unit turned on), the volume is set to the current level. 7 Press SELECT ¢ or SELECT 4 to select “FADE” or “NoFADE”, then press SET. FADE : Volume fades in (gradually becomes louder and is set to the specified level). NoFADE : No fade-in effect.
To sleep with Sleep Timer and wake up with Daily Timer Timer Priority The unit turns off when the shut-off time comes (set by the Sleep Timer), and turns on when the timer on-time (set by the Daily Timer) comes. Since each timer can be set separately, you may wonder what happens if the setting for these timers overlaps. Here are the priorities for each timer. 1 2 3 Set Daily Timer as explained on page 70. Start playing back any source you want to listen to before sleep. Set Sleep Timer.
Using an Optional Keyboard You can connect a keyboard with the PS/2 plug to the KEYBOARD terminal inside the front door (see page 9). You can use the following keys to operate this unit for Edit and Search Modes. • You can use such a keyboard as a PS/2 US101 keyboard or an equivalent. However, the keyboard connected to this unit must be a type of DC 5 V and less than 100 mA. Example of Keyboard Keys Used for Operating This Unit : While selecting a library, used to select library numbers.
Continued (Home) (End) Operating Procedures Using the Keyboard : Moves the cursor at the beginning of the title entry screen. While using the keyboard, the character set indication shown in the main display will not change even you enter small letters or numbers. : Moves the cursor at the end of the title entry screen. To assign an album title—F1 See also “To assign a title to an album” on pages 53 to 54. 1 Press F1 so that the following screen appears in the main display.
Ex. For album number 5, press 5, then Enter. For album number 10, press 1, 0, then Enter. For album number 204, press 2, 0, 4 then Enter. To change a library name—F3 See also “Changing the Library Names—LIB. NAME” on page 57. 1 Press F3 so that the following screen appears in the For album number 1, press the cursor downward Enter. button (≠), then For the last album number, press the cursor upward button (±), then Enter. main display. Currently selected library appears.
Maintenance To get the best performance of the unit, keep your CDs and mechanism clean. General Notes Cleaning the unit In general, you will have the best performance by keeping your CDs and the mechanism clean. • Store CDs in their cases, and keep them in cabinets or on shelves. • Keep the CD tray closed when not in use. • Stains on the unit Should be wiped off with a soft cloth.
Messages For HDD: Message Signification ALBUM No. FULL No more album can be additionally made. CANNOT DIVIDE Solution Erase unnecessary albums from the HDD. (The maximum number of the albums is 999.) • You are trying to divide a track (album) • This is not a malfunction. This track cannot recorded in “Library TUNER.” be divided. • You have already 254 tracks recorded in the • Erase unnecessary tracks from the album. album. (The maximum number of the tracks in an album is 254.
For CD: Signification Message Solution ALL SKIP TRK. All the tracks on the disc have a Track Skip mark*. Change the disc. CANNOT PLAY You are trying to play back a CD which cannot be played, or there is a problem with the CD. Change the disc. The first track on the CD has a Track Skip mark. Wait for a while until the unit finds another track without a Track Skip mark. CD NO DISC There is no disc loaded on the CD tray. Place a disc.
Troubleshooting If you are having a problem with your unit, check this list for a possible solution before calling for service. If you cannot solve the problem from the hints given here, or the unit has been physically damaged, call a qualified person, such as your dealer, for service. IMPORTANT: Before calling for service, make sure you have all data in the HDD duplicated into other recording devices, for it may be required to erase all data in the HDD for service purpose.
Continued Symptom Possible Cause Unable to record into HDD. Already 999 albums are created in the HDD. Erase unnecessary albums. CD Auto Recording cannot be done correctly. • You have stopped the playback before the entire disc is played back. Some of the tracks on the disc are copy-protected. • This is normal. (For details, see page 45.) You have turned on the function after you started CD playback. • To use CD Auto Recording, stop playback, then restart CD playback. CD Auto Recording starts.
General HDD editing Symptom Possible Cause Action Tracks cannot be joined. • These tracks are recorded in different • This is normal. You cannot join these recording modes or in different tracks. albums. • The total playing time of the joined • This is normal. The total playing time track exceeds 3 hours in the Linear of a track cannot exceed these hours. PCM format or 24 hours in the AAC format. When playing back the joined portion, you will hear noise.
Specifications Amplifier General Output Power (IEC 268-3/DIN): 40 W (20 W + 20 W) at 4 Ω (10% THD) Operating temperature : 5˚C to 35˚C Operating altitude : –300 m to +3 048 m Power requirement : AC 230 V , 50 Hz Power consumption : 60 W (in operation) 1.4 W (on standby: with display off) 1.6 W (on standby: with display on) Dimensions (W/H/D) (approx.) : 150 mm x 237 mm x 274 mm Mass (approx.) : 4.
SAFETY INSTRUCTIONS “SOME DOS AND DON’TS ON THE SAFE USE OF EQUIPMENT” This equipment has been designed and manufactured to meet international safety standards but, like any electrical equipment, care must be taken if you are to obtain the best results and safety is to be assured. ✮✮✮✮✮✮✮✮✮✮✮✮✮✮✮✮✮✮✮✮✮✮✮✮✮✮✮✮✮✮✮✮✮✮✮✮✮✮✮✮✮✮✮✮✮✮✮ Do read the operating instructions before you attempt to use the equipment.
INSTRUCTIONS SPEAKER SYSTEM SP-NXHD10 BEDIENUNGSANLEITUNG: LAUTSPRECHERSYSTEM MANUEL D’INSTRUCTIONS: SYSTEME DES ENCEINTES GEBRUIKSAANWIJZING: LUIDSPREKERSYSTEEM MANUAL DE INSTRUCCIONES: SISTEMA DE ALTAVOCES ISTRUZIONI: SISTEMA DI ALTOPARLANTI BRUKSANVISNING: HÖGTALARSYSTEM VEJLEDNING: HØJTTALERSYSTEM KÄYTTÖOHJE: KAIUTINJÄRJESTELMÄ Thank you for purchasing JVC speakers. Before you begin using them, please read the instructions carefully to be sure you get the best possible performance.
CONNECTION • Connect the LEFT speaker terminals of the amplifier to the LEFT terminals of the speaker and RIGHT to RIGHT using the attached speaker cords as shown in the figure making sure polarity is correct; (+) to (+) and (–) to (–). Connect the black speaker wire to the (–) terminal. • Turn off power to the whole system before connecting the speakers to the amplifier. • The nominal impedance of the SP-NXHD10 is 4 Ω.
ANSCHLUSS RACCORDEMENT • Schließen Sie die linken (LEFT) Lautsprecherbuchsen des Verstärkers an die linken (LEFT) Buchsen des Lautsprechers, und die rechten (RIGHT) Lautsprecherbuchsen des Verstärkers an die rechten (RIGHT) Buchsen des Lautsprechers an. Verwenden Sie hierfür das mitgelieferte Lautsprecherkabel — wie in der Abbildung gezeigt — und achten Sie beim Anschluß auf die richtigen Polaritäten; (+) and (+) und (–) an (–). Verbinden Sie die schwarzen Lautsprecherkabel mit den Minusklemmen (–).
AANSLUITINGEN CONEXIÓN • Sluit met de bijgeleverde luidsprekersnoeren de LEFTaansluitpunten op de versterker, bestemd voor aansluiting van de linkerluidspreker, aan op de LEFT-aansluitpunten op de luidspreker en de punten gemerkt RIGHT op RIGHT, volgens de aanwijzingen op de afbeelding, waarbij u ervoor zorgt de polariteit te respekteren; (+) op (+) en (–) op (–). Sluit de zwarte luidsprekersnoeren aan op de (–) aansluitpunten.
COLLEGAMENTO ANSLUTNING • Collegate i terminali per l’altoparlante di sinistra (LEFT) dell’amplificatore ai terminali LEFT dell’altoparlante e il terminali RIGHT a quelli RIGHT usando i cavi degli altoparlanti in dotazione come mostrato fornite nell’illustrazione, assicurandovi che la polarità sia corretta; (+) a (+) e (–) a (–). Collegate i fili neri dell’altoparlante a i terminali (–). • Spegnete la corrente dell’intero sistema prima di collegare gli altoparlanti all’amplificatore.
TILSLUTNING LIITÄNTÄ • Forbind LEFT højttalerbøsningerne på forstærkeren til LEFT på hojttaleren, og RIGHT til RIGHT med anvendelse af højttalerledningen som vist på tegningen, idet det kontrolleres at polerne vender rigtigt; (+) til (+) og (–) til (–). Tilslut de sorte højttalerledninger til (–) terminalerne. • Sluk for strømmen til hele systemet før højttalerne forbindes til forstærkeren. • Den nominelle impedans for SP-NXHD10 er 4 Ω.