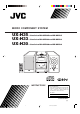
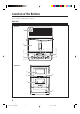
MICRO COMPONENT SYSTEM UX-H35 UX-H33 UX-H30 — Consists of CA-UXH35 and SP-UXH35 — Consists of CA-UXH33 and SP-UXH33 — Consists of CA-UXH30 and SP-UXH30 MICRO COMPONENT SYSTEM INSTRUCTIONS For Customer Use: Enter below the Model No. and Serial No. which are located either on the rear, bottom or side of the cabinet. Retain this information for future reference. Model No. Serial No. GVT0101-008A [B] COVER_UX-H30[B]f.pm6 1 02.12.
Warnings, Cautions and Others IMPORTANT for the U.K. DO NOT cut off the mains plug from this equipment. If the plug fitted is not suitable for the power points in your home or the cable is too short to reach a power point, then obtain an appropriate safety approved extension lead or consult your dealer. BE SURE to replace the fuse only with an identical approved type, as originally fitted.
SAFETY INSTRUCTIONS “SOME DOS AND DON’TS ON THE SAFE USE OF EQUIPMENT” This equipment has been designed and manufactured to meet international safety standards, but like any electrical equipment, care must be taken if you are to obtain the best results and safety is to be assured. ✮✮✮✮✮✮✮✮✮✮✮✮✮✮✮✮✮✮✮✮✮✮✮✮✮✮✮✮✮✮✮✮✮✮✮✮✮✮✮✮✮✮✮✮✮✮✮ Do read the operating instructions before you attempt to use the equipment.
Introduction We would like to thank you for purchasing one of our JVC products. Before operating this unit, read this manual carefully and thoroughly to obtain the best possible performance from your unit, and retain this manual for future reference. About This Manual Power sources This manual is organized as follows: • The manual mainly explains operations using the buttons on the remote control.
Contents Location of the Buttons ............................................... 3 Main Unit .......................................................................... 3 Remote Control ................................................................. 5 Getting Started ............................................................. 6 Supplied Accessories ......................................................... 6 Connecting Antennas ........................................................
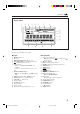
Location of the Buttons Become familiar with the buttons on your unit. Main Unit Top view PHONES 1 2 7 8 COMPACT DIGITAL AUDIO 3 TIMER/SNOOZE 4 9 OPEN MULTI CONTROL ONE TOUCH REC 4 7 ¢ VOLUME BAND 5 AUX TAPE TUNER AHB PRO p CD 6 Front view q w STANDBY MICRO COMPONENT SYSTEM r e t 3 EN01-15_UX-H30[B]f.pm6 3 02.12.
Continued Display window 1 2 3 4 5 6 7 8 BASS SLEEP SNOOZE REC ON OFF CLOCK MONO STEREO RDS TA NEWS INFO REC 9 p q 1 2 3 4 5 6 7 8 9 10 11 12 13 14 15 PROGRAM RANDOM ALL OVER e r t w y See the pages in parentheses for details.
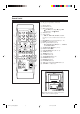
Remote Control See the pages in parentheses for details. STANDBY/ON 1 2 3 4 5 6 DISPLAY 7 8 9 CLOCK /TIMER 10 SLEEP 9 1 p q 10 w UP BASS TREBLE e 2 3 SET DOWN CANCEL r 4 5 CD TUNER TAPE AUX REV.
Getting Started Supplied Accessories Continued To connect an outdoor FM antenna Make sure that you have all the following items. The number in parentheses indicates the quantity of each piece supplied. • AM loop antenna (1) • FM antenna (1) • AC power cord (1) • Remote control (1) • Batteries (2) Before connecting the antenna, disconnect the supplied FM antenna. Outdoor FM antenna (not supplied) Coaxial cable (not supplied) If anything is missing, consult your dealer immediately.
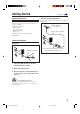
Connecting Speakers AM (MW) antenna 1 1 Vinyl-covered wire (not supplied) 2 Speaker cord Speaker cord 2 AM loop antenna (supplied) Right speaker 1 Connect the AM loop antenna to the AM LOOP terminals as illustrated. 2 Turn the AM loop antenna until you have the best reception. Left speaker 1 Press and hold the clamp of the speaker terminal on the rear of the unit. 2 Insert the end of the speaker cord into the terminal.
Continued To remove the speaker grilles NOW you are ready to plug in the unit and any other connected equipment. The speaker grilles are removable. IMPORTANT: Be sure to check all connections to be done before plugging the power cord. Projections Holes This unit can be supplied with power through the AC IN connector (at home) or the DC IN connector (in a car). • Do not connect the unit using the AC IN connector and the DC IN connector at the same time for safe and correct use.
When using the unit in your car To car’s cigarette lighter socket (12 V) Putting the Batteries into the Remote Control Insert the batteries—R6(SUM-3)/AA(15F)—into the remote control, by matching the polarity (+ and –) on the batteries with the + and – markings on the battery compartment. When the remote control can no longer operate the unit, replace both batteries at the same time.
Common Operations 3 Setting the Clock Before operating the unit any further, first set the unit’s clock. When you plug in the power cord, the CLOCK indicator and “0:00” start flashing on the display. You can set the clock whether the unit is on or off. • There is a time limit in doing the following steps. If the setting is canceled before you finish, start over from step 1. On the remote control: 1 Continued Press CLOCK/TIMER. Press ¢ or 4 to adjust the minute, then press TIMER/SNOOZE.
Turning On the Power Adjusting the Tone (Bass/Treble) STANDBY/ON To turn on the unit, press STANDBY/ON ( on the unit). The STANDBY lamp on the unit goes off. • When you press the source button —3/8 CD, 2 3 TAPE, TUNER (or BAND TUNER on the unit) and AUX, the unit automatically turns on and starts playback if the source is ready. You can adjust the bass level (low frequency range) and the treble level (high frequency range) within a range of –5 to +5.
Listening to FM and AM (MW) Broadcasts Tuning in to a Station 1 2 Presetting Stations Press TUNER (or BAND TUNER on the unit) to select the band. The unit automatically turns on and tunes in to the previously received station—either FM or AM (MW). • Each time you press the button, the band alternates between FM and AM (MW). TUNER BAND You can preset 30 FM and 15 AM (MW) stations— using either automatic presetting or manual presetting.
To preset stations manually—Manual presetting You need to preset stations separately for the FM and AM (MW) bands. • There is a time limit in doing the following steps. If the setting is canceled before you finish, start over from step 2. On the remote control ONLY: 1 Tune in to the station you want to preset. • See “Tuning in to a Station” on page 12. 2 SET Press SET.
Continued Changing the RDS Information On the remote control ONLY: You can see RDS information on the display while listening to an FM station. On the remote control ONLY: 1 “PTY” and “SELECT” appear on the display alternately. 2 Press DISPLAY (orange-colored).
Switching Temporarily to a Program Type of Your Choice How the Enhanced Other Networks function actually works: The Enhanced Other Networks function allows the unit to switch temporarily to a broadcast program of your choice (TA, NEWS, and INFO) from a different station. • The function only works when you are listening to a preset FM RDS stations providing the data. CASE 1 If there is no station broadcasting the program you have selected The unit continues tuning in to the current station.
Playing Back Discs This unit has been designed to play back the following discs—CD, CD-R, and CD-RW. When playing a CD-R or CD-RW User-edited CD-Rs (CD-Recordable) and CD-RWs (CD-ReWritable) can be played only if they are already “finalized.” • Usually you can play back your original CD-Rs or CD-RWs recorded in music CD format. However, sometimes they may not play depending on their characteristics or recording conditions. • Before playing CD-Rs or CD-RWs, read their instructions or cautions carefully.
Basic Disc Operations Programming the Playing Order of the Tracks—Program Play While playing a disc, you can do the following operations. You can arrange the order in which tracks play before you start playing. You can program up to 20 tracks. To stop playing for a moment During play, press 3/8 CD. While pausing, the elapsed playing time flashes on the display. On the remote control ONLY: CD 1 Load a disc.
To check the program contents You can check the program contents by pressing ¢ or 4 before or after playback. • ¢ : To check the contents in the programmed order. • 4 : To check the contents in the reverse order. To modify the program On the remote control ONLY: Before or after playing, you can erase the last programed track by pressing CANCEL. • Each time you press the button, the last programed track is erased from the program. CANCEL To erase the program, press 7 before or after playing.
Playing Back Tapes You can play back type I tapes. If no cassette is inserted when you press 2 3 TAPE “NO TAPE” appears on the display. Playing Back a Tape 1 Press ) for cassette deck on the unit. To stop playing, press 7. The cassette holder opens. To fast-wind to the left or to the right, press ¢ or 4 while the tape is not running. The tape direction indicator (3 or 2) starts flashing rapidly on the display. To remove the cassette, press ) on the unit.
Recording Continued IMPORTANT: • It should be noted that it may be unlawful to rerecord pre-recorded tapes, records, or discs without the consent of the owner of copyright in the sound or video recording, broadcast or cable program and in any literary, dramatic, musical, or artistic embodied therein. • The recording level is automatically set correctly, so it is not affected by the other sound settings.
Disc Direct Recording To record on both sides—Reverse Mode On the remote control ONLY: Everything on the disc goes onto the tape in the order it is on the disc, or according to the order you have set in Program Play. On the unit ONLY: 1 Put a recordable cassette in with the exposed part of the tape down. 2 Load a disc. • If the current playing source is not the CD player, press 3/8 CD, then 7 before going to the next step.
Using the Timers Continued There are four timers available—Daily Timer, Recording Timer, Snooze Timer, and Sleep Timer. Before using the timers, you need to set the unit’s clock (see page 10). 2 UP On the remote control: 1) Press UP or DOWN to set the hour, then press CLOCK/TIMER. UP or DOWN to set 2) Press the minute, then press CLOCK/TIMER. Using Daily Timer and Recording Timer You can set the timer whether the unit is on or off.
4 Select the timer (Daily Timer or Recording Timer) with the source to play. On the remote control: Press UP or DOWN to select the timer, then press CLOCK/TIMER. UP • See “Setting the Clock” on page 10. 7 On the unit: Press ¢ or 4 to select the timer, then press TIMER/SNOOZE. Press STANDBY/ON (or on the unit) to turn off the unit (standby) if you have set the timer with the unit turned on. STANDBY/ON • When the timer turns on the unit, the (timer) indicator starts flashing.
Using Snooze Timer Using Sleep Timer The Snooze Timer turns off the unit (standby) only for 5 minutes while the Daily Timer is in operation. • You can set the Snooze Timer only while the Daily Timer is in operation. With the Sleep Timer, you can fall asleep to music. You can set the Sleep Timer when the unit is turned on. Press TIMER/SNOOZE on the unit (or CLOCK/TIMER on the remote control) while the Daily Timer is in operation.
Maintenance To get the best performance from the unit, keep your discs, tapes, and mechanism clean. Cleaning the unit Handling cassette tapes • Stains on the unit Should be wiped off with a soft cloth. If the unit is heavily stained, wipe it with a cloth soaked in waterdiluted neutral detergent and wrung well, then wipe clean with a dry cloth. • Since the unit may deteriorate in quality, become damaged or have its paint peel, be careful about the following. —DO NOT wipe it with a rough cloth.
Troubleshooting If you are having a problem with your unit, check this list for a possible solution before calling for service. If you cannot solve the problem from the hints given here, or the unit has been physically damaged, call a qualified person, such as your dealer, for service. Symptom Cause Action No sound is heard. • Connections are incorrect or loose. • Headphones are connected. • Check all connections and make corrections. (See pages 6 – 9.) • Disconnect the headphones.
Additional Information Description of the PTY codes: NEWS: News. NATION M: AFFAIRS: Topical program expanding or enlarging upon the news—debate, or analysis. Current popular music of the nation or region in that country’s language. OLDIES: INFO: Program the purpose of which is to impart advice in the widest sense. Music from the so-called “golden age” of popular music. FOLK M: Music which has its roots in the musical culture of a particular nation.
Specifications Amplifier General Output Power: 20 W (10 W + 10 W) at 4 Ω (10% THD) Audio input sensitivity/Impedance (at 1 kHz) AUX: 500 mV/48.75 kΩ Speakers/Impedance: 4Ω Power requirement: AC IN: 230 V , 50 Hz DC IN: 12 V, 4 A Tuner FM tuning range: 87.50 MHz – 108.00 MHz AM tuning range: MW: 522 kHz – 1 629 kHz CD player Dynamic range: Signal-to-noise ratio: Wow and flutter: 85 dB 90 dB Immeasurable Power consumption: 35 W (at operation) 3.0 W (on standby) Dimensions (approx.
VICTOR COMPANY OF JAPAN, LIMITED EN © 2003 VICTOR COMPANY OF JAPAN, LIMITED COVER_UX-H30[B]f.pm6 2 0103MWMMDWJEM 02.12.