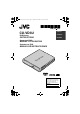
CU-VD3U_001C_EN.book Page 1 Monday, December 10, 2007 10:40 AM CU-VD3U ENGLISH FRANÇAIS DVD Burner INSTRUCTIONS ESPAÑOL Graveur de DVD MANUEL D'UTILISATION Grabador de DVD MANUAL DE INSTRUCCIONES For Customer Use: Enter the Model No. and Serial No. (located on the bottom of the burner) below. Retain this information for future reference. Model No. Serial No.
CU-VD3U_001C_EN.book Page 2 Monday, December 10, 2007 10:40 AM This burner enables DVDs of videos recorded with the JVC Hard Disk Camera to be created without using a PC. • If you want to edit videos recorded with the camera and create your original DVDs, use the software provided with the camera for editing and creating DVDs. • An optional data writing software Power2Go 5.5 Lite can be used for writing data. However, it cannot be used to edit videos or create DVDs.
CU-VD3U_001C_EN.book Page 3 Monday, December 10, 2007 10:40 AM Safety Precautions for the Burner Cleaning Procedure Be sure to observe the following precautions. Failing to do so may result in electric shock, fire, injury, or malfunction. • Do not disassemble, dismantle, or modify the equipment. Requests for repair and inspection should be made to the dealer. • Do not insert metal or combustible objects or pour water or other liquids inside the burner. • Turn off the power when connecting equipment.
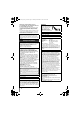
CU-VD3U_001C_EN.book Page 4 Monday, December 10, 2007 10:40 AM Basic Guide Getting ready to copy to a DVD! A Get ready a recommended disc Use DVD-R, DVD-RW or DVD-R DL disc of the brands listed below. DVD+R, DVD+RW and DVD-RAM cannot be used. DVD-R JVC, TDK, Verbatim, SONY Brand Caution B DVD-RW JVC DVD-R DL (Single-sided double layer) JVC, Verbatim z Use a commercially available cleaning cloth to wipe the disc gently if there are any fingerprints or dirt.
CU-VD3U_001C_EN.book Page 5 Monday, December 10, 2007 10:40 AM C Open the tray and insert the disc 1) Press the eject button. D Close the tray Push in until the tray snaps in. 2) Pull out completely. 3) Insert firmly into place. E Open the LCD monitor The Everio camera turns on. Turn the Everio off and on again if the following display remains unchanged.
CU-VD3U_001C_EN.book Page 6 Monday, December 10, 2007 10:40 AM Contents z Safety Precautions .................................................................................................. 2 z Basic Guide.............................................................................................................. 4 z Getting Started......................................................................................................... 7 Taking out the USB Cable .........................................
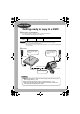
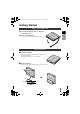
CU-VD3U_001C_EN.book Page 7 Monday, December 10, 2007 10:40 AM Getting Started Taking out the USB Cable A Hook the protruding tip with your finger and EN pull it towards you B FR Take out the USB cable • Can be connected to the USB extension cable. ES Placing the Burner o Horizontal orientation Take note of the top and bottom of the burner and place it in the horizontal orientation. ¹Do not place any objects on top of the burner.
CU-VD3U_001C_EN.book Page 8 Monday, December 10, 2007 10:40 AM Copying to DVD 3 Copy Options o Copying All Files to the DVD ....................................................................P. 9 o Copying by Date ........................................................................................P. 10 o Copying by Event ......................................................................................P.
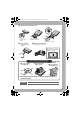
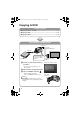
CU-VD3U_001C_EN.book Page 9 Monday, December 10, 2007 10:40 AM Copying All Files to the DVD Caution Preparations A z If the operation and display of your Everio camera differs from the following procedures, refer to the instruction manual of your Everio camera. z For some Everio cameras, still images cannot be copied. EN Connect CU-VD3 to the Everio camera according to the procedures on P. 4f5 and turn on the Everio camera.
CU-VD3U_001C_EN.book Page 10 Monday, December 10, 2007 10:40 AM Copying by Date Caution Preparations A z If the operation and display of your Everio camera differs from the following procedures, refer to the instruction manual of your Everio camera. z For some Everio cameras, still images cannot be copied. Connect CU-VD3 to the Everio camera according to the procedures on P. 4f5. The screen in step A appears when the Everio camera is turned on.
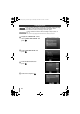
CU-VD3U_001C_EN.book Page 11 Monday, December 10, 2007 10:40 AM E Select “EXECUTE” and press ALL READY TO CREATE DVD-R EXECUTE EN RETURN QUIT F The “CREATING NOW” screen ES CREATING NOW appears and copying starts To cancel, select “STOP” and press . ELAPSED: 3 min 30% Do not turn off the power or remove the USB cable while the “CREATING NOW” screen is displayed.
CU-VD3U_001C_EN.book Page 12 Monday, December 10, 2007 10:40 AM Copying by Event Caution Preparations A z If the operation and display of your Everio camera differs from the following procedures, refer to the instruction manual of your Everio camera. z For some Everio cameras, still images cannot be copied. Register images to events beforehand. For details, refer to the instruction manual of the Everio camera. Connect CU-VD3 to the Everio camera according to the procedures on P. 4f5.
CU-VD3U_001C_EN.book Page 13 Monday, December 10, 2007 10:40 AM E Select “EXECUTE” and press ALL READY TO CREATE DVD-R EXECUTE EN RETURN QUIT F The “CREATING NOW” screen ES CREATING NOW appears and copying starts To cancel, select “STOP” and press . ELAPSED: 3 min 30% Do not turn off the power or remove the USB cable while the “CREATING NOW” screen is displayed.
CU-VD3U_001C_EN.book Page 14 Monday, December 10, 2007 10:40 AM C Optional Creating Data DVD from a PC Important! o The following optional accessories are required: z Specialized USB cable (QAM1092-001) • Please purchase from the JVC Accessory Store at: http://www.jvc.com http://www.jvc.ca z Disc writing software (Power2Go) • Please purchase from the CyberLink homepage. http://www.cyberlink.com/oem/jvc/cds/enu/index_2.jsp This burner can be used as a DVD burner by connecting it to a PC.
CU-VD3U_001C_EN.book Page 15 Monday, December 10, 2007 10:40 AM Troubleshooting Trouble Action CU-VD3 Cannot turn the power on. z Make sure the AC adapter and power cord are connected properly. The burner and AC adapter is hot. z This is not a malfunction. z If the burner is abnormally hot, remove the AC adapter and consult your authorized dealer. Cannot open the disc tray. z A disc cannot be ejected by pressing the eject button if data is being written to the disc. Wait until writing finishes.
CU-VD3U_001C_EN.book Page 16 Monday, December 10, 2007 10:40 AM Trouble Action Everio Cannot be recognized by the Everio camera. z Make sure the USB cable is connected properly. z Remove and insert the USB cable again. z Remove and insert the AC adapter of CU-VD3. Problems occur during operation. z Turn off CU-VD3 and the Everio camera, and then turn on again. Unable to play DVD video created on this burner on other DVD players.
CU-VD3U_001C_EN.book Page 17 Monday, December 10, 2007 10:40 AM Specifications General Rated current AC adapter (AP-V3U) 0.9 A Power supply Dimensions (mm) 141 x 23 x 166 (W x H x D) (5-3/5" x 9/10" x 6-1/2") AC110 V to 240 V 50 Hz/60 Hz EN Input capacity 0.26 A Output DC 5.2 V, 2 A Weight Approx. 380 g (0.
CU-VD3U_Memo.
CU-VD3U_Memo.
CU-VD3U_001C_EN.