English DD-831[A_Ux]-frontcover.
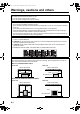
DD-831[A_Ux].book Page 1 Wednesday, August 30, 2006 11:48 AM Warnings, cautions and others CAUTION To reduce the risk of electrical shocks, fire, etc.: 1. Do not remove screws, covers or cabinet. 2. Do not expose this appliance to rain or moisture. CAUTION • Do not block the ventilation openings or holes. (If the ventilation openings or holes are blocked by a newspaper or cloth, etc., the heat may not be able to get out.) • Do not place any naked flame sources, such as lighted candles, on the apparatus.
DD-831[A_Ux].book Page 2 Wednesday, August 30, 2006 11:48 AM CAUTION — F button! (CA-DD8/CA-DD3/CA-DD1) Disconnect the mains plug to shut the power off completely (the STANDBY lamp goes off). When installing the apparatus, ensure that the plug is easily accessible. The F button in any position does not disconnect the mains line. • When the system is on standby, the STANDBY lamp lights red. • When the system is turned on, the STANDBY lamp goes off. The power can be remote controlled.
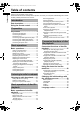
DD-831[A_Ux].book Page 1 Wednesday, August 30, 2006 11:48 AM Introduction Table of contents Thank you for purchasing a JVC product. Please read all instructions carefully before operation, to ensure your complete understanding and to obtain the best possible performance from the unit. Resuming playback.......................................28 Introduction Pausing playback..........................................28 Advancing the picture frame by frame ..........28 Part description ........................
DD-831[A_Ux]-01.fm Page 2 Friday, September 8, 2006 12:16 PM Introduction Playing back sources from other devices Playing back sources from other devices..........................................42 Selecting other devices as the source .......... 42 Selecting the signal gain ............................... 42 QP LINK........................................................ 43 Operating other devices using the remote control Operating other devices using the remote control..............................
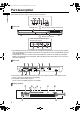
DD-831[A_Ux]-02.fm Page 3 Monday, September 25, 2006 2:58 PM Introduction Part description The numbers refer to the pages in which the parts are explained. Front view STANDBY lamp Refer to “Display window” shown below. Remote control sensor These terminals are available when the front cover is open. *1 The [PHONES] terminal is for connecting a pair of headphones equipped with a stereo plug (not supplied). When the headphones are connected, the speakers do not produce any sound.
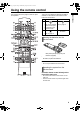
DD-831[A_Ux].book Page 4 Wednesday, August 30, 2006 11:48 AM Using the remote control There are some differences between DD-8/DD-3 and DD-1 in the locations of the remote control buttons as shown below. DD-8/DD-3 Introduction The numbers refer to the pages in which the parts are explained. DD-1 *1 Refer to the separate Refer to page 19. volume of the operation manual for the network function. *2 Refer to page 19.
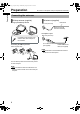
DD-831[A_Ux].book Page 5 Wednesday, August 30, 2006 11:48 AM Preparation Preparation Do not turn on the power until you complete the connection. Connecting the antennas AM loop antenna (supplied) Setting up the AM loop antenna FM antenna (supplied) FM antenna Main unit (rear view) Stretch out the FM antenna horizontally. If reception is poor Main unit (rear view) If insulation covers the tips of the antenna cable, twist and pull off the insulation.
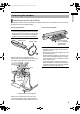
Connecting the speakers Assembling the speaker stands (DD-8) The speakers for DD-8 must be assembled to the speaker stands before the speakers can be connected to the subwoofer. Follow the diagrams below. Center surround speaker Left and right speakers ■ CAUTION • The left and right speakers for DD-8 are considerably heavy. Care must be taken in carrying and handling them. Injury to personnel or damage to devices may result if the left/right speaker falls.
DD-831[A_Ux].book Page 7 Wednesday, August 30, 2006 11:48 AM Preparation Preparation (continued) Do not turn on the power until you complete the connection. Connecting the speakers to the subwoofer (DD-8) Gray Blue Rear view Before connecting the speaker cables, twist and pull off the insulation at the end of each speaker cable.
Assembling the speaker stands (DD-3) The speakers for DD-3 must be assembled to the speaker stands before the speakers can be connected to the subwoofer. Follow the diagrams below. Left and right speakers ■ CAUTION • The left and right speakers and center surround speaker for DD-3 can be installed on a wall. • Be sure to have the speakers installed on the wall by qualified personnel. Bottom covers (2) are supplied with DD-3 for installing the left and right speakers on the wall.
DD-831[A_Ux].book Page 9 Wednesday, August 30, 2006 11:48 AM Preparation (continued) Do not turn on the power until you complete the connection. Preparation Connecting the speakers to the subwoofer (DD-3) Gray Blue Rear view Before connecting the speaker cables, twist and pull off the insulation at the end of each speaker cable.
DD-831[A_Ux].book Page 10 Wednesday, August 30, 2006 11:48 AM Gray Preparation Connecting the speakers to the subwoofer (DD-1) Blue Rear view Before connecting the speaker cables, twist and pull off the insulation at the end of each speaker cable. Subwoofer (SP-PWDD1) Black lines Rear view Black Black Rear view Center surround speaker (SP-DD1S) Right speaker Left speaker (SP-DD1F) (SP-DD1F) The left and right speakers are the same.
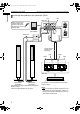
DD-831[A_Ux]-03.fm Page 11 Monday, December 25, 2006 1:57 PM Preparation Preparation (continued) Do not turn on the power until you complete the connection. Connecting the subwoofer to the main unit Only for DD-8 and DD-3 Speaker layout Center surround speaker Left speaker Right speaker Subwoofer Subwoofer Peel off the protective sheets from both sides of the subwoofer. Main unit Rear view Rear view System cable (supplied) Align the 5 marks on the terminals and the system cable.
Connecting a TV with the [COMPONENT VIDEO OUT] terminals Connecting a TV Connecting a TV with the [VIDEO] terminal TV TV Main unit (rear view) Main unit (rear view) To component terminals To a video terminal Component video cable (not supplied) Composite video cable (supplied) Connecting a TV with the [S-VIDEO] terminal TV Main unit (rear view) Connecting a TV with the [HDMI] terminal (not available for DD-1) DD-8 and DD-3 can output uncompressed digital video signals to a TV compatible with HDMI
DD-831[A_Ux]-03.fm Page 13 Wednesday, September 27, 2006 11:44 AM Preparation Preparation (continued) Do not turn on the power until you complete the connection. NOTE • DD-8 and DD-3 support up to HDMI version 1.0. The HDMI video signal type can be checked with the “HDMI” indicator in the display window. (Refer to “Selecting the video signal type” shown on the right.) • If the picture is distorted while an HDMI TV is connected, turn off the main unit and turn it on again.
3 Press 2 or 3 to select the video signal type suitable for the TV. • When the TV is connected to the [VIDEO] terminal or the [S-VIDEO] terminal, the video signal type can be selected as instructed below. - Select “PAL 576I” for a TV only compatible with PAL interlaced video signal. - Select “PAL 576P” for a TV equipped with a component terminal and compatible with PAL progressive video signal. NOTE • The picture may be distorted when you press [ENTER], but this is not a malfunction of the system.
DD-831[A_Ux]-03.fm Page 15 Friday, September 8, 2006 12:17 PM Preparation Preparation (continued) Do not turn on the power until you complete the connection. Connecting a portable digital audio player Listening to analog sound from a portable digital audio player ■Selecting the analog output level of the [LINE OUT] terminal You can lower the analog output level to prevent the system from producing unnecessarily loud sound.
DD-831[A_Ux]-03.
DD-831[A_Ux]-04.fm Page 17 Friday, September 8, 2006 1:57 PM Basic operations Basic operations Turning on the main unit NETWORK 3 (For DD-8/DD-3) DIMMER (For DD-1) Press [F AUDIO]. • Press [F AUDIO] again to turn off the main unit. Remote control mode selector • With the power off, pressing any of the following buttons also turns on the main unit.
Page 18 Monday, October 30, 2006 11:14 AM Sharpening the voice sound This function allows you to easily understand dialog recorded on the disc/file even with the volume down low. Press [CLEAR VOICE]. Adjusting the volume of the center surround speaker/ subwoofer 1 Press [CH LEVEL] to repeatedly select “SURR” (the center surround speaker) or “SUBWFR” (the subwoofer) in the display window. 2 Press [+] or [–] to adjust the volume.
DD-831[A_Ux].book Page 19 Wednesday, August 30, 2006 11:48 AM Basic operations Basic operations (continued) Changing the brightness of the display window Press [DIMMER]. • Each time you press [DIMMER], the display changes in the display window as follows. - “DIMMER 1” The display window becomes darker than the normal display brightness. - “DIMMER 2” The display window becomes darker than “DIMMER 1”. Using the sleep timer When the time you specify elapses, the main unit automatically turns off.
DD-831[A_Ux].book Page 20 Wednesday, August 30, 2006 11:48 AM Auto standby function If no sound is produced for 3 minutes, the main unit automatically turns off. This function is available when a disc/file is selected as the source. You cannot use this function when a radio broadcast or a device connected to the [LINE IN 1], [LINE IN 2] or [LINE-DIGITAL IN] terminals is selected as the source. Locking disc ejection You can lock the disc tray to prevent the disc from being ejected.
DD-831[A_Ux]-05.fm Page 21 Monday, September 25, 2006 2:59 PM Listening to radio broadcasts Listening to radio broadcasts Setting the AM tuner spacing AM stations are spaced 9 kHz apart in some countries and 10 kHz in other countries. Remote control mode selector ■When the main unit is turned off Number buttons* To select 9 kHz spacing, while holding down [VOLUME –] on the main unit, press F on the main unit to turn on the power. “AM 9 kHz STEP” appears in the display window.
2 Press [ TUNING] or [TUNING ] repeatedly to select a radio station. Tuning in to a preset radio station • When the main unit has receive an FM stereo broadcast, the “ST” (stereo) indicator lights up in the display window. Presetting radio stations in the main unit allows you to easily tune in to a radio station. • You can also select a radio station using the automatic tuning. ■Automatic tuning Hold down [ TUNING] or [TUNING ] until the frequency starts changing, and then release the button.
DD-831[A_Ux]-06.fm Page 23 Friday, October 13, 2006 11:02 AM Basic operations of disc/file playback Basic operations of disc/file playback Playing back a disc This part explains playing back the types of discs shown above. Remote control mode selector 1 Press [OPEN/CLOSE 0] on the remote control or 0 on the main unit. • The disc tray ejects. 2 Place a disc. Printed surface Number buttons* Disc tray • To play back an 8-cm disc, place it on the inner hollow of the disc tray.
Page 24 Monday, October 30, 2006 11:17 AM Playing back a file This part explains playing back 1) files recorded on the loaded disc, and 2) files recorded on a USB mass storage class device connected to the main unit. The operation is explained with a display of MP3 files as an example. NOTE • When files of different types are recorded on a disc or connected USB mass storage class device, select the file type before playback. (Refer to “FILE TYPE” on page 39.
DD-831[A_Ux]-06.fm Page 25 Friday, September 8, 2006 12:21 PM Basic operations of disc/file playback Basic operations of disc/file playback (continued) NOTE • Depending on the file type, the menu screen appears before you press 7. 4 VCD/SVCD ■When a disc is played back Press 5, /, 2 or 3 to select a group and track. NOTE • You can also use [GROUP/TITLE SKIP / ] to select a group, and the number buttons, 4 or ¢ to select a track. 5 Press [DVD/CD 3] or [USB 3].
DD-831[A_Ux].book Page 26 Tuesday, October 10, 2006 10:12 AM CD JPEG file ■When a disc is played back Track number ■When a file is played back or stopped Elapsed playback time ■When a disc is stopped File type Group number File number Messages on the TV screen When a DVD VIDEO is selected as the source, the messages shown below are displayed on the TV screen to indicate the disc status.
DD-831[A_Ux]-06.fm Page 27 Monday, October 30, 2006 11:18 AM Basic operations of disc/file playback Basic operations of disc/file playback (continued) Guide icons on the TV screen (on-screen guide) : Play : Pause : Fast reverse/fast forward search : Slow motion playback (reverse/ forward directions) : Containing multi-view angles (Refer to page 31.) : Containing multi-audio languages (Refer to page 31.) : Containing multi-subtitle languages (Refer to page 31.
DD-831[A_Ux]-06.fm Page 28 Friday, October 13, 2006 11:03 AM Stopping playback Pausing playback ■When a disc/file is played back ■When a disc/file is played back Press 7. Press 8. Resuming playback • Press [DVD/CD 3] or [USB 3] to return to the normal playback. Advancing the picture frame by frame (only for the loaded disc) When playback is stopped in the middle, playback can be started from the stopped position. Temporarily stopping playback ■When a disc/file is paused Press 8 repeatedly.
DD-831[A_Ux].book Page 29 Wednesday, August 30, 2006 11:48 AM Basic operations of disc/file playback Basic operations of disc/file playback (continued) Fast reverse/fast forward search Slow motion playback ■When a disc is paused There are 2 methods. Press [ ■When a disc/file is played back • Press 1 or ¡. - Each time you press ¡, the speed increases. To restore the normal speed, press [DVD/CD 3] or [USB 3]. • Hold down 4 or ¢. SLOW] or [SLOW • Each time you press [ the speed increases. ].
DD-831[A_Ux]-06.fm Page 30 Monday, October 30, 2006 11:19 AM Selecting a chapter/track using the number buttons (PBC off) ■When a disc/file is played back Press the number buttons to select the chapter number or track number. Skipping at approximately 5 minute intervals Selecting a track from the menu screen ■When a disc is stopped or played back 1 Press [MENU] or [TOP MENU]. • The menu screen is displayed. 2 Press 5, /, 2 , 3 or the number buttons to select the desired track. 3 Press [ENTER].
DD-831[A_Ux]-07.fm Page 31 Friday, September 8, 2006 12:24 PM Convenient functions of disc/file playback Convenient functions of disc/file playback Selecting the audio language, subtitle language and view angle ■When a disc/file is played back Remote control mode selector Press the desired button shown below. • Each time you press the button, the audio language, subtitle language or view angle changes.
Playing back a disc/file in the desired order (Program playback) Display for a VCD/SVCD/CD • Select a track number. Track indicator Track number Program number (only for the loaded disc) You can program a maximum of 99 tracks. The same track can be programmed more than once. Example: TV screen for a CD (Program screen) ■When a disc/file is stopped 1 Press [PLAY MODE] repeatedly to display “PROGRAM” in the display window. Example: Display for a CD • You can program up to 99 tracks.
DD-831[A_Ux]-07.fm Page 33 Wednesday, August 30, 2006 5:11 PM Convenient functions of disc/file playback Convenient functions of disc/file playback (continued) Playing back a disc/file in a random order (Random playback) Magnifying the picture ■When a disc is played back or paused 1 • Each time you press the button, the picture magnification changes in the display window.
DD-831[A_Ux]-07.fm Page 34 Friday, September 8, 2006 1:52 PM Playing back a disc/file repeatedly (Repeat playback) Selecting the surround mode Press [SURROUND MODE]. (PBC off) • Each time you press [SURROUND MODE], the display changes in the display window as follows. ■When a disc/file is played back Press [REPEAT]. • Each time you press [REPEAT], the repeat mode changes.
DD-831[A_Ux].book Page 35 Tuesday, October 10, 2006 10:12 AM For the locations of the remote control buttons, refer to page 31. Convenient functions of disc/file playback Convenient functions of disc/file playback (continued) Adjusting the picture quality (VFP) 3 • Each time you press 5 or /, the item changes on the TV screen as follows. - “GAMMA” Controls the brightness of neutral tints while maintaining the brightness of dark and light portions.
DD-831[A_Ux].book Page 36 Wednesday, August 30, 2006 11:48 AM Function list ■When a disc/file is played back 1 To select the settings for those items listed below without a description of their operation, press 5 or / to select an item and press [ENTER]. Press [ON SCREEN] twice. TV screen for a DVD VIDEO (example) Time Status bar Time display selection Menu bar 2 Press 2 or 3 to select an item you want to operate, and then press [ENTER]. • To turn off the menu bar, press [ON SCREEN].
DD-831[A_Ux]-07.fm Page 37 Wednesday, August 30, 2006 5:12 PM For the locations of the remote control buttons, refer to page 31. Convenient functions of disc/file playback Using the status bar and the menu bar (continued) Playing back a specified part repeatedly (A-B repeat playback) You can play back the desired part repeatedly by specifying a start point (A) and an end point (B). ■When a disc is played back Press [ON SCREEN] twice. • The menu bar appears. (Refer to page 36.
DD-831[A_Ux]-07.fm Page 38 Monday, September 11, 2006 10:12 AM Basic operations You can change the initial settings of the main unit with the preference screen according to the environment where the main unit is used. ■When a disc/file is stopped or no disc is loaded (“NO DISC” is displayed in the display window) 1 Press [SET UP]. • The preference screen appears on the TV screen. Example: Remote control mode selector 2 Use 5, /, 2, 3 and [ENTER] to control the preference screen.
DD-831[A_Ux].book Page 39 Tuesday, October 10, 2006 10:12 AM Convenient functions of disc/file playback Changing the initial settings with the preference screen (continued) PICTURE Items MONITOR TYPE Contents ( : initial setting) Select the display method suitable for your TV. 4 : 3 PS (Pan Scan) : For a TV with conventional 4:3 aspect ratio. When a wide screen picture is input, the left and right edges of the picture are not shown on the screen.
? AUDIO Items DIGITAL AUDIO OUTPUT Contents ( ? : initial setting) Select the output signal type suitable to the device connected to the [LINE-DIGITAL OUT] terminal. Refer to “List of relationships of DIGITAL AUDIO OUTPUT preference items and output signal” on page 41. PCM ONLY : Device corresponding only to linear PCM. DOLBY DIGITAL/PCM : Dolby Digital decoder or device having the same function. STREAM/PCM : DTS/Dolby Digital decoder or device having the same function.
DD-831[A_Ux]-07.
DD-831[A_Ux].book Page 42 Wednesday, August 30, 2006 11:48 AM 2 Start playback on the connected device. • Refer also to the operation manual for the connected device. 3 Adjust the volume and make other necessary settings. • Refer to “Basic operations” on page 17. Selecting the signal gain You can select the gain of the signal from the [LINE IN 1] and [LINE IN 2] terminals. Use the initial settings for normal operation. If the sound is too small or too loud, change the settings.
DD-831[A_Ux]-08.fm Page 43 Friday, September 8, 2006 2:23 PM For the locations of the remote control buttons, refer to page 42. Playing back sources from other devices Playing back sources from other devices (continued) 2 QP LINK When you start analog playback of a portable digital audio player connected to the [LINE IN 1] terminal while the main unit is off or another source is selected, the main unit automatically turns on and the source changes to the connected portable digital audio player.
DD-831[A_Ux]-09.fm Page 44 Friday, September 8, 2006 12:28 PM You can operate your TV, video cassette recorder (VCR) and digital broadcast satellite (DBS) using the remote control of this system. Operating a TV using the remote control Setting the manufacturer code Remote control mode selector 1 Slide the remote control mode selector to [TV]. 2 Hold down [TV F]. • Hold down [TV F] until you finish step 4. 3 4 Number buttons/ TV RETURN/ 100+ Press [ENTER] and release.
DD-831[A_Ux]-09.fm Page 45 Friday, September 8, 2006 12:28 PM Operating other devices using the remote control Operating other devices using the remote control (continued) Using the remote control for the TV operation Operate the remote control by pointing it at the TV. Operating a VCR/DBS using the remote control . Remote Usage control button Turns on/off the TV. [TV F] Changes between the TV and [TV/VIDEO] video input. [TV CHANNEL Changes channels. +/–] [TV VOL +/–] Adjusts volume.
DD-831[A_Ux]-09.fm Page 46 Friday, September 8, 2006 12:28 PM Manufacturer codes for DBSs Examples: For an Echostar DBS: Press [2], then [1]. For a Sony DBS: Press [2], then [0]. When the manufacturer of your DBS has 2 or more codes, select the manufacturer codes in turn and find the one that operates the DBS and the remote control properly. Manufacturer G. I.
DD-831[A_Ux]-10.
Notes on handling Important cautions Installation of the system • Select a place which is level, dry and neither too hot nor too cold; between 5°C and 35°C. • Leave sufficient distance between the system and the TV. • Do not use the system in a place subject to vibration. Power cord • Do not handle the power cord with wet hands! • A small amount of power is always consumed while the power cord is connected to the wall outlet.
DD-831[A_Ux].book Page 49 Tuesday, October 10, 2006 10:12 AM Reference Notes on discs/files Playable disc/file types Playable discs *1 Playable files recorded on a disc *1, *2 Playable files recorded on a USB mass storage class device *3 Playable files stored on a computer (Only for DD-8 and DD-3) • Even though listed above, some types may be unplayable. *1 Discs should be finalized before being played back. *2 For files recorded on a DVD-R/DVD-RW, the disc should be formatted with UDF Bridge.
Unplayable discs • The following discs cannot be played back: • DVD-ROM (except for MP3/WMA/JPEG/ASF/ DivX/MPEG1/MPEG2 format), DVD-RAM, CDROM, CD-I (CD-I Ready), Photo CD, SACD, etc. • Playing back these discs will generate noise and damage the speakers. • Damaged discs and discs in an extraordinary shape (other than a disc of 12 cm or 8 cm in diameter) cannot be played back. • JVC does not guarantee the operation and sound quality of discs not authorized by CD-DA, which is a CD specification.
DD-831[A_Ux].book Page 51 Tuesday, October 10, 2006 10:12 AM Reference Notes on discs/files (continued) Notes on DivX discs/files • The system supports DivX 5.x, 4.x and 3.11. • The system supports DivX files with a resolution of 720 x 480 pixels or less (30 fps) and 720 x 576 pixels or less (25 fps). • Audio stream should conform to MPEG1 Audio Layer-2 or MPEG Audio Layer-3 (MP3). • The system does not support GMC (Global Motion Compression).
Data hierarchy Handling discs DVD VIDEO A DVD VIDEO consists of “titles” and each title may be divided into “chapters”. Title 1 Title 2 • Do not use any non-standard shape disc (like a heart, flower or credit card, etc.) available on the market, because it may damage the system. • Do not use a disc with tape, stickers, or paste on it, because it may damage the system. • Do not bend the disc. Chapter 1 Chapter 2 Chapter 3 Chapter 1 Chapter 2 VCD/SVCD/CD A VCD/SVCD/CD consists of “tracks”.
DD-831[A_Ux].book Page 53 Tuesday, October 10, 2006 10:12 AM Reference Troubleshooting Problem Possible cause Improper connection. Headphones are connected. A disc/file recorded in a format incompatible with the main unit/ TV is played back. The connected TV is not comNo sound/video is pro- patible with HDCP. duced via the [HDMI] terminal. (Only for DD-8/ The main unit fails to recognize the TV connected to the [HDMI] DD-3) terminal. No sound/video is produced. Disc playback does not start.
DD-831[A_Ux]-10.fm Page 54 Monday, December 25, 2006 1:58 PM Main unit (CA-DD8/CA-DD3/ CA-DD1) Tuner FM frequency: 87.50 MHz - 108.
DD-831[A_Ux]-10.
Center surround speaker for DD-8/DD-3 (SP-DD8S) Type: 1-way acoustic suspension type Magnetically shielded type Speaker: 9.5 cm x 1 cm direct-drive Power handling capacity:30 W Impedance: 3Ω Frequency range: 120 Hz - 40 kHz Sound pressure level: 79 dB/W•m Dimensions (W x H x D):344 mm x 61 mm x 76 mm (including stand) Weight: 0.95 kg (including stand) Center surround speaker for DD-1 (SP-DD1S) Type: 1-way acoustic suspension type Magnetically shielded type Speaker: 9.
DD-831[A_Ux]-backcover.fm Page 57 Monday, December 25, 2006 1:57 PM Mains (AC) Line Instruction (Only for countries/areas other than Australia or Hong Kong) Subwoofer (rear view) CAUTION for mains (AC) line BEFORE PLUGGING IN, do check that your mains (AC) line voltage corresponds with the position of the voltage selector switch provided on the outside of this equipment and, if different, reset the voltage selector switch, to prevent from a damage or risk of fire/electric shock.