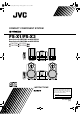
FS-X1-3(US)_E.book Page 1 Friday, April 18, 2003 7:27 PM COMPACT COMPONENT SYSTEM FS-X1/FS-X3 Consists of CA-FSX1 and SP-FSX1 Consists of CA-FSX3 and SP-FSX3 CA-FSX1 SP-FSX1 CA-FSX3 SP-FSX3 SP-FSX1 SP-FSX3 CA-FSX1 SP-FSX1 CA-FSX3 SP-FSX3 INSTRUCTIONS For Customer Use: Enter below the Model No. and Serial No. which are located either on the rear, bottom or side of the cabinet. Retain this information for future reference. Model No. Serial No.
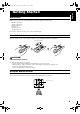
FS-X1-3(US)_E.book Page 1 Friday, April 18, 2003 7:27 PM Warnings, Cautions and Others CAUTION To reduce the risk of electrical shocks, fire, etc.: 1. Do not remove screws, covers or cabinet. 2. Do not expose this appliance to rain or moisture. IMPORTANT FOR LASER PRODUCTS / CLASS 1 LASER PRODUCT CAUTION 1. Invisible laser radiation when open and interlock failed or defeated. Avoid direct exposure to beam. CAUTION 1. Do not open the top cover.
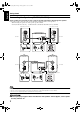
FS-X1-3(US)_E.book Page 2 Friday, April 18, 2003 7:27 PM Caution: Proper Ventilation To avoid risk of electric shock and fire, and to prevent damage, locate the apparatus as follows: 1 Front: No obstructions and open spacing. 2 Sides/ Top/ Back: No obstructions should be placed in the areas shown by the dimensions below. 3 Bottom: Place on the level surface. Maintain an adequate air path for ventilation by placing on a stand with a height of 10 cm or more.
English FS-X1-3(US)_E.book Page 1 Friday, April 18, 2003 7:27 PM Introduction Thank you for purchasing the JVC Compact Component System. We hope it will be a valued addition to your home, giving you years of enjoyment. Be sure to read this instruction manual carefully before operating your new stereo system. In it you will find all the information you need to set up and use the system. If you have a query that is not answered by the manual, please contact your dealer.
FS-X1-3(US)_E.book Page 2 Friday, April 18, 2003 7:27 PM English Table of Contents Introduction ........................................................................................................ 1 Features ...................................................................................................................................... 1 How This Manual Is Organized ................................................................................................. 1 WARNINGS .......................
FS-X1-3(US)_E.book Page 3 Friday, April 18, 2003 7:27 PM English Table of Contents Setting the Daily Timer ............................................................................................................ 23 Setting the SLEEP Timer ......................................................................................................... 26 Timer Priority........................................................................................................................... 26 Troubleshooting.
FS-X1-3(US)_E.book Page 4 Friday, April 18, 2003 7:27 PM English Getting Started Accessories Make sure that you have all of the following items, which are supplied with the System. FM Wire Antenna (1) AM Loop Antenna (1) Remote Control (1) Batteries (2) Speaker Cords (2) AC plug adaptor (1) If any of these items are missing, contact your dealer immediately. How To Put Batteries In the Remote Control Match the polarity (+ and –) on the batteries with the + and – markings in the battery compartment.
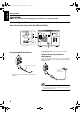
English FS-X1-3(US)_E.book Page 5 Friday, April 18, 2003 7:27 PM Getting Started CAUTION: • Make all connections before plugging the System into an AC power outlet. Connecting the FM Antenna Rear Panel of the Center Unit (CA-FSX1/CA-FSX3) (on the side panel) Using the Supplied Wire Antenna If reception is poor, connect the outdoor antenna.
Getting Started Connecting the AM Antenna Rear Panel of the Center Unit (CA-FSX1/CA-FSX3) AM loop antenna (Supplied) Attach the AM loop to its base by snapping the tabs on the loop into the slot in the base. Outdoor single vinyl-covered wire (not supplied) Turn the loop until you have the best reception. • If the AM loop antenna wire is covered with vinyl, remove the vinyl by twisting it as shown in the diagram.
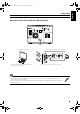
English FS-X1-3(US)_E.book Page 7 Friday, April 18, 2003 7:27 PM Getting Started Connecting the Speakers (SP-FSX1/SP-FSX3) These speakers are exclusively for this system. Using with other devices will damage the speakers. Connect the speaker cords between the speaker terminals of the Unit and those of the Speakers. • When inserting the speaker wire lead, open the speaker terminal. • Connect the black cord to the ( - ) terminal and the cord without a black line to the (+) terminal.
Getting Started Removing the Speaker Grills (SP-FSX1) The speaker grills can be removed. When removing: 1. Pull the bottom towards you with your fingers. 2. Also pull the top towards you. When attaching the speaker grills: Attach the speaker grills as shown in the diagram. Connecting a Powered Subwoofer Connect a signal cord (not supplied) between the System’s SUBWOOFER terminal and the input terminal of an external subwoofer.
English FS-X1-3(US)_E.book Page 9 Friday, April 18, 2003 7:27 PM Getting Started Connecting an MD Recorder, etc (Optical Digital Output) Unplug the cap and connect an optical digital cord (not supplied) between the System’s OPTICAL DIGITAL OUT terminal and the input terminal of the MD recorder, etc. You can record the digital output signal from the System’s CD Player to the MD recorder, etc. Cap Optical digital cord (not supplied) MD recorder, etc.
FS-X1-3(US)_E.book Page 10 Friday, April 18, 2003 7:27 PM English Basic Operations STANDBY/ON CD lamp (Inside) DISPLAY CD 6 A.P. off DIMMER LINE FM/AM AHB PRO BASS/TREBLE VOLUME +,_ AHB PRO Source indicator FADE MUTING Source selector STANDBY/ON indicator VOLUME +,_ STANDBY/ON PHONES Display Turning the Power On and Off Changing the Source Turning the System On The System has four sound sources, CD, FM, AM and LINE. Select one of sources you want to listen.
English FS-X1-3(US)_E.book Page 11 Friday, April 18, 2003 7:27 PM Basic Operations Adjusting the Brightness (DIMMER - at Power On) You can adjust the brightness of the display. When the System is Turned On At power on, each time you press the DIMMER button on the Remote Control, the brightness changes as follows: DIMMER OFF = DIMMER 1 = DIMMER 2 = (back to the beginning) DIMMER OFF : Bright DIMMER 1 : Dark (CD lamp also becomes dark.) DIMMER 2 : Darker (CD lamp goes out.
Basic Operations Tone Control (BASS/TREBLE) You can control the tone by changing the bass (low frequency) and treble (high frequency). On the Remote Control 1 Press the BASS/TREBLE button. Each time you press the button, the Tone Control mode changes as follows. BASS = TREBLE = Normal display = (back to the beginning) 2 While “BASS” or “TREBLE” appears on the display, press the VOLUME + or button to adjust the bass or treble level. No signal condition: Source CD: CD is stopped or no CD is inserted.
FS-X1-3(US)_E.book Page 13 Friday, April 18, 2003 7:27 PM English Using the Tuner Numeric Keys SET 2 5 3 ∞ FM/AM FM/PLAY MODE Multi-control button Source selector FM mode indicator ¢ 4 Band display, Preset channel, Frequency display * When the System is in use, the display shows other items as well. For simplicity, we show here only the items described in this section. You can listen to FM and AM stations. Stations can be tuned in manually, automatically, or from preset memory storage.
Using the Tuner ● Preset Tuning using the Remote Control (Possible only after presetting stations) Select the desired preset number using the 3 or 2 button on the Remote Control. The display will show the preset number’s band and frequency. • You can also select the desired preset number using the Numeric Keys. See “Entering the Number with the Remote Control” on page 12. (e.g. Press +10, and then 2 for number 12.
English FS-X1-3(US)_E.book Page 15 Friday, April 18, 2003 7:27 PM Using the Tuner Beat Cut (AM Reception) Switching the Beat Cut mode may reduce beat noise. Each time you press the FM/PLAY MODE button while receiving an AM broadcast, the Beat Cut mode changes as follows. BEAT CUT 1 = BEAT CUT 2 = BEAT CUT 3 = BEAT CUT 4 = (back to the beginning) FM/PLAY MODE Set to the position where beat noise is small. • The best position will differ depending on the AM broadcast station being received.
FS-X1-3(US)_E.book Page 16 Friday, April 18, 2003 7:27 PM English Using the CD Player CD DOOR 0 Numeric Keys CANCEL 5 3 ∞ SET 2 CD 6 7 CD door REPEAT FM/PLAY MODE 0 CD 6 ¢ Source selector 7 Disc indicator 4 Repeat indicator Play mode indicator * When the System is in use, the display shows other items as well. For simplicity, we show here only the items described in this section. You can use Normal, Random, Program or Repeat Play.
English FS-X1-3(US)_E.book Page 17 Friday, April 18, 2003 7:27 PM Using the CD Player ❑ You can insert a CD while listening to the other source. • However, while the CD door is operating (opening or closing), the other source will be muted. CAUTION: • DO NOT try to open or close the CD door by hands as it will be damaged. To Unload a CD Take out the CD as shown below.
Using the CD Player 5 Press the Numeric Keys to enter the track number you want to program (See page 12). The program order number will be assigned from “1”, if nothing is programmed yet. Example: Track number • If the total playback time of the programmed tracks exceeds 1 hour and 40 minutes, “--:--” will appear on the display. • If you try to program the 33rd track, “MEMORY FULL” appears on the display for about 2 seconds.
English FS-X1-3(US)_E.book Page 19 Friday, April 18, 2003 7:27 PM Using the CD Player Repeating Tracks CD DOOR LOCK You can repeat all tracks or individual track, as many times as you like. You can prevent unwanted CD ejection by locking the CD door. The CD Player works normally except CD ejection operation. During playback or in Stop mode, press the REPEAT button on the Remote Control. Each time you press the button, the Repeat mode and Repeat indicator change as follows.
FS-X1-3(US)_E.book Page 20 Friday, April 18, 2003 7:27 PM English Using External Equipments SET 2 3 LINE Source selector Listening to External Equipment You can listen to the external equipment such as MD recorder, tape deck or other auxiliary. ❑ First make sure that the external equipment is properly connected to the System. (See page 8). 1 2 Set the VOLUME control to the minimum position. Changing the Equipment’s Name You can change the equipment’s name according to the equipment to be used.
English FS-X1-3(US)_E.book Page 21 Friday, April 18, 2003 7:27 PM Using External Equipments Recording the System’s Source to External Equipment You can record the System’s source to external equipment which is connected to the LINE OUT or OPTICAL DIGITAL OUT terminal of the System, such as tape deck or MD recorder, etc.
FS-X1-3(US)_E.book Page 22 Friday, April 18, 2003 7:27 PM English Using the Timers STANDBY/ON CANCEL SET 3 2 CLOCK/TIMER SLEEP DAILY indicator Clock indicator SLEEP indicator * When the System is in use, the display shows other items as well. For simplicity, we show here only the items described in this section. The timers let you control listening functions automatically.
English FS-X1-3(US)_E.book Page 23 Friday, April 18, 2003 7:27 PM Using the Timers 3 Press the SET button. Example: The minute digits of the time indication blink on the display. • To return to the hour setting, press the CANCEL button. 4 5 Alternates Press the 3 or 2 button to set the minute. Press the SET button. “ADJUST OK!” appears on the display. The Clock indicator ( ) remains lit. Then, the selected time is set and the seconds start counting from 0.
Using the Timers 2. Press the 3 or 2 button to set the minute, then press the SET button. On the Remote Control 1 Press the CLOCK/TIMER button repeatedly until “ON (time)” appears on the display. At this time, “DAILY” indicator blinks on the display. Each time you press the button, the display changes as follows.
English FS-X1-3(US)_E.book Page 25 Friday, April 18, 2003 7:27 PM Using the Timers 5 Setting the volume level. Press the 3 or 2 button to select the volume level (VOLUME 1-50), then press the SET button. 6 Select the FADE function. 7 Press the SET button. Press the 3 or 2 button to select either “FADE” (fades in at power on) or “NoFADE” (does not fade in). The timer setting is completed, and the “DAILY” indicator stops blinking and remains lit.
Using the Timers Setting the SLEEP Timer Timer Priority Use the Sleep Timer to turn the System off after a certain number of minutes when it is playing. By setting the Sleep Timer, you can fall asleep to music and know that your System will turn off by itself rather than play all night. • You can only set the Sleep Timer when the System is on. The timer that will turn off earlier has the priority. You will see the priority from the following examples.
English FS-X1-3(US)_E.book Page 27 Friday, April 18, 2003 7:27 PM Troubleshooting • If you are having a problem with your System, check this list for a possible solution before calling for service. • If you cannot solve the problem from the hints given here “ERROR!” appears on the display, or the System has been physically damaged, call a qualified person, such as your dealer, for service. Symptom No sound is heard. Poor radio reception Stereo effect is lost in FM broadcast. The CD skips.
Care And Maintenance Handle your CDs carefully, and they will last a long time. Compact Discs • Only CDs bearing these marks can be used with this System. However, continued use of irregular shape CDs (heart-shape, octagonal, etc.) can damage the System. - DO NOT wipe it with a hard cloth. - DO NOT wipe it strong. - DO NOT wipe it with thinner or benzine. - DO NOT apply any volatile substance such as insecticides to it. - DO NOT allow any rubber or plastic to remain in contact with it for a long time.
English FS-X1-3(US)_E.book Page 29 Friday, April 18, 2003 7:27 PM Specifications CA-FSX1/CA-FSX3 Amplifier Output Power :60 W (30 W + 30 W) at 4 Ω (10% THD) Input Sensitivity/ Impedance (1 kHz) LINE IN :210 mV/51 kΩ (LEVEL 1) 520 mV/51 kΩ (LEVEL 2) Output Sensitivity/ Impedance (1 kHz) LINE OUT :600 mV/5.1 kΩ OPTICAL DIGITAL :–23 dBm - –15 dBm OUT Speaker terminals :MIN. 4 Ω Subwoofer out :220 mV/4.
FS-X1-3(US)_E.
FS-X1-3(UW)_E.book Page 1 Thursday, April 10, 2003 4:06 PM COMPACT COMPONENT SYSTEM SISTEMAS DE COMPONENTES COMPACTOS SISTEMA DE COMPONENTES COMPACTOS FS-X1/FS-X3 Consists of CA-FSX1 and SP-FSX1, Consists of CA-FSX3 and SP-FSX3 Consiste de CA-FSX1 y SP-FSX1, Consiste de CA-FSX3 y SP-FSX3 Consiste em CA-FSX1 e SP-FSX1, Consiste em CA-FSX3 e SP-FSX3 SP-FSX1 SP-FSX3 CA-FSX1 SP-FSX1 CA-FSX3 SP-FSX3 INSTRUCTIONS MANUAL DE INSTRUCCIONES INSTRUÇÕES For Customer Use: Enter below the Model No.
FS-X1-3(UW)_E.book Page 1 Thursday, April 10, 2003 4:06 PM Warnings, Cautions and Others Avisos, precauciones y otras notas Advertências, Cuidado e outras notas CAUTION To reduce the risk of electrical shocks, fire, etc.: 1. Do not remove screws, covers or cabinet. 2. Do not expose this appliance to rain or moisture. PRECAUCIÓN Para reducir riesgos de choques eléctricos, incendio, etc.: 1. No extraiga los tornillos, los cubiertas ni la caja. 2. No exponga este aparato a la lluvia o a la humedad.
FS-X1-3(UW)_E.book Page 2 Thursday, April 10, 2003 4:06 PM Caution: Proper Ventilation To avoid risk of electric shock and fire, and to prevent damage, locate the apparatus as follows: 1 Front: No obstructions and open spacing. 2 Sides/ Top/ Back: No obstructions should be placed in the areas shown by the dimensions below. 3 Bottom: Place on the level surface. Maintain an adequate air path for ventilation by placing on a stand with a height of 10 cm or more.
FS-X1-3(UW)_E.book Page 1 Thursday, April 10, 2003 4:06 PM English Introduction Thank you for purchasing the JVC Compact Component System. We hope it will be a valued addition to your home, giving you years of enjoyment. Be sure to read this instruction manual carefully before operating your new stereo system. In it you will find all the information you need to set up and use the system. If you have a query that is not answered by the manual, please contact your dealer.
FS-X1-3(UW)_E.book Page 2 Thursday, April 10, 2003 4:06 PM English Table of Contents Introduction ........................................................................................................ 1 Features ...................................................................................................................................... 1 How This Manual Is Organized ................................................................................................. 1 WARNINGS .....................
FS-X1-3(UW)_E.book Page 3 Thursday, April 10, 2003 4:06 PM English Table of Contents Setting the Daily Timer ............................................................................................................ 23 Setting the SLEEP Timer ......................................................................................................... 26 Timer Priority...........................................................................................................................
FS-X1-3(UW)_E.book Page 4 Thursday, April 10, 2003 4:06 PM English Getting Started Accessories Make sure that you have all of the following items, which are supplied with the System. FM Wire Antenna (1) AM Loop Antenna (1) Remote Control (1) Batteries (2) Speaker Cords (2) AC plug adaptor (1) If any of these items are missing, contact your dealer immediately. How To Put Batteries In the Remote Control Match the polarity (+ and –) on the batteries with the + and – markings in the battery compartment.
FS-X1-3(UW)_E.book Page 5 Thursday, April 10, 2003 4:06 PM English Getting Started CAUTION: • Make all connections before plugging the System into an AC power outlet. Connecting the FM Antenna Rear Panel of the Center Unit (CA-FSX1/CA-FSX3) (on the side panel) Using the Supplied Wire Antenna If reception is poor, connect the outdoor antenna.
FS-X1-3(UW)_E.book Page 6 Thursday, April 10, 2003 4:06 PM English Getting Started Connecting the AM Antenna Rear Panel of the Center Unit (CA-FSX1/CA-FSX3) AM loop antenna (Supplied) Attach the AM loop to its base by snapping the tabs on the loop into the slot in the base. Outdoor single vinyl-covered wire (not supplied) Turn the loop until you have the best reception. • If the AM loop antenna wire is covered with vinyl, remove the vinyl by twisting it as shown in the diagram.
FS-X1-3(UW)_E.book Page 7 Thursday, April 10, 2003 4:06 PM English Getting Started Connecting the Speakers (SP-FSX1/SP-FSX3) These speakers are exclusively for this system. Using with other devices will damage the speakers. Connect the speaker cords between the speaker terminals of the Unit and those of the Speakers. • When inserting the speaker wire lead, open the speaker terminal. • Connect the black cord to the ( - ) terminal and the cord without a black line to the (+) terminal.
FS-X1-3(UW)_E.book Page 8 Thursday, April 10, 2003 4:06 PM English Getting Started Removing the Speaker Grills (SP-FSX1) The speaker grills can be removed. When removing: 1. Pull the bottom towards you with your fingers. 2. Also pull the top towards you. When attaching the speaker grills: Attach the speaker grills as shown in the diagram. Connecting a Powered Subwoofer Connect a signal cord (not supplied) between the System’s SUBWOOFER terminal and the input terminal of an external subwoofer.
FS-X1-3(UW)_E.book Page 9 Thursday, April 10, 2003 4:06 PM English Getting Started Connecting an MD Recorder, etc (Optical Digital Output) Unplug the cap and connect an optical digital cord (not supplied) between the System’s OPTICAL DIGITAL OUT terminal and the input terminal of the MD recorder, etc. You can record the digital output signal from the System’s CD Player to the MD recorder, etc. Cap Optical digital cord (not supplied) MD recorder, etc.
FS-X1-3(UW)_E.book Page 10 Thursday, April 10, 2003 4:06 PM English Basic Operations STANDBY/ON CD lamp (Inside) DISPLAY CD 6 A.P. off DIMMER LINE FM/AM AHB PRO BASS/TREBLE VOLUME +,_ AHB PRO Source indicator FADE MUTING Source selector STANDBY/ON indicator VOLUME +,_ STANDBY/ON PHONES Display Turning the Power On and Off Changing the Source Turning the System On The System has four sound sources, CD, FM, AM and LINE. Select one of sources you want to listen.
FS-X1-3(UW)_E.book Page 11 Thursday, April 10, 2003 4:06 PM English Basic Operations Adjusting the Brightness (DIMMER - at Power On) You can adjust the brightness of the display. When the System is Turned On At power on, each time you press the DIMMER button on the Remote Control, the brightness changes as follows: DIMMER OFF = DIMMER 1 = DIMMER 2 = (back to the beginning) DIMMER OFF : Bright DIMMER 1 : Dark (CD lamp also becomes dark.) DIMMER 2 : Darker (CD lamp goes out.
FS-X1-3(UW)_E.book Page 12 Thursday, April 10, 2003 4:06 PM Tone Control (BASS/TREBLE) You can control the tone by changing the bass (low frequency) and treble (high frequency). On the Remote Control 1 Press the BASS/TREBLE button. Each time you press the button, the Tone Control mode changes as follows. BASS = TREBLE = Normal display = (back to the beginning) 2 While “BASS” or “TREBLE” appears on the display, press the VOLUME + or button to adjust the bass or treble level.
FS-X1-3(UW)_E.book Page 13 Thursday, April 10, 2003 4:06 PM English Using the Tuner Numeric Keys SET 2 5 3 ∞ FM/AM FM/PLAY MODE Multi-control button Source selector FM mode indicator ¢ 4 Band display, Preset channel, Frequency display * When the System is in use, the display shows other items as well. For simplicity, we show here only the items described in this section. You can listen to FM and AM stations. Stations can be tuned in manually, automatically, or from preset memory storage.
FS-X1-3(UW)_E.book Page 14 Thursday, April 10, 2003 4:06 PM ● Preset Tuning using the Remote Control (Possible only after presetting stations) Select the desired preset number using the 3 or 2 button on the Remote Control. The display will show the preset number’s band and frequency. • You can also select the desired preset number using the Numeric Keys. See “Entering the Number with the Remote Control” on page 12. (e.g. Press +10, and then 2 for number 12.
FS-X1-3(UW)_E.book Page 15 Thursday, April 10, 2003 4:06 PM English Using the Tuner Beat Cut (AM Reception) Switching the Beat Cut mode may reduce beat noise. Each time you press the FM/PLAY MODE button while receiving an AM broadcast, the Beat Cut mode changes as follows. BEAT CUT 1 = BEAT CUT 2 = BEAT CUT 3 = BEAT CUT 4 = (back to the beginning) FM/PLAY MODE Set to the position where beat noise is small. • The best position will differ depending on the AM broadcast station being received.
FS-X1-3(UW)_E.book Page 16 Thursday, April 10, 2003 4:06 PM English Using the CD Player CD DOOR 0 Numeric Keys CANCEL 5 3 ∞ SET 2 CD 6 7 CD door REPEAT FM/PLAY MODE 0 CD 6 ¢ Source selector 7 Disc indicator 4 Repeat indicator Play mode indicator * When the System is in use, the display shows other items as well. For simplicity, we show here only the items described in this section. You can use Normal, Random, Program or Repeat Play.
FS-X1-3(UW)_E.book Page 17 Thursday, April 10, 2003 4:06 PM English Using the CD Player ❑ You can insert a CD while listening to the other source. • However, while the CD door is operating (opening or closing), the other source will be muted. CAUTION: • DO NOT try to open or close the CD door by hands as it will be damaged. To Unload a CD Take out the CD as shown below.
FS-X1-3(UW)_E.book Page 18 Thursday, April 10, 2003 4:06 PM 5 Press the Numeric Keys to enter the track number you want to program (See page 12). The program order number will be assigned from “1”, if nothing is programmed yet. Example: Track number • If the total playback time of the programmed tracks exceeds 1 hour and 40 minutes, “--:--” will appear on the display. • If you try to program the 33rd track, “MEMORY FULL” appears on the display for about 2 seconds.
FS-X1-3(UW)_E.book Page 19 Thursday, April 10, 2003 4:06 PM English Using the CD Player Repeating Tracks CD DOOR LOCK You can repeat all tracks or individual track, as many times as you like. You can prevent unwanted CD ejection by locking the CD door. The CD Player works normally except CD ejection operation. During playback or in Stop mode, press the REPEAT button on the Remote Control. Each time you press the button, the Repeat mode and Repeat indicator change as follows.
FS-X1-3(UW)_E.book Page 20 Thursday, April 10, 2003 4:06 PM English Using External Equipments SET 2 3 LINE Source selector Listening to External Equipment You can listen to the external equipment such as MD recorder, tape deck or other auxiliary. ❑ First make sure that the external equipment is properly connected to the System. (See page 8). 1 2 Set the VOLUME control to the minimum position. Changing the Equipment’s Name You can change the equipment’s name according to the equipment to be used.
FS-X1-3(UW)_E.book Page 21 Thursday, April 10, 2003 4:06 PM English Using External Equipments Recording the System’s Source to External Equipment You can record the System’s source to external equipment which is connected to the LINE OUT or OPTICAL DIGITAL OUT terminal of the System, such as tape deck or MD recorder, etc.
FS-X1-3(UW)_E.book Page 22 Thursday, April 10, 2003 4:06 PM English Using the Timers STANDBY/ON CANCEL SET 3 2 CLOCK/TIMER SLEEP DAILY indicator Clock indicator SLEEP indicator * When the System is in use, the display shows other items as well. For simplicity, we show here only the items described in this section. The timers let you control listening functions automatically.
FS-X1-3(UW)_E.book Page 23 Thursday, April 10, 2003 4:06 PM English Using the Timers 3 Press the SET button. Example: The minute digits of the time indication blink on the display. • To return to the hour setting, press the CANCEL button. 4 5 Alternates Press the 3 or 2 button to set the minute. Press the SET button. “ADJUST OK!” appears on the display. The Clock indicator ( ) remains lit. Then, the selected time is set and the seconds start counting from 0.
FS-X1-3(UW)_E.book Page 24 Thursday, April 10, 2003 4:06 PM 2. Press the 3 or 2 button to set the minute, then press the SET button. On the Remote Control 1 Press the CLOCK/TIMER button repeatedly until “ON (time)” appears on the display. At this time, “DAILY” indicator blinks on the display. Each time you press the button, the display changes as follows.
FS-X1-3(UW)_E.book Page 25 Thursday, April 10, 2003 4:06 PM English Using the Timers 5 Setting the volume level. Press the 3 or 2 button to select the volume level (VOLUME 1-50), then press the SET button. 6 Select the FADE function. 7 Press the SET button. Press the 3 or 2 button to select either “FADE” (fades in at power on) or “NoFADE” (does not fade in). The timer setting is completed, and the “DAILY” indicator stops blinking and remains lit.
FS-X1-3(UW)_E.book Page 26 Thursday, April 10, 2003 4:06 PM Setting the SLEEP Timer Timer Priority Use the Sleep Timer to turn the System off after a certain number of minutes when it is playing. By setting the Sleep Timer, you can fall asleep to music and know that your System will turn off by itself rather than play all night. • You can only set the Sleep Timer when the System is on. The timer that will turn off earlier has the priority. You will see the priority from the following examples.
FS-X1-3(UW)_E.book Page 27 Thursday, April 10, 2003 4:06 PM English Troubleshooting • If you are having a problem with your System, check this list for a possible solution before calling for service. • If you cannot solve the problem from the hints given here “ERROR!” appears on the display, or the System has been physically damaged, call a qualified person, such as your dealer, for service. Symptom No sound is heard. Poor radio reception Stereo effect is lost in FM broadcast. The CD skips.
FS-X1-3(UW)_E.book Page 28 Thursday, April 10, 2003 4:06 PM Handle your CDs carefully, and they will last a long time. Compact Discs • Only CDs bearing these marks can be used with this System. However, continued use of irregular shape CDs (heart-shape, octagonal, etc.) can damage the System. - DO NOT wipe it with a hard cloth. - DO NOT wipe it strong. - DO NOT wipe it with thinner or benzine. - DO NOT apply any volatile substance such as insecticides to it.
FS-X1-3(UW)_E3.fm Page 29 Thursday, April 17, 2003 2:26 PM English Specifications CA-FSX1/CA-FSX3 Amplifier Output Power :60 W (30 W + 30 W) at 4 Ω (10% THD) Input Sensitivity/ Impedance (1 kHz) LINE IN :210 mV/51 kΩ (LEVEL 1) 520 mV/51 kΩ (LEVEL 2) Output Sensitivity/ Impedance (1 kHz) LINE OUT :600 mV/5.1 kΩ OPTICAL DIGITAL :–23 dBm - –15 dBm OUT Speaker terminals :MIN. 4 Ω Subwoofer out :220 mV/4.
FS-X1-3(UW)_E.