DLA-SH4_EN.book Page 1 Tuesday, January 15, 2008 6:07 PM Getting Started Setup PROJECTOR DLA-SH4K INSTRUCTIONS Operation and Settings Others For Customer use : Thank you for purchasing this JVC product. Please study this instruction manual carefully before starting to operate the unit, in order to use the unit correctly. We take no responsibility for any problems resulting from misuse of this unit by operating this equipment other than instructed in this manual. Enter below the serial No.
DLA-SH4_EN.book Page 2 Tuesday, January 15, 2008 6:07 PM Getting Started Safety Precautions IMPORTANT INFORMATION WARNING: TO PREVENT FIRE OR SHOCK HAZARDS, DO NOT EXPOSE THIS APPLIANCE TO RAIN OR MOISTURE. WARNING: THIS APPARATUS MUST BE EARTHED. CAUTION: To reduce the risk of electric shock, do not remove cover. Refer servicing to qualified service personnel. This projector is equipped with a 3-blade grounding type plug to satisfy FCC rule.
DLA-SH4_EN.book Page 3 Tuesday, January 15, 2008 6:07 PM - Power-supply cords should be routed so that they are not likely to be walked on or pinched by items placed upon or against them. Pay particular attention to cords at doors, plugs, receptacles, and the point where they exit from the product. - For added protection of this product during a lightning storm, or when it is left unattended and unused for long periods of time, unplug it from the wall outlet and disconnect the cable system.
DLA-SH4_EN.book Page 4 Tuesday, January 15, 2008 6:07 PM Getting Started Safety Precautions (Cont’d) POWER CONNECTION The power supply voltage rating of this product is AC110 V – 120 V, AC200 V – 240 V, the power cord attached conforms to the following power supply voltage. Use only the power cord designated by our dealer to ensure Safety and EMC. When it is used by other power supply voltage, power cable must be changed.
DLA-SH4_EN.book Page 5 Tuesday, January 15, 2008 6:07 PM EMC Supplement - This equipment is in conformity with the provisions and protection requirements of the corresponding European Directives. This equipment is designed for professional projector appliances and can be used in the following environments. ● Controlled EMC environment (for example purpose built broadcasting or recording studio), and the rural outdoors environment (far away from railways, transmitters, overhead power lines, etc).
DLA-SH4_EN.book Page 6 Tuesday, January 15, 2008 6:07 PM Getting Started Contents Getting Started Safety Precautions . . . . . . . . . . . . . . . . . . . . . . . . . . . 2 Contents . . . . . . . . . . . . . . . . . . . . . . . . . . . . . . . . . . . 6 Check the Accessories/Optional Accessories . . . . . . . 6 Optional Accessories . . . . . . . . . . . . . . . . . . . . . . . . 6 Features . . . . . . . . . . . . . . . . . . . . . . . . . . . . . . . . . . . 7 How to Read this Manual . . . . . . . . . .
DLA-SH4_EN.book Page 7 Tuesday, January 15, 2008 6:07 PM Features ● The Email feature enables you to send reports on the lamp replacement timing or error messages to a remote location. Comes with various built-in test patterns (six types including Cross Hatch, Color Bars, etc.) Ultra-high resolution, high contrast, and high quality projector Ultra-high resolution of 4096 2400 This projector comes with a newly developed 1.
DLA-SH4_EN.book Page 8 Tuesday, January 15, 2008 6:07 PM Getting Started Precautions During Use Burning-in of D-ILA Device oDo not allow the same still picture to be projected for a long time or an abnormally bright video image to be projected Do not project still images with a high brightness or high contrast on the screen for a long time. This video image could be burnt into the D-ILA device. Pay special attention when projecting video games and computer program images.
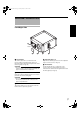
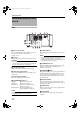
DLA-SH4_EN.book Page 9 Tuesday, January 15, 2008 6:07 PM Names and Functions of Parts Front/Right Side A Intake air Intake air B C D E A Air Inlet/Filter D Adjustable Feet (x 4) The air inlets absorb air to cool the interior of the projector. A filter is mounted inside the projector to remove dirt in the air that enters through the inlets. Clean the filter regularly. (A Page 36) Adjust the feet until the projector is level. The adjustable range is 20 mm for each.
DLA-SH4_EN.book Page 10 Tuesday, January 15, 2008 6:07 PM Getting Started Names and Functions of Parts (Cont’d) Rear F G H I J DVI 1 DVI 2 Q P O CONTROL USB Exhaust air DVI 3 LAN OPERATE I/B STANDBY/ON LAMP DVI 4 WARNING RS-232C N M L K F [DVI 1 to 4] Terminal L [LAMP] Indicator This is an input terminal for video signals. Connect it to the video output terminal of the computer. (A Page 17, 19) This indicator lights up when the lamp time exceeds 1400 hours.
DLA-SH4_EN.book Page 11 Tuesday, January 15, 2008 6:07 PM Setup Installation Please read the following carefully when installing this unit. Minimum Space Required Do not use a cover that may enclose this unit or block the air inlets/vent holes. Allow sufficient space around this unit. When this unit is enclosed in a space with dimensions as indicated below, ventilate accordingly so that the internal and external temperatures are the same.
DLA-SH4_EN.book Page 12 Tuesday, January 15, 2008 6:07 PM Setup Installation (Cont’d) Installing the Projector and Screen It is recommended that this projector be installed at right angle to the screen. You can shift the projection screen position vertically between 0 % to ±50 %, and horizontally between 0 % to ±25 %. (Lens shift feature) Projector Installation You can install this projector between 90 . Images will be properly displayed if the horizontal angle is between the range of 5 .
DLA-SH4_EN.book Page 13 Tuesday, January 15, 2008 6:07 PM When shift amount in the right direction is +25 % Movable Range of Projected Image Install the projector such that the center of the lens is aligned with the 1/4 position from the left edge of the screen. 50 % 25 % 25 % 50 % NOTE: When shift amount in the left/right direction is 0 % Install the projector such that the center of the lens is aligned with the center of the screen.
DLA-SH4_EN.book Page 14 Tuesday, January 15, 2008 6:07 PM Setup Installation (Cont’d) Installing the Projector and Screen (Cont’d) Overlaying projected images Projecting images by arranging projectors side by side The lens shift feature enables you to use up to two projectors that are arranged side by side. Arranging two projectors side by side enhances the brightness level, and helps to project images that are sufficiently bright even when the venue is relatively big or bright.
DLA-SH4_EN.book Page 15 Tuesday, January 15, 2008 6:07 PM Screen Size and Projection Distance Adjust the distance from the lens to the screen to achieve your desired screen size. This projector uses a 1.22x power zoom lens for projection. Projection Screen Size (Diagonal Length) Image Width 80" (Approx. 2.03 m) 90" (Approx. 2.29 m) Projection distance Tele End Wide End 1.75 m 3.19 m 2.58 m 1.97 m 3.60 m 2.91 m 100" (Approx. 2.54 m) 2.19 m 4.01 m 3.25 m 110" (Approx. 2.79 m) 2.41 m 4.
DLA-SH4_EN.book Page 16 Tuesday, January 15, 2008 6:07 PM Setup Connecting Video Signals of the Computer Connection During Single-Screen Mode Display The single-screen mode displays signals (up to four signals) from a computer as a single video image. To select to the single-screen mode, set “Display Mode” in the Setting menu to “Single”.
DLA-SH4_EN.book Page 17 Tuesday, January 15, 2008 6:07 PM Normal 2 Stripes DVI 1 DVI 1 DVI 3 4 Stripes DVI 1 DVI 2 Cross DVI 3 DVI 4 DVI 1 DVI 2 DVI 3 DVI 4 Connection During Single-Screen Mode Display Below is the connection example for four-channel signals from the computer. For two-channel signals from the computer, connect to the [DVI 1] and [DVI 3] terminals of this projector.
DLA-SH4_EN.book Page 18 Tuesday, January 15, 2008 6:07 PM Setup Connecting Video Signals of the Computer (Cont’d) Connection During Two-Screen/FourScreen Mode Display The two-screen/four-screen mode enables simultaneous display of signals from two or four computers. To select the two-screen mode, set “Display Mode” in the Setting menu to “Double”. To select the four-screen mode, set it to “Cross”.
DLA-SH4_EN.
DLA-SH4_EN.book Page 20 Tuesday, January 15, 2008 6:07 PM Setup Connection Using a LAN Cable You can control this projector using a computer by connecting the projector and computer to the network (LAN). Configuring the Network Settings This sections describes the procedures when the IP address is automatically assigned by the DHCP server.
DLA-SH4_EN.book Page 21 Tuesday, January 15, 2008 6:07 PM 7 Enter the IP address assigned by the DHCP server in the address field of the web browser, and click AGoB ● A login screen for this projector appears. 7 Using the Mail Delivery Feature This feature enables delivery of mail (error message) to the preset e-mail address when error occurs inside this projector unit.
DLA-SH4_EN.book Page 22 Tuesday, January 15, 2008 6:07 PM Operation and Settings 3 Adjust the zoom ratio (screen size) Projecting Image You can adjust the focus using the AZoomB item of the Lens menu. host PJ-1 user: root Logout If setting for this projector is not completed, refer to the “Setting Menu” (A Page 24) upon turning on the power and configure the settings accordingly. Once the basic settings are configured, this projector can be used by simply performing the following operation procedures.
DLA-SH4_EN.book Page 23 Tuesday, January 15, 2008 6:07 PM 5 Adjust the focus 8 Turn the main power at the rear of the You can adjust the focus using the AFocusB item of the Lens menu. To move the focus point closer: projector unit to off [O] ● The [STANDBY/ON] indicator on the projector unit goes off. Press the A+B (Near) end of AFocusB CAUTION: To move the focus point away: ● Do not turn off the main power supply switch when in the cool down mode.
DLA-SH4_EN.book Page 24 Tuesday, January 15, 2008 6:07 PM Operation and Settings Settings Menu After installation and connection are complete, perform the necessary adjustment and setting. Operate the menus using the computer’s browser to make adjustments and configure settings. Main Menu This menu displays the ON/OFF status of the power supply and information on signals input to the projector.
DLA-SH4_EN.book Page 25 Tuesday, January 15, 2008 6:07 PM Item Power Setting Value ON OFF Description For turning the power ON/OFF. ON : Turns on the power. OFF : Turns off the power. NOTE: ● The following operating modes of the projector are displayed to the right of the OFF button.
DLA-SH4_EN.book Page 26 Tuesday, January 15, 2008 6:07 PM Operation and Settings Setting Menu (Cont’d) Image Menu This menu is used for adjusting the picture quality. host PJ-1 user: root Logout Brightness Main Image Setting Red -30 Green -30 Blue -30 Red -30 Green -30 Blue -30 0 0 Convergence Lens 0 +30 +30 +30 Option Network Contrast Mail 0 0 0 Gamma A +30 +30 +30 Hide B C OFF ON Q denotes the factory default.
DLA-SH4_EN.book Page 27 Tuesday, January 15, 2008 6:07 PM Setting Menu This menu is used for specifying the input level of the terminal and the display mode. host PJ-1 user: root Logout Main Input Level Image Standard Setting Enhanced Display Mode Convergence 1 1 3 Lens 1 2 3 4 Option Network Mail Single Double Cross Q denotes the factory default.
DLA-SH4_EN.book Page 28 Tuesday, January 15, 2008 6:07 PM Operation and Settings Setting Menu (Cont’d) Convergence Menu This menu is used for correcting color shifts in the optical system. host PJ-1 user: root Logout Main Red Blue U Image U Setting Convergence Lens L R L R Option Network Mail D Item Red Blue Setting Value — — D Description For adjusting the horizontal/vertical position of red and blue colors on the image. NOTE: ● The green color value is fixed.
DLA-SH4_EN.book Page 29 Tuesday, January 15, 2008 6:07 PM Lens Menu This menu is used for adjusting the projection lens. host PJ-1 user: root Logout Main Image Zoom w Focus Shift U + Setting Convergence Lens L Option Network T R _ Mail D Item Zoom Setting Value — Description For adjusting the zoom ratio (screen size). NOTE: ● The zoom position changes each time the inner button is clicked. The zoom position changes when the outer button is depressed.
DLA-SH4_EN.book Page 30 Tuesday, January 15, 2008 6:07 PM Operation and Settings Setting Menu (Cont’d) Option Menu This menu is used for specifying settings for flipping images and screen displays. host PJ-1 user: root Logout Main Flip Horz. Image ON Vert.
DLA-SH4_EN.book Page 31 Tuesday, January 15, 2008 6:07 PM Network Menu For configuring the network settings. host PJ-1 user: root Logout Host Name Setting Main Host Name Image PJZZZZZZ SET Setting Convergence IP Address Setting DHCP Client Lens Mail Static IP IP Address 192.168.1.100 Subnet Mask 255.255.255.0 Option Network DHCP Default Gateway Mac Address 192.168.1.
DLA-SH4_EN.book Page 32 Tuesday, January 15, 2008 6:07 PM Operation and Settings Setting Menu (Cont’d) Mail Menu This menu is for configuring the mail settings, which sends out an error message to the computer of the preset address when error occurs on this projector. host PJ-1 user: root Logout Main E-Mail Setting Image E-Mail Setting E-Mail Address Convergence ON OFF user@localhost SMTP Server Address 1.1.1.1 E-Mail Auth. ON Lens Option Network Mail Auth. Type OFF PLAN LOGIN Auth.
DLA-SH4_EN.book Page 33 Tuesday, January 15, 2008 6:07 PM Q indicates the factory default Item Setting Value E-Mail Setting E-Mail E-Mail Address Description For configuring the e-mail feature. ON Q OFF — (Default Value: user@localhost) ON : Use the mail feature. OFF : Do not use the mail feature. For specifying the destination e-mail address. NOTE: ● Specify an address up to a maximum of 64 characters. ● Make use of single-byte alphanumeric characters, “-”, “.”, “_”, and “@”.
DLA-SH4_EN.book Page 34 Tuesday, January 15, 2008 6:07 PM Operation and Settings RS-232C Interface You can control this projector by connecting the computer to this unit using a RS-232C cross cable (D-sub 9 pins). The commands to control this unit and the response data format against the received commands are explained here. For details, please consult your authorized dealer.
DLA-SH4_EN.book Page 35 Tuesday, January 15, 2008 6:07 PM Parameters used for the data format The following 2 types of parameters are used for command and response data: (1) ON/OFF (2) Special Parameter Each parameter is as follows: (1) ON/OFF Shows the status (ON or OFF) of the unit, such as POWER and HIDE.
DLA-SH4_EN.book Page 36 Tuesday, January 15, 2008 6:07 PM Others Maintenance Turn off the power of the projector unit, and unplug the power cord when cleaning or replacing the filter. Cleaning and Replacing the Filter Clean the filter regularly. If the filter is soiled, air intake efficiency may deteriorate, thus resulting in malfunction of the product. Replace with a new one if the filter fails to remove dust thoroughly or if it is damaged.
DLA-SH4_EN.book Page 37 Tuesday, January 15, 2008 6:07 PM 1 Remove the filter cover The filter is located at the front and side of the projector unit. 2 Remove the sponge and filter Hold the center of the filter using your fingers, and pull the filter toward you to remove it. 3 Clean the sponge and filter Remove any dirt or dust using a vacuum cleaner. CAUTION: ● Do not clean using a flammable air duster. This may cause fire.
DLA-SH4_EN.book Page 38 Tuesday, January 15, 2008 6:07 PM Others Troubleshooting ● Device noise is heard from the interior of the projector ● There is color bleeding on the screen When the projector fails to run properly due to external noises, perform the following operations. Check the following points before sending this product for repair. The following phenomena are not malfunctions. If there is no abnormality on the screen when the phenomena below appear, they are not malfunctions.
DLA-SH4_EN.book Page 39 Tuesday, January 15, 2008 6:07 PM Symptom Probable Cause Image is unusually dark or bright ● Is the brightness level properly adjusted? Coloring of the image is poor or distorted Corrective Action Reference Page ● Adjust accordingly using ABrightnessB of the Image menu. ● Adjust “Ramp Power” in the Option menu. A Page 26 ● Is the contrast level properly adjusted? ● Adjust accordingly using AContrastB of the Image menu.
DLA-SH4_EN.book Page 40 Tuesday, January 15, 2008 6:07 PM Others What to do when these messages are displayed Messages are displayed when the lamp life has expired and when there is input of signals that cannot be used. Message Lamp Time Over Message Lamp Time Over Out of Range Cause (Details) ● Displayed when the lamp time has exceeded 1500 hours. The message is displayed for a period of 3 minutes during each projection. N Replace with a new lamp unit.
DLA-SH4_EN.book Page 41 Tuesday, January 15, 2008 6:07 PM Warnings Using Indicators The lamp time and warning mode are indicated using the indicator. For details on indicator displays during normal operation, refer to “Names and Functions of Parts”. (A Page 10) No. Indicator STANDBY/ON LAMP Description WARNING About time to replace lamp (Lamp time has exceeded 1400 hours) 1 *1 Light On — 2 When the lamp life has expired (Lamp time has exceeded 1500 hours. Message displayed.
DLA-SH4_EN.book Page 42 Tuesday, January 15, 2008 6:07 PM Others Latest Error The latest error number appears in the Main Menu when an error occurs in the projector. Error details are as follows: Error Number 42 Meaning 01 The lamp does not turn on. 02 Accumulated lamp time has exceeded 1500 hours. 06 The lamp goes off during projection. 08 Abnormal temperature in the projector. 09 Abnormal temperature around the intake vent. 0A Abnormal temperature around the exhaust vent.
DLA-SH4_EN.book Page 43 Tuesday, January 15, 2008 6:07 PM Specifications General Terminal Video input DVI-D (dual link) 24 pins (supports 12-bit extended input) 4 (supports HDCP*3) LAN RJ45 1 USB Type B (Slave) 1 RS-232C D-sub 9 pins (male) 1 Power supply AC 110 V - 120 V, AC 200 V - 240 V 50/60 Hz Accessories Power consumption 1230 W (Standby mode: 2.7 W) Power cord ......................................................................1 Current consumption Max 10.
DLA-SH4_EN.book Page 44 Tuesday, January 15, 2008 6:07 PM Others Specifications (Cont’d) Pin Assignment RS-232C Terminal 5 9 6 1 Pin No. 2 3 5 1,4,6 - 9 Signal RxD TxD GND NC Operation Incoming Data Outgoing Data Signal Ground ^ Signal Direction This Projector PC This Projector PC ^ ^ DVI-D Terminal 8 7 6 5 4 3 2 1 24 23 22 21 20 19 18 17 16 15 14 13 12 11 10 9 Pin No.
DLA-SH4_EN.book Page 45 Tuesday, January 15, 2008 6:07 PM Dimensional Outline Drawing (Unit: mm) Top Side 30 Center of gravity 827 257.6 803 688 339 199 342 - 362 404 449 677 36 M10 hole (x 12) Tightening depth: 10 - 20 127 30 663 Front Rear 457 434 Center of lens 315 136 211 317 DVI 1 DVI 2 CONTROL USB DVI 3 LAN OPERATE STANDBY/ON LAMP DVI 4 WARNING RS-232C 26 - 46 43.
DLA-SH4_EN.
DLA-SH4_EN.
DLA-SH4_EN.