cov.
E6850ED_EN.book Page 2 Friday, July 22, 2005 10:09 AM Before you start Before you start Accessories Supplied • Remote control with two R6 (AA) batteries • Instruction Manual • RF cable • Scart cable Precautions WARNING: TO REDUCE THE RISK OF FIRE OR ELECTRIC SHOCK, DO NOT EXPOSE THIS APPLIANCE TO RAIN OR MOISTURE. CAUTION RISK OF ELECTRIC SHOCK DO NOT OPEN CAUTION: TO REDUCE THE RISK OF ELECTRIC SHOCK, DO NOT REMOVE COVER (OR BACK). NO USER SERVICEABLE PARTS INSIDE.
E6850ED_EN.book Page 3 Wednesday, August 3, 2005 4:02 PM Information for Users on Disposal of Old Equipment [European Union] This symbol indicates that the electrical and electronic equipment should not be disposed as general household waste at its end-of-life. Instead, the product should be handed over to the applicable collection point for the recycling of electrical and electronic equipment for proper treatment, recovery and recycling in accordance with your national legislation.
E6850ED_EN.book Page 4 Wednesday, August 3, 2005 4:02 PM Maintenance Before you start CLEANING THE UNIT Use a soft cloth slightly moistened with a mild detergent solution. Do not use solutions containing alcohol, spirits, ammonia or abrasive. CLEANING DISCS If a disc becomes dirty, clean it with a cleaning cloth. Wipe the disc from the centre out. Do not wipe in a circular motion.
E6850ED_EN.book Page 5 Wednesday, August 3, 2005 4:02 PM Editing ...................................................46 Precautions ........................................................... 2 Disc editing ......................................................... 46 Features ................................................................ 6 Editing discs in Video mode ............................... 46 Guide to the Instruction Manual ........................... 7 Editing discs in VR mode ............
E6850ED_EN.book Page 6 Wednesday, August 3, 2005 4:02 PM Editing Before you start Features Along with playing back CDs and recording, editing, and playing back DVDs, this unit offers you the following features. Recording The unit is compatible with DVD-RW discs, which are recordable repeatedly, and DVD-R discs, which are recordable only once. Recording up to 8 programmes : You can programme the unit to record up to 8 programmes, up to a month in advance.
E6850ED_EN.book Page 7 Wednesday, August 3, 2005 4:02 PM Before you start Guide to the Instruction Manual Symbols used in the Instruction Manual To show what recording mode or disc type applies to each function, the following symbols appear at the beginning of each operating item.
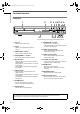
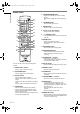
E6850ED_EN.book Page 8 Wednesday, August 3, 2005 4:02 PM Before you start Functional overview Front panel 1 2 3* 4 5 6 7* 8* 9 PR / I STANDBY/ON S-VIDEO VIDEO (MONO) L _ AUDIO _ R REC SPEED 14 13 12 11 10 15 *You can also turn on the unit by pressing these buttons. 1 Disc tray • Place a disc here when open. 2 Display • Refer to “Front Panel Display Guide” on page 14. 3 OPEN/CLOSE O button* • Press to open or close the disc tray.
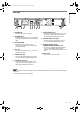
E6850ED_EN.book Page 9 Wednesday, August 3, 2005 4:02 PM Rear panel AV2 (DECODER) OUT IN (AV3) Before you start S-VIDEO IN AUDIO IN ANALOG (AV3) AUDIO OUT L L DIGITAL AUDIO OUTPUT PCM/BITSTREAM OUT 12 1 R AV1 (TV) ANTENNA 3 4 R COAXIAL 5 6 7 8 9 ANTENNA IN 10 7 • Connect to an antenna or a cable. 2 3 AV2 (DECODER) • Connect to VCR, camcorder, or other Audio-Video equipment. Use a commercially available Scart cable. 4 AV1 (TV) • Connect to the Scart jack on your TV.
E6850ED_EN.book Page 10 Wednesday, August 3, 2005 4:02 PM Remote control Before you start 5 1* 2 OPEN/ CLOSE ON SCREEN • Press once to display the SHOWVIEW setting window. • Press twice to display the Timer Programming list. SET UP 13 14 6 REPEAT ZOOM 16 7 PR CLEAR 6 7 8 SHOWVIEW/ VIDEO Plus+ TOP MENU MENU/LIST 19 ENTER RETURN 9 SLOW PLAY SLOW REC STOP PAUSE 10 REC SPEED 8 REC MONITOR 11 12 20 21 22* 23 24 25* Cursor U / D / L / P buttons • Press to select items or settings.
E6850ED_EN.book Page 11 Wednesday, August 3, 2005 4:02 PM 20 RETURN button 21 B (SKIP) button • During playback, press to skip to the previous chapter or track. • When playback is paused, press to play reverse step by step. F (SKIP) button • During playback, press to skip to the next chapter or track. • When playback is paused, press to advance step by step. 22 PLAY P button* • Press to start or resume playback. 23 SLOW /REV r button • During playback, press to reverse fast.
E6850ED_EN.book Page 12 Wednesday, August 3, 2005 4:02 PM Before you start Guide to On Screen Displays DISPLAY menu With a disc inserted into the unit, press [ON SCREEN] to display the on screen display. The menu shows information about what is recorded on the disc. 3 4 1 1 1 0:00:00 DVD-RW Video mode P22 Main 2 6 SP 1:35 5 This is an example screen for explanation. Displayed items vary depending on the actual mode. 1 Disc type and format mode.
E6850ED_EN.book Page 13 Wednesday, August 3, 2005 4:02 PM Advanced Setting Menu: CD, MP3, JPEG & Video CD You can make all the settings available as follows. CD Playback Mode Before you start Random Play Advanced Setting Menu Program Play Playback PBC(Video CD only) ON Recording Slide Show 5 sec. Display Select Video Clock Channel Disc This is an example screen for explanation. Some items will be displayed in grey depending on the inserted disc.
E6850ED_EN.book Page 14 Wednesday, August 3, 2005 4:02 PM Before you start Front Panel Display Guide 4 2 1 3 5 1 Current status of the unit DVD: p: Appears when disc playback is paused. Appears also during step by step playback. P: Appears when playing back a disc. p P : Appears during slow forward or slow reverse playback. : Appears when the timer programming or one-touch timer recording (OTR) is set and is operating. Flashes when all the timer programmes are finished.
E6850ED_EN.
E6850ED_EN.book Page 16 Wednesday, August 3, 2005 4:02 PM Recording from a camcorder or other Audio-Video equipment with no Scart output jack (AV3 or AV4) If no S-Video input jack is available, connect to VIDEO input jack on the front panel using an RCA Video cable. Change the setup when using S-VIDEO input jack. (See page 31.
E6850ED_EN.book Page 17 Wednesday, August 3, 2005 4:02 PM Selecting the on-screen display (OSD) language 1 In stop mode, press [SET UP]. 2 If you select “Advanced Setting Menu,” proceed to step 3. If you select “Easy Setting Menu,” proceed to step 4. Channel setting Tuning of this unit to broadcast channels can be performed in two ways. Auto tuning Programme the tuner to scan only the channels you can receive in your area. Select “Display” using [Cursor U / D], then press [ENTER].
E6850ED_EN.book Page 18 Wednesday, August 3, 2005 4:02 PM • If “Skip” is set to “ON,” select “Skip” using [Cursor U / D], then press [ENTER]. Select “OFF” using [Cursor U / D], then press [RETURN]. • If you want to decode scrambled signals, select “Decoder” using [Cursor U / D], then press [ENTER]. Select “ON” using [Cursor U / D], then press [RETURN]. • To store another channel, repeat steps 4 to 7. Manual tuning Manually tune each channel. 1 In stop mode, press [SET UP].
E6850ED_EN.book Page 19 Wednesday, August 3, 2005 4:02 PM Move You can replace two channels. 1 2 In stop mode, press [SET UP]. Select “Advanced Setting Menu” using [Cursor U / D], then press [ENTER]. Setting the clock Clock Setting 1 “Easy Setting Menu” or “Advanced Setting Menu” will appear. If it has already appeared, proceed to step 3. Select “Channel” using [Cursor U / D], then press [ENTER]. 4 Select “Move” using [Cursor U / D], then press [ENTER].
E6850ED_EN.book Page 20 Wednesday, August 3, 2005 4:02 PM Selecting the TV aspect ratio You can select the TV aspect ratio to match the format of the programme you are playing back with the unit and that of your TV screen (4:3 standard or 16:9 wide screen TV). Getting Started 1 2 In stop mode, press [SET UP]. Select “Advanced Setting Menu” using [Cursor U / D], then press [ENTER]. If it has already appeared, proceed to step 3. 3 Select “Playback” using [Cursor U / D], then press [ENTER].
E6850ED_EN.book Page 21 Wednesday, August 3, 2005 4:02 PM Recording Information on DVD recording Disc type Disc format Functions Video mode Playing back, Limited recording, Limited editing Video DVD-RW Type of discs VR mode This unit can record on DVD-R and DVD-RW. You can record on DVD-R only once. On DVD-RW, you can record and erase many times. It is possible to record on DVD-R only in Video mode. DVD-RW can record in the format you select from Video mode or VR mode.
E6850ED_EN.book Page 22 Wednesday, August 3, 2005 4:02 PM Information on copy control Some satellite broadcasts include copy-protected information. If you wish to record them, refer to the following. Disc type / format VR Copy- Copy- Copyfree once prohibited ver.1.1 / ver. 1.2 DVD-RW ver.1.1 / ver. 1.2 CPRM compatible Video ver.1.1 / ver. 1.2 DVD-RW ver.1.1 / ver. 1.2 CPRM compatible DVD-R ver.2.0 Recordable Not Recordable Note Recording • This unit cannot record on CD-RW or CD-R discs.
E6850ED_EN.book Page 23 Wednesday, August 3, 2005 4:02 PM Formatting a disc Choosing the recording format of a blank DVD-RW disc Video VR DVD-RW DVD-RW When inserting a blank disc, the unit automatically starts to initialise the disc. You can also manually format a DVD-RW disc once it has been used. After formatting, you can record on the disc with the recording format selected in the Setting menu.
E6850ED_EN.book Page 24 Wednesday, August 3, 2005 4:02 PM Reformatting a disc manually Video VR DVD-RW DVD-RW If you are using a DVD-RW disc, you can format the disc by performing “Format.” By default it will be in Video mode. You can change this to VR mode using the Setting menu. Note Selecting the Sound mode This unit can receive bilingual broadcasts. You can switch between modes by pressing [AUDIO] on the remote control. Each mode is indicated on the TV screen as follows.
E6850ED_EN.book Page 25 Wednesday, August 3, 2005 4:02 PM External input Audio Stereo Basic recording Bilingual Video VR DVD-RW DVD-RW DVD-R Follow the steps below to record a TV programme. 1 6 Make sure that the TV input is set on the unit. This operation may take a few moments to complete. Press [SET UP] to exit. 2 Hint • If you select “Stereo”: The audio will be recorded as “stereo audio.” Setting Bilingual Recording Audio Make sure that the recording format is set to the desired mode.
E6850ED_EN.book Page 26 Wednesday, August 3, 2005 4:02 PM Checking the recording picture and sound quality Video VR DVD-RW DVD-RW DVD-R Before recording on a DVD, you can confirm the quality of the picture and sound with the recording speed you selected. 1 2 Recording SP LP EP SLP SEP • You cannot change the recording speed during recording. Press [REC MONITOR] again to exit. Hint • If you press [REC MONITOR] while receiving the bilingual broadcast, the sound to be recorded will be output.
E6850ED_EN.book Page 27 Wednesday, August 3, 2005 4:02 PM 7 Enter the time to start and to end using [Cursor U / D], then press [Cursor P]. 8 Select the channel number to record using [Cursor U / D], then press [Cursor P]. Timer recording Video VR DVD-RW DVD-RW DVD-R You can set the unit to record up to 8 programmes, up to a month in advance. Daily or weekly programme recordings are also available. • Be sure to set the clock before entering a timer programming.
E6850ED_EN.book Page 28 Wednesday, August 3, 2005 4:02 PM Checking, cancelling, or correcting the timer programming information If the timer programming did not complete correctly In the following example, No. 5 timer programming overlaps on No. 1 and No. 6 timer programmes. In such a case, you should correct the programme time to clear the overlap. The error number appears on the timer programming list. Timer Programming Date Timer Programming Date 1. 01/01 1. 01/01 Start End CH Speed 2.
E6850ED_EN.book Page 29 Wednesday, August 3, 2005 4:02 PM 4 Timer recording using the SHOWVIEW® system Select a recording channel using [Cursor U / D], then press [Cursor P]. You can programme the timer using the SHOWVIEW programming numbers that are printed in your local TV guide magazine. Timer Programming Date Start End CH Speed 1. Daily 7:30 14:15 P08 LP 2. - - - 1 2 In stop mode, press [the SHOWVIEW button]. 3.
E6850ED_EN.book Page 30 Wednesday, August 3, 2005 4:02 PM Hints for timer recording Recording • If there is a power failure or the unit is unplugged for more than 30 seconds, the clock setting and all timer settings will be lost. • If there is no disc or an unrecordable disc in the tray, the icon will flash and timer recording will not occur. Insert a recordable disc. • When all timer recordings are complete, the icon flashes.
E6850ED_EN.book Page 31 Wednesday, August 3, 2005 4:02 PM Settings for external equipment Connection to external equipment Video VR DVD-RW DVD-RW DVD-R Connect the external equipment using either the input jacks, AV1, AV2, AV3 (Rear) or AV4 (Front). However, for AV4 jacks, you have to select S-VIDEO input or VIDEO input jacks depending on the connected devices. Use commercially available Scart, S-Video or Video cable and an Audio cable for this connection. 1 2 In stop mode, press [SET UP].
E6850ED_EN.book Page 32 Wednesday, August 3, 2005 4:02 PM Setting a disc to protect Finalising discs VR DVD-RW To prevent accidental over-recording, editing or erasing of recordings, you can protect them using the Setting menu. Video “Easy Setting Menu” or “Advanced Setting Menu” will appear. 2 Select “Disc” using [Cursor U / D], then press [ENTER]. Insert a recordable disc before finalising. 3 Select “Disc Protect OFF → ON” using [Cursor U / D], then press [ENTER].
E6850ED_EN.book Page 33 Wednesday, August 3, 2005 4:02 PM To cancel finalising (DVD-RW only): At step 4, press [STOP S], select “Yes,” then press [ENTER]. Finalising is cancelled and the unit switches to stop mode. Auto finalise Video DVD-RW DVD-R You can finalise discs automatically when the disc space runs out if you set this in the Setting menu. 1 2 Do you want to cancel ? Yes No In stop mode, press [SET UP]. Select “Advanced Setting Menu” using [Cursor U / D], then press [ENTER].
E6850ED_EN.book Page 34 Wednesday, August 3, 2005 4:02 PM Playing back discs Disc Information on playing back DVDs Read the following information before you play back a DVD. Playable discs You can play back all the discs listed on the right. Before attempting to play back a DVD, make sure it meets the requirements for Region Codes and Colour Systems as described in this section. Discs that bear any of the logos shown below will be played back correctly in this unit.
E6850ED_EN.book Page 35 Wednesday, August 3, 2005 4:02 PM 7 To eject the disc, press [OPEN/CLOSE O] to open the disc tray, then remove the disc. Press [OPEN/CLOSE O] to close the disc tray before turning off the unit. Basic playback Hint for DVD playback The contents of a DVD are generally divided into titles. Titles are sometimes further subdivided into chapters. Start Rec. Stop/Start Title 1 Press [STOP S] to stop playback. Stop Rec.
E6850ED_EN.book Page 36 Wednesday, August 3, 2005 4:02 PM 2 Press [Cursor U / D] to select the desired folder (group) or file (track), then press [ENTER]. If a file is selected: Playback will start. If a folder is selected: The files in the folder will appear. Press [Cursor U / D] to select the track or folder you want, then press [ENTER]. • Press [PLAY P], [ENTER] or [Cursor P] to move to any lower folders. • Press [Cursor L] or [RETURN] to move back to the folder above.
E6850ED_EN.book Page 37 Wednesday, August 3, 2005 4:02 PM Playing back a disc using the title menu DVD-V Some DVDs have a title menu, which lists the titles available on the DVD. You can start playing back such discs at a specific title. 1 Press [TOP MENU]. The title menu will appear. If the feature is not available, the TV screen. 2 may appear on Select a desired item using [Cursor U / D / L / P], then press [ENTER]. The disc will start playing back at the title you selected.
E6850ED_EN.book Page 38 Wednesday, August 3, 2005 4:02 PM Cancelling and Recalling the PBC function Special playback Insert a Video CD. Resume playback 1 2 3 In stop mode, press [SET UP]. DVD-V “Easy Setting Menu” or “Advanced Setting Menu” will appear. DVD+R DVD+RW VD+RW W Select “CD Playback Mode” using [Cursor U / D], then press [ENTER]. Select “PBC (Video CD only)” using [Cursor U / D], then press [ENTER].
E6850ED_EN.book Page 39 Wednesday, August 3, 2005 4:02 PM Hint • Forward / reverse speeds are indicated with icons as follows. Forward (Approx. Speed): x1.5: x20: x40: Reverse (Approx. Speed): x5: x20: x40: Step by step playback DVD-V DVD+R DVD+RW VD+RW W 1 2 Press and hold [F] to continue going forward. To continue going backward, press and hold [B]. 3 ]. Normal playback will start 30-second advanced point from the point at which you press [ ].
E6850ED_EN.book Page 40 Wednesday, August 3, 2005 4:02 PM Zoom DVD-V Marker Setup Video VR DVD-RW DVD-RW DVD+R DVD+RW VD+RW W 1 DVD+R DVD+R VCD DVD-R DVD-V JPEG Video VR DVD-RW DVD-RW DVD+R DVD+RW VD+RW W DVD+R DVD+R DVD-R VCD CD (PBC OFF) During playback, press [ZOOM]. 1 1 0:00:00 DVD-Video 1.2 1.5 2.0 Four options are available, x1.0, x1.2, x1.5 and x2.0. These are displayed excluding the current zoom rate. You can assign a specific point on a disc to return later.
E6850ED_EN.book Page 41 Wednesday, August 3, 2005 4:02 PM Track search Search CD Title / Chapter search DVD-V DVD+R DVD+RW VD+RW W Video VR DVD-RW DVD-RW DVD-R 1 DVD+R DVD+R To go back to the previous title or chapter, press [B] repeatedly. Using the [ON SCREEN] button During playback, press [ON SCREEN]. 2 Select the icon using [Cursor L / P], then press [ENTER]. Using the [ON SCREEN] button 1 During playback, press [ON SCREEN]. 2 Select the icon using [Cursor L / P], then press [ENTER].
E6850ED_EN.book Page 42 Wednesday, August 3, 2005 4:02 PM Time search DVD-V DVD+R DVD+RW VD+RW W Video VR DVD-RW DVD-RW DVD+R DVD+R Repeat / Random / Program playback / Slide Show DVD-R VCD CD (PBC OFF) 1 2 Repeat playback During playback, press [ON SCREEN]. DVD-V Select the icon using [Cursor L / P], then press [ENTER]. DVD+R DVD+RW VD+RW W Press [Cursor L / P] to highlight . Enter the desired time to search for using [Cursor U / D] or [the Number buttons], then press [ENTER].
34_45_PlayingDiscs_EN.fm Page 43 Wednesday, August 3, 2005 5:48 PM 2 Note • You can only set A-B repeat playback within the current title (for DVDs) or current track (for Audio CDs and Video CDs). • You cannot select “Group” during the random playback of MP3 files. • For Video CDs with PBC function, repeat playback does not work while the PBC function is on. Select “Program Play” using [Cursor U / D], then press [ENTER].
E6850ED_EN.book Page 44 Wednesday, August 3, 2005 4:02 PM Selecting the format of audio and video You can select the format of audio and video to suit the content of the disc you are playing back. Switching audio soundtrack VR DVD-V DVD-RW CD VCD Playing back discs 2 Select the icon using [Cursor L / P], then press [ENTER]. 3 Select a desired audio soundtrack or audio channel using [Cursor U / D], then press [ENTER]. With a DVD-Video: Audio soundtrack will switch.
E6850ED_EN.book Page 45 Wednesday, August 3, 2005 4:02 PM Switching camera angles Reducing block noise DVD-V Some DVD-Videos feature scenes shot from two or more angles. The disc case is usually marked with an angle icon if the disc has multi-angle scenes. 1 During playback, press [ON SCREEN]. The angle icon appears when a switching camera angle is available. (Available only when the angle icon appears in bottom right on the TV screen.) 2 Select the icon using [Cursor L / P], then press [ENTER].
E6850ED_EN.book Page 46 Wednesday, August 3, 2005 4:02 PM Editing Disc editing Editing discs in Video mode You can edit a disc recorded using the PAL system. It is not possible to edit discs recorded using the NTSC system. You can edit the following disc items in Video mode. • Deleting titles (See below.) • Editing titles (See page 47.) • Setting or clearing chapter markers (See page 48.) Guide to a title list Note The title list enables you to check the titles recorded on a disc easily.
E6850ED_EN.book Page 47 Wednesday, August 3, 2005 4:02 PM 4 Select the desired title using [Cursor U / D / L / P], then press [ENTER]. 3 2 Select “Edit Title Name” using [Cursor U / D], then press [ENTER]. A window for entering the title name will appear. 3 Title List 1 2 To enter the title name, refer to “Guide to editing title names” on this page. Title List - Edit Title Name 15/04 19:00 P12 XP 4 5 6 5 6 Select “Title Delete” using [Cursor U / D], then press [ENTER].
E6850ED_EN.book Page 48 Wednesday, August 3, 2005 4:02 PM 7 Note • To delete letters, press [CLEAR] repeatedly. Press and hold [CLEAR] to delete all letters. • To move on to the next set of letters, press [Cursor P]. • You can enter up to 30 letters. • Unrecognisable characters will be replaced with asterisks (*). If you delete them, adjoining characters may change to asterisks (*) or other. Select “Yes” using [Cursor U / D], then press [ENTER].
E6850ED_EN.book Page 49 Wednesday, August 3, 2005 4:02 PM Editing discs in VR mode Original Editing Original titles in VR mode For discs in VR mode, you can edit from the “Original” menu or the “Playlist” menu that you create from the original. Insert a recordable disc before editing. Editing original titles Original Original Deleting titles You can perform the following operations on the original titles. • Deleting titles (See this page.) • Protecting titles (See page 50.
E6850ED_EN.book Page 50 Wednesday, August 3, 2005 4:02 PM Original Protecting titles VR DVD-RW To prevent the accidental editing or erasing of the titles, you can protect them in the original menu. 1 In stop mode, press [SET UP]. “Easy Setting Menu” or “Advanced Setting Menu” will appear. 2 Select “Disc” using [Cursor U / D], then press [ENTER]. 3 Select “Original” using [Cursor U / D], then press [ENTER]. 4 Select the desired title using [Cursor U / D / L / P], then press [ENTER].
E6850ED_EN.book Page 51 Wednesday, August 3, 2005 4:02 PM Playlist Editing the Playlist in VR mode Note • When you play back the disc of which the playlist is edited, select “Playlist” in the title menu. Insert a recordable disc before editing. Playlist Deleting titles VR DVD-RW In VR mode, even when a title is deleted from the Playlist, the original title will remain in the Original list. The recordable disc space to record will not increase.
E6850ED_EN.book Page 52 Wednesday, August 3, 2005 4:02 PM Playlist Editing titles 3 Use [B / F], [REV r], [FWD f], [PLAY P] and [PAUSE p] to find the point where you will create a new chapter marker. Or, use [B / F] to find a chapter marker that you wish to delete. 4 Select “Add” or “Delete” accordingly using [Cursor U / D], then press [ENTER]. VR DVD-RW You can edit the title names from this menu. The names you edit will appear on the title list.
E6850ED_EN.book Page 53 Wednesday, August 3, 2005 4:02 PM Playlist Setting pictures as thumbnails VR DVD-RW You can set a picture as a thumbnail for each title. This helps you to remember the content of the title without having to play it back. The first picture of the title is selected as the default. 1 Follow steps 1 to 4 in “ Playlist Deleting titles.” 2 Use [B / F], [REV r], [FWD f], [PLAY P] and [PAUSE p] to find the picture you want to set as a thumbnail, then press [ENTER].
E6850ED_EN.book Page 54 Wednesday, August 3, 2005 4:02 PM Playlist Combining titles 3 Select the desired title using [Cursor U / D / L / P], then press [ENTER]. 4 Press [SET UP]. VR DVD-RW You can combine two titles into a single title. 1 Follow steps 1 to 4 in “ Playlist Deleting titles.” 2 Select “Title Combining” using [Cursor U / D], then press [ENTER]. 3 Select another title to combine using [Cursor U / D / L / P], then press [ENTER].
E6850ED_EN.book Page 55 Wednesday, August 3, 2005 4:02 PM Changing the Setting menu Tour of the Setting menu The following table shows the items you can set and their default settings. Use the table as a reference for efficient operation. Setting menu Language setting page 56 Display setting page 57 Audio setting pages 57-58 Parental setting pages 59-60 Menu items Default Disc Menu Language English Sets the disc menu language. Audio Language Original Sets the audio language.
E6850ED_EN.book Page 56 Wednesday, August 3, 2005 4:02 PM If “Other” is selected, enter the appropriate 4-digit code using [the Number buttons]. Language setting 1 In stop mode, press [SET UP]. 2 Select “Advanced Setting Menu” Refer to the language code table on page 64. Subtitle Language using [Cursor U / D], then press [ENTER]. Code Input 4 7 4 If it has already appeared, proceed to step 3. 3 Select “Playback” using [Cursor U / D], then press [ENTER].
E6850ED_EN.book Page 57 Wednesday, August 3, 2005 4:02 PM Display setting 1 In stop mode, press [SET UP]. 2 Select “Advanced Setting Menu” using [Cursor U / D], then press [ENTER]. If it has already appeared, proceed to step 3. 3 Select “Display” using [Cursor U / D], then press [ENTER]. 4 Select the desired item using [Cursor U / D], then press [ENTER]. OSD Language (Default: English) Set the OSD language. See page 17 for details.
E6850ED_EN.book Page 58 Wednesday, August 3, 2005 4:02 PM Note When playing back a disc with copyright protection: • Even if you select “96kHz,” the sound is down sampled to 48 kHz. Settings for DTS (Default: ON) Digital Out - DTS ON Dolby Digital conversion (Default: Stream) OFF Digital Out - Dolby Digital PCM Stream Select a setting using [Cursor U / D], then press [ENTER]. Your setting is activated. Select a setting using [Cursor U / D], then press [ENTER]. Your setting is activated.
E6850ED_EN.book Page 59 Wednesday, August 3, 2005 4:02 PM Parental level All: All parental locks are cancelled. 8: DVD software of any grade (adult / general / children) can be played back. 7 to 2: Only DVD software intended for general use and children can be played back. 1: Only DVD softwares intended for children can be played back. DVD-Videos Parental lock level Some DVD-Videos feature a Parental Lock function. If the rating of the inserted disc exceeds the level you set, playback will stop.
E6850ED_EN.book Page 60 Wednesday, August 3, 2005 4:02 PM Note • Press [CLEAR] to erase numbers entered incorrectly. • If you forget your password or you want to clear all settings in Parental lock, enter [4], [7], [3], [7] using [the Number buttons] at the option window. Your password is cleared and parental levels are set to “All.” Changing Video Out system Setting TV system 1 2 In stop mode, press [SET UP]. Select “Advanced Setting Menu” using [Cursor U / D], then press [ENTER].
E6850ED_EN.book Page 61 Wednesday, August 3, 2005 4:02 PM Others Troubleshooting Before requesting service for this unit, check the table below for a possible cause of the problem you are experiencing. Some simple checks or a minor adjustment by you may eliminate the problem and restore correct operation. Symptom Remedy Power The power does not turn on. • Check the mains cable is connected securely. • Check building circuit the breaker (in case of power failure) . There is no picture.
E6850ED_EN.book Page 62 Wednesday, August 3, 2005 4:02 PM Symptom Playback The unit does not play back the disc. Remedy • No disc is inserted. • A blank disc is inserted. • The disc is upside down. Insert the disc with the labelled side facing up. • The disc is not correctly inserted. • The unit cannot play back certain discs (such as a CD-ROM). (See page 34.) • The region codes on the DVD-Video and the unit are not matched. (See page 34.) • Moisture has condensed inside the unit.
E6850ED_EN.book Page 63 Wednesday, August 3, 2005 4:02 PM Error message Cause Solution • An unplayable disc is inserted in the unit. • The disc is upside down. • Insert a standard disc shown in “Playable discs.” (See page 34.) • Insert the disc with the labelled side facing up. Region Error — Please eject the disc. — Playback is not authorized in your region. • Playback is not authorized in the region of the DVD-Video that you inserted in the unit. • Insert a DVD-Video with region codes 2 or ALL.
E6850ED_EN.
E6850ED_EN.book Page 65 Wednesday, August 3, 2005 4:02 PM Glossary Analogue audio An electrical signal that directly represents sound. In contrast, digital audio can also be an electrical signal, but is an indirect representation of sound. See also Digital audio. DTS (Digital Theater System) DTS is a Multi-channel surround sound system, but it is different from Dolby Digital. Both formats were developed by Digital Theater System, Inc. Aspect ratio The width of a TV screen relative to its height.
E6850ED_EN.book Page 66 Wednesday, August 3, 2005 4:02 PM Specifications General System DVD-Video, DVD-RW / R, DVD+RW / R, CD-DA, CD-RW / R Power requirements 220–240 V Power consumption 25 W (standby: 5.0 W) Weight 2.4 kg ± 10%, 50 Hz ± 0.
E6850ED_EN.
cov.