Master Page: Cover1 CU-VH1US.book Page 1 Tuesday, July 6, 2004 6:50 PM ENGLISH DIGITAL HD PLAYER CU-VH1 GETTING STARTED 11 VIDEO PLAYBACK 18 DIGITAL STILL CAMERA (D.S.C.) PLAYBACK 22 ADVANCED FEATURES 28 REFERENCES 44 TERMS 61 Please visit our Homepage on the World Wide Web for Digital Video Camera: http://www.jvc.co.jp/english/cyber/ For Accessories: http://www.jvc.co.jp/english/accessory/ INSTRUCTIONS For Customer Use: Enter below the Model No. and Serial No.
Master Page: Left-Safety-Dummy CU-VH1US.book Page 2 Friday, November 28, 2003 8:01 PM 2 EN Dear Customer, Thank you for purchasing this digital HD player. Before use, please read the safety information and precautions contained in the following pages to ensure safe use of this product. Using This Instruction Manual ● All major sections are listed in the Table Of Contents on the cover page. ● Notes appear after most subsections. Be sure to read these as well.
Master Page: Right-Safety CU-VH1US.book Page 3 Friday, November 28, 2003 8:01 PM EN 3 When the equipment is installed in a cabinet or on a shelf, make sure that it has sufficient space on all sides to allow for ventilation (10 cm (3-15/16”) or more on both sides, on top and at the rear). Do not block the ventilation holes. (If the ventilation holes are blocked by a newspaper, or cloth etc. the heat may not be able to get out.
Master Page: Left-Safety CU-VH1US.book Page 4 Friday, November 28, 2003 8:01 PM 4 EN IMPORTANT PRODUCT SAFETY INSTRUCTIONS Electrical energy can perform many useful functions. But improper use can result in potential electrical shock or fire hazards. This product has been engineered and manufactured to assure your personal safety. In order not to defeat the built-in safeguards, observe the following basic rules for its installation, use and servicing.
Master Page: Right-Safety CU-VH1US.book Page 5 Friday, November 28, 2003 8:01 PM EN 5 USE SERVICING 1. Accessories To avoid personal injury: ● Do not place this product on an unstable cart, stand, tripod, bracket or table. It may fall, causing serious injury to a child or adult, and serious damage to the product. ● Use only with a cart, stand, tripod, bracket, or table recommended by the manufacturer or sold with the product.
Master Page: Left-Safety CU-VH1US.book Page 6 Friday, November 28, 2003 8:01 PM 6 EN SAFETY PRECAUTIONS CAUTION! The following notes concern possible physical damage to the player and to the user. When carrying, be sure to always securely attach and use the provided strap. Carrying or holding the player by the LCD monitor can result in dropping the unit, or in a malfunction. Take care not to get your finger caught in the cassette holder cover.
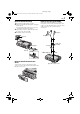
Master Page: Right CU-VH1US_03Acce.fm Page 7 Thursday, December 4, 2003 5:59 PM EN 7 Provided Accessories AC Power Adapter/ Charger AA-V40U DC Cord Battery Pack BN-V416U Audio/Video Cable (RCA plug to RCA plug) S-Video Cable Component Video Cable USB Cable Audio Cable x 2 (for connection of optional headphones and external microphone 墌 pg. 9) 9 2 w 6 0 4 3 e 5 T W Shoulder Strap (墌 pg.
Master Page: Left CU-VH1US.book Page 8 Friday, November 28, 2003 8:01 PM 8 EN How To Attach The Core Filter 3 Close the core filter until it clicks shut. Attach the core filters to the cables. The core filter reduces interference. Types of core filters Size Cable Large (A) Audio/video cable S-video cable Times to wind Once Large (B) i.LINK cable* Twice Medium USB cable** Once Small DC cord Audio cable Once * Optional (If you have an optional JVC i.
Master Page: Right CU-VH1US_03Acce.fm Page 9 Thursday, December 4, 2003 6:02 PM EN 9 How To Attach The Strap How To Use The Audio Cable 1 2 Thread the strap through the eyelet a. When using optional headphones or external microphone, connect to the provided audio cable (with a core filter attached), then connect the audio cable to the player. The core filter reduces interference. 3 Repeat the procedure to attach the other end of the strap to the other eyelet b. 4 Confirm the strap is not twisted.
Master Page: Left CU-VH1US_04TOC.fm Page 10 Thursday, December 4, 2003 5:35 PM 10 EN GETTING STARTED CONTENTS 11 Power .......................................................................11 Operation Mode .......................................................13 LCD Monitor ............................................................14 Brightness Adjustment Of The Display ......................14 Date/Time Settings ....................................................
Master Page: Right-start CU-VH1US.book Page 11 Friday, November 28, 2003 8:01 PM EN Power This player’s 2-way power supply system lets you choose the most appropriate source of power. Do not use provided power supply units with other equipment. 11 ● If the battery operation time remains extremely short even after having been fully charged, the battery is worn out and needs to be replaced. Please purchase a new one. ● For other notes, 墌 pg. 44.
Master Page: Left CU-VH1US_05Start-Video.fm Page 12 Thursday, December 4, 2003 5:36 PM 12 EN Using AC Power About Batteries Open the cover. Mark Lithium-ion is vulnerable in colder temperatures. To DC connector To AC outlet Power cord AC Power Adapter/ Charger To DC OUT connector DC cord 1 Make sure you unplug the player’s DC cord from the AC Power Adapter/Charger. 2 Connect the AC Power Adapter/Charger to the player as shown in the illustration above.
Master Page: Right CU-VH1US_05Start-Video.fm Page 13 Thursday, December 4, 2003 5:59 PM EN Operation Mode 13 Playback Mode Switch Position To turn on the player, set the Power Switch to “ON” while pressing down the Lock Button located on the switch. Video Output Mode Switch VIDEO: Allows you to play back a tape. MEMORY: Allows you to play back images stored in a memory card or access data stored in a memory card. COMPONENT VIDEO OUT: Allows you to output signals from the Component Video connector.
Master Page: Left CU-VH1US.book Page 14 Friday, November 28, 2003 8:01 PM 14 EN LCD Monitor Press the Monitor Opening Button and open the LCD monitor fully. To view images on the LCD monitor, set the Video Output Mode Switch to “LCD MONITOR”. (墌 pg. 13) Brightness Adjustment Of The Display 1 2 3 Set the Power Switch to “ON” while pressing down the Lock Button located on the switch. Open the LCD monitor fully. Rotate the BRIGHT Wheel until the appropriate brightness is reached.
Master Page: Right CU-VH1US_05Start-Video.fm Page 15 Monday, December 1, 2003 11:58 AM EN Date/Time Settings The date/time display can be turned on or off during playback. (墌 pg. 28, 31) 15 1 Set the Power Switch to “ON” while pressing down the Lock Button located on the switch. 2 3 Open the LCD monitor fully. 4 Press R or T to select “n” (DISPLAY), and press MENU. The DISPLAY Menu appears. 5 Press R or T to select “CLOCK ADJ.”, and press MENU. The parameter for “Month” is highlighted.
Master Page: Left CU-VH1US.book Page 16 Friday, November 28, 2003 8:01 PM 16 EN Loading A Cassette /Unloading A Cassette The player needs to be powered up to load or eject a cassette Cassette holder cover PUSH HERE Approximate recording time Tape Recording mode SP LP 30 min. 30 min. 45 min. 60 min. 60 min. 90 min. 80 min. 80 min. 120 min. To switch the recording mode, refer to pages 28 and 29. OPEN/EJECT Switch Cassette holder Make sure the window side is facing up.
Master Page: Right CU-VH1US.book Page 17 Friday, November 28, 2003 8:01 PM EN Loading A Memory Card /Unloading A Memory Card 17 To protect valuable files (available only for SD Memory Card)… Write/erase protection tab Card Cover (MEMORY CARD) Memory card Clipped edge Label 1 2 3 4 Make sure the player’s power is off. Slide to open the card cover (MEMORY CARD). To load a memory card, firmly insert it with its clipped edge first. To unload a memory card, push it once.
Master Page: Left-start CU-VH1US_05Start-Video.fm Page 18 Monday, December 8, 2003 4:46 PM 18 EN VIDEO PLAYBACK Normal Playback Fast-Forward Button (5) Play/Pause Button (4/9) BLANK SEARCH Button VOLUME Wheel Rewind Button (3) Stop Button (8) Speaker Playback Mode Switch Power Switch 1 VIDEO PLAYBACK Open the LCD monitor fully. ● Set the Video Output Mode Switch to “LCD MONITOR”. (墌 pg. 13) 2 3 4 Load a cassette. (墌 pg. 16) 5 6 To start playback, press 4/9.
Master Page: Right CU-VH1US.book Page 19 Friday, November 28, 2003 8:01 PM EN Allows high-speed search in either direction during video playback. 1) During playback, press 5 for forward search, or 3 for reverse search. 2) To resume normal playback, press 4/9. ● During playback, press and hold 5 or 3. The search continues as long as you hold the button. Once you release the button, normal playback resumes. ● A slight mosaic effect appears on the display during Shuttle Search. This is not a malfunction.
Master Page: Left CU-VH1US_05Start-Video.fm Page 20 Monday, December 1, 2003 12:22 PM 20 EN VIDEO PLAYBACK (cont.) Connections To A TV Or VCR To Connect To A TV or VCR Equipped With The Component Video Connectors These are some basic types of connections. When making the connections, refer also to your VCR and TV instruction manuals.
Master Page: Right CU-VH1US_05Start-Video.fm Page 21 Thursday, December 4, 2003 5:36 PM EN Make sure all units are turned off. Connect the player to a TV or VCR as shown in the illustration. If using a VCR, go to step 3. If not, go to step 4. 3 Connect the VCR output to the TV input, referring to your VCR’s instruction manual. 4 For S-video or video connection Set “S/VIDEO” to “16:9 TV” or “4:3 TV” depending on the aspect ratio of the TV you are connecting. (墌 pg.
Master Page: Left-start CU-VH1US.book Page 22 Friday, November 28, 2003 8:01 PM 22 EN D.S.C. PLAYBACK DIGITAL STILL CAMERA (D.S.C.) PLAYBACK Normal Playback Of Images You can view the stored images in the memory card, one at a time, much like flipping through a photo album.
Master Page: Right CU-VH1US.book Page 23 Friday, November 28, 2003 8:01 PM EN Index Playback Of Files Information Screen FOL DER F I LE DA T E S I ZE QUA L I T Y P RO T E C T You can view several different files stored in the memory card at a time. This browsing capability makes it easy to locate a particular file you want. 1 Perform steps 1 – 4 in “Normal Playback Of Images” (墌 pg. 22). 2 Press INDEX. The Index Screen of the image files appears.
Master Page: Left CU-VH1US.book Page 24 Friday, November 28, 2003 8:01 PM 24 EN D.S.C. PLAYBACK (cont.) To protect the currently displayed file Protecting Files 7 The Protect mode helps prevent the accidental erasure of files. RT Button Playback Mode Switch MENU Button Rewind Button (3) Press R or T to select “CURRENT”, and press MENU. The PROTECT screen appears. 8 Press 3 or 5 to select the desired file. 9 Press R or T to select “EXECUTE”, and press MENU.
Master Page: Right CU-VH1US.book Page 25 Friday, November 28, 2003 8:01 PM EN 8 7 Press R or T to select “CANC.ALL”, and press MENU. The PROTECT screen appears. Press R or T to select “EXECUTE”, and press MENU. ● To cancel selection, select “RETURN”. 8 Press 3 or 5 to select the desired file. 9 Press R or T to select “EXECUTE”, and press MENU. ● To cancel deletion, select “RETURN”. ● Repeat steps 8 and 9 for all files you want to delete.
Master Page: Left CU-VH1US.book Page 26 Friday, November 28, 2003 8:01 PM 26 EN D.S.C. PLAYBACK (cont.) Resetting The File Name By resetting the file name, a new folder will be made. The new files you are going to make will be stored in the new folder. It is convenient to separate the new files from previously made files. 1 Open the LCD monitor fully. ● Set the Video Output Mode Switch to “LCD MONITOR”. (墌 pg. 13) 2 3 4 Load a memory card. (墌 pg. 17) 5 6 Press MENU. The Menu Screen appears.
Master Page: Right CU-VH1US.book Page 27 Friday, November 28, 2003 8:01 PM EN To Print By Selecting Still Images And Number Of Prints 2 Press R or T to select “CURRENT”, and press MENU. The DPOF screen appears. DPOF Press 3 or 5 to select the desired file. 4 Press R or T to select the number indication (00), and press MENU. 5 Select the number of prints DPOF by pressing R to increase number, or “T” to SHEETS decrease the number, and 05 press MENU.
Master Page: Left-start CU-VH1US_07Advanced.fm Page 28 Monday, December 1, 2003 12:01 PM 28 EN MENUS FOR DETAILED ADJUSTMENT ADVANCED FEATURES Example: t VIDEO Menu Changing The Menu Settings Selected function This player is equipped with an easy-to-use, onscreen menu system that simplifies many of the more detailed player settings. (墌 pg. 29 – 31) Selected menu icon blinks. RT Button V I D EO SOUND MOD E – ST E REO DV NARR . – OF F RE C MOD E – COP Y – ON NA V I . DE L .
Master Page: Right-Heading0 CU-VH1US.book Page 29 Friday, November 28, 2003 8:01 PM PLAYBACK MENUS VIDEO Playback sound During tape playback, the player detects the sound mode in which the recording was made, and plays the sound back. Select the type of sound to accompany your playback picture. According to the menu access explanation on page 28, select “SOUND MODE” or “DV NARR.” from the Menu Screen and set it to the desired parameter.
Master Page: Left CU-VH1US.book Page 30 Friday, November 28, 2003 8:01 PM 30 EN System Menu SYSTEM Beep and melody sound BEEP (Factory-preset: OFF) OFF: The beep does not sound even when the operation is performed. BEEP: The beep sounds when the operation is performed. MELODY: Instead of a beep, a melody sounds when any operation is performed. Remote control setting For details, refer to “USING THE REMOTE CONTROL UNIT” (墌 pg. 39). REMOTE (Factory-preset: ON) OFF: Disables the remote control operations.
Master Page: Right CU-VH1US.book Page 31 Friday, November 28, 2003 8:01 PM EN Display Menu DISPLAY 31 NOTE: The date indication can also be turned on/off by pressing the DISPLAY Button on the remote control (provided). (墌 pg. 21, 34) Display Display setting DV 1 2b i t / NARR . L 4 ON SCREEN (Factory-preset: LCD) OFF: The player’s display disappears. LCD: Keeps the player’s display (except the date, time and time code) from appearing on the connected TV screen.
Master Page: Left-Heading0 CU-VH1US.book Page 32 Friday, November 28, 2003 8:01 PM 32 EN NAVIGATION To add thumbnail images during video playback NAVIGATION Function The Navigation Function helps you check tape contents by making thumbnail images on a memory card.
Master Page: Right CU-VH1US_07Advanced.fm Page 33 Monday, December 1, 2003 12:03 PM EN To delete thumbnail images 1 2 3 Load a memory card. (墌 pg. 17) 4 5 Press MENU. The Menu Screen appears. 6 Press R or T to select “NAVI.DEL.”, and press MENU. The Sub Menu appears. 7 Set the Playback Mode switch to “VIDEO”. Set the Power Switch to “ON” while pressing down the Lock Button located on the switch. Press R or T to select “t” (VIDEO), and press MENU. The VIDEO Menu appears. By pressing R or T...
Master Page: Left-Heading0 CU-VH1US.book Page 34 Friday, November 28, 2003 8:01 PM 34 EN DUBBING Dubbing To Or From A VCR 8 Press 4/9 on the player to start playback of the source tape. 9 At the point you want to start dubbing, engage the VCR’s Record mode. 10 To pause dubbing, engage the VCR’s RecordPause mode and press 4/9 on the player. 11 Repeat steps 8 – 10 for additional editing. Stop the VCR and player.
Master Page: Right CU-VH1US_07Advanced.fm Page 35 Tuesday, December 9, 2003 2:05 PM EN Dubbing To Or From A Video Unit Equipped With An i.LINK Connector (Digital Dubbing) Using an i.LINK cable (optional), it is possible to dub recorded scenes in DV format from the player onto another video unit equipped with i.LINK connector. Since a digital signal is sent, there is little if any image or sound deterioration.
Master Page: Left CU-VH1US.book Page 36 Friday, November 28, 2003 8:01 PM 36 EN To use this player as a recorder Dubbing from other devices in MPEG2 format is possible if the connected device is another same model of this unit. It is also possible to dub in MPEG2 format from a D-VHS VCR, if the source tape (D-VHS) has been originally dubbed from this digital HD player in MPEG2 format. ● However, if signals on the D-VHS tape are originally from an ATSC tuner etc.
Master Page: Right CU-VH1US_07Advanced.fm Page 37 Monday, December 8, 2003 4:46 PM EN DV (480i): The player records signals in the interlace scan mode (half of 525 scanning lines at 1/60th of a second). The image will be recorded in an aspect ratio of 4:3. The DV mode is suitable for playback on a conventional 4:3-screen TV. SD (480p): The player records signals in the progressive scan mode (525 scanning lines at 1/60th a second at one time).
Master Page: Left CU-VH1US_07Advanced.fm Page 38 Thursday, December 4, 2003 5:37 PM 38 EN DUBBING (cont.) Dubbing Still Images Recorded On A Tape To A Memory Card Still images can be dubbed from a tape to a memory card.
Master Page: Right-Heading0 CU-VH1US.book Page 39 Friday, November 28, 2003 8:01 PM USING THE REMOTE CONTROL UNIT The Full-Function Remote Control Unit can operate this player from a distance. It also makes additional playback functions possible. (墌 pg. 40, 41) EN 39 Buttons And Functions Installing The Battery 1 Pull out the battery holder by inserting a pointed instrument into the slot. 2 Insert the battery in the holder, and be sure to have the “+” mark visible.
Master Page: Left CU-VH1US.book Page 40 Friday, November 28, 2003 8:01 PM 40 EN USING THE REMOTE CONTROL UNIT (cont.) . Up Button or PAUSE SLOW Forward Button SLOW Rewind Button Right Button Left Button PLAY Down Button or STOP T W Zoom Buttons SHIFT Slow-Motion Playback (DV mode only) Allows slow-speed search in either direction during video playback. During normal video playback, press SLOW (YI or IU) more than approx. 2 seconds. ● After approx. 5 minutes (approx.
Master Page: Right CU-VH1US.book Page 41 Friday, November 28, 2003 8:01 PM EN 41 Playback Zoom (DV mode only) Playback Special Effects (DV mode only) Magnifies the recorded image up to 10X at any time during video playback and D.S.C. playback. 1) Press PLAY (U) to start video playback. Or perform normal playback of images. Allows you to add creative effects to the video playback image that was recorded in DV mode.
Master Page: Left CU-VH1US.book Page 42 Tuesday, July 6, 2004 6:50 PM 42 EN USING THE REMOTE CONTROL UNIT (cont.) Audio Dubbing (DV mode only) The audio track of a tape recorded in DV format can be customized only when recorded in the 12-bit and SP modes. (墌 pg. 29) Microphone Speaker Audio cable (provided) Open the cover. 1 Play back the tape to locate the point where editing will start, then press PAUSE (9). 2 While holding A. DUB (D) on the remote control, press PAUSE (9).
Master Page: Right-Heading0 CU-VH1US.book Page 43 Tuesday, July 6, 2004 6:50 PM SYSTEM CONNECTIONS EN 43 Connection To A Personal Computer [A] Using USB cable To USB connector USB cable (provided) PC OR To USB [B] Using i.LINK cable i.LINK cable (optional) [A] Using USB cable It is possible to do the following things: ● Transfer still images stored on a memory card to a PC.
Master Page: Left-start CU-VH1US.book Page 44 Friday, November 28, 2003 8:01 PM 44 EN REFERENCES ITEMS V Power (墌 pg. 11) DETAILS NOTES ● Perform charging where the temperature is between 10°C and 35°C (50°F and 95°F). 20°C to 25°C (68°F to 77°F) is the ideal temperature range for charging. If the environment is too cold, charging may be incomplete. ● Charging times are for a fully discharged battery pack. ● Charging time varies according to the ambient temperature and the status of the battery pack.
Master Page: Right-Heading0 CU-VH1US_08Trouble.fm Page 45 Thursday, December 4, 2003 5:37 PM TROUBLESHOOTING EN 45 If, after following the steps in the chart below, the problem still exists, please consult your nearest JVC dealer. The player is a microcomputer-controlled device. External noise and interference (from a TV, a radio, etc.) might prevent it from functioning properly. In such cases, first disconnect its power supply unit (battery pack, AC Power Adapter/Charger, etc.
Master Page: Left CU-VH1US.book Page 46 Friday, November 28, 2003 8:01 PM 46 EN TROUBLESHOOTING (cont.) Advanced features SYMPTOM POSSIBLE CAUSES CORRECTIVE ACTION 9. During recording, the date/ time does not appear. 9. • “DATE/TIME” is set to “OFF”. 9. • Set “DATE/TIME” to “ON”. (墌 pg. 28, 31) 10. During recording, sound cannot be heard. 10. • The optional headphones are 10. • Connect the optional not connected to the headphones to the headphones connector. headphone connector. (墌 pg. 59) 11.
Master Page: Right CU-VH1US.book Page 47 Friday, November 28, 2003 8:01 PM EN 47 Other problems SYMPTOM POSSIBLE CAUSES CORRECTIVE ACTION 12. • To protect the battery, it is 12. The CHARGE indicator on the 12. • The temperature of the recommended to charge it in AC Power Adapter/Charger battery is extremely high/low. places with a temperature of does not light. • Charging is difficult in places 10°C to 35°C (50°F to 95°F). subject to extremely high/ (墌 pg. 52) low temperatures. 13.
Master Page: Left CU-VH1US.book Page 48 Friday, November 28, 2003 8:01 PM 48 EN TROUBLESHOOTING (cont.) 20. The indicators and the image color on the LCD monitor are not clear. 20. • This may occur when the surface or the edge of the LCD monitor is pressed. 20. 21. The cassette will not load properly. 21. • The battery’s charge is low. 21. • Install a fully charged battery. (墌 pg. 11, 12) 22. The memory card cannot be removed from the player. 22. 22. • Push in the memory card a few more times.
Master Page: Right CU-VH1US.book Page 49 Friday, November 28, 2003 8:01 PM EN 49 Warning Indications Indications Meaning Displays the battery remaining power. Remaining power level: high Remaining power level: exhausted As the battery power comes close to nil, the battery indicator blinks. When the battery power is exhausted, power turns off automatically. Appears when no tape is loaded. (墌 pg.
Master Page: Left CU-VH1US.book Page 50 Friday, November 28, 2003 8:01 PM 50 EN TROUBLESHOOTING (cont.) Warning Indications Indications Meaning i.LINK CONNECTION Appears when an i.LINK cable is connected but not detected. Disconnect the ERROR! CHECK cable once and connect it again, or disconnect other connected cables. CABLE CONNECTION (墌 pg. 35) TO CHANGE i.LINK OUTPUT SETTING, DISCONNECT i.LINK CABLE, FIRST INVALID DATA! CAN NOT INPUT Appears when you attempt to change the i.
Master Page: Right CU-VH1US.book Page 51 Friday, November 28, 2003 8:01 PM EN 51 Warning Indications Indications Meaning COPYING FAILED ● Appears if dubbing of copyguarded signals is attempted while this player is being used as a recorder. ● Appears in the following cases when dubbing still images from a tape to a memory card: – when no memory card is loaded. – when the memory card’s memory is full. – when the memory card is not formatted. – when a write-protected SD Memory Card is loaded. (墌 pg.
Master Page: Left-Heading0 CU-VH1US.book Page 52 Friday, November 28, 2003 8:01 PM 52 EN CAUTIONS When using the AC Power Adapter/Charger in areas other than the USA 䡲 The provided AC Power Adapter/Charger features automatic voltage selection in the AC range from 110 V to 240 V. USING HOUSEHOLD AC PLUG ADAPTER In case of connecting the unit’s power cord to an AC wall outlet other than American National Standard C73 series type use an AC plug adapter, called a “Siemens Plug”, as shown.
Master Page: Right CU-VH1US.book Page 53 Friday, November 28, 2003 8:01 PM EN To properly use and store your memory cards, be sure to read the following cautions: 1. During use… ... make sure the memory card bears the SD or MultiMediaCard mark. ... make sure the memory card is positioned properly when inserting. 2. While the memory card is being accessed (during recording, playback, deletion, initialization, etc.)… ... never unload the memory card and never turn off the player. 3. Store memory cards… ...
Master Page: Left CU-VH1US.book Page 54 Friday, November 28, 2003 8:01 PM 54 EN About moisture condensation... ● You have observed that pouring a cold liquid into a glass will cause drops of water to form on the glass’ outer surface. This same phenomenon occurs on the head drum of a player when it is moved from a cool place to a warm place, after heating a cold room, under extremely humid conditions or in a place directly subjected to the cool air from an air conditioner.
Master Page: Right-Heading0 CU-VH1US.book Page 55 Friday, November 28, 2003 8:01 PM USER MAINTENANCE EN After Use Cleaning The Player Turn off the player. Slide and hold OPEN/EJECT in the direction of the arrow, then pull the cassette holder cover open until it locks. The cassette holder opens automatically. Remove the cassette. 3 Press “PUSH HERE” to close the cassette holder. ● Once the cassette holder is closed, it recedes automatically.
Master Page: Left-Heading0 CU-VH1US_09Spec.fm Page 56 Monday, December 8, 2003 4:47 PM 56 EN SPECIFICATIONS Player For General Power supply : Power consumption Dimensions (W x H x D) : : Weight : Operating temperature Operating humidity Storage temperature LCD monitor Speaker : : : : : For Video Playback Signal format Cassette Tape speed : : : Maximum recording time (using 80 min. cassette) For D.S.C. Playback Storage media Compression system File size : : : : DC 6.
Master Page: Right CU-VH1US_09Spec.fm Page 57 Monday, December 1, 2003 12:06 PM EN For Connectors S2 S-Video input S-Video output VIDEO Video input Video output AUDIO Audio input Audio output Headphone output Microphone input i.LINK Input/output USB Y/Pb/Pr output : : 57 Y: 0.8 V to 1.2 V (p-p), 75 Ω, analog C: 0.2 V to 0.4 V (p-p), 75 Ω, analog Y: 1.0 V (p-p), 75 Ω, analog C: 0.29 V (p-p), 75 Ω, analog : : Y: 0.8 V to 1.2 V (p-p), 75 Ω, analog Y: 1.
Master Page: Left-start CU-VH1US.book Page 58 Friday, November 28, 2003 8:01 PM 58 EN INDEX Controls, Connectors And Indicators INDEX O COMPONENT VIDEO OUT N SNAP SHOT LCD MONITOR A B C D k M MENU BLANK SEARCH INDEX INFO NAVI NAVI STORE REC PLAY MODE VIDEO L K J MEMORY E F G H I g h i j DV MPEG2 Q I.
Master Page: Right CU-VH1US.book Page 59 Friday, November 28, 2003 8:01 PM EN Controls Indicators a b c d e f g h J Power Lamp i j k l m n o p q r s t u v Menu Button [MENU] (墌 pg. 28) Rewind Button [3] (墌 pg. 18) Stop Button [8] (墌 pg. 18) Play/Pause Button [4/9] (墌 pg. 18) Index Button [INDEX] (墌 pg. 23) Information Button [INFO] (墌 pg. 23) Navigation Button [NAVI] (墌 pg. 32) Thumbnail Storing Button [NAVI STORE] (墌 pg. 32) Recording Start/Stop Button [REC (7)] (墌 pg.
Master Page: Left-Heading0 CU-VH1US.book Page 60 Friday, November 28, 2003 8:01 PM 60 EN INDEX Indications LCD Monitor Indications During D.S.C. Playback 1 During Video Playback 1 2 3 45 6 100-0013 7 i.LINK in BLANK SEARCH PUSH "STOP" BUTTON TO CANCEL BR I GHT 8 : q 0 g 9 a b c d Video Playback Mode Indicator (墌 pg. 37) Sound Mode Indicator (墌 pg. 29) Blank Search Indicator (墌 pg. 19) Thumbnail Storing Indicator (墌 pg.
Master Page: Right-Heading0 CU-VH1US.book Page 61 Friday, November 28, 2003 8:01 PM TERMS EN 61 M AC Power Adapter/Charger ...........................11, 12 Audio Dubbing ...................................................42 Auto Playback Of Images ....................................22 Memory Card ................................................ 17, 53 Menu Screen D.S.C. Playback .................................... 23 – 27 DISPLAY ....................................................... 31 SYSTEM ...
Master Page: Left CU-VH1US.
Master Page: Right CU-VH1US.
Master Page: Cover4 CU-VH1US.book Page 64 Tuesday, July 6, 2004 6:50 PM EN CU-VH1 “JVC” is the trademark or registered trademark of Victor Company of Japan, Limited. © 2004 Victor Company of Japan, Limited.