DVM600US_00.
Filename [DVM600US_02Safety.fm] DVM600US_00.book Page 2 Monday, September 25, 2006 1:54 PM 2 EN Masterpage:Left0 SAFETY FIRST Dear Customer, Thank you for purchasing the JVC Mini DV & HDD & DVD video recorder. Before use, please read the safety information and precautions to ensure safe use of your new unit. Cautions CAUTION AVIS RISQUE DE CHOC ELECTRIQUE RISK OF ELECTRIC SHOCK - NE PAS OUVRIR. DO NOT OPEN This Class B digital apparatus complies with Canadian ICES-003.
Filename [DVM600US_02Safety.fm] DVM600US_00.book Page 3 Monday, September 25, 2006 1:54 PM Masterpage:Right+ SAFETY FIRST IMPORTANT PRODUCT SAFETY INSTRUCTIONS Electrical energy can perform many useful functions. But improper use can result in potential electrical shock or fire hazards. This product has been engineered and manufactured to assure your personal safety. In order not to defeat the built-in safeguards, observe the following basic rules for its installation, use and servicing.
Filename [DVM600US_02Safety.fm] DVM600US_00.book Page 4 Monday, September 25, 2006 1:54 PM 4 EN Masterpage:Left+ SAFETY FIRST USE 1. Accessories To avoid personal injury: ● Do not place this product on an unstable cart, stand, tripod, bracket, or table. It may fall, causing serious injury to a child or adult, and serious damage to the product. ● Use only with a cart, stand, tripod, bracket, or table recommended by the manufacturer or sold with the product.
Filename [DVM600US_02Safety.fm] DVM600US_00.book Page 5 Monday, September 25, 2006 1:54 PM Masterpage:Right+ SAFETY FIRST NTSC ● Manufactured under license from Dolby Laboratories. ADolbyB and the double-D symbol are trademarks of Dolby Laboratories. ● ADTSB and ADTS DIGITAL OUTB are trademarks of Digital Theater Systems, Inc. ● This unit can play back and record only NTSC signals. PAL signals can also be played back on the DVD deck.
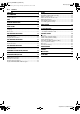
Filename [DVM600US_03TOC.fm] Masterpage:Left0 DVM600US_00.book Page 6 Monday, September 25, 2006 1:54 PM 6 EN CONTENTS SAFETY FIRST DISC INFORMATION 2 7 About Discs ....................................................................................7 Life Span Of Parts........................................................................11 INDEX 12 INSTALLING YOUR NEW UNIT 18 Basic Connections .......................................................................
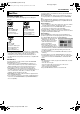
Filename [DVM600US_04DiscInfo.fm] Masterpage:Right0 DVM600US_00.book Page 7 Monday, September 25, 2006 1:54 PM DISC INFORMATION About Discs Recordable/Playable Discs You can use discs with the following logos for recording and playback. DVD-RAM DVD-RW 12 cm: 4.7 GB/9.4 GB 8 cm: 1.4 GB/2.8 GB Ver. 2.0/2x speed Ver. 2.1/1x – 3x speed 12 cm: 4.7 GB/9.4 GB Ver. 1.1/1x – 2x speed (Video mode/VR mode) Ver. 1.2/4x speed (Video mode/VR mode) DVD-R 12 cm: 4.7 GB 8 cm: 1.4 GB Ver. 2.
Filename [DVM600US_04DiscInfo.fm] DVM600US_00.book Page 8 Monday, September 25, 2006 1:54 PM 8 EN DISC INFORMATION Discs For Playback Only Unplayable Discs You can use discs with the following logos for playback only. DVD VIDEO Masterpage:Left+ Video CD/Super Video CD (example of region code indications) The following types of discs cannot be played using this unit.
Filename [DVM600US_04DiscInfo.fm] Masterpage:Right+ DVM600US_00.book Page 9 Monday, September 25, 2006 1:54 PM DISC INFORMATION Recording Medium And Format DVD-RAM ● Recording and erasing can be performed as many times as possible on a disc. ● Editing can be performed after recording, such as deleting unwanted parts. ● While recording, it is possible not only to start playback of a program currently being recorded, but also to watch another program previously recorded.
Filename [DVM600US_04DiscInfo.fm] DVM600US_00.book Page 10 Monday, September 25, 2006 1:54 PM 10 EN DISC INFORMATION DVD VIDEO Marks Masterpage:Left+ Placing A Disc Sometimes marks are printed on a DVD disc and/or on its packaging to indicate information regarding the contents and functions of the disc. Check the marks indicating the contents and functions of the disc. Note, however, that in some cases a disc may not include a mark even for a function it supports.
Filename [DVM600US_04DiscInfo.fm] DVM600US_00.book Page 11 Monday, September 25, 2006 1:54 PM Masterpage:Right+ DISC INFORMATION Care And Handling Of Discs How to handle discs When handling a disc, do not touch the surface of the disc. Since discs are made of plastic, they are easily damaged. If a disc gets dirty, dusty, scratched or warped, the images and sound will not be picked up correctly, and such a disc may cause the unit to malfunction.
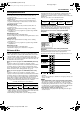
Filename [DVM600US_05Name.fm] Masterpage:Left0 DVM600US_00.book Page 12 Monday, September 25, 2006 1:54 PM 12 EN INDEX Front View J A C B D E F G H I EJECT DV/HDD/DVD REC MODE K L M STANDBY/ON DISPLAY EJECT S-VIDEO DV VIDEO (MONO)L - AUDIO - R REC HDD REC DVD REC INPUT OUTPUT SELECT SELECT STOP REW PLAY INSTANT REPLAY FF PAUSE AUDIO DUB. REC INSERT DV IN/ OUT IN F-1 N O A B C D P QR T S STANDBY/ON Button (A) Eject Button (M) (DV) A pg.
Filename [DVM600US_05Name.fm] Masterpage:Right+ DVM600US_00.book Page 13 Monday, September 25, 2006 1:54 PM INDEX EN 13 Rear View A B C HDD/DVD D E OUTPUT INPUT L-1 S-VIDEO F OUTPUT DV/HDD/DVD S-VIDEO S-VIDEO COMPONENT VIDEO OUT Y VIDEO HDD/DVD DIGITAL AUDIO OUT PB OUTPUT VIDEO A AC Power Cord A pg. 18 B Cooling Fan ● This prevents the temperature from rising inside the unit. Do not remove it. ● Install the unit so as not to block the area around the fan.
Filename [DVM600US_05Name.fm] Masterpage:Left+ DVM600US_00.book Page 14 Monday, September 25, 2006 1:54 PM 14 EN INDEX Front Display Panel A B C D E F G H J I LPCM FR XP SP LP EP VR +-RW VCD -RAM K L A Disc Type Indicator When a disc is loaded, the type of the disc is indicated. Disc Status Indicator When a disc is running, the disc marks rotate. VR Mode Indicator (VR) A pg. 61 Lights when a DVD-R/RW disc is formatted in VR mode.
Filename [DVM600US_05Name.fm] DVM600US_00.
Filename [DVM600US_05Name.fm] Masterpage:Left+ DVM600US_00.book Page 16 Monday, September 25, 2006 1:54 PM 16 EN INDEX On-Screen Display (HDD & DVD deck) When ASUPERIMPOSEB is set to AONB or AAUTOB and ON SCREEN on the remote control is pressed, various operational indicators appear on the TV screen. To clear the operational indicators, press ON SCREEN twice. When pressing REC MODE (Appears for eight seconds.
Filename [DVM600US_05Name.fm] Masterpage:Right+ DVM600US_00.book Page 17 Monday, September 25, 2006 1:54 PM INDEX EN 17 On-Screen Display (DV Dubbing) On-Screen Display (DV deck) When capturing images from the external DV equipment When ASUPERIMPOSEB is set to AONB or AAUTOB and ON SCREEN on the remote control is pressed, various operational indicators appear on the TV screen. To clear the operational indicators, press ON SCREEN again. HDD A B C D E F G H I J K 0:00 1:00 FR360 00:00:00.
Filename [DVM600US_05Name.fm] Masterpage:Left0 DVM600US_00.book Page 18 Monday, September 25, 2006 1:54 PM 18 EN INSTALLING YOUR NEW UNIT Basic Connections THESE STEPS MUST BE COMPLETED BEFORE ANY VIDEO OPERATION CAN BE PERFORMED. Another Recorder Camcorder Connecting to a TV Monitor Connect the unit to a TV depending on the TV and cables you use.
Filename [DVM600US_05Name.fm] Masterpage:Right0 DVM600US_00.book Page 19 Monday, September 25, 2006 1:54 PM INITIAL SETTINGS Clock Set ● Turn on the unit. ● Turn on the TV and select the AV mode. ● Slide the TV/DVD switch to DVD. TV 1 2 Press SET UP to access the Main Menu screen. 3 Press selection keys to select ACLOCK SETB, then press G. 19 Press selection keys to select AINITIAL SET UPB, then press G.
Filename [DVM600US_05Name.fm] Masterpage:Left+ DVM600US_00.book Page 20 Monday, September 25, 2006 1:54 PM 20 EN INITIAL SETTINGS On-screen Language Set Language This unit offers you the choice to view on-screen messages in 3 different languages. ● Turn on the unit. ● Turn on the TV and select the AV mode. ● Slide the TV/DVD switch to DVD. TV HDD DVD 1 Press HDD or DVD so that the HDD or DVD lamp lights up on the unit. 2 3 Press SET UP to access the Main Menu screen.
Filename [DVM600US_05Name.fm] Masterpage:Right+ DVM600US_00.book Page 21 Monday, September 25, 2006 1:54 PM INITIAL SETTINGS Monitor Set You can select the monitor type depending on the TV used when you play back DVD VIDEO discs recorded for wide-screen TVs. ● Turn on the unit. ● Turn on the TV and select the AV mode. ● Slide the TV/DVD switch to DVD. TV 21 1 2 Press DVD so that the DVD lamp lights up on the unit. 3 Press selection keys to select AFUNCTION SET UPB, then press G.
Filename [DVM600US_06DVD Operation.fm] Masterpage:Left0 DVM600US_00.book Page 22 Monday, September 25, 2006 1:54 PM 22 EN BASIC OPERATIONS ON DVD DECK To play back an MP3/JPEG disc, see APlayback With MP3/WMA/ JPEG NavigationB (A pg. 44). Basic Playback 1 Load a disc. ● For details, refer to APlacing A DiscB (A pg. 10). ● Pressing I also closes the disc tray. ● Playback begins automatically if an auto-playback DVD disc is loaded. ● Turn on the unit. ● Turn on the TV and select the AV mode.
Filename [DVM600US_06DVD Operation.fm] Masterpage:Right+ DVM600US_00.book Page 23 Monday, September 25, 2006 1:54 PM BASIC OPERATIONS ON DVD DECK Playback Features EN 23 Current playback point ● Turn on the unit. ● Turn on the TV and select the AV mode. ● Slide the TV/DVD switch to DVD. ● Press DVD so that the DVD lamp lights up on the unit.
Filename [DVM600US_06DVD Operation.fm] Masterpage:Left+ DVM600US_00.book Page 24 Monday, September 25, 2006 1:54 PM 24 EN BASIC OPERATIONS ON DVD DECK Skip Search Resume Function During playback, press v. ● Each press initiates an approximately 30-second period of fastmotion playback. Normal playback resumes automatically. ● Skip search cannot be performed when a VCD/SVCD disc is being played back with the PBC function.
Filename [DVM600US_06DVD Operation.fm] Masterpage:Right+ DVM600US_00.
Filename [DVM600US_06DVD Operation.fm] Masterpage:Left+ DVM600US_00.book Page 26 Monday, September 25, 2006 1:54 PM 26 EN BASIC OPERATIONS ON DVD DECK Subtitle Selection Audio Language/Sound Selection Some DVD VIDEO discs contain more than one subtitle language, from among which you can choose the desired subtitle language. AhB appears on the TV screen at the beginning of the part where more than one subtitle language are recorded. Some DVD VIDEO discs contain the multiple audio language or sound.
Filename [DVM600US_06DVD Operation.fm] Masterpage:Right+ DVM600US_00.book Page 27 Monday, September 25, 2006 1:54 PM BASIC OPERATIONS ON DVD DECK A B C D E F Using The On-screen Bar The on-screen bar allows you to control various playback functions. Some of the functions operated on Navigation Menu can be controlled on the On-screen bar. ATTENTION: The on-screen bar can also be used for the HDD deck. Be sure to clear Library Database Navigation screen by pressing NAVIGATION.
Filename [DVM600US_06DVD Operation.fm] Masterpage:Left+ DVM600US_00.book Page 28 Monday, September 25, 2006 1:54 PM 28 EN BASIC OPERATIONS ON DVD DECK DVD-RAM/RW/R OFF: Repeat playback is not performed. ALL REPEAT: The whole disc is played back repeatedly. TITLE REPEAT: The current title is played back repeatedly. To clear the on-screen bar Press ON SCREEN. To cancel A-B Repeat Playback Press selection keys to select AA-B xB, then press ENTER.
Filename [DVM600US_06DVD Operation.fm] Masterpage:Right+ DVM600US_00.book Page 29 Monday, September 25, 2006 1:54 PM BASIC OPERATIONS ON DVD DECK EN 29 Simulated Surround Effect TV DVD It is possible to get a simulated surround effect from your stereo system. You can enjoy the virtual surround sound with your 2channel stereo system. 0-9 1 2 3 CANCEL ENTER Press selection keys to select A B, then press ENTER. Press selection keys to select AONB, then press ENTER.
Filename [DVM600US_06DVD Operation.fm] Masterpage:Left+ DVM600US_00.book Page 30 Monday, September 25, 2006 1:54 PM 30 EN BASIC OPERATIONS ON DVD DECK Setting The Progressive Mode 4 You can obtain optimal picture quality by selecting whether the content on the disc is processed by field (video source) or by frame (film source). 1 2 3 Set the unit to the progressive scan mode. (A pg. 65) Program Playback stops, but the programmed information remains.
Filename [DVM600US_07HDD Operation.fm] Masterpage:Right0 DVM600US_00.book Page 31 Monday, September 25, 2006 1:54 PM BASIC OPERATIONS ON HDD DECK EN 31 Playback Features Basic Playback ● Turn on the unit. ● Turn on the TV and select the AV mode. ● Slide the TV/DVD switch to DVD. ● Press HDD so that the HDD lamp lights up on the unit. ● Turn on the unit. ● Turn on the TV and select the AV mode. ● Slide the TV/DVD switch to DVD.
Filename [DVM600US_07HDD Operation.fm] Masterpage:Left+ DVM600US_00.book Page 32 Monday, September 25, 2006 1:54 PM 32 EN BASIC OPERATIONS ON HDD DECK Instant Replay Marking Positions To Play Back Again Later You can move back the playback position slightly. Press w on the remote control or INSTANT REPLAY on the unit. ● Each press skips back for approximately 7 seconds and resumes playback. ● Pressing while paused skips back for approximately 7 seconds and resumes pause. 1.
Filename [DVM600US_08DV Operation.fm] Masterpage:Right0 DVM600US_00.book Page 33 Monday, September 25, 2006 1:54 PM BASIC OPERATIONS ON DV DECK 33 1 Load a cassette. Make sure the window side is up, the rear label side is facing you and the arrow on the front of the cassette is pointed toward the unit. ● Do not apply too much pressure when inserting. ● If the erase protection switch is set to ASAVEB, playback begins automatically. It takes about 15 seconds until the playback picture appears.
Filename [DVM600US_08DV Operation.fm] Masterpage:Left+ DVM600US_00.book Page 34 Monday, September 25, 2006 1:54 PM 34 EN BASIC OPERATIONS ON DV DECK Skip Search Playback Features During playback, press v. ● Each press initiates an approximately 30-second period of fastmotion playback. Normal playback resumes automatically. ● Turn on the unit. ● Turn on the TV and select the AV mode. ● Slide the TV/DVD switch to DVD.
Filename [DVM600US_09Live Memory.fm] DVM600US_00.book Page 35 Monday, September 25, 2006 1:54 PM Masterpage:Right0 LIVE MEMORY PLAYBACK ON HDD/DVD DECK TV ● Turn on the unit. ● Turn on the TV and select the AV mode. ● Slide the TV/DVD switch to DVD. ● Press DV/HDD/DVD on the unit repeatedly to select the HDD or DVD deck. This unit records pictures onto the hard disk and DVD-RAM disc, instead of video tapes, then plays back the pictures recorded on the disc.
Filename [DVM600US_09Live Memory.fm] DVM600US_00.book Page 36 Monday, September 25, 2006 1:54 PM 36 EN LIVE MEMORY PLAYBACK ON HDD/DVD DECK Buttons To Be Used During Live Memory Playback ● Turn on the unit. ● Turn on the TV and select the AV mode. ● Slide the TV/DVD switch to DVD. ● Press HDD or DVD to select the desired deck for Live Memory Playback. TV HDD DVD DVD A B C D F E H J G I K A NAVIGATION Displays Library Database Navigation menu. You can choose a title to play back.
Filename [DVM600US_09Live Memory.fm] Masterpage:Right+ DVM600US_00.book Page 37 Monday, September 25, 2006 1:54 PM LIVE MEMORY PLAYBACK ON HDD/DVD DECK EN 37 Temporary recording for Live Memory (HDD deck only) Simultaneous Recording and Playback This unit automatically records the AV input being received, within the specified range of time, to the reserved space on the hard disk. The time range can be set for 30 minutes, 1 hour, and 3 hours. (A pg.
Filename [DVM600US_10Navigation.fm] Masterpage:Left0 DVM600US_00.book Page 38 Monday, September 25, 2006 1:54 PM 38 EN NAVIGATION ON HDD/DVD DECK Using Library Database Navigation system, you can easily modify registered information, edit the title or play list, as well as search for the beginning of each title. Library Database Navigation The Library Database Navigation enables you to search and select the desired titles recorded on the HDD deck and the DVD deck very easily.
Filename [DVM600US_10Navigation.fm] Masterpage:Right+ DVM600US_00.book Page 39 Monday, September 25, 2006 1:54 PM NAVIGATION ON HDD/DVD DECK Scan For Beginning Of Title 39 EN Edit Original Information ● Turn on the TV and select the AV mode. ● Slide the TV/DVD switch to DVD. ● Press HDD or DVD to choose the corresponding deck. ● Load a DVD disc to scan. TV HDD ● Turn on the TV and select the AV mode. ● Slide the TV/DVD switch to DVD. ● Press HDD or DVD to choose the corresponding deck.
Filename [DVM600US_10Navigation.fm] Masterpage:Left+ DVM600US_00.book Page 40 Monday, September 25, 2006 1:54 PM 40 EN NAVIGATION ON HDD/DVD DECK Modify Category Delete Unwanted Part Of The Title (HDD, DVD-RAM & DVD-R/RW (VR mode) only) 1 Perform steps 1 – 4 of AModify IndexB (A pg. 39) before continuing. 2 Press selection keys to select ACATEGORYB, then press ENTER. 1 3 Perform steps 1 – 2 of AModify IndexB (A pg. 39) before continuing.
Filename [DVM600US_10Navigation.fm] DVM600US_00.book Page 41 Monday, September 25, 2006 1:54 PM Masterpage:Right+ NAVIGATION ON HDD/DVD DECK Divide Title (HDD deck only) EN 41 Edit Play List Information You can divide titles that are recorded continuously. 1 2 3 Press EDIT. The Editing screen appears. 4 Press I to start playback. Press O or N to locate a point to divide, then press W. 5 Confirm the arrow is on ADIVIDEB, then press ENTER.
Filename [DVM600US_10Navigation.fm] Masterpage:Left+ DVM600US_00.book Page 42 Monday, September 25, 2006 1:54 PM 42 EN NAVIGATION ON HDD/DVD DECK Create Play List 1 2 3 4 5 Press EDIT. The Editing screen appears. 1 (DVD deck only) Press selection keys to select AMODIFYB under AORIGINAL/PLAY LISTB, then press ENTER. Perform steps 1 – 5 of AEdit ScenesB on the left column before continuing. 2 Press selection keys to select ASEL. TITLEB, then press ENTER.
Filename [DVM600US_10Navigation.fm] Masterpage:Right+ DVM600US_00.book Page 43 Monday, September 25, 2006 1:54 PM NAVIGATION ON HDD/DVD DECK Delete Play List 1 2 3 EN 43 Navigate Library Information Press EDIT. The Editing screen appears. (DVD deck only) Press selection keys to select AMODIFYB under AORIGINAL/PLAY LISTB, then press ENTER. Press selection keys to select ADELETEB under APLAY LISTB, then press ENTER. 4 Press selection keys to select one play list you want to delete, then press ENTER.
Filename [DVM600US_10Navigation.fm] Masterpage:Left+ DVM600US_00.book Page 44 Monday, September 25, 2006 1:54 PM 44 EN NAVIGATION ON HDD/DVD DECK Playback With MP3/WMA/JPEG Navigation This unit can play back discs that MP3/WMA sound files and JPEG image files taken with digital still cameras or other devices are recorded. The MP3/WMA/JPEG Navigation enables you to search and select the desired files recorded on CD-R/RW or CD-ROM discs very easily. ● Turn on the TV and select the AV mode.
Filename [DVM600US_11Editing.fm] Masterpage:Right0 DVM600US_00.book Page 45 Monday, September 25, 2006 1:54 PM EDITING 45 ● Recording may not be performed in the highest speed depending Dubbing on the characteristics of the disc used. ● Turn on the unit. ● Turn on the TV and select the AV mode. ● Slide the TV/DVD switch to DVD. TV HDD DV DVD DVD MARK ENTER R o 1 2 3 Load a recordable disc. 4 Press selection keys to select AHIGH SPEEDB, then press ENTER.
Filename [DVM600US_11Editing.fm] Masterpage:Left+ DVM600US_00.book Page 46 Monday, September 25, 2006 1:54 PM 46 EN EDITING NOTES: ● In Video mode, if the selected play list includes the scenes recorded in the different transfer rate, the dubbing is performed in the highest transfer rate of the scenes in the selected play list. However, the lower transfer rate cannot be dubbed in the higher transfer rate. ● The recordable time of the disc is displayed on the bar meter.
Filename [DVM600US_11Editing.fm] Masterpage:Right+ DVM600US_00.book Page 47 Monday, September 25, 2006 1:54 PM EDITING Dubbing From DV To HDD (Dubbing An Entire Cassette) It is possible to perform automatic dubbing of all the recorded programs of a cassette from the DV deck to the HDD deck using the AENTIREB dubbing. You cannot select the images to be dubbed; all recorded images on the DV cassette will be dubbed. 1 Load the Mini DV cassette you want to dub.
Filename [DVM600US_11Editing.fm] Masterpage:Left+ DVM600US_00.book Page 48 Monday, September 25, 2006 1:54 PM 48 EN EDITING Dubbing From DV To DVD (Dubbing A Part Of A Cassette) It is possible to select the images on the DV cassette to be dubbed from the DV deck to the DVD deck using AMANUALB dubbing. 1 Load the Mini DV cassette you want to dub. Make sure its erase protection switch is set to ASAVEB. ● Set ADV AUDIO RECB to the appropriate mode. (A pg.
Filename [DVM600US_11Editing.fm] Masterpage:Right+ DVM600US_00.book Page 49 Monday, September 25, 2006 1:54 PM EDITING DV Dubbing (HDD & DVD Deck Only) You can dub programs from a camcorder or DV equipment connected to the unit with a DV cable. The unit’s remote control allows you the limited control of the connected camcorder or DV equipment functions during dubbing. NOTE: When connecting the unit to a device equipped with a DV input connector, be sure to use the optional DV cable (VC-VDV 204U).
Filename [DVM600US_11Editing.fm] Masterpage:Left+ DVM600US_00.book Page 50 Monday, September 25, 2006 1:54 PM 50 EN EDITING ● If the dubbing is paused while the channel is set to ADVB, you cannot switch channels. When you dub from DV equipment other than a camcorder A Perform steps 1 – 4. B Locate the point from where you want to start dubbing, then stop on the DV equipment.
Filename [DVM600US_11Editing.fm] Masterpage:Right+ DVM600US_00.book Page 51 Monday, September 25, 2006 1:54 PM EDITING Edit From A Camcorder EN 51 ● Slide the TV/DVD switch to DVD. You can use a camcorder as the source player and your unit as the recording deck. If your camcorder has a DV IN/OUT connector, you can use the camcorder as the recording deck and your unit (DV deck only) as the source player.
Filename [DVM600US_11Editing.fm] Masterpage:Left+ DVM600US_00.book Page 52 Monday, September 25, 2006 1:54 PM 52 EN EDITING Edit To Or From Another Recorder You can use your unit as the source player or as the recording deck. NOTES: ● When using another recorder as the recording deck, refer to its instruction manual. ● It is not possible to dub copy-protected contents. An error message will appear on the TV screen.
Filename [DVM600US_11Editing.fm] Masterpage:Right+ DVM600US_00.book Page 53 Monday, September 25, 2006 1:54 PM EDITING Digital Audio Dubbing You can dub selected audio from a DVD or Audio CD disc to a digital audio device. However, it is not possible to dub copy-protected discs. ● Turn on the TV and select the AV mode. ● Slide the TV/DVD switch to DVD.
Filename [DVM600US_11Editing.fm] Masterpage:Left+ DVM600US_00.book Page 54 Monday, September 25, 2006 1:54 PM 54 EN EDITING Audio Dubbing (DV Deck Only) ● Slide the TV/DVD switch to DVD. This function allows you to record new audio, without erasing the original audio, on a DV tape that was recorded with ADV AUDIO RECB set to A12BITB (A pg. 60). ATTENTION: You cannot perform Audio Dubbing on a tape that was recorded with ADV AUDIO RECB set to A16BITB (A pg.
Filename [DVM600US_11Editing.fm] Masterpage:Right+ DVM600US_00.book Page 55 Monday, September 25, 2006 1:54 PM EDITING Insert Editing (DV Deck Only) ATTENTION: Insert Editing is not possible with a Mini DV cassette recorded in LP mode. A If the player has no S-VIDEO output connector: INPUT SELECT 55 ● Slide the TV/DVD switch to DVD. Insert Editing replaces the pictures with new ones, while the audio soundtrack remains unchanged. For Insert Editing, use your unit as the recording deck.
Filename [DVM600US_11Editing.fm] Masterpage:Left0 DVM600US_00.book Page 56 Monday, September 25, 2006 1:54 PM 56 EN REMOTE CONTROL Remote Control Functions TV TV/VIDEO TV d Remote Control 1/2/3/4 Code Switching DVD A The remote control is capable of controlling four JVC video units independently. Each of the units can respond to one of the four codes (1, 2, 3 or 4). The remote control is preset to send code 3 signals because your unit is initially set to respond to code 3 signals.
Filename [DVM600US_11Editing.fm] Masterpage:Right0 DVM600US_00.book Page 57 Monday, September 25, 2006 1:54 PM SYSTEM CONNECTIONS Connecting To A Dolby Digital Decoder Or An Amplifier With Built-in DTS These instructions enable you to connect your unit to a Dolby Digital Decoder or an amplifier with built-in DTS. 1 EN 57 Connect the unit and a Dolby Digital Decoder or an amplifier with built-in DTS using either an optional optical cable or an optional coaxial cable.
Filename [DVM600US_12Subsidiary.fm] Masterpage:Left0 DVM600US_00.book Page 58 Monday, September 25, 2006 1:54 PM 58 EN SUBSIDIARY SETTINGS * The boldface settings below indicate the settings at your purchase. Mode Set AUDIO OUTPUT 8 DIGITAL AUDIO OUT ^ DOLBY DIGITAL/PCM / STREAM/ PCM / PCM ONLY ● Turn on the unit. ● Turn on the TV and select the AV mode. ● Slide the TV/DVD switch to DVD. Set to the appropriate mode according to the type of the device connected to [DIGITAL AUDIO OUTPUT] connector.
Filename [DVM600US_12Subsidiary.fm] Masterpage:Right+ DVM600US_00.book Page 59 Monday, September 25, 2006 1:54 PM SUBSIDIARY SETTINGS DISC PLAY SET UP 8 RESUME ^ OFF / ON / DISC RESUME When this function is set to AONB or ADISC RESUMEB, you can use the resume function. (A pg. 24) OFF: You cannot use the resume function. ON: You can start playback from the resume point of the placed disc.
Filename [DVM600US_12Subsidiary.fm] Masterpage:Left+ DVM600US_00.book Page 60 Monday, September 25, 2006 1:54 PM 60 EN SUBSIDIARY SETTINGS VIDEO IN/OUT 8 MONITOR TYPE ^ 4:3LB / 4:3PS / 16:9AUTO / 16:9FIX NOTE: To display the ADV SET UPB menu, press SET UP while in the DV deck mode. You can select the monitor type depending on the TV used when you play back DVD VIDEO discs recorded for wide-screen TVs. For details, refer to AMonitor SetB (A pg. 21).
Filename [DVM600US_12Subsidiary.fm] Masterpage:Right+ DVM600US_00.book Page 61 Monday, September 25, 2006 1:54 PM SUBSIDIARY SETTINGS Format A Disc (DVD Deck Only) Some DVD-RAM/RW discs are unformatted. Format the disc when you use an unformatted disc or you want to delete all recordings and data on the disc. To use a DVD-R disc in VR mode, format the new disc in VR mode. (It will be in Video mode when not formatted.) ATTENTION: ● When a disc is formatted, all recordings and data are erased.
Filename [DVM600US_12Subsidiary.fm] Masterpage:Left+ DVM600US_00.book Page 62 Monday, September 25, 2006 1:54 PM 62 EN SUBSIDIARY SETTINGS Finalize A Disc (DVD Deck Only) Finalizing DVD-R/RW discs recorded on this unit makes it possible for the discs to be played back on other DVD players. DVD-RW discs are finalized in the mode that the discs were formatted, enabling playback on compatible DVD players. Title names input in the Library Database Navigation are registered as title names in the DVD menu.
Filename [DVM600US_12Subsidiary.fm] Masterpage:Right+ DVM600US_00.book Page 63 Monday, September 25, 2006 1:54 PM SUBSIDIARY SETTINGS EN 63 Cancel The Finalization Of A DVD-RW Disc Direct Access To ADISC SET UPB Screen 1 Load a DVD-RW disc to cancel the disc finalization, and perform steps 1 – 2 of AFinalize A DVD-R/RW DiscB (A pg. 62) before continuing. 2 Press selection keys to select AHDD/DVD SET UPB, then press G.
Filename [DVM600US_12Subsidiary.fm] Masterpage:Left+ DVM600US_00.book Page 64 Monday, September 25, 2006 1:54 PM 64 EN SUBSIDIARY SETTINGS Registering Default Background Setting The Background You can select a desired background from the 18 backgrounds available on this unit, and set it as the default background to be used during finalization (A pg. 45, 62). ● Turn on the unit. ● Turn on the TV and select the AV mode. ● Slide the TV/DVD switch to DVD.
Filename [DVM600US_12Subsidiary.fm] DVM600US_00.book Page 65 Monday, September 25, 2006 1:54 PM Masterpage:Right+ SUBSIDIARY SETTINGS Scan Mode Set (HDD & DVD Deck Only) If you connect the unit and TV with Component Video Connection (A pg. 18), you can select the scan mode from two modes: Interlaced scan mode which is used in the conventional TV system, and Progressive scan mode which enables reproduction of higher-quality images.
Filename [DVM600US_12Subsidiary.fm] Masterpage:Left0 DVM600US_00.book Page 66 Monday, September 25, 2006 1:54 PM 66 EN TROUBLESHOOTING Before requesting service for a problem, use this chart and see if you can solve the trouble yourself. Small problems are often easily solved, and this can save you the trouble of sending your unit off for repair. Initializing (DVD Deck Only) Malfunction occurs on the unit. ] Press A to turn off the unit, press and hold A, then press o for two seconds or more.
Filename [DVM600US_12Subsidiary.fm] Masterpage:Right+ DVM600US_00.book Page 67 Monday, September 25, 2006 1:54 PM TROUBLESHOOTING ● A finalized DVD-R disc is loaded. ] Recording cannot be made on finalized discs. Load a recordable disc on the unit. ● The disc is full or does not have enough space for the title to be recorded. ] Clear unnecessary titles on the disc or load a blank disc. (A pg. 40) ● The DVD-RAM disc loaded has had its protect tab slid to the protect position. ] Release the protect tab.
Filename [DVM600US_12Subsidiary.fm] DVM600US_00.book Page 68 Monday, September 25, 2006 1:54 PM 68 EN TROUBLESHOOTING On-screen Message (HDD & DVD Deck Only) DISC NOT REGISTERED IN THE LIBRARY REGISTER DISC? ● A disc that is not registered in the library has been inserted. Register the disc as necessary. (A pg. 43) TITLE MEMORY IS FULL, UNABLE TO RECORD DELETE UNWANTED TITLE ● Recording and/or editing cannot be performed. ● The number of titles exceeds 99. ● The number of play lists exceeds 99.
Filename [DVM600US_12Subsidiary.fm] DVM600US_00.
Filename [DVM600US_12Subsidiary.fm] DVM600US_00.book Page 70 Monday, September 25, 2006 1:54 PM 70 EN Masterpage:Left0 SPECIFICATIONS GENERAL VIDEO/AUDIO (HDD Deck) Power requirement AC 120 VH, 60 Hz Video recording compression system MPEG2 (VBR) Power consumption Power on: 45 W Power off: 2.5 W Audio recording system Dolby Digital (2 ch) Linear PCM (XP mode only) Laser specification For CD Wavelength: 770 to 810 nm Output: 0.4 mW For DVD Wavelength: 653 to 663 nm Output: 1.
Filename [DVM600US_13IX.fm] Masterpage:Right0 DVM600US_00.book Page 71 Monday, September 25, 2006 1:54 PM LIST OF TERMS EN 71 A P A-B Repeat Playback ................................................ 28 Accidental erasure prevention .................................... 33 Adjusting The Picture Quality ..................................... 29 Angle Selection ........................................................ 25 Audio Channel Selection ...........................................
DVM600US_00.