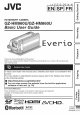
LYT2313-OOIA-M Basic User Guide ._ GZ-H IV1960U/G Z- HIVi860U Thank you for purchasing this JVC product. Before use, please read the Safety Precautions use of this product. Everio and Cautions on p. 2 and p. 36 to ensure safe A "Basic User Guide" (this manual) and a "Detailed User Guide" are available for this 3roduct. For more details on operating this product, please refer to the "Detailed User Guide" at the following website. m http://manual.jvc.co.jp/index.
Safety Precautions When the equipment is installed in a cabinet or on a shelf make sure that it has sufficient space on all sides to allow for ventilation (10 cm (3-15/16") or CAUTION: TO DO NO REFER REDUCE NOT THE REMOVE RiSK SERVICING OF COVER USER-SERVICEABLE ELECTRIC {OR PARTS TO QUALIFIED more on both sides on top and at the rear). Do not block the ventilation holes. SHOCK, BACK). iNSIDE. SERVICE PERSONNEL.
iMPORTANT SAFETY iNSTRUCTiONS Remember that this unit is intended private consumer use only. 1. Read these instructions. 2. Keep these instructions. 3. 4. Heed all warnings. Follow all instructions. 5. Do not use this apparatus Any commercial use without proper permission is prohibited. (Even if you record an event such as a show, performance or exhibition for personal enjoyment, it is strongly recommended that you obtain permission beforehand.) near water. 6. Clean only with dry cloth.
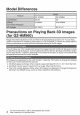
Model Differences Precautions GZ-HM960 GZ-HM860 3D/2D 2D Available Unavailable on Playing Back 3D Images (for GZ-HM960) Images recorded in 2D mode can be converted to 3D and played back on this unit, You can enjoy realistic and powerful 3D images by playing back on a 3D compatible TV. Before use, please read the following precautions to ensure safe and comfortable viewing of the 3D images.
_,,,_ _ Viewing of 3D images is not recommended for people with medical history of photosensitivity, with heart diseases, feel unwell, suffer from lack of sleep, suffer from fatigue, or are drunk, = Medical conditions may worsen. if you have vision problems such as short-sightedness, !ong-sightedness, varying vision in the left and right eyes, or astigmatism, it is recommended to correct your vision by wearing glasses, etc. Stop viewing of 3D images if you see double images.
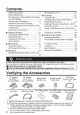
Contents Safety Precautions ............................... Model Differences ............................... 2 4 Precautions on Playing Back 3D Images (for GZ-HM960) ................................... 4 Verifying the Accessories .................... 6 Names of Parts and Functions ............. 7 Names of Buttons and Functions on the LCD Monitor ........................................ 8 Using the Touch Screen ...................... 9 _,Getting Started .........................
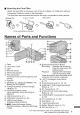
[] Attaching theCoreFilter Attach thecorefiltertothepower cord of the AC adapter, AV Cable and optiona( Component Cable as shown in the illustration. The core filter reduces interference when this unit is connected to other devices. Release the stopper, 3 cm (1-3/16") i_ Wind once To be connected to this unit Names of Parts and Functions @ ® Flash 2_ Lens/Lens Cover (3_ Light (4_ Remote Sensor _5_Stereo Microphone _6_3D LCD Monitor Turns the power on/off by opening and closing.
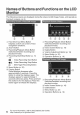
Names of Buttons and Functions on the LCD Monitor The following screens are displayed during the video and still image modes, and operate as the touch screens. (p. 9) Face Short Cut Menu Button Displays a short cut screen of face recognition functions. (_ Zoom Button (3) Recording/Playback Mode Button Switches between recording and playback modes. (4) Recording Start/Stop Button (p.
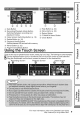
,m Date Button _ Recording/Playback Mode Button Switches between recording and playback modes. (3_ Index Screen Switching Button (p. 18) (4_ Delete Button (p. 18) _5_Playback Media Button SwitchesbetweenSD cardand built-inmemory. _6_Menu Button (p. 32) q_ Page Forward/Back Button Help Button (p. 32) 1_ (2_ Menu Items (p. 32) (:3)Return Button (:47COMMON Menu Button _5) Close Button _-_ Using the Touch Screen There aretwo waysto operatethetouch screen,namely"tap"and "drag".
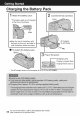
Charging the Battery Pack Attach the battery pack. Connect the DC connector. Cover * The battery pack is not charged at the time of purchase. AC Adapter To AC Outlet eAlign the top of the battery with the mark on this unit, and slide in until the battery clicks into place. m To detach the battery pack (Base) Plug in the power.
Grip Adjustment Pad _1_ Pull back the pad ( _;Z_Adjust the length of the belt _3_Attach the pad Inserting an SD Card To record to the card, it is necessary to perform media settings. (p. 13) When no card is available, set media settings to "BUILT-IN MEMORY" for recording. By default, it is set to "BUILT-IN MEMORY". 1 Close the LCD monitor. 2 Open the cover and insert an SD card. (Base) Terminal Side * Turn off the power of this unit before inserting or removing a card.
Formore information, refer totheDetailed User Guide 12 http://manual.jvc.co.jp/index.
_To use an SD card [] Recording can be performed on a card when "REC MEDIA FOR VIDEO" or "REC MEDIA FOR IMAGE" of "COMMON" menu is set to "SD CARD". To use SD cards that have been used on other devices Format (initialize) the card using "FORMAT SD CARD" from "COMMON" menu. All data on the card will be deleted when it is formatted. Copy all files on the card to a computer before formatting, 1_ Perform steps 1_- (.3_from "To use an SD card". 1_ Open the LCD monitor. • The unit turns on. Tap "MENU".
Clock Setting _o Open the LCD monitor. reset the clock Set the clock with "CLOCK ADJUST" from the "COMMON" menu. 1_ Open the LCD monitor. • The unit turns on. • The unit turns on. When the LCD monitor is closed, the unit turns off. Tap "YES" when "SET DATE/TIM is displayed. Tap "MENU". @ Tap "€_'". E!" Set the date and time. • The subsequent setting operations are _e • When the year, month,day, hour, or minute item is tapped,"^" and "v" will be displayed. Tap "^" or "v" to adjustthe value.
Video Recording You can record without worrying about the setting details by using the Intelligent Auto mode. Settings such as exposure and focus will be adjusted automatically to suit the shooting conditions. • In case of specific shooting scenes such as person etc., its icon is displayed on the screen. Before recording an important scene, it is recommended to conduct a trial recording. 1 Select video mode. _/_ _ 12 Check if the recording I Auto.
[] Face registration By registering the face of a person beforehand, focus and brightness can be adjusted automatically by the face tracking function. Up to 6 faces, together with names and priority levels, can be registered. It is recommended to register the faces that are often being recorded by this camera beforehand. For details, refer to "Registering Human Face Personal Authentication Information" in the Detailed User Guide.
Still image Recording Select still image Set the focus on the subject. mode. ,_/_ Lwihgh_sfup_negdeen Take l, a still PHOTO' image. _ Lights up during image recording still • You can also tap _,*_on the touch screen to record. However, focus cannot be set by pressing halfway.
Playing Back/Deleting Files on this Unit Select and play back the recorded videos or still images from an index screen (thumbnail display). Volume adjustment during playback 1 image mode. Select video or still Turn down the _] Turn up the !2 Tap onthe touch screen | | to select the playback mode. * Tap [_._] again to return to the recording mode. STep on the file to play back. Im To delete unwanted files (_ Tap'@. Tap on the files to delete. o A delete mark appears on the selected file.
[] Playing back 3D images (for GZ=HM960) The mode changes between 3D and 2D with every press of the 3D button. • To play back 3D images, refer also to "Precautions on Playing Back 3D Images".(p. 4) • Some subjects may appear unnatural when played back in 3D mode. In this case, it is recommended to play back the video in 2D mode. • 3D images are supported by the LCD monitor of this unit. You can play back 3D images on the LCD monitor.
[] 3D display warnings Fatigue or discomfort time. (for GZ=HIV1960) may be experienced if you view 3D images for a long period of When viewing 3D images on this unit, a message will be displayed every 30 minutes. To turn off the message display, set "3D DISPLAY WARNING" to "OFF". To change the setting, refer to the Detailed User Guide (Menu Settings - COMMON Menu). Playing Back on TV Connect to a TV. * Refer also to the instruction manual of the TV in use.
Playing back in standard quality Ifyouareusingaconventional TV,youcanplaybackinstandard qualitybyconnecting totheAVconnector. Connecting to the AV connector TV Yellow Video Input Audio Input (L) Audio Input (R) To AV Connector Connect the AC adapter. (p. 10) • This unit powers on automatically D Select the TV input switch. D Play back a file. (p. 18) m When images look unnatural when the AC adapter is connected. on the TV • Disconnectthe cableandconnectagain. • Turnoff andonthis unit again.
Copying Files You can create discs or copy the files on this unit by connecting : Recordable and playable A : Playable only : Not applicable it to various devices. DVDWriter iiiiiiiiiiiiiiiiiiiiiiiiiiiiiii!i!i!i!iii!ill '_ iiiiiiiiiiiiiiiiiiiiiiiiiiiiiii!i!i!i!iii!ill ExternalBlu-rayDrive iiiiiiiiiiiiiiiiiiiiiiiiiiiiiii!i!i!i!iii!ill '_ %/ p. 23 %/ %/ p. 23 iiiiiiiiiiiiiii_! Blu-ray Recorder v /X "1 _ "1 _ See manualof recorder. _ p. 26 DVD Recorder "1 !!ii_iiiii VCR p.
Creating Discs with a DVD Writer or External Biu-ray Drive While a DVD writer is used in the following explanation, external Blu-ray drive. B Connect the USB cable and the AC adapter. • Turn off the camcorder by pressing the button for about 2 seconds. 1_ Connect the USB cable provided with the DVD writer. Connect the AC adapter DVD writer. of the Connect the AC adapter unit. to this • This unit powers on automatically when the AC adapter is connected.
Copying AJl Files Sebct video or still image mode. Tap "EXECUTE". Tap "CREATE FROM ALL" (video) or "SAVE ALL" (still image). Number You can change the media to save to by selecting "CHANGE REC. MEDIA". (For details, refer to the Detailed User Guide.) • Selecting"Blu-ray DtSC'enablesyouto save videos in a Blu-ray disc in the high definition quality. (External Blu-ray drives only) • Selecting "DVD(AVCHD)" enables you to save videos in a DVD in the high definition quality.
"o Selecting Files to Copy Select video or still image mode. Tap "SELECT AN D CREATE" (video) or "SELECT AND SAVE" (still image). • You can change the media to save to by selecting "CHANGE REC. MEDIA". (For details, refer to p. 24 or the Detailed User Guide.) _Tap on the media to r_ CREATE BY DATE/SAVE BY DATE t= 1_ Tap to select a recording date. L_ o o • Only files of the selected date will be copied. • The subsequent operations are the same as steps 4 - 8 on the previous page.
Dubbing Files by Connecting Recorder or VCR to a DVD You can dub videos in standard quality by connecting to a DVD recorder or VCR. Refer also to the instruction manuals of the TV, DVD recorder, VCR, etc. Connect to a VCR/DVD recorder. • Turn off the camcorder by pressing the (_ button for about 2 seconds. To DC Connector AC Adapter TO AC Outlet VCR/DVD Recorder ....
Using a USB External Hard Disk Drive You can copy video and still image files to a USB external hard disk drive from this Select video or still image mode. unit. You can also play the files in the USB external hard disk drive on this unit. B [] Compatible drives external hard Tap "BACK UP". disk You can use the FreeAgent Desk series from Seagate or Design by Neil Poulton series from LaCie. USB external hard disk drives with the capacity over 2 TB cannot be used.
Copying to Computer Verifying System Requirements (Guideline) Windows PC You can copy files to a PC using the provided software. Right-click on "Computer" (or "My Computer") in the "Start" menu and select "Properties" to check the following items. [] Windows 7 / Windows Vista Processor Intel Core Duo, CPU 1.66 GHz or higher (Intel Core 2 Duo, CPU 2.13 GHz or higher ..... '.......... V:At least ..................
You can import files from this unit to a computer using Apple's iMovie '08, '09, '11 (video) or iPhoto (still image). To verify the system requirements, select "About This Mac" from the Apple menu. YOL can determine the operating system version, processor and amount of memory. • For the latest information on iMovie or iPhoto, refer to the Apple website. • For details on how to use iMovie or iPhoto, refer to the help file of the respective software.
Installing the Provided Software (Buibin) You can display the recorded images in calendar format and perform simple editing using the provided software. Open the LCD monitor. • Turn off the camcorder by pressing the button for about 2 seconds. Connect the USB cable and the AC adapter. To DC Connector Tap "PLAYBACK ON PC". Perform the following computer. steps on the Click "Run INSTALL.EXE" auto play dialog box. in the Click "Continue" on the user account control screen.
Backing Up All Files Beforemakingbackup,makesurethatthereis enough free spaceinthe PC'sHDD. Backupwill notstart ifthereis notenoughfree space. Connectthe USBcable and the AC adapter. B The subsequent operations are to be performed on the PC. _ Select the volume. • Before connecting, turn off the camcorder by pressing the _ button for about 2 seconds. To DC Connector _ Start backup.
Operating the Menu You can configure various settings using the menu. Tap the desired setting. Tap "MENU". • The menu differs according to the mode in use. • Tap "5" menu. to display the face short cut Tap the desired menu. [] To exit the screen Tap "X" (quit). [] To return to the previous screen Tap "_" (return). [] To display the help file Tap "?" (help) and tap the menu item. • Help file may not be available for some items. • Tap ".3_"to display the "COMMON" menu.
Recordable Time/Number of images You can check the video recording time by pressing the INFO button. lh20m 2h 2h50m 20m 30m 40m 7h h40m 40m lh lh20m h20m 2h 2h50m 2h50m 4hl0m 5h50m 4h20m 6hl0m 8h40m 5h50m 8h20m 11h50m 3h40m 7hl0m 14h50m 21h50m 29h50m • The approximate recording time is onlya guide. The actual recording time may shorten depending on the shooting environment.
Troubleshooting If you encounter problems with this unit, check the following before requesting service. 1 Refer to "Trouble" below. 2 Refer to the "Troubleshooting" section in the "Detailed User Guide". If you have difficulties operating the unit, refer to the detailed descriptions User Guide". in the "Detailed • http://manual.jvc.co.jp/index.html/ 3 Refer to the FAQ of new products on JVC's website. • http://wwwjvc.com/ 4 This unit is a microcomputer-controlled device.
• Set"HDMIOUTPUT"inthe"COMMON" menu accordingly. - z • Check the remaining battery power. (When the battery pack is fully charged, the lamp does not flash.) • When charging in either a hot or cold environment, ensure that battery is being charged within the permitted temperature range. (Otherwise, charging may stop to protect the battery pack.) become warm when used for a long e time.) his is not a malfunction.
Cautions ATTENTION: When using the than the USA AC adapter in areas The provided AC adapter features automatic voltage selection in the AC range from 110 V to 240 V. USING HOUSEHOLD AC PLUG ADAPTER In case of connecting the unit's power an AC wall outlet other than American is powered by a rechargeable battery that is recyclable. Please call 1-800-8-BATTERY for he product you have purchased information on how to recycle this other o battery.
® To prevent the unit from dropping, ®Fasten the grip belt securely. ®When using the camcorder with a tripod, attach the camcorder to the tripod securely. If the camcorder drops, you may be injured and the camcorder may be damaged. When a child uses the unit, there must be parental guidance. ®Forsafety, DONOT ...open thecamcorder's chassis. ...disassemble ormodify theunit. ...a inflammables, ormetallic objects tollow enter theunit. water ...
Specifications Using AC adapter: DC 5.2 V, Using battery pack: DC 3.6 V • GZ-HM960 4.1 W (LCD mon itor 2D display) 4.6 W (LCD monitor 3D display) i(when "MONITOR BRIGHTNESS" is set to "STANDARD") • GZ-HM860 3.7W (when "MONITOR BRIGHTNESS" is set to "STANDARD") 54 mm x 62 mm x 121 mm (2-1/4" x 2-1/2" x 4-7/8")(W x H x D: excluding grip belt) • GZ-HM960 iApprox. 330 g (0.731bs) (camera only), Approx. 370 g (0.821bs) (including supplied battery pack) • GZ-HM860 iApprox. 310 g (0.681bs) (camera only), Approx.
AC 110 V to 240 V, 50 Hz/60 Hz DC 5.2 V, 1 A 0°C to 40°C (32°F to 104°F) (10°C to 35°C (50°F to 95°F) during charging) 78x 34 x 46(3-1/8"x 1-3/8"x 1-13/16")(Wx H x D: excludingcordandAC plug) Approx. 107 g (0.24 Ibs) AC 110 V to 240 V, 50 Hz/60 Hz DC 5.2 V, 1 A 0°C to 40°C (32°F to 104°F) (10°C to 35°C (50°F to 95°F) during charging) 66x 28 x 47(2-5/8"x 1-1/8"x 1-7/8")(Wx H x D: excludingcord andAC plug) Approx. 71 g (0.
Index AC adapter ............................... 10, 36 Apple .............................................. 29 AV Connection ......................... 21,26 L LCD Monitor ................................... 36 M Mac ................................................ 29 Battery Pack ............................. 10, 36 Bluetooth ........................................ 39 N Number of Images .......................... 33 R Recordable Time ............................ 33 Clock Adjust .............