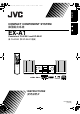
Page 1 Tuesday, October 19, 2004 1:27 PM English EXA1mkII[US UB]_CS-00Cov1.
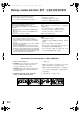
EXA1[US UB]_CS-00Cov2.fm Page 1 Wednesday, January 14, 2004 3:45 PM Warnings, cautions and others / 警告,注意及其他须知事项 CAUTION 注意 To reduce the risk of electrical shocks, fire, etc.: 1. Do not remove screws, covers or cabinet. 2. Do not expose this appliance to rain or moisture. 为了减少触电、火灾等危险: 1. 请勿擅自卸下螺丝钉、盖子或机壳。 2. 请勿让本机受雨淋或置于潮湿环境中。 CAUTION — F button! 注意- F 开关! Disconnect the mains plug to shut the power off completely (the STANDBY lamp goes off).
EXA1[US UB]_CS-00Cov2.fm Page 2 Wednesday, January 14, 2004 3:45 PM Introduction/ 简介 CAUTION — Proper Ventilation 注意 — 正确的通风方法 To avoid risk of electric shock and fire and to protect from damage, locate the apparatus as follows: Top/Front/Back/Sides: No obstructions should be placed in the areas shown by the dimensions below. Bottom: Place on the level surface. Maintain adequate air path for ventilation by placing on a stand with a height of 10 cm more.
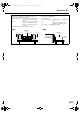
EXA1[US UB].book Page 1 Wednesday, January 14, 2004 11:59 AM English Table of contents Introduction Warnings, cautions and others....................G-1 Special cautions ..............................................2 About discs......................................................3 To select the color system...............................5 Description of parts .........................................6 Getting started Using the remote control .................................
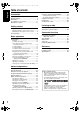
Page 2 Wednesday, January 14, 2004 11:59 AM Special cautions Introduction Care of the cabinet When cleaning the system, use a soft cloth and follow the relevant instructions on the use of chemically-coated cloths. Do not use benzene, thinner or other organic solvents including disinfectants. These may cause deformation or discoloring. Notes on handling 7 Important cautions Installation of the system • Select a place which is level, dry and neither too hot nor too cold; between 5°C and 35°C.
EXA1mkII[US UB]-01.fm Page 3 Tuesday, October 19, 2004 11:32 AM English About discs Discs that cannot be played back Playable disc types This system has been designed to play back the following discs: DVD VIDEO, DVD AUDIO, VCD, SVCD, CD This system can also play back the following discs: • Finalized DVD-R/RW discs recorded in the DVD VIDEO format.
EXA1mkII[US UB]-01.fm Page 4 Tuesday, October 19, 2004 11:32 AM English Introduction Disc structure DVD VIDEO A DVD VIDEO consists of “titles” and each title may be divided into “chapters”. Title 1 Title 2 Chapter 1 Chapter 2 Chapter 3 Chapter 1 Chapter 2 DVD AUDIO A DVD AUDIO consists of “groups” and each group may be divided into “tracks”. Some discs include a “bonus group” that requires a password for playing (A page 28).
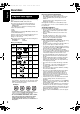
EXA1mkII[US UB]-01.fm Page 5 Friday, October 22, 2004 1:16 PM English To select the color system This system is compatible with PAL and NTSC color systems. In standby mode, select PAL or NTSC to match your TV. If the VIDEO OUT SELECT switch is switched over when the power is ON, turn off the power, and then turn it on again. 13 3 Color system of TV Multi-color system 13 VIDEO OUT SELECT PAL or NTSC* PAL PAL NTSC NTSC * Set the color system of the unit and TV to match the playback disc.
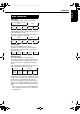
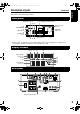
EXA1mkII[US UB]-01.fm Page 6 Tuesday, October 19, 2004 11:33 AM Description of parts English Introduction The numbers represent the page numbers. Front panel Play/Pause:13, 15 Look at “Display window” below. 33 35 Remote control sensor: 7 12,13 STANDBY/ON : 13 Open/Close : 13 Headphones jack* VOLUME control: 17 PHONES Disc tray: 13 15 15 15 * Connect a pair of headphones (commercially available) with a stereo mini plug.
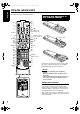
EXA1[US UB].book Page 7 Wednesday, January 14, 2004 11:59 AM English Using the remote control The numbers represent the page numbers.
EXA1mkII[US UB]-01.fm Page 8 Tuesday, October 19, 2004 11:33 AM This page is for when operating your TV using the remote control of this product. Operating the TV using the remote control English Getting Introduction started Examples: For a Hitachi TV: Press 1, then 0. For a Toshiba TV: Press 0, then 8. If there are more than one manufacturer’s codes, try them in turn and select the one that causes the product to work properly.
EXA1[US UB].book Page 9 Wednesday, January 14, 2004 11:59 AM English Connecting up – Do not turn on the power until the connection is complete – Connection Connecting antennas Connecting AM loop antenna (supplied) 1 Set up the AM loop antenna. Connecting FM antenna (supplied) (/ ǡ %1#:+#. FM antenna Main unit (rear panel) Put the antenna up straight in the direction where the best radio reception can be obtained, and fix by using tape. 2 Connect antenna cords.
EXA1[US UB].book Page 10 Wednesday, January 14, 2004 11:59 AM Getting Connection started English Connecting up Connecting speakers There is no difference between the left and right speakers.
EXA1mkII[US UB]-02.fm Page 11 Friday, October 22, 2004 English Connecting up (continued) 1:22 PM – Do not turn on the power until the connection is complete – Connection Connecting other devices This page is for when connecting the main unit with other devices. Connecting subwoofer With an amplifier-built in subwoofer (sold separately), you can enjoy a more dynamic bass sound. Refer to the manual of the subwoofer for details.
Page 12 Wednesday, January 14, 2004 11:59 AM Connecting up Getting Connection started Connecting by using the component video cord Connecting with TV TV Supplied composite video cord Main unit English EXA1[US UB].book You can enjoy better quality pictures than when using the S-Video cord. CAUTION Connect the main unit directly with a TV (or a monitor) without routing through a VCR. Otherwise it may cause picture distortion while playing.
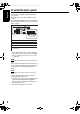
EXA1mkII[US UB]-03.fm Page 13 Tuesday, October 19, 2004 11:54 AM English Playing discs Playback (Refer to page 17 for playing MP3 and JPEG.) A page 6 1 Place a disc with the label side facing up. • Place an 8 cm disc in to the hollow part in the center. Press F AUDIO. • The power will be turned on and the STANDBY lamp will go off. • Press F AUDIO again to turn off the power. 2 Press 0OPEN/CLOSE to open the disc tray to load a disc. 3 Press 3 (play).
EXA1mkII[US UB]-03.fm Page 14 Tuesday, October 19, 2004 11:35 AM Example: When an MP3 disc is played Elapsed playing time English Basic operations Track number Example: When a JPEG disc is played Group number File number Display window during disc playback Example: When a DVD VIDEO or DVD AUDIO is played Elapsed playing time Chapter/Track number If “BONUS” or “B.S.P.” is displayed during a DVD AUDIO playback, refer to page 28.
EXA1mkII[US UB]-03.fm Page 15 Tuesday, October 19, 2004 11:35 AM English Playing discs (continued) Designate the chapter number or track number to play during playback. Refer to “How to use the number buttons” on page 16. To stop playback Press 7 during playback. To pause playback 3 (Play button) Press 8 during playback. Cursor (5// ) To resume normal playback, press 3 (play). • Press 8 to pause during JPEG disc slide-show. Press 3 (play) to start playback from the next file.
EXA1[US UB].book Page 16 Wednesday, January 14, 2004 11:59 AM Playing back from a position 10 seconds before (One Touch Replay) Skip to the beginning of the selection English Basic operations Press 4 or ¢ during playback*. Press during playback. NOTE • This operation may not be carried out for some discs. • It is not possible to go back to the immediately previous title. Slow Motion Playback Press SLOW pause. or SLOW during • Each time you press the button, the speed increases.
EXA1[US UB].book Page 17 Wednesday, January 14, 2004 11:59 AM English Playing discs (continued) Playing MP3 and JPEG discs To change the brightness of the display window (DIMMER) Press DIMMER repeatedly. • The modified brightness will be stored even after the power is turned off. The items below can be carried out for all sources. Adjusting the volume Press AUDIO VOL +/–. NOTE 3 (Play button) The volume can be adjusted by turning the VOLUME control on the main unit.
EXA1[US UB].book Page 18 Wednesday, January 14, 2004 11:59 AM Playback Repeat playback Display of an MP3 disc is described here as an example. For a JPEG disc, read “track” as “file”. 1 When playing a disc containing both MP3 and JPEG files, set one of them to be played (A page 30). Load a disc. TV screen Elapsed time of the track currently being played (MP3 only). Time : 00:03:08 Track: Group list Selected group 2 3 Press REPEAT while the disc is stopped.
EXA1[US UB].book Page 19 Wednesday, January 14, 2004 11:59 AM English Resume Playback How to suspend playback When playback is stopped in the middle, playback can be started from the stopped scene. This is called Resume function. Perform any of the following operations during playback. Press 7 once.* Press F AUDIO to turn off the power. Change the source to FM/AM or AUX.* * Even if the power is turned off by pressing FAUDIO after this, the position where playback has been stopped will be stored.
11:37 AM Select the scene to be played Advanced operations English EXA1mkII[US UB]-04.fm Page 20 Tuesday, October 19, 2004 out only when the PBC function is off. • This operation cannot be carried out for a disc without a menu screen. • Playback may start for some discs without pressing ENTER. Designate the time (Time search) Cursor (5// /2/3 ) /ENTER 1 Press ON SCREEN twice during playback*2. The menu bar will be displayed (A page 29). 2 3 4 Number buttons Press cursor2/3 to select Press ENTER.
EXA1mkII[US UB]-04.fm Page 21 Friday, October 22, 2004 1:24 PM English Program Playback/Random Playback Play the disc in the desired order (Program Playback) It is possible to program a maximum of 99 tracks or chapters. The same track or chapter can be programmed more than once. 1 While the disc is stopped, press PLAY MODE repeatedly to display “PRGM” on the display window on the main unit. “PRGM” is an abbreviation for PROGRAM.
EXA1mkII[US UB]-04.fm Page 22 Tuesday, October 19, 2004 11:37 AM To program on the display window on the main unit, operate as follows. (1) Select a group/title using the number buttons. Display example of the upper display window: T2 C-(2) Designate a track/chapter number using the number buttons. Display example of the upper display window: T2 C3 • Refer to “How to use the number buttons” (A page 16). • The program number will be displayed on the lower display window (Example: “P2”).
EXA1[US UB].book Page 23 Wednesday, January 14, 2004 11:59 AM English Repeat Playback Refer to page 18 for Repeat Playback of MP3 and JPEG files.
EXA1mkII[US UB]-04.fm Page 24 Tuesday, October 19, 2004 11:38 AM English Advanced operations Playing the designated part repeatedly (A-B Repeat Playback) 1 Press ON SCREEN twice during playback. The menu bar (A page 29) will be displayed. 2 3 4 Press cursor2/3 to select OFF . Press ENTER. Press cursor5// to display OFF A B . Other Repeat modes can be selected here. For other Repeat modes, refer to “Playing the title/chapter/group/track/all tracks repeatedly (REPEAT)” (A page 23).
EXA1[US UB].book Page 25 Wednesday, January 14, 2004 11:59 AM English Other convenient functions Cursor (5// /2/3 ) /ENTER Selecting the audio language 1 Press AUDIO during playback of a disc containing several audio languages. Example: • Each time you press the button, the audio language will be alternated. Also, the audio language can be changed by pressing cursor5//. • For a language code such as “AA”, refer to “Language codes” (A page 39).
EXA1mkII[US UB]-04.fm Page 26 Tuesday, October 19, 2004 11:38 AM Enlarging the picture (ZOOM) 3 4 Press ZOOM during playback or while paused. • Each time you press the button, the picture magnification will be changed. • (For a JPEG) You cannot change the picture magnification during slide-show playback. 2 TV screen GAMMA 5 6 Press cursor5//to change the value. Press ENTER. To adjust other items, go back to Step 3. Select the portion you want to see by using cursor 5// /2/3.
EXA1mkII[US UB]-04.fm Page 27 Tuesday, October 19, 2004 11:38 AM English Other convenient functions (continued) Adjusting playback level (DVD LEVEL) The audio of a DVD VIDEO and DVD AUDIO may be recorded at a lower level (volume) than for other types of disc. If the difference is not to your liking, adjust the DVD Level. 1 Press DVD LEVEL during playback. • Each time you press the button, the level will be alternated among “NOR” (Normal), “MID” (Middle) and “HIG” (High).
Page 28 Wednesday, January 14, 2004 11:59 AM Functions specific to DVD AUDIO Advanced operations NOTE Set the remote control mode selector to AUDIO before using the number buttons. English EXA1[US UB].book Playing the Bonus Group There are some DVD AUDIO discs with a special group, called “Bonus Group”, recorded. NOTE This operation can be carried out when “BONUS” is lit on the display window on the main unit. 1 Press GROUP/TITLE repeatedly during playback to select a bonus group.
EXA1mkII[US UB]-04.fm Page 29 Tuesday, October 19, 2004 11:39 AM English Using the menu bar Select this to change time information displayed on the display window on the main unit and the status bar. Each time ENTER is pressed, the display will be alternated. DVD VIDEO/DVD AUDIO (operating during playback) TOTAL : Elapsed playing time of current title/ group. T.REM : Remaining time of current title/group TIME : Elapsed playing time of current chapter/track.
Page 30 Tuesday, October 19, 2004 11:39 AM Preferences Advanced operations Items Contents MENU LANGUAGE Select the language for the DVD VIDEO menu. English EXA1mkII[US UB]-04.fm AUDIO LANGUAGE Select the audio language for the DVD VIDEO. Cursor (5// /2/3 ) /ENTER SUBTITLE Select the subtitle language for the DVD VIDEO. ON SCREEN LANGUAGE Select the language displayed on the preference screens. PICTURE Items Contents ( MONITOR TYPE Select a display method suitable for your TV.
EXA1[US UB].book Page 31 Wednesday, January 14, 2004 11:59 AM English Preferences (continued) PICTURE AUDIO OTHERS Items Contents ( DIGITAL AUDIO OUTPUT Select an output signal type from the following in accordance with the device connected to the digital audio output terminal (AV amplifier, etc.). (See the list below for the preference items and output signal.) : initial setting) PCM ONLY: Device corresponding only to linear PCM. Items Contents ( RESUME Select ON /OFF.
Page 32 Wednesday, January 14, 2004 11:59 AM Country/Area codes AD AE AF AG AI AL AM AN AO AQ AR AS AT AU AW AZ BA BB BD BE BF BG BH BI BJ BM BN BO BR BS BT BV BW BY BZ CA CC CF CG CH CI CK CL CM CN CO CR CU CV CX CY CZ DE DJ DK DM DO DZ EC EE EG EH ER Andorra United Arab Emirates Afghanistan Antigua and Barbuda Anguilla Albania Armenia Netherlands Antilles Angola Antarctica Argentina American Samoa Austria Australia Aruba Azerbaijan Bosnia and Herzegovina Barbados Bangladesh Belgium Burkina Faso Bulgari
EXA1[US UB].book Page 33 Wednesday, January 14, 2004 11:59 AM English Listening to a radio broadcast You can tune in to FM or AM. Selecting a station 1 Press FM/AM. Each time you press the button, the band will be alternated between FM and AM. Example: Frequency Cursor (5// ) 2 Press TUNING or TUNING to select the station (frequency). Automatic tuning: Hold down TUNING or TUNING until the system starts searching, and then release the button.
Page 34 Wednesday, January 14, 2004 11:59 AM Tuning in to a preset station Listening to radio 3 Select the number you want to store by pressing cursor 2/3 while the memory number is blinking. English EXA1[US UB].book • You can also select the number by using the number buttons. • Refer to “How to use the number buttons” (A page 16). 4 Cursor (2/3 ) /ENTER Press MEMORY or ENTER while the selected number is blinking. “SET” will be displayed and the selected station will be stored.
English EXA1[US UB].book Page 35 Wednesday, January 14, 2004 11:59 AM Listening to the sound of other audio device Auto Standby If there is no operation for 3 minutes while the disc is stopped, the power will be automatically turned off. 1 Connect the other audio device to this system in advance (A page 11). 1 Press AUX. The source changes to AUX. 2 Play the other audio device. For details, refer to the manual of the device connected.
Page 36 Wednesday, January 14, 2004 11:59 AM Sleep Timer Tray Lock You can lock the disc tray to prevent the disc from being ejected. English EXA1[US UB].book Setting Turn off the power. And while holding down 7(Stop) on the main unit, press 0(Open/Close). “LOCKED” appears on the display window on the main unit. When the time you specify elapses, the system will be turned off by itself. Press SLEEP.
EXA1mkII[US UB]-06.fm Page 37 Tuesday, October 19, 2004 11:48 AM English Using AV COMPU LINK Reference When the TV set or device to be connected is a JVC product equipped with the AV COMPU LINKII or -III jack, connecting them to the AV COMPU LINK jack on the system will allow you to control the other devices by operating one device. Connection with a TV set and an AV amplifier AV COMPU LINK-II or -III • Also read manuals of the AV amplifier.
Page 38 Wednesday, January 14, 2004 11:59 AM Troubleshooting When you encounter a problem that seems to be a fault, check the following points before contacting your JVC service center: Power source 7 Power does not come on. • The power cord is not connected to the main unit or an AC outlet. → Connect the power cord correctly. (A page 12) Reference 7 The TV screen darkens. • “SCREEN SAVER” is set. → If set, press any button. (A page 30) English EXA1[US UB].book 7 The screen cannot be switched.
EXA1mkII[US UB]-06.fm Page 39 Tuesday, October 19, 2004 11:41 AM English Troubleshooting (continued) Others 7 It is not possible to switch audio or subtitles between languages. • The disc does not contain 2 or more languages. → If only a single language is recorded on the disc, switching to another language is impossible. (A page 25) 7 No subtitle is displayed. • The disc does not contain any subtitles. → A DVD VIDEO without subtitles cannot display any subtitles.
Page 40 Wednesday, January 14, 2004 11:59 AM Specifications Reference General Power source: Power consumption: Audio input AC 110 – 240 V Ó , 50 Hz/60 Hz (except for Hong Kong) AC 220 V Ó , 50 Hz (for Hong Kong only) 24 W (in operation) 1.1 W (on standby) 3.
EXA1mkII[US UB]_CS-BackCov.
Page 1 Friday, January 16, 2004 2:25 PM COMPACT COMPONENT SYSTEM SISTEMAS DE COMPONENTES COMPACTOS SISTEMA DE COMPONENTES COMPACTOS Português EX-A1 Español English EXA1[UW]-00Cov1.
EXA1[UW]-00Cov2.fm Page 1 Friday, January 16, 2004 2:29 PM Warnings, cautions and others/Avisos, precauciones y otras notas/Advertêcias, precauções e outras notas CAUTION To reduce the risk of electrical shocks, fire, etc.: 1. Do not remove screws, covers or cabinet. 2. Do not expose this appliance to rain or moisture. PRECAUTION Para reducir el riesgo de descargas eléctricas, fuego, etc.: 1. No quitar los tomillos, tapas o caja. 2. No exponer el aparato a la lluvia ni a la húmedad. 1.
EXA1[UW]-00Cov2.fm Page 2 Friday, January 16, 2004 4:08 PM Introduction CAUTION — Proper Ventilation To avoid risk of electric shock and fire and to protect from damage, locate the apparatus as follows: Top/Front/Back/Sides: No obstructions should be placed in the areas shown by the dimensions below. Bottom: Place on the level surface. Maintain adequate air path for ventilation by placing on a stand with a height of 10 cm more. In addition, maintain the best possible air circulation.
EXA1[UW].book Page 1 Thursday, January 8, 2004 10:09 AM English Table of contents Introduction Warnings, cautions and others....................G-1 Special cautions ..............................................2 About discs......................................................3 To select the color system...............................5 Description of parts .........................................6 Getting started Using the remote control .................................
Page 2 Friday, January 16, 2004 2:08 PM Special cautions Introduction Care of the cabinet When cleaning the system, use a soft cloth and follow the relevant instructions on the use of chemically-coated cloths. Do not use benzene, thinner or other organic solvents including disinfectants. These may cause deformation or discoloring. Notes on handling 7 Important cautions Installation of the system • Select a place which is level, dry and neither too hot nor too cold; between 5°C and 35°C.
EXA1[UW].book Page 3 Thursday, January 8, 2004 10:09 AM English About discs Discs that cannot be played back Playable disc types This system has been designed to play back the following discs: DVD VIDEO, DVD AUDIO, VCD, SVCD, CD This system can also play back the following discs: • Finalized DVD-R/RW discs recorded in the DVD VIDEO format.
EXA1[UW].book Page 4 Thursday, January 8, 2004 10:09 AM English Introduction Disc structure DVD VIDEO A DVD VIDEO consists of “titles” and each title may be divided into “chapters”. Title 1 Title 2 Chapter 1 Chapter 2 Chapter 3 Chapter 1 Chapter 2 DVD AUDIO A DVD AUDIO consists of “groups” and each group may be divided into “tracks”. Some discs include a “bonus group” that requires a password for playing (A page 28).
EXA1[UW]-01.fm Page 5 Friday, January 16, 2004 2:08 PM English To select the color system This system is compatible with PAL and NTSC color systems. In standby mode, select PAL or NTSC to match your TV. If the VIDEO OUT SELECT switch is switched over when the power is ON, turn off the power, and then turn it on again. 13 13 Color system of TV Multi-color system VIDEO OUT SELECT PAL or NTSC* PAL PAL NTSC NTSC * Set the color system of the unit and TV to match the playback disc.
EXA1[UW]-01.fm Page 6 Friday, January 16, 2004 2:08 PM Description of parts English Introduction The numbers represent the page numbers. Front panel Play/Pause:13, 15 Look at “Display window” below. 33 35 Remote control sensor: 7 12,13 STANDBY/ON : 13 Open/Close : 13 Headphones jack* VOLUME control: 17 PHONES Disc tray: 13 15 15 15 * Connect a pair of headphones (commercially available) with a stereo mini plug.
EXA1[UW].book Page 7 Thursday, January 8, 2004 10:09 AM English Using the remote control The numbers represent the page numbers.
EXA1[UW].book Page 8 Thursday, January 8, 2004 10:09 AM This page is for when operating your TV using the remote control of this product. Operating the TV using the remote control 4 Press number buttons (1-9, 0). Examples: For a Hitachi TV: Press 1, then 0. For a Toshiba TV: Press 0, then 8. English Getting Introduction started If there are more than one manufacturer’s codes, try them in turn and select the one that causes the product to work properly.
EXA1[UW].book Page 9 Thursday, January 8, 2004 10:09 AM English Connecting up – Do not turn on the power until the connection is complete – Connection Connecting antennas Connecting AM loop antenna (supplied) 1 Set up the AM loop antenna. Connecting FM antenna (supplied) (/ ǡ %1#:+#. FM antenna Main unit (rear panel) Put the antenna up straight in the direction where the best radio reception can be obtained, and fix by using tape. 2 Connect antenna cords.
EXA1[UW].book Page 10 Thursday, January 8, 2004 10:09 AM Getting Connection started English Connecting up Connecting speakers There is no difference between the left and right speakers.
EXA1[UW].book Page 11 Thursday, January 8, 2004 10:09 AM English Connecting up (continued) – Do not turn on the power until the connection is complete – Connection Connecting other devices This page is for when connecting the main unit with other devices. Connecting subwoofer With an amplifier-built in subwoofer (sold separately), you can enjoy a more dynamic bass sound. Refer to the manual of the subwoofer for details.
Page 12 Thursday, January 8, 2004 10:09 AM Connecting up Getting Connection started Connecting by using the component video cord Connecting with TV TV Supplied composite video cord Main unit English EXA1[UW].book You can enjoy better quality pictures than when using the S-Video cord. CAUTION Connect the main unit directly with a TV (or a monitor) without routing through a VCR. Otherwise it may cause picture distortion while playing.
EXA1[UW].book Page 13 Thursday, January 8, 2004 10:09 AM English Playing discs Playback (Refer to page 17 for playing MP3 and JPEG.) A page 6 1 Place a disc with the label side facing up. • Place an 8 cm disc in to the hollow part in the center. Press F AUDIO. • The power will be turned on and the STANDBY lamp will go off. • Press F AUDIO again to turn off the power. 2 Press 0 OPEN/CLOSE to open the disc tray to load a disc. 3 Press 3 (play). The disc tray will close and playback will start.
EXA1[UW].book Page 14 Thursday, January 8, 2004 10:09 AM Example: When an MP3 disc is played Elapsed playing time English Basic operations Track number Example: When a JPEG disc is played Group number File number Display window during disc playback Example: When a DVD VIDEO or DVD AUDIO is played Elapsed playing time Chapter/Track number If “BONUS” or “B.S.P.” is displayed during a DVD AUDIO playback, refer to page 28.
EXA1[UW].book Page 15 Thursday, January 8, 2004 10:09 AM English Playing discs (continued) Designate the chapter number or track number to play during playback. Refer to “How to use the number buttons” on page 16. To stop playback Press 7 during playback. To pause playback 3 (Play button) Press 8 during playback. Cursor (5// ) To resume normal playback, press 3 (play). • Press 8 to pause during JPEG disc slide-show. Press 3(play) to start playback from the next file.
EXA1[UW].book Page 16 Thursday, January 8, 2004 10:09 AM Playing back from a position 10 seconds before (One Touch Replay) Skip to the beginning of the selection English Basic operations Press 4 or ¢ during playback*. Press during playback. NOTE • This operation may not be carried out for some discs. • It is not possible to go back to the immediately previous title. Slow Motion Playback Press SLOW pause. or SLOW during • Each time you press the button, the speed increases.
EXA1[UW].book Page 17 Thursday, January 8, 2004 10:09 AM English Playing discs (continued) Playing MP3 and JPEG discs To change the brightness of the display window (DIMMER) Press DIMMER repeatedly. • The modified brightness will be stored even after the power is turned off. The items below can be carried out for all sources. Adjusting the volume Press AUDIO VOL +/–. NOTE 3 (Play button) The volume can be adjusted by turning the VOLUME control on the main unit.
EXA1[UW].book Page 18 Thursday, January 8, 2004 10:09 AM Playback Repeat playback Display of an MP3 disc is described here as an example. For a JPEG disc, read “track” as “file”. 1 When playing a disc containing both MP3 and JPEG files, set one of them to be played (A page 30). Load a disc. TV screen Elapsed time of the track currently being played (MP3 only). Time : 00:03:08 Track: Group list Selected group 2 3 Press REPEAT while the disc is stopped.
EXA1[UW].book Page 19 Thursday, January 8, 2004 10:09 AM English Resume Playback How to suspend playback When playback is stopped in the middle, playback can be started from the stopped scene. This is called Resume function. Perform any of the following operations during playback. Press 7 once.* Press F AUDIO to turn off the power. Change the source to FM/AM or AUX.* * Even if the power is turned off by pressing FAUDIO after this, the position where playback has been stopped will be stored.
Page 20 Thursday, January 8, 2004 10:09 AM Select the scene to be played Advanced operations English EXA1[UW].book without a menu screen. • Playback may start for some discs without pressing ENTER. Designate the time (Time search) 1 Cursor (5// /2/3 ) /ENTER Press ON SCREEN twice during playback*2. The menu bar will be displayed (A page 29). 2 3 4 Press cursor2/3 to select Press ENTER. Input the time*3 using the number buttons (1-9, 0).
EXA1[UW].book Page 21 Thursday, January 8, 2004 10:09 AM English Program Playback/Random Playback Play the disc in the desired order (Program Playback) It is possible to program a maximum of 99 chapters or tracks. The same chapter or track can be programmed more than once. 1 While the disc is stopped, press PLAY MODE repeatedly to display “PRGM” on the display window on the main unit. “PRGM” is an abbreviation for PROGRAM.
EXA1[UW].book Page 22 Thursday, January 8, 2004 10:09 AM To program on the display window on the main unit, operate as follows. (1) Select a title/group using the number buttons. Display example of the upper display window: T2 C-(2) Designate a chapter/track number using the number buttons. Display example of the upper display window: T2 C3 • Refer to “How to use the number buttons” (A page 16). • The program number will be displayed on the lower display window (Example: “P2”).
EXA1[UW]-04.fm Page 23 Thursday, January 8, 2004 10:18 AM English Repeat Playback Refer to page 18 for Repeat Playback of MP3 and JPEG files.
EXA1[UW].book Page 24 Thursday, January 8, 2004 10:09 AM English Advanced operations Playing the designated part repeatedly (A-B Repeat Playback) 1 Press ON SCREEN twice during playback. The menu bar (A page 29) will be displayed. 2 3 4 Press cursor2/3 to select OFF . Press ENTER. Press cursor5// to display OFF A B . Other Repeat modes can be selected here. For other Repeat modes, refer to “Playing the title/chapter/group/track/all tracks repeatedly (REPEAT)” (A page 23).
EXA1[UW].book Page 25 Thursday, January 8, 2004 10:09 AM English Other convenient functions Cursor (5// /2/3 ) /ENTER Selecting the audio language 1 Press AUDIO during playback of a disc containing several audio languages. Example: • Each time you press the button, the audio language will be alternated. Also, the audio language can be changed by pressing cursor5//. • For a language code such as “AA”, refer to “Language codes” (A page 39).
EXA1[UW].book Page 26 Thursday, January 8, 2004 10:09 AM Enlarging the picture (ZOOM) 3 4 Press ZOOM during playback or while paused. • Each time you press the button, the picture magnification will be changed ( M1.5 only for a VCD and SVCD). 2 Select the portion you want to see by using cursor 5// /2/3. • This operation cannot be carried out when the magnification is M1. • To resume normal playback, select M1 in Step 1. Adjusting the picture quality (VFP) 1 Press ENTER.
EXA1[UW].book Page 27 Thursday, January 8, 2004 10:09 AM English Other convenient functions (continued) types of disc. If the difference is not to your liking, adjust the DVD Level. 1 Press DVD LEVEL during playback. • Each time you press the button, the level will be alternated among “NOR” (Normal), “MID” (Middle) and “HIG” (High). • Select the level while listening to the sound played. NOTE • DVD Level is effective only for playback of a DVD.
Page 28 Thursday, January 8, 2004 10:09 AM Functions specific to DVD AUDIO Advanced operations NOTE Set the remote control mode selector to AUDIO before using the number buttons. English EXA1[UW].book Playing the Bonus Group There are some DVD AUDIO discs with a special group, called “Bonus Group”, recorded. NOTE This operation can be carried out when “BONUS” is lit on the display window on the main unit. 1 Press GROUP/TITLE repeatedly during playback to select a bonus group.
EXA1[UW].book Page 29 Thursday, January 8, 2004 10:09 AM English Using the menu bar Select this to change time information displayed on the display window on the main unit and the status bar. Each time ENTER is pressed, the display will be alternated. DVD VIDEO/DVD AUDIO (operating during playback) TOTAL : Elapsed playing time of current title/ group. T.REM : Remaining time of current title/group TIME : Elapsed playing time of current chapter/track.
Page 30 Thursday, January 8, 2004 10:09 AM Preferences Advanced operations LANGUAGE English EXA1[UW].book NOTE Cursor (5///2/3 ) /ENTER • If the selected language is not recorded on the disc, the optimum language set for the disc will be displayed. • For a language code such as “AA”, refer to the “Language codes ” (A page 39). Items Contents MENU LANGUAGE Select the language for the DVD VIDEO menu. AUDIO LANGUAGE Select the audio language for the DVD VIDEO.
EXA1[UW]-04.fm Page 31 Friday, February 6, 2004 11:13 AM English Preferences (continued) PICTURE AUDIO OTHERS Items Contents ( DIGITAL AUDIO OUTPUT Select an output signal type from the following in accordance with the device connected to the digital audio output terminal (AV amplifier, etc.). (See the list below for the preference items and output signal.) : initial setting) PCM ONLY: Device corresponding only to linear PCM. Items Contents ( RESUME Select ON /OFF.
Page 32 Thursday, January 8, 2004 10:09 AM Country/Area codes AD AE AF AG AI AL AM AN AO AQ AR AS AT AU AW AZ BA BB BD BE BF BG BH BI BJ BM BN BO BR BS BT BV BW BY BZ CA CC CF CG CH CI CK CL CM CN CO CR CU CV CX CY CZ DE DJ DK DM DO DZ EC EE EG EH ER Andorra United Arab Emirates Afghanistan Antigua and Barbuda Anguilla Albania Armenia Netherlands Antilles Angola Antarctica Argentina American Samoa Austria Australia Aruba Azerbaijan Bosnia and Herzegovina Barbados Bangladesh Belgium Burkina Faso Bulgaria
EXA1[UW].book Page 33 Thursday, January 8, 2004 10:09 AM English Listening to a radio broadcast You can tune in to FM or AM. Selecting a station 1 Press FM/AM. Each time you press the button, the band will be alternated between FM and AM. Example: Frequency Cursor (5// ) 2 Press TUNING or TUNING to select the station (frequency). Automatic tuning: Hold down TUNING or TUNING until the system starts searching, and then release the button.
Page 34 Thursday, January 8, 2004 10:09 AM Tuning in to a preset station Listening to radio 3 Select the number you want to store by pressing cursor 2/3 while the memory number is blinking. English EXA1[UW].book • You can also select the number by using the number buttons. • Refer to “How to use the number buttons” (A page 16). 4 Cursor (2/3 ) /ENTER Press MEMORY or ENTER while the selected number is blinking. “SET” will be displayed and the selected station will be stored.
English EXA1[UW].book Page 35 Thursday, January 8, 2004 10:09 AM Listening to the sound of other audio device Auto Standby If there is no operation for 3 minutes while the disc is stopped, the power will be automatically turned off. 1 Connect the other audio device to this system in advance (A page 11). 1 Press AUX. The source changes to AUX. 2 Play the other audio device. For details, refer to the manual of the device connected.
Page 36 Thursday, January 8, 2004 10:09 AM Sleep Timer Tray Lock You can lock the disc tray to prevent the disc from being ejected. English EXA1[UW].book Setting Turn off the power. And while holding down 7(Stop) on the main unit, press 0(Open/Close). “LOCKED” appears on the display window on the main unit. When the time you specify elapses, the system will be turned off by itself. Press SLEEP.
EXA1[UW].book Page 37 Thursday, January 8, 2004 10:09 AM English Using AV COMPU LINK Reference When the TV set or device to be connected is a JVC product equipped with the AV COMPU LINKII or -III jack, connecting them to the AV COMPU LINK jack on the system will allow you to control the other devices by operating one device. Connection with a TV set and an AV amplifier AV COMPU LINK-II or -III • Also read manuals of the AV amplifier.
Page 38 Thursday, January 8, 2004 10:09 AM Troubleshooting When you encounter a problem that seems to be a fault, check the following points before contacting your JVC service center: Power source 7 Power does not come on. • The power cord is not connected to the main unit or an AC outlet. → Connect the power cord correctly. (A page 12) Reference 7 The TV screen darkens. • “SCREEN SAVER” is set. → If set, press any button. (A page 30) English EXA1[UW].book 7 The screen cannot be switched.
EXA1[UW].book Page 39 Thursday, January 8, 2004 10:09 AM English Troubleshooting (continued) Others 7 It is not possible to switch audio or subtitles between languages. • The disc does not contain 2 or more languages. → If only a single language is recorded on the disc, switching to another language is impossible. (A page 25) 7 No subtitle is displayed. • The disc does not contain any subtitles. → A DVD VIDEO without subtitles cannot display any subtitles. • The subtitle language is set to “OFF”.
EXA1[UW]-specification.fm Page 40 Friday, January 16, 2004 4:11 PM Specifications General Power source: Power consumption: Audio input AC 110 - 240 V Ó, 50 Hz/60 Hz 24 W (in operation) 1.1 W (on standby) 3.
EXA1[UW]-BackCov.
EXA1mkII[UJ]-00Cov1.
EXA1[UJ].book Page 1 Monday, January 19, 2004 1:54 PM Warnings, cautions and others CAUTION To reduce the risk of electrical shocks, fire, etc.: 1. Do not remove screws, covers or cabinet. 2. Do not expose this appliance to rain or moisture. CAUTION — F button! Disconnect the mains plug to shut the power off completely (the STANDBY lamp goes off). The F button in any position does not disconnect the mains line. • When the system is on standby, the STANDBY lamp lights red.
EXA1[UJ].book Page 2 Monday, January 19, 2004 1:54 PM Introduction CAUTION — Proper Ventilation To avoid risk of electric shock and fire and to protect from damage, locate the apparatus as follows: Top/Front/Back/Sides: No obstructions should be placed in the areas shown by the dimensions below. Bottom: Place on the level surface. Maintain adequate air path for ventilation by placing on a stand with a height of 10 cm more. In addition, maintain the best possible air circulation.
EXA1[UJ]-TOC.fm Page 1 Wednesday, January 28, 2004 2:46 PM Table of contents Introduction Functions specific to DVD AUDIO................. 28 Playing the Bonus Group...................................28 Browsable Still Pictures (B.S.P.) .......................28 Warnings, cautions and others....................G-1 Special cautions ..............................................2 About discs......................................................3 Description of parts ......................................
EXA1[UJ]-01.fm Page 2 Wednesday, January 28, 2004 2:46 PM Special cautions Introduction Care of the cabinet When cleaning the system, use a soft cloth and follow the relevant instructions on the use of chemically-coated cloths. Do not use benzene, thinner or other organic solvents including disinfectants. These may cause deformation or discoloring.
EXA1mkII[UJ]-01.fm Page 3 Wednesday, October 13, 2004 3:57 PM About discs Discs that cannot be played back Playable disc types This system has been designed to play back the following discs: DVD VIDEO, DVD AUDIO, VCD, SVCD, CD This system can also play back the following discs: • Finalized DVD-R/RW discs recorded in the DVD VIDEO format.
EXA1mkII[UJ]-01.fm Page 4 Wednesday, October 13, 2004 3:57 PM Introduction Disc structure DVD VIDEO A DVD VIDEO consists of “titles” and each title may be divided into “chapters”. Title 1 Title 2 Chapter 1 Chapter 2 Chapter 3 Chapter 1 Chapter 2 DVD AUDIO A DVD AUDIO consists of “groups” and each group may be divided into “tracks”. Some discs include a “bonus group” that requires a password for playing (A page 28).
EXA1[UJ]-01.
EXA1mkII[UJ]-01.fm Page 6 Wednesday, October 13, 2004 3:58 PM Description of parts Introduction The numbers represent the page numbers. Front panel Play/Pause:13, 15 Look at “Display window” below. 33 35 Remote control sensor: 7 12,13 STANDBY/ON : 13 Open/Close : 13 Headphones jack* VOLUME control: 17 PHONES Disc tray: 13 15 15 15 * Connect a pair of headphones (commercially available) with a stereo mini plug. If the headphones are connected, the speakers and subwoofer will not produce any sound.
EXA1[UJ].book Page 7 Monday, January 19, 2004 1:54 PM Using the remote control The numbers represent the page numbers. Putting the batteries in the remote control 13 17 14 16, 18 8 8 15, 33 16 15 20 20, 29 29 25 30 14 27 28 26 21 33 27 35 34, 35 11 33 36 13 8 35 8 One touch 17 replay: 16 Remote control mode selector: 8 17 15, 33 13 16 15 20 20, 29 Batteries (2) 22 25 25 Number buttons: 8, 16 23 27 17 17 If the range or effectiveness of the remote control decreases, replace the batteries.
EXA1mkII[UJ]-01.fm Page 8 Wednesday, October 13, 2004 4:23 PM Getting Introduction started This page is for when operating your TV using the remote control of this product. Operating the TV using the remote control 4 Press number buttons (1-9, 0). Examples: For a Hitachi TV: Press 1, then 0. For a Toshiba TV: Press 0, then 8. If there are more than one manufacturer’s codes, try them in turn and select the one that causes the product to work properly.
EXA1[UJ].book Page 9 Monday, January 19, 2004 1:54 PM Connecting up – Do not turn on the power until the connection is complete – Connection Connecting antennas Connecting AM loop antenna (supplied) 1 Set up the AM loop antenna. Connecting FM antenna (supplied) (/ ǡ %1#:+#. FM antenna Main unit (rear panel) Put the antenna up straight in the direction where the best radio reception can be obtained, and fix by using tape. 2 Connect antenna cords.
EXA1[UJ].book Page 10 Monday, January 19, 2004 1:54 PM Connecting up Getting Connection started Connecting speakers There is no difference between the left and right speakers.
EXA1mkII[UJ]-02.fm Page 11 Wednesday, October 13, 2004 Connecting up (continued) 3:59 PM – Do not turn on the power until the connection is complete – Connection Connecting other devices This page is for when connecting the main unit with other devices. Connecting subwoofer With an amplifier-built in subwoofer (sold separately), you can enjoy a more dynamic bass sound. Refer to the manual of the subwoofer for details.
EXA1[UJ]-02.fm Page 12 Wednesday, January 28, 2004 2:47 PM Connecting up Getting Connection started Connecting by using the component video cord Connecting with TV TV Supplied composite video cord Main unit You can enjoy better quality pictures than when using the S-Video cord. CAUTION Connect the main unit directly with a TV (or a monitor) without routing through a VCR. Otherwise it may cause picture distortion while playing.
EXA1mkII[UJ]-03.fm Page 13 Wednesday, October 13, 2004 3:59 PM Playing discs Playback (Refer to page 17 for playing MP3 and JPEG.) A page 6 1 Place a disc with the label side facing up. • Place an 8 cm disc in to the hollow part in the center. Press F AUDIO. • The power will be turned on and the STANDBY lamp will go off. • Press F AUDIO again to turn off the power. 2 Press 0OPEN/CLOSE to open the disc tray to load a disc. 3 Press 3 (play). The disc tray will close and playback will start.
EXA1mkII[UJ]-03.fm Page 14 Wednesday, October 13, 2004 3:59 PM Basic operations Example: When an MP3 disc is played Elapsed playing time Track number Example: When a JPEG disc is played Group number File number Display window during disc playback Example: When a DVD VIDEO or DVD AUDIO is played Elapsed playing time Chapter/Track number If “BONUS” or “B.S.P.” is displayed during a DVD AUDIO playback, refer to page 28.
EXA1mkII[UJ]-03.fm Page 15 Wednesday, October 13, 2004 3:59 PM Playing discs (continued) Designate the chapter number or track number to play during playback. Refer to “How to use the number buttons” on page 16. To stop playback Press 7 during playback. To pause playback 3 (Play button) Press 8 during playback. Cursor (5// ) To resume normal playback, press 3 (play). • Press 8 to pause during JPEG disc slide-show. Press 3 (play) to start playback from the next file.
EXA1[UJ].book Page 16 Monday, January 19, 2004 1:54 PM Basic operations Playing back from a position 10 seconds before (One Touch Replay) Skip to the beginning of the selection Press 4 or ¢ during playback*. Press during playback. NOTE • This operation may not be carried out for some discs. • It is not possible to go back to the immediately previous title. Slow Motion Playback Press SLOW pause. or SLOW during • Each time you press the button, the speed increases.
EXA1[UJ].book Page 17 Monday, January 19, 2004 1:54 PM Playing discs (continued) Playing MP3 and JPEG discs To change the brightness of the display window (DIMMER) Press DIMMER repeatedly. • The modified brightness will be stored even after the power is turned off. The items below can be carried out for all sources. Adjusting the volume Press AUDIO VOL +/–. NOTE 3 (Play button) The volume can be adjusted by turning the VOLUME control on the main unit.
EXA1[UJ].book Page 18 Monday, January 19, 2004 1:54 PM Advanced operations Playback Repeat playback Display of an MP3 disc is described here as an example. For a JPEG disc, read “track” as “file”. 1 Each time you press the button, the Repeat type will be alternated. NOTE When playing a disc containing both MP3 and JPEG files, set one of them to be played (A page 30). 1 Load a disc. TV screen Elapsed time of the track currently being played (MP3 only).
EXA1[UJ].book Page 19 Monday, January 19, 2004 1:54 PM Resume Playback How to suspend playback When playback is stopped in the middle, playback can be started from the stopped scene. This is called Resume function. Perform any of the following operations during playback. Press 7 once.* Press F AUDIO to turn off the power. Change the source to FM/AM or AUX.* * Even if the power is turned off by pressing FAUDIO after this, the position where playback has been stopped will be stored.
EXA1mkII[UJ]-04.fm Page 20 Wednesday, October 13, 2004 4:01 PM Select the scene to be played Advanced operations out only when the PBC function is off. • This operation cannot be carried out for a disc without a menu screen. • Playback may start for some discs without pressing ENTER. Designate the time (Time search) Cursor (5// /2/3 ) /ENTER Number buttons 1 Press ON SCREEN twice during playback*2. The menu bar will be displayed (A page 29). 2 3 4 Press cursor2/3 to select Press ENTER.
EXA1mkII[UJ]-04.fm Page 21 Sunday, October 17, 2004 3:18 PM Program Playback/Random Playback Play the disc in the desired order (Program Playback) It is possible to program a maximum of 99 tracks or chapters. The same track or chapter can be programmed more than once. 1 While the disc is stopped, press PLAY MODE repeatedly to display “PRGM” on the display window on the main unit. “PRGM” is an abbreviation for PROGRAM.
EXA1mkII[UJ]-04.fm Page 22 Sunday, October 17, 2004 3:19 PM Advanced operations To program on the display window on the main unit, operate as follows. (1) Select a group/title using the number buttons. Display example of the upper display window: T2 C-(2) Designate a track/chapter number using the number buttons. Display example of the upper display window: T2 C3 • Refer to “How to use the number buttons” (A page 16). • The program number will be displayed on the lower display window (Example: “P2”).
EXA1[UJ].book Page 23 Monday, January 19, 2004 1:54 PM Repeat Playback Refer to page 18 for Repeat Playback of MP3 and JPEG files.
EXA1mkII[UJ]-04.fm Page 24 Wednesday, October 13, 2004 4:03 PM Advanced operations Playing the designated part repeatedly (A-B Repeat Playback) 1 Press ON SCREEN twice during playback. The menu bar (A page 29) will be displayed. 2 3 4 Press cursor2/3 to select OFF . Press ENTER. Press cursor5// to display OFF A B . Other Repeat modes can be selected here. For other Repeat modes, refer to “Playing the title/chapter/group/track/all tracks repeatedly (REPEAT)” (A page 23).
EXA1[UJ].book Page 25 Monday, January 19, 2004 1:54 PM Other convenient functions Cursor (5// /2/3 ) /ENTER Selecting the audio language 1 Press AUDIO during playback of a disc containing several audio languages. Example: • Each time you press the button, the audio language will be alternated. Also, the audio language can be changed by pressing cursor5//. • For a language code such as “AA”, refer to “Language codes” (A page 39).
EXA1mkII[UJ]-04.fm Page 26 Wednesday, October 13, 2004 4:03 PM Advanced operations Enlarging the picture (ZOOM) 3 4 Press ZOOM during playback or while paused. • Each time you press the button, the picture magnification will be changed. • (For a JPEG) You cannot change the picture magnification during slide-show playback. 2 TV screen GAMMA 5 6 Press cursor5//to change the value. Press ENTER. To adjust other items, go back to Step 3. Select the portion you want to see by using cursor 5// /2/3.
EXA1mkII[UJ]-04.fm Page 27 Wednesday, October 13, 2004 4:03 PM Other convenient functions (continued) Adjusting playback level (DVD LEVEL) The audio of a DVD VIDEO and DVD AUDIO may be recorded at a lower level (volume) than for other types of disc. If the difference is not to your liking, adjust the DVD Level. 1 Press DVD LEVEL during playback. • Each time you press the button, the level will be alternated among “NOR” (Normal), “MID” (Middle) and “HIG” (High).
EXA1[UJ].book Page 28 Monday, January 19, 2004 1:54 PM Functions specific to DVD AUDIO Advanced operations NOTE Set the remote control mode selector to AUDIO before using the number buttons. Playing the Bonus Group There are some DVD AUDIO discs with a special group, called “Bonus Group”, recorded. NOTE This operation can be carried out when “BONUS” is lit on the display window on the main unit. 1 Press GROUP/TITLE repeatedly during playback to select a bonus group.
EXA1mkII[UJ]-04.fm Page 29 Wednesday, October 13, 2004 4:04 PM Using the menu bar Select this to change time information displayed on the display window on the main unit and the status bar. Each time ENTER is pressed, the display will be alternated. DVD VIDEO/DVD AUDIO (operating during playback) TOTAL : Elapsed playing time of current title/ group. T.REM : Remaining time of current title/group TIME : Elapsed playing time of current chapter/track.
EXA1mkII[UJ]-04.fm Page 30 Wednesday, October 13, 2004 4:04 PM Preferences Advanced operations Items Contents MENU LANGUAGE Select the language for the DVD VIDEO menu. AUDIO LANGUAGE Select the audio language for the DVD VIDEO. Cursor (5// /2/3 ) /ENTER SUBTITLE Select the subtitle language for the DVD VIDEO. ON SCREEN LANGUAGE Select the language displayed on the preference screens. PICTURE Items Contents ( MONITOR TYPE Select a display method suitable for your TV.
EXA1[UJ].book Page 31 Monday, January 19, 2004 1:54 PM Preferences (continued) PICTURE AUDIO OTHERS Items Contents ( DIGITAL AUDIO OUTPUT Select an output signal type from the following in accordance with the device connected to the digital audio output terminal (AV amplifier, etc.). (See the list below for the preference items and output signal.) : initial setting) PCM ONLY: Device corresponding only to linear PCM. Items Contents ( RESUME Select ON /OFF.
EXA1mkII[A]-04.
EXA1[UJ].book Page 33 Monday, January 19, 2004 1:54 PM Listening to a radio broadcast You can tune in to FM or AM. Selecting a station 1 Press FM/AM. Each time you press the button, the band will be alternated between FM and AM. Example: Frequency Cursor (5// ) 2 Press TUNING or TUNING to select the station (frequency). Automatic tuning: Hold down TUNING or TUNING until the system starts searching, and then release the button.
EXA1[UJ].book Page 34 Monday, January 19, 2004 1:54 PM Tuning in to a preset station Listening to radio 3 Select the number you want to store by pressing cursor 2/3 while the memory number is blinking. • You can also select the number by using the number buttons. • Refer to “How to use the number buttons” (A page 16). 4 Cursor (2/3 ) /ENTER Press MEMORY or ENTER while the selected number is blinking. “SET” will be displayed and the selected station will be stored.
EXA1[UJ].book Page 35 Monday, January 19, 2004 1:54 PM Listening to the sound of other audio device Auto Standby If there is no operation for 3 minutes while the disc is stopped, the power will be automatically turned off. 1 Connect the other audio device to this system in advance (A page 11). 1 Press AUX. The source changes to AUX. 2 Play the other audio device. For details, refer to the manual of the device connected. 3 Adjust the volume and the sound quality of the system (A page 17).
EXA1[UJ].book Page 36 Monday, January 19, 2004 1:54 PM Sleep Timer Tray Lock You can lock the disc tray to prevent the disc from being ejected. Setting Turn off the power. And while holding down 7(Stop) on the main unit, press 0(Open/Close). “LOCKED” appears on the display window on the main unit. When the time you specify elapses, the system will be turned off by itself. Press SLEEP. Each time you press the button, the time indicated on the display window on the main unit changes (in minutes).
EXA1mkII[UJ]-06.fm Page 37 Tuesday, October 19, 2004 1:35 PM Using AV COMPU LINK Reference When the TV set or device to be connected is a JVC product equipped with the AV COMPU LINKII or -III jack, connecting them to the AV COMPU LINK jack on the system will allow you to control the other devices by operating one device. Connection with a TV set and an AV amplifier AV COMPU LINK-II or -III • Also read manuals of the AV amplifier.
EXA1[UJ]-06.fm Page 38 Wednesday, January 28, 2004 2:48 PM Troubleshooting When you encounter a problem that seems to be a fault, check the following points before contacting your JVC service center: Power source 7 Power does not come on. • The power cord is not connected to the main unit or an AC outlet. → Connect the power cord correctly. (A page 12) Operation 7 You cannot operate any button. • Some specific operations may be inhibited for some discs. 7 The remote control does not work.
EXA1mkII[UJ]-06.fm Page 39 Thursday, October 14, 2004 5:44 PM Troubleshooting (continued) Others 7 It is not possible to switch audio or subtitles between languages. • The disc does not contain 2 or more languages. → If only a single language is recorded on the disc, switching to another language is impossible. (A page 25) 7 No subtitle is displayed. • The disc does not contain any subtitles. → A DVD VIDEO without subtitles cannot display any subtitles. • The subtitle language is set to “OFF”.
EXA1[UJ]-specification.fm Page 40 Wednesday, January 28, 2004 2:58 PM Specifications Reference General Power source: Power consumption: Audio input AC 110 – 240 V Ó , 50 Hz/60 Hz 24 W (in operation) 1.1 W (on standby) 3.
EXA1mkII[UJ]-BackCov.