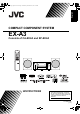
English EX-A3[J_C]-frontcover.fm Page 1 Wednesday, December 27, 2006 5:01 PM COMPACT COMPONENT SYSTEM EX-A3 Consists of CA-EXA3 and SP-EXA3 INSTRUCTIONS For Customer Use: Enter below the Model No. and Serial No. which are located either on the rear, bottom or side of the cabinet. Retain this information for future reference. Model No. Serial No.
EX-A3[J_C].book Page 1 Wednesday, December 27, 2006 3:53 PM Warnings, cautions and others (For U.S.A.) (For U.S.A.) (For U.S.A.) INFORMATION This equipment has been tested and found to comply with the limits for a Class B digital device, pursuant to part 15 of the FCC Rules. These limits are designed to provide reasonable protection against harmful interference in a residential installation.
EX-A3[J_C]-gpage.fm Page 2 Friday, January 12, 2007 9:34 AM For Canada/pour le Canada THIS DIGITAL APPARATUS DOES NOT EXCEED THE CLASS B LIMITS FOR RADIO NOISE EMISSIONS FROM DIGITAL APPARATUS AS SET OUT IN THE INTERFERENCE-CAUSING EQUIPMENT STANDARD ENTITLED “DIGITAL APPARATUS”, ICES-003 OF THE DEPARTMENT OF COMMUNICATIONS.
EX-A3[J_C]-gpage.fm Page 3 Friday, January 12, 2007 9:34 AM Warnings, cautions and others (continued) CAUTION — F button! Disconnect the mains plug to shut the power off completely (the STANDBY lamp goes off). When installing the apparatus, ensure that the plug is easily accessible. The F button in any position does not disconnect the mains line. • When the system is on standby, the STANDBY lamp lights red. • When the system is turned on, the STANDBY lamp goes off. The power can be remote controlled.
EX-A3[J_C]-gpage.fm Page 4 Friday, January 12, 2007 9:34 AM IMPORTANT FOR LASER PRODUCTS 1. CLASS 1 LASER PRODUCT 2. CAUTION: Do not open the top cover or cabinet. There are no user serviceable parts inside the unit; leave all servicing to qualified service personnel. 3. CAUTION: (For U.S.A.) Visible and/or invisible class II laser radiation when open. Do not stare into beam. (For Canada) Visible and/or invisible class 1M laser radiation when open. Do not view directly with optical instruments. 4.
EX-A3[J_C].book Page 1 Wednesday, December 27, 2006 3:53 PM Introduction Table of contents Thank you for purchasing a JVC product. Please read all instructions carefully before operation, to ensure your complete understanding and to obtain the best possible performance from the unit. Introduction Part description .............................3 Features of the main feet and studs ............... 4 Using the remote control ..............5 Inserting the batteries into the remote control ...................
EX-A3[J_C].book Page 2 Wednesday, December 27, 2006 3:53 PM Introduction Using the status bar and the menu bar.......................................39 Playing back a specified part repeatedly (A-B repeat playback) ................................. 40 Designating the time (Time search) .............. 40 Changing the initial settings with the preference screen .................41 Basic operations ........................................... 41 LANGUAGE ..................................................
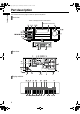
EX-A3[J_C].book Page 3 Wednesday, December 27, 2006 3:53 PM Introduction Part description The numbers refer to the pages in which the parts are explained. Front view Refer to “Display window” shown below.
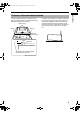
Features of the main feet and studs The use of three main feet on the bottom of the main unit enables higher sound quality while maintaining the stability of the main unit. Main feet (3) Stud (1) Stud (1) In addition, the two studs on the bottom help stabilize the main unit and prevent it from wobbling or tipping when nudged from above. Because the studs are slightly shorter than the main feet, the studs do not come in contact with the mounted surface, leaving the main feet to support the main unit.
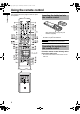
EX-A3[J_C].book Page 5 Wednesday, December 27, 2006 3:53 PM Introduction Using the remote control The numbers refer to the pages in which the parts are explained. Inserting the batteries into the remote control R6P (SUM-3)/AA (15F) type dry-cell batteries (supplied) • If the effective range of the remote control decreases, replace both batteries. CAUTION • Do not expose batteries to heat or flame.
Operating a TV using the remote control You can operate your TV using the remote control of this system. Examples: For a Hitachi TV: Press [1], then [0]. For a Toshiba TV: Press [0], then [8]. When the manufacturer of your TV has two or more codes, select the manufacturer codes in turn and find the one that operates the TV and the remote control properly.
EX-A3[J_C].book Page 7 Wednesday, December 27, 2006 3:53 PM Preparation Preparation Do not turn on the power until you complete the connection. Connecting the antennas AM loop antenna (supplied) FM antenna (supplied) FM antenna Main unit (rear view) Setting up the AM loop antenna Stretch out the FM antenna to the best position for radio reception.
EX-A3[J_C].book Page 8 Wednesday, December 27, 2006 3:53 PM Preparation Connecting the speakers The left and right speakers are the same. Before connecting the speaker cables, twist and pull off the insulation at the end of each speaker cable. Speaker terminal Speaker terminal Speaker cable Speaker cable (supplied) Black line Right speaker (rear view) Speaker cable Black line Main unit (rear view) ■ IMPORTANT • Improper speaker cable connection reduces the stereo effect and sound quality.
EX-A3[J_C].book Page 9 Wednesday, December 27, 2006 3:53 PM Preparation Preparation (continued) Do not turn on the power until you complete the connection.
4 Press 2 or 3 to select the video signal type suitable for the TV. • You can select “INTERLACE” or “PROGRESSIVE”. You can obtain better picture quality in “PROGRESSIVE” mode than in “INTERLACE” mode. • Select “INTERLACE” when connecting to a TV that is only compatible with interlaced video signals. • Select “PROGRESSIVE” when connecting to a TV that is equipped with a component terminal and is compatible with progressive video signals. 5 Press [ENTER].
EX-A3[J_C].book Page 11 Wednesday, December 27, 2006 3:53 PM Preparation Preparation (continued) Do not turn on the power until you complete the connection. Connecting a portable digital audio player Listening to analog sound from a portable digital audio player Connecting a subwoofer When you connect this system with an amplifierbuilt-in subwoofer (not supplied), you can enjoy a more dynamic bass sound. Refer to the manual of the subwoofer for details.
EX-A3[J_C].
EX-A3[J_C].book Page 13 Wednesday, December 27, 2006 3:53 PM Preparation Preparation (continued) Do not turn on the power until you complete the connection.
EX-A3[J_C].book Page 14 Wednesday, December 27, 2006 3:53 PM Basic operations Basic operations Using the number buttons Examples: 5: [5] 15: [ 10] → [1] → [5] Remote control mode selector 150: [ 10] → [ 10] → [1] → [5] → [0] Turning on the main unit Press [F AUDIO] (or F on the main unit). • The power of the main unit turns on and the [STANDBY] lamp on the main unit turns off. • Press [F AUDIO] again to turn off the power of the main unit.
EX-A3[J_C]-04.fm Page 15 Thursday, February 1, 2007 1:48 PM Basic operations Basic operations (continued) Setting the clock 6 You can set the clock when the main unit is on or off. Press 2 or 3 to select the day of the week. • Hold down 2 or 3 to change the setting for the day of the week. Example: To set the clock to 10:30 a.m. on Wednesday 1 Press [CLOCK/TIMER]. • Abbreviations are used for the days of the week. SUN→Sunday 2 MON→Monday Press 2 or 3 to select the hour.
EX-A3[J_C].book Page 16 Wednesday, December 27, 2006 3:53 PM For the locations of the remote control buttons, refer to page 14. Basic operations Adjusting the volume Press [AUDIO VOL +/–]. • You can also adjust the volume by turning the [VOLUME] control on the main unit. Turning off the sound temporarily Press [FADE MUTING]. • Press [FADE MUTING] again or [AUDIO VOL +] to restore the sound. The sound is also restored when the main unit is turned off once and turned on.
EX-A3[J_C].book Page 17 Wednesday, December 27, 2006 3:53 PM Basic operations Basic operations (continued) Auto standby function If no sound is produced for 3 minutes, the main unit automatically turns off. This function is available when a loaded disc, a connected USB mass storage class device, or a device connected to the [LINE1 IN] terminal is selected as the source.
EX-A3[J_C].book Page 18 Wednesday, December 27, 2006 3:53 PM Changing the brightness of the display window ■When the main unit is turned on Press [DIMMER] repeatedly. Locking disc ejection You can lock the disc tray to prevent the disc from being ejected. Setting the disc ejection lock • Each time you press [DIMMER], the setting in the display window changes as follows.
EX-A3[J_C].book Page 19 Wednesday, December 27, 2006 3:53 PM Listening to radio broadcasts Listening to radio broadcasts Selecting a radio station 1 Press [FM/AM] to select “FM” or “AM” in the display window. • Pressing [FM/AM] selects a radio broadcast as the sound source. Remote control mode selector • Repeatedly pressing [FM/AM/LINE] on the main unit can also select a radio broadcast as the source. • Each time you press [FM/AM], the band toggles between “FM” and “AM”.
NOTE • If an FM stereo broadcast is difficult to hear because of noise, you may be able to hear the broadcast more easily by pressing [PLAY/ TUNER MODE] to switch the sound to monaural reception. In this case, the “MONO” (monaural) indicator lights up in the display window. To return the sound to stereo reception, press [PLAY/TUNER MODE] again. • If a beeping sound disturbs your AM broadcast, you can reduce the noise.
EX-A3[J_C]-06.fm Page 21 Wednesday, January 10, 2007 1:36 PM Basic operations of disc/file playback Basic operations of disc/file playback Playing back a disc This part explains how to play back the types of discs shown above. Remote control mode selector 1 Press 0 on the remote control or on the main unit. • The disc tray ejects. 2 Place a disc on the disc tray. Printed surface Number buttons* Disc tray • To play back an 8-cm (3 3 16 ″) disc, place it on the inner hollow of the disc tray.
Playing back a file This part explains how to play back 1) files recorded on the loaded disc, and 2) files recorded on a USB mass storage class device connected to the main unit. The operations are explained with a display of MP3 files as an example. NOTE 3 Press 7 to stop playback. • The menu screen appears on the TV screen. When a file recorded on the connected USB mass storage class device is selected as the source, “USB” is displayed.
EX-A3[J_C].book Page 23 Wednesday, December 27, 2006 3:53 PM Basic operations of disc/file playback Basic operations of disc/file playback (continued) 4 Press 5, /, 2 or 3 to select a group and track. Display window on the main unit for disc/file types NOTE • You can also use [GROUP/TITLE / ] to select a group, and the number buttons, [PREVIOUS 4] or [NEXT ¢] to select a track. 5 Press [DVD/CD 3] or [USB MEMORY 3].
EX-A3[J_C].book Page 24 Wednesday, December 27, 2006 3:53 PM VCD/SVCD CD ■When a disc is played back Track number Playback control • You can use the menu screen to control playback of a PBC compatible disc. • To cancel the PBC function, follow the instructions below. - Specify the track number using the number buttons when the disc is stopped. - Specify the track number using [PREVIOUS 4] or [NEXT ¢] when the disc is stopped, and then press [DVD/CD 3].
EX-A3[J_C].book Page 25 Wednesday, December 27, 2006 3:53 PM Basic operations of disc/file playback Basic operations of disc/file playback (continued) MP3/WMA/WAV/ASF/DivX/MPEG1/ MPEG2 file ■When a file is played back JPEG file ■When a file is played back *1 Group number File number ■When a file is stopped File type Group number Track number *1 “MP3” or “WMA” appears when an MP3 or WMA file is played back.
EX-A3[J_C].book Page 26 Wednesday, December 27, 2006 3:53 PM For the locations of the remote control buttons, refer to page 21. ■VCD/SVCD/CD/JPEG file Basic operations of disc/file playback Changing the display in the display window *3 Normal display (as shown on page 24) Clock Press [DISPLAY] repeatedly during playback. • Each time you press [DISPLAY], the display changes.
EX-A3[J_C].book Page 27 Wednesday, December 27, 2006 3:53 PM Basic operations of disc/file playback Basic operations of disc/file playback (continued) Messages on the TV screen When a DVD VIDEO or an USB mass storage class device is selected as the source, the messages shown below are displayed on the TV screen to indicate its status. NOW READING: Appears when the main unit is reading the disc/ file information. Wait for a short time.
EX-A3[J_C].book Page 28 Wednesday, December 27, 2006 3:53 PM Pausing playback Fast reverse/fast forward search ■When a disc/file is played back Press 8. There are two methods. • To return to normal playback, press [DVD/CD 3] or [USB MEMORY 3]. ■When a disc/file is played back Advancing the picture frame by frame • Press 1 or ¡. Each time you press ¡, the speed increases. To restore the normal speed, press [DVD/CD 3] or [USB MEMORY 3]. • Hold down 4 or ¢.
EX-A3[J_C].book Page 29 Wednesday, December 27, 2006 3:53 PM Basic operations of disc/file playback Basic operations of disc/file playback (continued) Slow motion playback Selecting a chapter/track using the number buttons (only for moving images) ■When a disc is paused Press [ SLOW] or [SLOW • Each time you press [ the speed increases. (PBC off) ]. SLOW] or [SLOW ], • Press 8 to pause playback, and press [DVD/ CD 3] to return to normal playback. NOTE • No sound is produced.
EX-A3[J_C]-06.fm Page 30 Thursday, February 1, 2007 1:57 PM Selecting a track from the menu screen ■When a disc is stopped or played back 1 ■When a disc is stopped or played back 1 Press [MENU/PL] or [TOP MENU/ PG]. Press [TOP MENU/PG] to display the original program or press [MENU/PL] to display the play list. Original program • The menu screen is displayed. 2 Press 5, /, 2, 3 or the number buttons to select the desired track. 3 Press [ENTER].
EX-A3[J_C].book Page 31 Wednesday, December 27, 2006 3:53 PM Convenient functions of disc/file playback Convenient functions of disc/file playback Playing back a disc/file in the desired order (Program playback) Remote control mode selector (only on a loaded disc) You can program a maximum of 99 chapters or tracks. The same chapter or track can be programmed more than once. ■When a disc/file is stopped 1 Number buttons* Press [PLAY/TUNER MODE] to display “PROGRAM” in the display window.
2 Example: TV screen for a DVD VIDEO (Program Press the number buttons to program chapters/tracks. screen) Display for a DVD VIDEO • Select a title number, and then a chapter number. Title indicator Chapter indicator Title number Chapter number • Before selecting a bonus group of a DVD AUDIO, cancel the “BONUS” indicator as explained in “Playing back the bonus group” on page 38. • You can program up to 99 chapters/tracks.
EX-A3[J_C].book Page 33 Wednesday, December 27, 2006 3:53 PM Convenient functions of disc/file playback Convenient functions of disc/file playback (continued) Playing back a disc/file in a random order (Random playback) Playing back a disc/file repeatedly (Repeat playback) (PBC off) (only on a loaded disc) ■When a disc/file is stopped 1 Press [PLAY/TUNER MODE] repeatedly to display “RANDOM” in the display window. This indicator lights up when the random playback function is activated.
EX-A3[J_C].book Page 34 Wednesday, December 27, 2006 3:53 PM Selecting the audio language, subtitle language and view angle ■When a disc/file is played back 1 Press the desired button shown below. Function Button Audio [AUDIO] language (only for moving images) ■When a disc/file is played back or paused 1 Press [ZOOM]. • Each time you press [ZOOM], the picture magnification changes in the display window.
EX-A3[J_C].book Page 35 Wednesday, December 27, 2006 3:53 PM Convenient functions of disc/file playback Convenient functions of disc/file playback (continued) - “SATURATION” Controls the saturation of the display. (Setting range: –7 to +7) Adjusting the picture quality (VFP) - “TINT” Controls the tint of the display. (Setting range: –7 to +7) - “SHARPNESS” Controls the sharpness of the display. (Setting range: –8 to +8) ■When a disc/file is played back or paused 1 Press [VFP].
EX-A3[J_C].book Page 36 Wednesday, December 27, 2006 3:53 PM Sharpening the voice sound This function allows you to easily understand dialog recorded on the disc/file even with the volume down low. This function is useful when you are watching a movie. Press [CLEAR VOICE]. This indicator lights up when the clear voice function is activated. Selecting the headphone surround mode You can listen to surround sound via headphones connected to the [PHONES] terminal.
EX-A3[J_C].book Page 37 Wednesday, December 27, 2006 3:53 PM Convenient functions of disc/file playback Convenient functions of disc/file playback (continued) Creating realistic sound (3D PHONIC) Selecting the audio volume level of the DVD The two speakers can produce an effect resembling surround sound. When the audio volume of a DVD VIDEO/DVD AUDIO is lower than that of another source, you can increase the audio volume level of the DVD.
EX-A3[J_C].book Page 38 Wednesday, December 27, 2006 3:53 PM Functions unique to a DVD AUDIO Playing back the bonus group Some DVD AUDIOs may have a special group, called “bonus group”. You can use this function when the “BONUS” indicator lights up in the display window. Browsable still pictures (B.S.P.) Some DVD AUDIOs may have pictures called browsable still pictures (B.S.P.). The pictures can be viewed as if you are turning pages. You can use this function when the “B.S.P.
EX-A3[J_C].book Page 39 Wednesday, December 27, 2006 3:53 PM Convenient functions of disc/file playback Using the status bar and the menu bar Function list To select the settings for those items listed below without a description of their operation, press 5 or / to select an item and press [ENTER]. ■When a disc/file is played back 1 Press [ON SCREEN] twice.
EX-A3[J_C].book Page 40 Wednesday, December 27, 2006 3:53 PM Playing back a specified part repeatedly (A-B repeat playback) (PBC off) You can play back a desired part repeatedly by specifying a start point (A) and an end point (B). ■When a disc is played back 1 Press [ON SCREEN] twice. • The menu bar appears. (Refer to page 39.) 2 3 4 5 Press 2 or 3 to select 6 Press 5 or / to select “A-B”. Press [ENTER] at the start point of the part to be repeated (specifying point A). .
EX-A3[J_C].book Page 41 Wednesday, December 27, 2006 3:53 PM Convenient functions of disc/file playback Changing the initial settings with the preference screen Basic operations You can use the preference screen to change the initial settings of the main unit according to the environment where the main unit is used. ■When a disc/file is stopped or no disc is loaded (“NO DISC” is displayed in the display window) 1 Press [SET UP]. • The preference screen appears on the TV screen.
PICTURE Items MONITOR TYPE Contents ( : initial setting) Select the display method suitable for your TV. 4 : 3 PS (Pan Scan) : For a TV with conventional 4:3 aspect ratio. When a wide screen picture is input, the left and right edges of the picture are not shown on the screen. (If the disc/file is not compatible with Pan Scan, the picture is displayed at the Letterbox ratio.) 4 : 3 LB (Letterbox) : For a TV with conventional 4:3 aspect ratio.
EX-A3[J_C].book Page 43 Wednesday, December 27, 2006 3:53 PM Convenient functions of disc/file playback Changing the initial settings with the preference screen (continued) ? AUDIO Items DIGITAL AUDIO OUTPUT Contents ( ? : initial setting) Select the output signal type suitable to the device connected to the [LINE 3 DIGITAL OUT] terminal. Refer to “List of relationships of DIGITAL AUDIO OUTPUT preference items and output signals” on page 44. PCM ONLY : Device corresponding only to linear PCM.
List of relationships of DIGITAL AUDIO OUTPUT preference items and output signals Playback disc/file STREAM/PCM 48 kHz, 16/20/24 bits linear PCM DVD VIDEO 96 kHz linear PCM DVD VIDEO 48/96/192 kHz, 16/20/24 bits linear PCM DVD AUDIO 44.1/88.2/176.
EX-A3[J_C].book Page 45 Wednesday, December 27, 2006 3:53 PM Playing back sources from other devices Playing back sources from other devices 2 Start playback on the connected device. 3 Adjust the volume or the sound quality for your preference. • Refer to page 16. NOTE • Refer also to the operation manual for the connected device. • An audio signal from a device connected to the [LINE1 IN] terminal is not output via the [LINE1 OUT] terminal.
EX-A3[J_C].book Page 46 Wednesday, December 27, 2006 3:53 PM Selecting the output level Playing back sources from other devices When outputting the audio signal from the [LINE1 OUT] terminal to another audio device, you can select the audio level. Using QP LINK ■When “QP LINK ON” is selected 1 Press [OUTPUT LEVEL]. Connect a portable digital audio player to the [LINE1 IN] terminal using an audio cable. • Each time you press [OUTPUT LEVEL], the display changes as follows.
EX-A3[J_C].book Page 47 Wednesday, December 27, 2006 3:53 PM Timer Timer Using the sleep timer When the time you specify elapses, the main unit is turned off automatically. Press [SLEEP]. Remote control mode selector • Each time you press [SLEEP], the time indicated in the display window changes (in minutes). Example: When the sleep timer is set to 60 minutes The sleep timer is automatically set in a few seconds, and the display disappears. The “SLEEP” indicator remains on.
Using the playback timer 4 Set the clock beforehand. (Refer to page 15.) 1 Press [CLOCK/TIMER]. Press 2 or 3 to select “ONCE” or “WEEKLY”, and then press [ENTER]. ONCE WEEKLY 5 The playback timer works once. The playback timer works weekly or every day. Press 2 or 3 to select the desired day of the week, and then press [ENTER]. • Each time you press 2 or 3, the display changes as follows.
EX-A3[J_C].book Page 49 Wednesday, December 27, 2006 3:53 PM For the locations of the remote control buttons, refer to page 47. Timer Timer (continued) 8 Press [F AUDIO] to turn off the main unit. The indicator lights up when the playback timer is activated. Activating the playback timer again 1 2 Press [CLOCK/TIMER]. Press [ENTER]. • The current playback timer setting appears in the display window. 3 • The playback timer is available only when the main unit is off.
EX-A3[J_C].book Page 50 Wednesday, December 27, 2006 3:53 PM When a JVC-manufactured TV with AV COMPU LINK II or III terminals is connected to the main unit using these terminals, operating either the TV or the main unit controls the other device at the same time. Preparation for the AV COMPU LINK function Operating the AV COMPU LINK function 1 2 Turn on the main power of the TV. Play back a disc/file. • Refer to pages 21–23. • The power of the TV is turned on.
EX-A3[J_C].
Notes on handling Important cautions Installation of the system • Select a place that is level, dry and neither too hot nor too cold, and between 5°C and 35°C (between 41°F and 95°F). • Leave sufficient distance between the system and the TV. • Do not use the system in a place subject to vibration. Power cable • Do not handle the power cable with wet hands! • A small amount of power is always consumed while the power cable is connected to the wall outlet.
EX-A3[J_C].book Page 53 Wednesday, December 27, 2006 3:53 PM Reference Notes on discs/files Playable disc/file types Playable discs *1 DVD VIDEO, DVD AUDIO, DVD VR *3, VCD, SVCD, CD, CD-R *4, CD-RW *4, DVD-R *5, *6, DVD-RW *6, +R, +RW Playable files recorded on a disc *1 Playable files recorded on a USB mass storage class device *2 • Even though listed above, some types may be unplayable. *1 Discs should be finalized before being played back.
Unplayable discs • The following discs cannot be played back: • DVD-ROM (except for MP3/WMA/JPEG/ASF/ DivX/MPEG1/MPEG2 format), DVD-RAM, CDROM, CD-I (CD-I Ready), Photo CD, SACD, etc. • Playing back these discs generates noise and may damage the speakers. • Damaged discs and discs with an unusual shape (other than a disc of 12 cm or 8 cm (4 3 4 ″ or 3 3 16 ″) in diameter) cannot be played back.
EX-A3[J_C]-10.fm Page 55 Wednesday, January 10, 2007 1:39 PM Reference Notes on discs/files (continued) Notes on DivX discs/files • The system supports DivX 5.x, 4.x and 3.11. • The system supports DivX files with a resolution of 720 x 480 pixels or less (30 fps) and 720 x 576 pixels or less (25 fps). • Audio streams should conform to MPEG1 Audio Layer-2, MPEG Audio Layer-3 (MP3) or Dolby Digital. • The system does not support GMC (Global Motion Compression).
Data hierarchy Handling discs DVD VIDEO/DVD VR A DVD VIDEO consists of “titles” and each title may be divided into “chapters”. A DVD VR consists of “original programs” or “play lists” and each original program/play list may be divided into “chapters”. Title 1/Original program 1/ Play list 1 • Do not use a commercially-available non-standard shape disc (like a heart, flower or credit card, etc.), because it may damage the system.
EX-A3[J_C].book Page 57 Wednesday, December 27, 2006 3:53 PM Reference Troubleshooting ■General Problem Power does not come on. Possible cause The power cable is not connected to an AC outlet. Possible solution Connect the power cable correctly. You cannot operate any Some specific operations are button. restricted. This is not a malfunction. The remote control does The batteries are running low. not work. Replace the batteries. You cannot operate the main unit using the remote control.
■For a loaded disc Problem Possible cause Possible solution A disc cannot be played If “REGION CODE ERROR!” Confirm the region code number back. appears on the TV screen, the compatible with this system. region code number of a disc is not compatible with this system. (only for a DVD VIDEO) If “CANNOT PLAY THIS DISC” Confirm the disc type playable with appears on the TV screen, the this system. disc cannot be played back with this system. The disc is upside down.
EX-A3[J_C].book Page 59 Wednesday, December 27, 2006 3:53 PM Reference Troubleshooting (continued) ■For a connected USB mass storage class device Problem Files on a USB mass storage class device cannot be played back. MP3, WMA, WAV, JPEG, ASF, DivX, MPEG1 or MPEG2 file cannot be played back. Possible cause Possible solution If “CANNOT PLAY THIS DEVICE” appears on the TV screen, the files on a USB mass storage class device cannot be playable.
EX-A3[J_C]-10.fm Page 60 Wednesday, January 24, 2007 3:06 PM Main unit (CA-EXA3) Tuner FM frequency: AM frequency: 87.5 MHz – 108.0 MHz 530 kHz – 1 710 kHz Terminal (front of the main unit) • USB digital input terminal x 1 • Analog input terminal x 1 Stereo mini jack • Analog output terminal x 1 Stereo mini jack • Audio output headphone terminal x 1 Impedance: 16 Ω – 1 kΩ Terminal (rear of the main unit) • Composite video output terminal x 1 Y: 1.
EX-A3[J_C]-COV.fm Page 61 Monday, January 22, 2007 2:01 PM For U.S.A. TO OUR VALUED CUSTOMER THANK YOU FOR PURCHASING THIS JVC PRODUCT. WE WANT TO HELP YOU ACHIEVE A PERFECT EXPERIENCE. NEED HELP ON HOW TO HOOK UP? NEED ASSISTANCE ON HOW TO OPERATE? NEED TO LOCATE A JVC SERVICE CENTER? LIKE TO PURCHASE ACCESSORIES? IS HERE TO HELP! TOLL FREE: 1(800)252-5722 http://www.jvc.com Remember to retain your Bill of Sale for Warranty Service.
EX-A3[J_C]-COV.fm Page 62 Wednesday, January 24, 2007 3:42 PM For U.S.A. LIMITED WARRANTY 1-1 USA ONLY ONLY FOR PRODUCT PURCHASED IN U.S.A. JVC Americas Corp. (JVC) warrants this product and all parts thereof, except as set forth below ONLY TO THE ORIGINAL RETAIL PURCHASER to be FREE FROM DEFECTIVE MATERIALS AND WORKMANSHIP from the date of original purchase for the period shown below.
EX-A3[J_C].