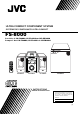
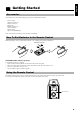
ULTRA COMPACT COMPONENT SYSTEM SYSTEME DE COMPOSANTS ULTRA COMPACT FS-8000 Consists of CA-FS8000, SP-FS8000 and SP-PW8000 Composé des CA-FS8000, SP-FS8000 et SP-PW8000 BASS CONTROL PRESET TUNING DOWN MULTI CONTROL UP CLOCK POWER SLEEP OPEN/CLOSE AUX MD/TAPE TUNER BAND CD REMOTE CONTROL RM-RXFS8000 DIMMER SLEEP POWER DISPLAY FM MODE AUX SUBWOOFER AUTO PRESET LEVEL CD PROGRAM RANDOM BASS REPEAT TREBLE VOLUME CANCEL STANDBY VOLUME GAIN SELECT UP SET DOWN MD /TAPE TUNER BAND CD
Warnings, Cautions and Others / Mises en garde, précautions et indications diverses (For U.S.A) CAUTION RISK OF ELECTRIC SHOCK CAUTION: TO REDUCE THE RISK OF ELECTRIC SHOCK DO NOT REMOVE COVER (OR BACK) NO USER SERVICEABLE PARTS INSIDE REFER SERVICING TO QUALIFIED SERVICE PERSONNEL.
For Canada/pour le Canada For Canada/pour le Canada CAUTION: TO PREVENT ELECTRIC SHOCK, MATCH WIDE BLADE OF PLUG TO WIDE SLOT, FULLY INSERT. PRECAUTION: POUR EVITER LES CHOCS ELECTRIQUES, INTRODUIRE LA LAME LA PLUS LARGE DE LA FICHE DANS LA BORNE CORRESPONDANTE DE LA PRISE ET POUSSER JUSQUAU FOND.
English Thank you for purchasing the JVC Ultra Compact Component System. We hope it will be a valued addition to your home, giving you years of enjoyment. Be sure to read this instruction manual carefully before operating your new stereo system. In it you will find all the information you need to set up and use the system. If you have a query that is not answered by the manual, please contact your dealer. Features Here are some of the things that make your System both powerful and simple to use.
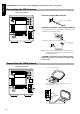
English ■ ■ Getting Started Accessories Check that you have all of the following items, which are supplied with the System. Power Cord (1) AM Loop Antenna (1) Remote Control (1) Batteries (2) FM Wire Antenna (1) Speaker Cords (2) Signal Cord (1) Spacers for SP-FS8000 (8) If any of these items are missing, contact your dealer immediately. How To Put Batteries In the Remote Control Match the polarity (+ and –) on the batteries with the + and – markings in the battery compartment.
English CAUTION: Make all connections before plugging the System into an AC power outlet. Connecting the FM Antenna Rear Panel of the Unit Using the Supplied Wire Antenna R L FM wire antenna (supplied) Using the Coaxial Type Connector (Not Supplied) A 75-ohm antenna with coaxial type connector should be connected to the FM 75-ohm COAXIAL terminal. AC IN If reception is poor, connect the outside antenna.
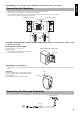
English CAUTION: Make all connections before plugging the System into an AC power outlet. Connecting the Speakers 1. Open the Speaker terminals on the rear of the Unit, and on the Speakers themselves. 2. Connect the speaker cords between the terminals as shown below. Connect the cords with a black line to the (–) terminals and cords without a black line to the (+) terminals. Close each of the terminals to securely connect the cords.
English CAUTION: Make all connections before plugging the System into an AC power outlet. Connecting an MD Recorder/Tape Deck Connect (optional) signal cords between the System’s MD/TAPE IN/OUT terminals and the output/input terminals of the external MD recorder, tape deck, etc. You can then listen to the external source through the System, or record the System’s CD player or tuner to the external unit.
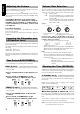
JVC’s COMPU PLAY feature lets you control the most frequently used System functions with a single touch. With One Touch Operation you can play a CD, turn on the radio, or listen to an external equipment with a single press of the play button for that function. One Touch Operation turns the power on for you, then starts the function you have specified. If the System is not ready (no CD in place), the System still powers on so you can insert a CD.
English Adjusting the Volume Turn the VOLUME control of the Unit clockwise to increase the volume or counterclockwise to decrease it. OR With the System turned on, press the VOLUME + button on the Remote Cotrol to increase the volume or press the VOLUME – button to decrease it. CAUTION: DO NOT turn on the System and/or start playing any source without first setting the VOLUME control to minimum, as a sudden blast of sound could damage your hearing, speakers and/ or headphones.
AUTO POWER ON/STANDBY indicator English ■ ■ Using the Powered Subwoofer VOLUME PHASE INPUT (LOW-LEVEL) INPUT (HIGH-LEVEL) POWER Operating the Powered Subwoofer CAUTION: Be sure to turn off the POWER of the Powered Subwoofer when the Powered Subwoofer is not in use for an extended period of time. Presetting the Volume ——————— INPUT Terminals —————————— You need to preset the volume level of this speaker to match those of the other speakers.
REMOTE CONTROL RM-RXFS8000 DIMMER SLEEP POWER DISPLAY FM MODE AUX SUBWOOFER AUTO LEVEL PRESET FM MODE CD AUTO PRESET M E T CANCEL A R TREBLE T UL BASS REPEAT S PROGRAM RANDOM C Y English ■ ■ Using the Tuner O M VOLUME GAIN SELECT SET UP UP < SET > TUNER BAND PRESET TUNING BASS CONTROL DOWN MD PRESET TUNING DOWN MULTI CONTROL UP TIMER/ SNOOZE CLOCK OPEN/CLOSE POWER AUX TUNER BAND MD/TAPE CD 4 S Band display, Frequency display, Preset channel DOWN /TAPE T N PA
English 5. Press the SET button. ■ After 1 second, the display returns to the broadcast frequency display. 6. Repeat above steps 1 to 5 for each station ■ you want to store in memory with a preset number. To cancel the presetting, press the CANCEL button in step 3 or 4. To change the preset stations, repeat the same steps as above. Auto Presetting In each band, you can automatically preset FM-30, AM-15 stations.
REMOTE CONTROL RM-RXFS8000 DIMMER SLEEP POWER DISPLAY FM MODE AUX SUBWOOFER AUTO PRESET LEVEL CD REPEAT PROGRAM BASS TREBLE CANCEL CD 0 CD Holder REPEAT RANDOM VOLUME GAIN SELECT SET < R A LRT UT UL PROGRAM RANDOM UP UP SET > Pause Indicator Play Indicator BASS PTY/EON CONTROL DISPLAY PRESET TUNING MODE AC S Y T SE TM E M English ■ ■ Using the CD Player S Y O M S T M ICP UFX N S--78000000R ET R AO NN CT OE CO PN CM PO OM DOWN MULTI CONTROL UP OPEN/CLOSE AUX DOWN DOWN MD
Holding down the 4 or ¢ button on the Unit or the Remote Control, during playback, will fast forward/backwards the CD so you can quickly find a particular passage in the track you are listening to. To confirm the programmed tracks, press the PROGRAM button; the tracks making up the program will successively be displayed in the programmed order. Programming the Playing Order of the Tracks You can program the playing order of the tracks using the Remote Control.
REMOTE CONTROL RM-RXFS8000 SLEEP POWER AUX SUBWOOFER AUTO PRESET LEVEL PROGRAM RANDOM REPEAT T UL M CANCEL A R VOLUME GAIN SELECT UP E TREBLE T BASS AUX CD S DIMMER DISPLAY FM MODE C Y English ■ ■ Listening to External Equipments O M T PA FS-8000 EN CT C MPON O S SET DOWN MD/TAPE MD /TAPE TUNER BAND BASS CONTROL CD PRESET TUNING DOWN MULTI CONTROL UP CLOCK AUX MD/TAPE TIMER/ SNOOZE OPEN/CLOSE POWER AUX TUNER BAND MD/TAPE CD VOLUME GAIN SELECTOR 0 dB -6dB -12dB
English ■ ■ Using the Timers REMOTE CONTROL RM-RXFS8000 DIMMER SLEEP POWER SLEEP DISPLAY FM MODE AUX SUBWOOFER AUTO PRESET LEVEL CD PROGRAM RANDOM A R T E T UL Timer indicator SLEEP indicator UP M CANCEL VOLUME GAIN SELECT S TREBLE C Y BASS REPEAT O M T PA FS-8000 EN CT C MPON O S 4 ¢ SET DOWN MD /TAPE TUNER BAND CD BASS CONTROL PRESET TUNING DOWN MULTI CONTROL UP CLOCK POWER TIMER/ SNOOZE OPEN/CLOSE AUX TUNER BAND MD/TAPE CD CLOCK TIMER/ SNOOZE VOLUME GAIN SELE
English 3. Setting the OFF time (Example: PM 1:15). ■ 1. Press the TIMER/SNOOZE button on the Unit. The current OFF time blinks on the display. (After 2 seconds) 2. Press the ¢ or 4 button on the Unit to set the time you want the Unit to be turned off. Pressing the ¢ button moves the time forwards and pressing the 4 button moves the time backwards. Hold down the button to move the time in 10-minute intervals.
Handle your CDs carefully, and they will last a long time. Compact Discs • Only CDs bearing this mark can be used with this System. However, continued use of irregular shape CDs (heart-shape, octagonal, etc.) can damage the System. English ■ ■ Care And Maintenance General Notes In general, you will have the best performance by keeping your CDs and the mechanism clean. • Store CDs in their cases, and keep them in cabinets or on shelves. • Keep the system’s CD holder closed when not in use.
English ■ ■ Troubleshooting • • If you are having a problem with your System, check this list for a possible solution before calling for service. If you cannot solve the problem from the hints given here, or the System has been physically damaged, call a qualified person, such as your dealer, for service. Symptom No sound is heard. Poor radio reception Possible Cause Action • Connections are incorrect, or loose. • • Headphones are connected. • • • The antenna is disconnected.
English ■ ■ Specifications (CA-FS8000) Amplifier Output Power 13 watts per channel, min. RMS, at 4 ohms from 110 Hz to 20 kHz, with no more than 10% total harmonic distortion (for U.S.A.) 30 W (15 W + 15 W) at 4 ohms (Max.) (for Canada) Input Sensitivity/Impedance (1 kHz) AUX MD/TAPE Output Sensitivity/Impedance (1 kHz) MD/TAPE Optical out Subwoofer Speaker terminals Phones 500 mV/59 kohms 500 mV/59 kohms 500 mV/4.
VICTOR COMPANY OF JAPAN, LIMITED EN, FR 0599MNMCREJSC