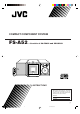
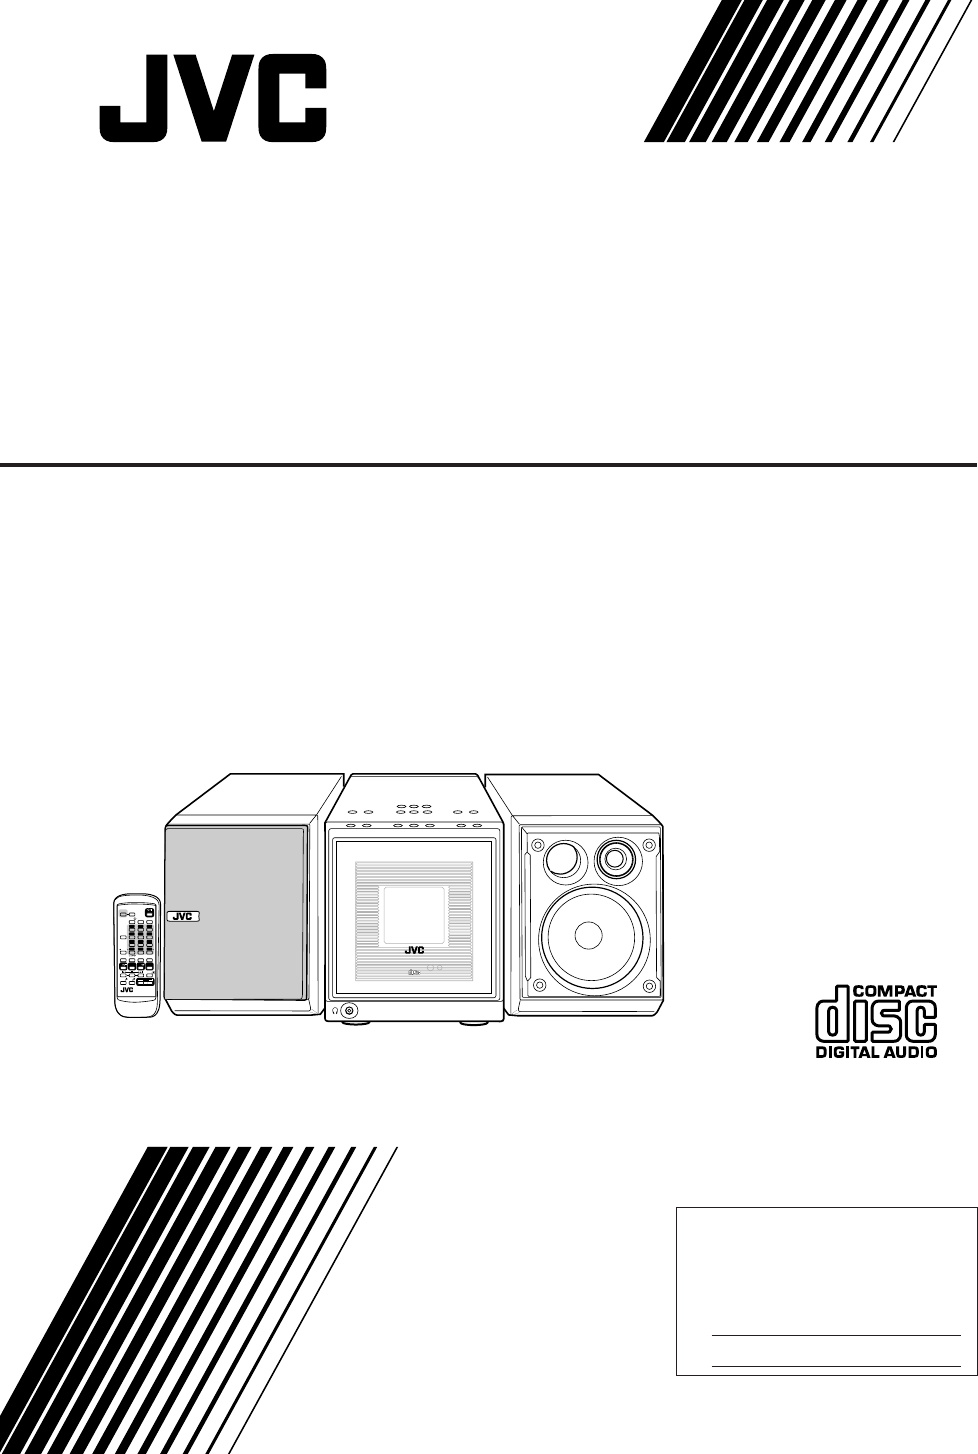
COMPACT COMPONENT SYSTEM FS-A52 COLOR DIMMER CLOCK /TIMER STANDBY/ON FM MODE SLEEP 1 2 DISPLAY 4 5 7 8 9 SET 10 0 +10 CANCEL REV.MODE CD — Consists of CA-FSA52 and SP-UXA52 3 6 COMPACT COMPONENT SYSTEM FS-A52 REPEAT PLAY MODE FM/AM TAPE AUX/MD COMPACT STANDBY/ON BEEP DIGITAL AUDIO SOUND MODE AHB PRO VOLUME RM-SFSA52J PHONES INSTRUCTIONS For Customer Use: Enter below the Model No. and Serial No. which are located either on the rear, bottom or side of the cabinet.
Warnings, Cautions and Others Mises en garde, précautions et indications diverses CAUTION RISK OF ELECTRIC SHOCK DO NOT OPEN CAUTION: TO REDUCE THE RISK OF ELECTRIC SHOCK, DO NOT REMOVE COVER (OR BACK). NO USER SERVICEABLE PARTS INSIDE. REFER SERVICING TO QUALIFIED SERVICE PERSONNEL.
For U.S.A. This equipment has been tested and found to comply with the limits for a Class B digital device, pursuant to part 15 of the FCC Rules. These limits are designed to provide reasonable protection against harmful interference in a residential installation. This equipment generates, uses and can radiate radio frequency energy and, if not installed and used in accordance with the instructions, may cause harmful interference to radio communications.
Introduction We would like to thank you for purchasing one of our JVC products. Before operating this unit, read this manual carefully and thoroughly to obtain the best possible performance from your unit, and retain this manual for future reference. About This Manual Power sources • When unplugging the unit from the wall outlet, always pull the plug, not the AC power cord.
Contents Location of the Buttons .................................. 3 Playing Back a CD ........................................ 17 Main Unit ............................................................... 3 Remote Control ...................................................... 5 Precautions on CD Playback ................................. 18 Playing Back the Entire CD—Normal Play .......... 18 Basic CD Operations ............................................
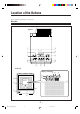
Location of the Buttons Become familiar with the buttons on your unit. Main Unit Top view 1 e w 2 F M / A M A U X / M D AHB PRO STANDBY/ON VOLUME COLOR MODE select 3 open/close REC start q SLEEP TA P E CD open/close 4 5 p 9 6 8 7 Front view Display—indicators g f o ; r PBC REC DAILY SOUND ST MONO PBC REC DAILY SOUND ST MONO GROUP s a COMPACT COMPONENT SYSTEM FS-A52 STANDBY/ON COMPACT DIGITAL AUDIO i y PHONES u –3– 3 AHB PRO AHB PRO t EN01-09FS-A52[J]f.pm6 d 02.1.
Continued See pages in the parentheses for details. Main unit Display—indicators 1 FM/AM button (11, 15) • Pressing this button also turns on the unit. 2 COLOR button (9, 13) STANDBY/ON button (11) 3 4 CD open/close 0 button (18 – 20) • Pressing this button also turns on the unit. 5 CD # ¥ 8 (play/pause) button (11, 18, 28) • Pressing this button also turns on the unit.
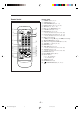
Remote Control Remote control s 1 COLOR DIMMER STANDBY/ON 2 CLOCK /TIMER FM MODE SLEEP 1 2 3 4 5 6 7 8 9 SET 10 0 +10 CANCEL REV.MODE 3 DISPLAY 4 5 6 7 8 CD REPEAT PLAY MODE FM/AM TAPE AUX/MD 9 BEEP p SOUND MODE AHB PRO a ; 9 p o i u y t r VOLUME q w 1 2 3 4 5 6 7 8 e q w e r t y u i o RM-SFSA52J ; a s DIMMER button (13, 31) COLOR button (9, 13) CLOCK/TIMER button (31 – 33) DISPLAY button (16, 19, 23, 28, 29) SET button (13, 15, 31 – 34) REV.
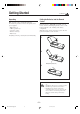
Getting Started Unpacking Make sure that you have all the following items. The number in parentheses indicates the quantity of the pieces supplied. • • • • • FM antenna (1) AM loop antenna (1) AC power cord (1) Remote control (1) Batteries (2) Continued Putting the Batteries into the Remote Control Insert the batteries—R6P(SUM-3)/AA(15F)—into the remote control, by matching the polarity (+ and –) on the batteries with the + and – marking on the battery compartment.
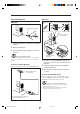
Connecting Antennas AM antenna FM antenna 2 1 ANT ENN A AM AM EX FM antenna (supplied) T LO OP FM (7 CO 5Ω) AXIA L ANT Vinyl-covered wire (not supplied) ENN A AM 1 Attach the FM antenna to the FM (75 Ω) COAXIAL terminal. 2 Extend the FM antenna. 3 Fasten it up in the position which gives you the best reception. AM EX T OP LO FM (7 CO 5Ω) AXIA L 3 About the supplied FM antenna The FM antenna supplied with this unit can be used as temporary measure.
Continued Connecting Speakers To remove the speaker grilles The speaker grilles are removable. To connect speakers You can connect the speakers by following the procedure below: Holes Projections 1 2 Speaker terminals 3,4 Speaker grille To remove the speaker grille, insert your fingers at the top of the speaker grille, then pull towards you. Do the same at the bottom. To attach the speaker grille, put the projections of the speaker grille into the holes of the speaker.
Connecting Other Equipment To connect audio equipment with an optical digital input terminal You can connect both of the analog and digital equipment. When you connect and use the equipment, refer also to its manual supplied. You can record CD sound onto the connected digital equipment. Connect an optical digital cord (not supplied) between the optical digital input terminal on the other equipment and the OPTICAL DIGITAL OUT terminal. • DO NOT connect other equipment while the power is on.
Basic and Common Operations Continued The buttons emphasized in the illustration below are used and explained in this section (pages 11 to 13.) Remote control COLOR DIMMER STANDBY/ON COLOR DIMMER CLOCK /TIMER FM MODE SLEEP 1 2 3 4 5 6 7 8 9 SET 10 0 +10 CANCEL REV.
Turning On the Power Selecting the Sources and Starting Play When you press the play buttons (CD 3 / 8, TAPE 2 3) for a particular source or FM/AM and AUX/MD, the unit automatically turns on (and starts playback if the source is ready.) To select the tuner, press FM/AM. The unit automatically turns on (when the unit is on standby) and the last selected station is tuned in. Each time you press FM/AM, the band alternates between FM and AM. • For more detailed operations, see pages 14 to 16.
Continued Adjusting the Volume Reinforcing the Bass Sound You can adjust the volume level while the unit is turned on. The volume level has no effect on recording. The richness and fullness of the bass sound is clearly maintained regardless of how low you set the volume— Active Hyper Bass PRO. You can select the bass effect levels while the unit is turned on. The AHB PRO can be applied only to playback sounds, and cannot be used for recording. To increase the volume, press VOLUME +.
Setting the Display Illumination To adjust and register the color To select the color pattern You can adjust the color by changing the tone, whiteness, brightness, and register into COLOR 1 to 7. • There is a time limit in doing the following steps. If the setting is canceled before you finish, start from step 1 again. You can select the color pattern by your preference.
Listening to FM and AM Broadcasts Continued The buttons emphasized in the illustration below are used and explained in this section (pages 15 to 16.) Remote control FM MODE COLOR DIMMER CLOCK /TIMER STANDBY/ON FM MODE SLEEP 1 2 3 4 5 6 7 8 9 SET 10 0 +10 CANCEL REV.
Tuning in a Station Presetting Stations 1 Press FM/AM repeatedly to select “FM” or “AM.” You can preset 30 FM and 15 AM stations manually. In some cases, test frequencies have been already memorized for the tuner since the factory examined the tuner preset function before shipment. This is not a malfunction. You can preset the stations you want into memory by following the presetting method. The unit automatically turns on with the last selected station.
Tuning in a Preset Station On the remote control ONLY: 1 Press FM/AM repeatedly to select “FM” or “AM.” The unit automatically turns on with the last selected station. • Each time you press the button, the band alternates between FM and AM. 2 Press the number buttons to select a preset number. Ex. For preset number 5, press 5. For preset number 15, press +10, then 5. For preset number 20, press +10, then 10. For preset number 30, press +10, +10, then 10.
Playing Back a CD The buttons emphasized in the illustration below are used and explained in this section (pages 18 to 21.) Remote control COLOR DIMMER FM MODE SLEEP 1 2 3 4 5 6 7 8 9 SET 10 0 +10 CANCEL REV.
Continued Precautions on CD Playback Playing Back the Entire CD—Normal Play This unit has been designed to play back discs bearing the following logos: You can play a CD. 1 Press CD open/close 0 on the unit. The unit automatically turns on, the electronic swing panel slides upward, and the disc tray comes out.
To stop during play, press 7. The following information appears. Basic CD Operations While playing a CD, you can do the following operations. CD indicator To stop playback for a moment Total track number Press CD 3 / 8. The elapsed playing time starts flashing on the display. To resume playback, press CD 3 / 8 again. Total playing time To remove the disc, press CD open/close 0. The electronic swing panel slides upward, and the disc tray comes out.
Continued Programing the Playing Order of the Tracks —Program Play You can arrange the order in which the tracks play before you start playing. You can program up to 32 tracks. Before playing, you can check the program contents by pressing 4 or ¢. • 4 : Shows the programed tracks in the reverse order. • ¢ : Shows tracks in the programed order. To modify the program On the remote control ONLY: Before or after playing, you can erase the last programed track by pressing CANCEL.
Playing at Random—Random Play Repeating Tracks—Repeat Play The tracks of a loaded CD will play at random. You can repeat all tracks (regardless of play mode), or also a single track as many times as you like. On the remote control ONLY: On the remote control ONLY: To repeat play, press REPEAT before or during play. • Each time you press the button, Repeat Play changes as follows: 1 Load a CD. 2 Press CD 3 / 8, then 7. The source is changed to “CD.
Playing Back a Tape Continued The buttons emphasized in the illustration below are used and explained in this section (page 23.) Remote control COLOR DIMMER CLOCK /TIMER DISPLAY STANDBY/ON FM MODE SLEEP 1 2 3 4 5 6 7 8 9 SET 10 0 +10 CANCEL REV.MODE DISPLAY CD REV.
To stop during play, press 7. Playing Back a Tape You can play back type I, II, and IV tapes. 1 Press TAPE open/close 0 on the unit. The unit automatically turns on, the electronic swing panel slides downward, and the cassette loading slot appears. If a cassette is already in the cassette loading slot, it is ejected. cassette loading slot To fast-wind or rewind the tape, press ¢ or 4. • When the tape direction is ¢ : Fast-winds the tape. 4 : Rewinds the tape.
Using External Equipment Continued The buttons emphasized in the illustration below are used and explained in this section (page 25.) Remote control COLOR DIMMER CLOCK /TIMER STANDBY/ON FM MODE SLEEP 1 2 3 4 5 6 7 8 9 SET 10 0 +10 CANCEL REV.
Listening to External Equipment You can listen to external equipment such as an MD recorder. • First make sure that the external equipment is properly connected as follows: LINE IN (AUX) R Recording from This Unit to External Equipment You can record from this unit to external equipment connected to the OPTICAL DIGITAL OUT terminal of this unit, such as an MD recorder. • The recording level is not affected by the VOLUME level and sound effect, either.
Recording on Tapes Continued The buttons emphasized in the illustration below are used and explained in this section (pages 28 to 29.) For recording operations, mainly use the buttons on the unit. Main unit (Top view) F M / A M A U X / M D AHB PRO STANDBY/ON VOLUME COLOR MODE select open/close REC start SLEEP TA P E CD open/close Remote control COLOR DIMMER CLOCK /TIMER DISPLAY STANDBY/ON FM MODE SLEEP 1 2 3 4 5 6 7 8 9 SET 10 0 +10 CANCEL REV.
Before You Start Recording • It should be noted that it may be unlawful to re-record pre-recorded tapes, records, or discs without the consent of the owner of copyright in the sound or video recording, broadcast or cable programme and in any literary, dramatic, musical, or artistic embodied therein. • The recording level is automatically set correctly, so it is not affected by the VOLUME control.
Continued To check the clock time while recording from the broadcast onto a tape What’s a Recording Mode and Reverse Mode ? You have two methods (MODE 1/2 and 2/2) to record from some sources onto a tape. Recording mode On the remote control ONLY: Press DISPLAY (not on number buttons.) • Each time you press the button, the recording information and the clock time alternate on the display.
Recording External Equipment To record a single track during play or pause While playing back you want to record, perform steps 3 and 4. The playback of the track is stopped, and then starts from the beginning again. This time, the cassette deck starts recording the track. • After the track is recorded, both the CD player and the cassette deck stop automatically. To check the clock time while recording from the CD onto a tape On the remote control ONLY: Press DISPLAY (not on number buttons.
Using the Timers Continued The buttons emphasized in the illustration below are used and explained in this section (pages 31 to 34.) Remote control STANDBY/ON DIMMER COLOR CLOCK /TIMER DIMMER CLOCK /TIMER STANDBY/ON FM MODE SLEEP 1 2 3 4 5 6 7 8 9 SET 10 0 +10 CANCEL REV.
You need to set the built-in clock to use these timers. When you unplug the AC power cord or if a power failure occurs The clock setting will be reset to “AM12:00.” If this happen, you need to set the clock again. Setting the Clock Using Recording Timer You can set the clock whether the unit is turned on or off (on standby.) With Recording Timer, you can make an unattended recording. • You can set Recording Timer whether the unit is turned on or off (on standby.
Continued 2 Press 4 to select “ON,” then press SET. 3 Select the source to record. 1) Press ¢ or 4 repeatedly to select the source. • Each time you press the buttons, the source changes as follows: FROM AUX FROM FM FROM AM 2) Press SET. • When you have selected “FROM FM” or “FROM AM,” select a preset number by pressing ¢ or 4 (for how to preset stations, see page 15.) • When you have selected “FROM AUX,” the external equipment also needs to have the timer function. 3) Press SET again.
2) Press ¢ or 4 repeatedly to select the minute of the timer-on time, then press SET. The hour digit of timer-off time starts flashing on the display. 3) Press ¢ or 4 repeatedly to select the hour of the timer-off time, then press SET. The minute digit of timer-off time starts flashing on the display. 4) Press ¢ or 4 repeatedly to select the minute of the timer-off time, then press SET. On the remote control ONLY: 1 Press CLOCK/TIMER repeatedly until “DAILY TIMER” appears on the display.
Using Sleep Timer To sleep with the Sleep Timer and wake up with the Daily Timer With Sleep Timer, you can fall asleep to your favorite music. • You can set Sleep Timer while the unit is turned on. The unit turns off when the shut-off time comes (set by the Sleep Timer), and turns on when the timer-on time comes (set by the Daily Timer.) How Sleep Timer actually works 1 2 The unit automatically turns off after the specified time length passes. Set the Daily Timer as explained on pages 32 and 33.
Maintenance To get the best performance of the unit, keep your discs, tapes, and mechanism clean. Handling cassette tapes General Notes In general, you will have the best performance by keeping your discs and the mechanism clean. • Store discs in their cases, and keep them in cabinets or on shelves. • Keep the electronic swing panel closed when not in use. Cleaning the unit • Stains on the unit Should be wiped off with a soft cloth.
Troubleshooting If you are having a problem with your unit, check this list for a possible solution before calling for service. If you cannot solve the problem from the hints given here, or the unit has been physically damaged, call a qualified person, such as your dealer, for service. Symptom Possible Cause No sound is heard. Connections are incorrect or loose. Unable to operate the remote control. • The path between the remote control and the remote sensor on the unit is blocked.
Authorized Service Centers ® QUALITY SERVICE HOW TO LOCATE YOUR JVC SERVICE CENTER TOLL FREE: 1 (800) 537-5722 http://www.jvc.com Dear Customer, In order to receive the most satisfaction from your purchase,please read the instruction booklet before operating the unit.In the event that repairs are necessary, please call 1 (800)537-5722 for your nearest authorized servicer or visit our website at www.JVC.com Remember to retain your Bill of Sale for Warranty Service.
LIMITED WARRANTY AUDIO-1 JVC COMPANY OF AMERICA warrants this product and all parts thereof, except as set forth below ONLY TO THE ORIGINAL PURCHASER AT RETAIL to be FREE FROM DEFECTIVE MATERIALS AND WORKMANSHIP from the date of original retail purchase for the period as shown below. ("The Warranty Period") PARTS 1 LABOR YR 1 YR THIS LIMITED WARRANTY IS VALID ONLY IN THE FIFTY (50) UNITED STATES, THE DISTRICT OF COLUMBIA AND IN COMMONWEALTH OF PUERTO RICO.
VICTOR COMPANY OF JAPAN, LIMITED V J EN FS-A52[J]COVER_f.pm6 2 02.1.