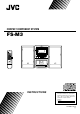
COMPACT COMPONENT SYSTEM FS-M3 C O M PA C T SYSTEM FS-M3 OPEN /CLOSE DISPLAY MODE REMAIN TIMER ON/OFF STANDBY/ON CD/RANDOM COMPONENT STANDBY /ON TUNER /BAND INTRO SET TAPE RANDOM BAND CD TUNER TAPE REC PROGRAM PROGRAM PRESET SEARCH/TUNING REPEAT PHONES REMAIN SLEEP PRE UP INTRO TIMER REPEAT /PRE DOWN DISPLAY MODE PRE EQ/HBS + MUTING BEAT CUT VOLUME VOLUME REC STOP/CLEAR PLAY/PAUSE PRE EQ /HBS EJECT – RM-SFSM3J REMOTE CONTROL FULL LOGIC DECK CD SYNCHRO RECORDING I
Warnings, Cautions and Others Mises en garde, précautions et indications diverses CAUTION WARNING: TO REDUCE THE RISK OF FIRE OR ELECTRIC SHOCK, DO NOT EXPOSE THIS APPLIANCE TO RAIN OR MOISTURE. RISK OF ELECTRIC SHOCK DO NOT OPEN CAUTION: TO REDUCE THE RISK OF ELECTRIC SHOCK, DO NOT REMOVE COVER (OR BACK). NO USER SERVICEABLE PARTS INSIDE. REFER SERVICING TO QUALIFIED SERVICE PERSONNEL.
Introduction We would like to thank you for purchasing one of our JVC products. Before operating this unit, read this manual carefully and thoroughly to obtain the best possible performance from your unit, and retain this manual for future reference. About This Manual Power source This manual is organized as follows: • When unplugging from the wall outlet, always pull the plug, not the AC power cord. • The manual mainly explains operations using the buttons and controls on the unit.
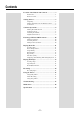
Contents Location of the Buttons and Controls ..................... 3 Front Panel ................................................................ 4 Remote Control ......................................................... 5 Getting Started .......................................................... 6 Unpacking ................................................................. 6 Putting the Batteries into the Remote Control .......... 6 Connections .............................................................
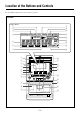
Location of the Buttons and Controls Become familiar with the buttons and controls on your unit.
Continued Front Panel See pages in the parentheses for details. 1 Disc compartment (11) 2 STANDBY/ON button (8) Turns the unit on or off (standby mode). 3 CD/RANDOM button (11, 12) Selects CD mode. Starts or stops random play in CD mode. 4 DISPLAY MODE button (8, 15) Displays the clock time or sets the timer. 5 TIMER ON/OFF SET button (15) Activates/deactivates the timer. 6 Remote sensor (5) Infrared sensor for remote control 7 PROGRAM button (8, 10, 11, 15) CD: programs the track playback order.
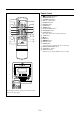
Remote Control Remote Control 1 2 w STANDBY/ON TUNER /BAND CD/RANDOM 3 TAPE e REC 4 5 6 7 r t PROGRAM SLEEP PRE UP INTRO TIMER REPEAT /PRE DOWN DISPLAY MODE PRE EQ/HBS + MUTING BEAT CUT VOLUME REMAIN y u 8 9 i o – p ; q 1 2 3 4 5 6 7 8 9 p q RM-SFSM3J REMOTE CONTROL w e r t y u i o ; C O M PA C T COMPONENT SYSTEM FS-M3 STANDBY /ON OPEN /CLOSE DISPLAY MODE REMAIN TIMER ON/OFF INTRO SET PROGRAM RANDOM BAND CD TUNER PRESET TAPE SEARCH/TUNING REPEAT PHONES
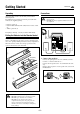
Getting Started Continued Unpacking Connections After unpacking, check to be sure that you have all the following items. The number in the parentheses following each item name indicates the supplied quantity. • DO NOT connect any equipment to the unit while the unit is powered. • DO NOT plug in any equipment until all connections are completed.
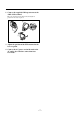
2 Connect the supplied AM loop antenna to the AM LOOP terminal. Place the antenna away from the unit and adjust its position for the best reception. 1 2 3 3 Adjust the position of the FM antenna for the best reception. 4 Connect the AC power cord of the unit to the AC outlet after all other connections have been made.
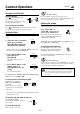
Common Operations Continued Turning On or Off the Unit On clock resetting If a power failure occurs or the AC power cord is disconnected, the clock is reset to “AM 12:00” (flashing). In such a case you need to set the clock again. To turn on the unit Press STANDBY/ON on the unit or remote control. The unit turns on with the last source selection remaining valid.
Digital Sound Control The unit’s digital sound control feature enables you to select desired preset equalizer settings (selectable as sound modes) to enjoy special sound effects matching the music type. You can also use the HBS (Hyper Bass Sound) system to enjoy powerful bass sound created by emphasizing low frequencies. To select the desired sound mode Press PRE EQ/HBS repeatedly.
Listening to FM and AM Broadcasts Tuning In a Station Presetting Stations You can preset 20 FM and 20 AM stations. 1 When the unit is turned on, press TUNER/BAND to select tuner mode. BAND TUNER The unit tunes in the last station tuned in (either FM or AM). 2 Press TUNER/BAND to select the band, FM or AM. 1 Tune in the station you want to preset. BAND TUNER Each time you press the button, the band selection alternates between FM and AM. 3 Press and hold 4 or ¢ for more than 1 second.
Playing Back CDs Program Play This unit can play back audio CDs. You can arrange the order in which the tracks are played before you start playing. You can program up to 60 tracks. 1 In stop mode, press PROGRAM. Loading a Disc 1 Press CD/RANDOM to select CD mode. RANDOM The PROGRAM indicator starts blinking. CD 2 Press 0 OPEN/CLOSE. OPEN /CLOSE The disc tray slides out. PROGRAM 2 Press 4 or ¢ repeatedly to select the desired track. SEARCH/TUNING The current program number starts blinking.
Random Play Introductory Play You can play all the tracks in random order. The introductory portions of tracks can be played back automatically. Press CD/RANDOM before or during playing. RANDOM Press INTRO. CD The first 10-second portion of each of the tracks is played back in order. The RANDOM indicator lights up. To exit random play mode, press CD/RANDOM again. The RANDOM indicator goes off. To exit introductory play mode, press INTRO again.
Playing Back Tapes Rewind/Fast Forward • Use only type I normal tapes. 1 Press 4 or ¢ to rewind or fast forward the tape. The use of tapes longer than 120 minutes is not recommended, since characteristic deterioration may occur and these tapes easily jam in the pinchroller and the capstan. “REW” or “FF” appears on the display. 2 Press 7 to stop rewinding or fast forwarding. Loading a Tape 1 Press 0 EJECT to open the tape deck door. 3 Close the tape deck door.
Recording Recording Tapes IMPORTANT: • It should be noted that it may be unlawful to re-record pre-recorded tapes, records, or discs without the consent of the owner of copyright in the sound or video recording, broadcast or cable program and in any literary, dramatic, musical, or artistic content embodied therein. • The recording level is automatically set correctly, so it is not affected by the volume control.
Using the Timers There are three timers available – daily timer, recording timer and sleep timer. Before using the timers, you need to set the built-in clock (see page 8). Using Daily Timer With the daily timer, you can wake to your favorite music or radio program. How the daily timer actually works At the timer-on time, the unit automatically turns on, sets the volume to the preset level, and starts playing the specified source (radio or CD).
Using Sleep Timer With the sleep timer, you can fall asleep to music. You can set the sleep timer using the remote control when the unit is turned on. How the sleep timer actually works The unit automatically turns off after the specified time length passes. 1 Press and hold SLEEP on the remote control until the desired time length appears on the display. SLEEP The time length changes from 90 to 10 minutes in 10-minute steps. 2 Wait for a moment after specifying the time length.
Troubleshooting If you are having a problem with your unit, check this list for a possible solution before calling for service. If you cannot solve the problem from the hints given here, or the unit has been physically damaged, call a qualified person, such as your dealer, for service. Symptom No sound is heard. Cause Action • Connections are incorrect or loose. • Check all connections and make corrections (see pages 6 and 7). • Headphones are connected. • Disconnect the headphones.
Maintenance To get the best performance of the unit, keep your discs, tapes, and mechanism clean. Handling discs Cassette deck • Remove the disc from its case by holding it at the edge while pressing the center hole lightly. • Do not touch the shiny surface of the disc, or bend the disc. • Put the disc back in its case after use to prevent warping.
Specifications Amplifier section General Output power 10 W per channel, min. RMS, driven into 8 Ω at 1 kHz with no more than 10% total harmonic distortion Audio output level PHONES: 20 mW/ch output into 32 Ω Speakers/Impedance 8 Ω - 16 Ω Power requirement Power consumption Tuner Speaker FM tuning range AM tuning range 87.5 MHz - 108.
Authorized Service Centers ® QUALITY SERVICE HOW TO LOCATE YOUR JVC SERVICE CENTER TOLL FREE: 1 (800) 537-5722 http://www.jvc.com Dear Customer, In order to receive the most satisfaction from your purchase,please read the instruction booklet before operating the unit.In the event that repairs are necessary, please call 1 (800)537-5722 for your nearest authorized servicer or visit our website at www.JVC.com Remember to retain your Bill of Sale for Warranty Service.
LIMITED WARRANTY AUDIO-1 JVC COMPANY OF AMERICA warrants this product and all parts thereof, except as set forth below ONLY TO THE ORIGINAL PURCHASER AT RETAIL to be FREE FROM DEFECTIVE MATERIALS AND WORKMANSHIP from the date of original retail purchase for the period as shown below. ("The Warranty Period") PARTS 1 LABOR YR 1 YR THIS LIMITED WARRANTY IS VALID ONLY IN THE FIFTY (50) UNITED STATES, THE DISTRICT OF COLUMBIA AND IN COMMONWEALTH OF PUERTO RICO.
MEMO
MEMO
MEMO
EN 1201NNMBICORI