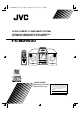
FS-MD9000(J)-Cover.fm Page 1 Thursday, July 30, 1998 1:17 PM ULTRA COMPACT COMPONENT SYSTEM SISTEMAS DE COMPONENTES ULTRA COMPACTOS SYSTEME DE COMPOSANTS ULTRA COMPACT U M FS-MD9000 L T R A M IC T FS 0 R O -MD900 NEN COMPO E T S Y S REMOTE CONTROL RM-RXFSMD9000 DIMMER SLEEP POWER AHB. SUPER PRO CLOCK PRESET TUNING DOWN MULTI CONTROL UP CLOCK FM MODE TAPE/AUX SLEEP OPEN/CLOSE TAPE/AUX MD/TAPE TUNER BAND CD AUTO AHB.
FS-MD9000(J)-Warning.fm Page 1 Thursday, July 30, 1998 1:23 PM Warnings, Cautions and Others / Mises en garde, précautions et indications diverses (For U.S.A) CAUTION RISK OF ELECTRIC SHOCK CAUTION: TO REDUCE THE RISK OF ELECTRIC SHOCK DO NOT REMOVE COVER (OR BACK) NO USER SERVICEABLE PARTS INSIDE REFER SERVICING TO QUALIFIED SERVICE PERSONNEL.
FS-MD9000(J)-Warning.fm Page 2 Thursday, July 30, 1998 1:23 PM For Canada/pour le Canada CAUTION: TO PREVENT ELECTRIC SHOCK, MATCH WIDE BLADE OF PLUG TO WIDE SLOT, FULLY INSERT. PRECAUTION: POUR EVITER LES CHOCS ELECTRIQUES, INTRODUIRE LA LAME LA PLUS LARGE DE LA FICHE DANS LA BORNE CORRESPONDANTE DE LA PRISE ET POUSSER JUSQUAU FOND. 1. CLASS 1 LASER PRODUCT 2. DANGER: Invisible laser radiation when open and interlock failed or defeated. Avoid direct exposure to beam. 3.
FS-MD9000(J)-e.fm Page 1 Thursday, July 30, 1998 1:19 PM English Thank you for purchasing the JVC Ultra Compact Component System. We hope it will be a valued addition to your home, giving you years of enjoyment. Be sure to read this instruction manual carefully before operating your new stereo system. In it you will find all the information you need to set up and use the system. If you have a query that is not answered by the manual, please contact your dealer.
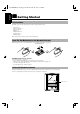
English FS-MD9000(J)-e.fm Page 2 Thursday, July 30, 1998 1:19 PM ■ ■ Getting Started Accessories Check that you have all of the following items, which are supplied with the System. Power Cord (1) AM Loop Antenna (1) Remote Control (1) Batteries (2) FM Wire Antenna (1) Speaker Cords (2) Polishing Cloth (1) If any of these items are missing, contact your dealer immediately.
FS-MD9000(J)-e.fm Page 3 Thursday, July 30, 1998 1:19 PM English CAUTION: Make all connections before plugging the System into an AC power outlet.
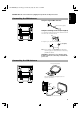
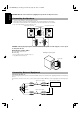
English FS-MD9000(J)-e.fm Page 4 Thursday, July 30, 1998 1:19 PM CAUTION: Make all connections before plugging the System into an AC power outlet. Connecting the Speakers 1. Open each of the terminals to connect the speaker wire leads. 2. Connect the speaker cords between the Speaker terminals of the Unit and the terminals of the Speakers. Connect the cords with a black line to the (–) terminals and cords without a black line to the (+) terminals. 3.
CAUTION: Make all connections before plugging the System into an AC power outlet. Connecting Auxiliary Equipment Connect an (not supplied) signal cord between the LINE IN (AUX1) terminals on the System and the output terminals of your auxiliary equipment (e.g. turntable). You can listen to this source.
COMPU PLAY JVC's COMPU PLAY feature lets you control the most frequently used System functions with a single touch. With One Touch Operation you can play a CD, an MD, or turn on the radio with a single press of the play button for that function. One Touch Operation turns the power on for you, then starts the function you have specified. If the System is not ready (no CD in place, for example), the System still powers on so you can insert a CD.
Adjusting the Volume You can adjust the volume level between 0 and 50. The VOLUME indicator on the display indicates the volume level. ■ The bass or treble level display goes out when the BASS or TREBLE button is pressed again or when nothing is done for about 6 seconds. Showing the Time (CLOCK) VOLUME Press the VOLUME UP button of the Unit to increase the volume or press the VOLUME DOWN button to decrease it.
■ ■ Using the Tuner C Y A S R T E LT English FS-MD9000(J)-e.fm Page 8 Thursday, July 30, 1998 1:19 PM O M REMOTE CONTROL RM-RXFSMD9000 DIMMER CLOCK SLEEP S POWER FM MODE TAPE/AUX PROGRAM RANDOM TREBLE PRESET TUNING FM MODE AUTO PRESET AUTO AHB. SUPER PRO PRESET BASS T F P A S -M D 9 0 0 0 E N N CT C OMPO 4 AHB.
5. Press the SET button. ■ 3. Repeat steps 1-2 for the other band. ■ "STORED" appears and, after 1 second, the display returns to the broadcast frequency display. ■ 6. Repeat above steps 1 to 5 for each station ■ CAUTION: If the System is unplugged or if a power failure occurs, the preset stations will be erased after about 24 hours. If this happens, you will need to preset the stations again. you want to store in memory with a preset number.
English FS-MD9000(J)-e.fm Page 10 Thursday, July 30, 1998 1:19 PM ■ ■ ■ You can place an 8 cm (3'') CD without an adaptor. If the CD cannot be read correctly (because it is scratched, for example), " 0 0:00" appears on the display. You can insert a CD while listening to the other source. Basics of Using the CD Player-Normal Play PROGRAM 5. Press the UP, DOWN, >, or < button to ■ select the track to program. To Play a CD ———————————— 1. Insert a CD. ■ 2. Press the CD 38 button.
2. Press the CD 38 button. ■ Press the REPEAT button on the Remote Control. The Repeat indicator changes with each press of the button, as shown below. = ALL =blank display = (back to the beginning) : Repeats one track. ALL : In Normal Play mode, repeats all the tracks. In Program Play mode, repeats all the tracks in the program. In Random Play mode, repeats all the tracks in random order. To exit Repeat mode, press the REPEAT button until the Repeat indicator on the display goes out.
English FS-MD9000(J)-e.fm Page 12 Thursday, July 30, 1998 1:19 PM To stop playing the MD, press the 7 button. The following information for the MD is displayed. Total track number Total playback time press the > button, then press the UP button twice (or simply press the UP button 12 times). 6. Press the SET button. ■ Program order number To stop playing and remove the MD, press the MD0 button to eject the MD. To pause, press the MD 38 button. The playback time blinks on the display.
= ALL= blank display = (back to the beginning) : Repeats one track. ALL : In Normal Play mode, repeats all the tracks. In Program Play mode, repeats all the tracks in the program. In Random Play mode, repeats all the tracks in random order. To exit Repeat mode, press the REPEAT button until the Repeat indicator on the display goes out. ■ In Random Play, as a matter of course, cannot be selected. ■ Repeat mode remains on the display even when you change the play mode.
English FS-MD9000(J)-e.fm Page 14 Thursday, July 30, 1998 1:19 PM 4. Play the record source selected in step 2. ■ 5. Press the MD 38 button to start recording. ■ The MD indicator blinks slowly and the selected source is recorded on the MD. REC PAUSE or (Source playback) MD (Track is increased by 1.) 6. Press the 7 button to stop recording. ■ • CD Synchro Recording Everything on the CD goes onto the MD in the order it is on the CD, or according to the order you have set in the program.
Erasing all the tracks (ALL ERASE function) Giving titles to discs and tracks (TITLE function) All the tracks can be erased at once without recording fresh material over them. A title consisting of up to 32 characters can be given to a disc and a track. The title given appears in the display window. Track No. ALL ERASE Track A Track B Track C Track D New tracks can be recorded. Note: Track marks These marks are provided to locate the start of each track.
English FS-MD9000(J)-e.fm Page 16 Thursday, July 30, 1998 1:19 PM Note: While “UTOCwriting” is displayed, do not disconnect the power cord or subject the Unit to the vibration to avoid incorrect recording. 3. Press the EDIT/TITLE button until "MOVE ?" ■ is displayed. The "EDIT" indicator appears on the display. Joining Tracks (JOIN Function) ■ Use the Remote Control to carry out this function. DIVIDE=JOIN=MOVE=ERASE=ALL ERASE=DISC TITLE=TITLE=(Back to the beginning) 4. Press the SET button. ■ 1.
2. Press the MD 38 button and then 7 button ■ to set the function to MD. The track numbers and total playback time are displayed. 3. Press the EDIT/TITLE button until "ERASE ■ To cancel the all erasing, press the CANCEL button in step 4. To remove the MD, press the MD0 button. Note: While “UTOCwriting” is displayed, do not disconnect the power cord or subject the Unit to the vibration to avoid incorrect recording. ?" is displayed. The "EDIT" indicator appears on the display.
English FS-MD9000(J)-e.fm Page 18 Thursday, July 30, 1998 1:19 PM 5. Input a preferred title (up to 32 charac■ The letter N is now displayed in the title area. ters). Use the following buttons to input a title. [Title editing buttons and their functions] (see below) Button DISPLAY /CHARA 4. Select “(space)” and press the SET button. 5. Press the DISPLAY/CHARA button until the numbers are displayed. 6. Select “1” and press the SET button. The title name "N(space)1" will be displayed.
FS-MD9000(J)-e.fm Page 19 Thursday, July 30, 1998 1:19 PM CLOCK M POWER FM MODE TAPE/AUX C Y A SLEEP S R DIMMER T T E UL REMOTE CONTROL RM-RXFSMD9000 English ■ ■ Using External Equipments O M T F P A S -M D 9 0 0 0 E N N CT C OMPO S TAPE/AUX AUTO AHB. SUPER PRO PRESET PROGRAM RANDOM BASS TREBLE REPEAT AHB.
■ ■ Using the Timers C Y A S R T T English FS-MD9000(J)-e.fm Page 20 Thursday, July 30, 1998 1:19 PM O M REMOTE CONTROL RM-RXFSMD9000 DIMMER SLEEP T F P A S -M D 9 0 0 0 E N N CT C OMPO S POWER 4 ¢ SLEEP CLOCK FM MODE TAPE/AUX AUTO AHB. SUPER PRO PRESET PROGRAM RANDOM BASS TREBLE CLOCK REPEAT AHB.
6. Press the TIMER/SNOOZE button on the ■ Setting the SLEEP Timer Unit. The timer setting is completed and the display returns to the display before you set the timer. The timer indicator remains lit. 7. Before turning off the System, prepare the ■ music source selected in step 4. TUNER: Tune in to the desired station. TUNER REC: Tune in to the desired station and insert an MD for recording the station. CD: Insert a CD. MD: Insert an MD.
English FS-MD9000(J)-e.fm Page 22 Thursday, July 30, 1998 1:19 PM ATRAC (Adaptive Transform Acoustic Coding) Optical pickup Within recordings, there are sounds which cannot be readily heard. For example, as the volume decreases, high-pitched sounds and low-pitched sounds become difficult to hear. also, if a quiet sound comes at the same time as or just after a loud sound, it will not be heard.
FS-MD9000(J)-e.fm Page 23 Thursday, July 30, 1998 1:19 PM English ■ ■ Minidisc limitations The minidisc records information in an original format that differs from that of conventional cassette tapes or DATs. Since there are some limitations with this recording format, the following types of conditions may arise. These conditions arre not malfunctions. Condition Cause “DISC FULL” is displayed, even though the possible recording time is not used up.
English FS-MD9000(J)-e.
■ ■ Troubleshooting ‡ ‡ ,Iý\RXýDUHýKDYLQJýDýSUREOHPýZLWKý\RXUý6\VWHPñýFKHFNýWKLVýOLVWýIRUýDýSRVVLEOHýVROXWLRQýEHIRUHýFDOOLQJýIRUýVHUYLFHï ,Iý\RXýFDQQRWýVROYHýWKHýSUREOHPýIURPýWKHýKLQWVýJLYHQýKHUHñýRUýWKHý6\VWHPýKDVýEHHQýSK\VLFDOO\ýGDPDJHGñýFDOOýDýTXDOLILHGýSHUVRQñýVXFKýDVý \RXUýGHDOHUñýIRUýVHUYLFHï Symptom 1RýVRXQGýLVýKHDUGï 3RRUýUDGLRýUHFHSWLRQ Possible Cause Action ‡ &RQQHFWLRQVýDUHýLQFRUUHFWñýRUýORRVHï ‡ ‡ +HDGSKRQHVýDUHýFRQQHFWHGï ‡ ‡ ‡ 7KHýDQWHQQDýLVýGLVFRQQHFWHGï 7KHý$0ý/RRSý$QWHQQDýLVýWR
English FS-MD9000(J)-e.
FS-MD9000(J)-Back cover.