FS-SD550(A)/ GNT0008-010A/ English FS-SD5_01A.
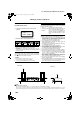
FS-SD550(A)/ GNT0008-010A/ English FS-SD5_01A.book Page 1 Friday, February 9, 2001 6:20 PM Warnings, Cautions and Others IMPORTANT FOR LASER PRODUCTS Caution: Proper Ventilation To avoid risk of electric shock and fire, and to prevent damage, locate the apparatus as follows: 1 Front: No obstructions and open spacing. 2 Sides/ Top/ Back:No obstructions should be placed in the areas shown by the dimensions below. 3 Bottom: Place on the level surface.
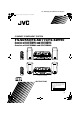
FS-SD550(A)/ GNT0008-010A/ English FS-SD5_01A.book Page 1 Friday, February 9, 2001 6:20 PM Introduction Thank you for purchasing the JVC Compact Component System. We hope it will be a valued addition to your home, giving you years of enjoyment. Be sure to read this instruction manual carefully before operating your new stereo system. In it you will find all the information you need to set up and use the system. If you have a query that is not answered by the manual, please contact your dealer.
FS-SD550(A)/ GNT0008-010A/ English FS-SD5_01A.book Page 2 Friday, February 9, 2001 6:20 PM Table of Contents Introduction ........................................................................................................ 1 Features ...................................................................................................................................... 1 How This Manual Is Organized .................................................................................................
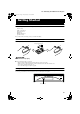
FS-SD550(A)/ GNT0008-010A/ English FS-SD5_01A.book Page 3 Friday, February 9, 2001 6:20 PM Getting Started Accessories Make sure that you have all of the following items, which are supplied with the System. Power Cord (1) AM Loop Antenna (1) Remote Control (1) Batteries (2) FM Wire Antenna (1) Speaker Cords (2) If any of these items are missing, contact your dealer immediately.
FS-SD550(A)/ GNT0008-010A/ English FS-SD5_01A.book Page 4 Friday, February 9, 2001 6:20 PM Getting Started CAUTION: • Make all connections before plugging the System into an AC power outlet.
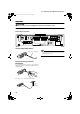
FS-SD550(A)/ GNT0008-010A/ English FS-SD5_01A.book Page 5 Friday, February 9, 2001 6:20 PM Getting Started Connecting the AM (MW/LW) Antenna Rear Panel of the Unit SUB WOOFER CD DIGITAL OUT OUT SPEAKERS IMPEDANCE 4 IN R 16 L MD / AUX ANTENNA AC IN AM EXT FM(75 ) COAXIAL AM LOOP AM loop antenna (Supplied) ANTENNA AM EXT FM(75 ) COAXIAL AM LOOP Attach the AM loop to its base by snapping the tabs on the loop into the slot in the base. Turn the loop until you have the best reception.
FS-SD550(A)/ GNT0008-010A/ English FS-SD5_01A.book Page 6 Friday, February 9, 2001 6:20 PM Getting Started CAUTION: • Make all connections before plugging the System into an AC power outlet. Connecting the Speakers 1. Open each of the terminals to connect the speaker wire leads. 2. Connect the speaker cords between the Speaker terminals of the Unit and the terminals of the Speakers. Connect the cords with a black line to the (–) terminals and cords without a black line to the (+) terminals. 3.
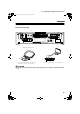
FS-SD550(A)/ GNT0008-010A/ English FS-SD5_01A.book Page 7 Friday, February 9, 2001 6:20 PM Getting Started Connecting a Subwoofer Connect a signal cord (not supplied) between the System’s SUBWOOFER terminal and the input terminal of an external subwoofer. Subwoofer (not supplied) SUB WOOFER OUT CD DIGITAL OUT IN MD / AUX Signal cord (not supplied) ANTENNA 11mm Max. FM(75 11mm Max/ ) COAXIAL AM EXT * AM LOOP * Use the plug whose diameter is 11mm or less.
FS-SD550(A)/ GNT0008-010A/ English FS-SD5_01A.book Page 8 Friday, February 9, 2001 6:20 PM Getting Started Connecting the AC Power Cord Firmly insert the supplied AC power cord into the AC inlet on the back of the Unit. AC IN Power cord CAUTIONS: • ONLY USE THE JVC POWER CORD PROVIDED WITH THIS SYSTEM TO AVOID MALFUNCTION OR DAMAGE TO THE SYSTEM. • BE SURE TO UNPLUG THE POWER CORD FROM THE OUTLET WHEN GOING OUT OR WHEN THE SYSTEM IS NOT IN USE FOR AN EXTENDED PERIOD OF TIME.
FS-SD550(A)/ GNT0008-010A/ English FS-SD5_01A.
FS-SD550(A)/ GNT0008-010A/ English FS-SD5_01A.book Page 10 Friday, February 9, 2001 6:20 PM Basic Operations Fade-out Muting (FADE MUTING) You can mute the output with one touch operation. To mute the output, press the FADE MUTING button on the Remote Control. Then, the output will be faded out and becomes 0. To release muting, press the FADE MUTING button once again. Then, the output will be faded in to the original level. Showing the Time (CLOCK/DISPLAY) You can show the current time on the display.
FS-SD550(A)/ GNT0008-010A/ English FS-SD5_01A.
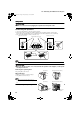
FS-SD550(A)/ GNT0008-010A/ English FS-SD5_01A.book Page 12 Friday, February 9, 2001 6:20 PM Using the Tuner Presetting Stations Auto Presetting You can preset up to 30 FM stations and up to 15 AM (MW/ LW) stations using the Remote Control. In each band, you can automatically preset FM-30, AM-15 (MW/LW) stations. Preset numbers will be allocated as stations are found, starting from the lowest frequency and moving up the frequency.
FS-SD550(A)/ GNT0008-010A/ English FS-SD5_01A.
FS-SD550(A)/ GNT0008-010A/ English FS-SD5_01A.book Page 14 Friday, February 9, 2001 6:20 PM Using the CD Player To Unload a CD Take out the CD as shown below. To pause, press the CD #¥8 button. The playback time blinks on the display. To cancel pause, press the same button again. Play continues from the point where it was paused. To Select a Track or Passage within a Track During playback, press the 4 or ¢ (< or >) button to select the track you want. • The selected track starts playing.
FS-SD550(A)/ GNT0008-010A/ English FS-SD5_01A.book Page 15 Friday, February 9, 2001 6:20 PM Using the CD Player 6 Press the SET button. Program order number UP Random Play The tracks will play in no special order when you use this mode. SET (After 2 seconds) DOWN 1 The “RANDOM” indicator lights up on the display. Total playback time of the programmed tracks 7 Repeat steps 5 and 6 to select the other tracks for the program. You can see the total playback time of programmed tracks on the display.
FS-SD550(A)/ GNT0008-010A/ English FS-SD5_01A.
FS-SD550(A)/ GNT0008-010A/ English FS-SD5_01A.
FS-SD550(A)/ GNT0008-010A/ English FS-SD5_01A.book Page 18 Friday, February 9, 2001 6:20 PM Using the Timers 1 Set the minute you want the Unit to be turned off, using the ¢ and 4 buttons. Setting the ON time (Example: 10:15). 1. Press the TIMER button on the Unit for more than two seconds. The Timer indicator lights up and the hour digit of the current ON time blinks on the display. • When the clock is not set, “CLOCK” and “ADJUST” appear alternately on the display. Set the clock first.
FS-SD550(A)/ GNT0008-010A/ English FS-SD5_01A.book Page 19 Friday, February 9, 2001 6:20 PM Using the Timers Setting the SLEEP Timer (Using the Remote Control) Use the Sleep Timer to turn the System off after a certain number of minutes when it is playing. By setting the Sleep Timer, you can fall asleep to music and know that your System will turn off by itself rather than play all night. ■ You can only set the Sleep Timer when the System is on and a source is playing.
FS-SD550(A)/ GNT0008-010A/ English FS-SD5_01A.book Page 20 Friday, February 9, 2001 6:20 PM Care And Maintenance Handle your CDs carefully, and they will last a long time. Compact Discs • Only CDs bearing this mark can be used with this System. However, continued use of irregular shape CDs (heart-shape, octagonal, etc.) can damage the System. Cleaning the Lens If the lens in the CD pickup is dirty, dropout, etc., could degrade sound. Open the Top Cover and clean the lens as shown.
FS-SD550(A)/ GNT0008-010A/ English FS-SD5_01A.book Page 21 Friday, February 9, 2001 6:20 PM Troubleshooting • If you are having a problem with your System, check this list for a possible solution before calling for service. Symptom No sound is heard. Poor radio reception • If you cannot solve the problem from the hints given here, or the System has been physically damaged, call a qualified person, such as your dealer, for service. Possible Cause Action • Connections are incorrect, or loose.
FS-SD550(A)/ GNT0008-010A/ English FS-SD5_01A.book Page 22 Friday, February 9, 2001 6:20 PM Specifications Amplifier Output Power 38 W (19 W + 19 W) at 4 ohms (Max.