FS-SD5&7&9_Cover1.
FS-SD5&7&9_Warning.fm Page 1 Thursday, June 1, 2000 9:25 AM Warnings, Cautions and Others Avisos, precauciones y otras notas CAUTION To reduce the risk of electrical shocks, fire, etc.: 1. Do not remove screws, covers or cabinet. 2. Do not expose this appliance to rain or moisture. Caution –– switch! Disconnect the mains plug to shut the power off completely. The switch in any position does not disconnect the mains line. The power can be remote controlled.
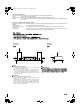
FS-SD5&7&9_Warning.fm Page 2 Thursday, June 1, 2000 9:25 AM Caution: Proper Ventilation To avoid risk of electric shock and fire, and to prevent damage, locate the apparatus as follows: 1 Front: No obstructions and open spacing. 2 Sides/ Top/ Back: No obstructions should be placed in the areas shown by the dimensions below. 3 Bottom: Place on the level surface. Maintain an adequate air path for ventilation by placing on a stand with a height of 10 cm or more.
FS-SD5&7&9_Intro.fm Page 1 Thursday, June 1, 2000 9:25 AM English Introduction Thank you for purchasing the JVC Compact Component System. We hope it will be a valued addition to your home, giving you years of enjoyment. Be sure to read this instruction manual carefully before operating your new stereo system. In it you will find all the information you need to set up and use the system. If you have a query that is not answered by the manual, please contact your dealer.
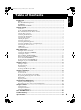
FS-SD5&7&9TOC.fm Page 2 Thursday, June 1, 2000 9:26 AM English Table of Contents Introduction ........................................................................................................ 1 Features ...................................................................................................................................... 1 How This Manual Is Organized ................................................................................................. 1 WARNINGS .........................
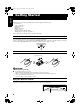
FS-SD5&7&9_A1.fm Page 3 Thursday, June 1, 2000 9:26 AM English Getting Started Accessories Make sure that you have all of the following items, which are supplied with the System. Power Cord (1) AM Loop Antenna (1) Remote Control (1) Batteries (2) FM Wire Antenna (1) Speaker Cords (2) Spacers (6) (only for FS-SD7 / SD9) AC Plug Adaptor (except for Argentina) (1) If any of these items are missing, contact your dealer immediately.
FS-SD5&7&9_A1.fm Page 4 Thursday, June 1, 2000 9:26 AM English Getting Started CAUTION: • Make all connections before plugging the System into an AC power outlet.
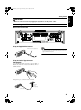
FS-SD5&7&9_A1.fm Page 5 Thursday, June 1, 2000 9:26 AM English Getting Started Connecting the AM Antenna Rear Panel of the Unit SUB WOOFER CD DIGITAL OUT OUT SPEAKERS IMPEDANCE 4 IN 16 L R MD / AUX ANTENNA AC IN AM EXT FM(75 ) COAXIAL AM LOOP AM loop antenna (Supplied) ANTENNA AM EXT FM(75 ) COAXIAL AM LOOP Attach the AM loop to its base by snapping the tabs on the loop into the slot in the base. Turn the loop until you have the best reception.
FS-SD5&7&9_A1.fm Page 6 Thursday, June 1, 2000 9:26 AM English Getting Started CAUTION: • Make all connections before plugging the System into an AC power outlet. Connecting the Speakers 1. Open each of the terminals to connect the speaker wire leads. 2. Connect the speaker cords between the Speaker terminals of the Unit and the terminals of the Speakers. Connect the cords with a black line to the (–) terminals and cords without a black line to the (+) terminals. 3.
FS-SD5&7&9_A1.fm Page 7 Thursday, June 1, 2000 9:26 AM English Getting Started Attaching the Spacers CAUTION: Note for installation • Take special care to select an appropriate installation place where an earthquake or shock does not cause the speaker to collapse or drop on the floor. (FS-SD7) (FS-SD9) Spacer Spacer FS-SD7 / SD9 Attach the supplied spacers to the bottom of the speaker to protect the cabinet, prevent slipping, and absorb the cabinet vibration.
FS-SD5&7&9_A1.fm Page 8 Thursday, June 1, 2000 9:26 AM English Getting Started Connecting the AC Power Cord Firmly insert the supplied AC power cord into the AC inlet on the back of the Unit. AC IN Power cord CAUTIONS: • ONLY USE THE JVC POWER CORD PROVIDED WITH THIS SYSTEM TO AVOID MALFUNCTION OR DAMAGE TO THE SYSTEM. • BE SURE TO UNPLUG THE POWER CORD FROM THE OUTLET WHEN GOING OUT OR WHEN THE SYSTEM IS NOT IN USE FOR AN EXTENDED PERIOD OF TIME.
FS-SD5&7&9_A1.
FS-SD5&7&9_A1.fm Page 10 Thursday, June 1, 2000 9:26 AM Fade-out Muting (FADE MUTING) You can mute the output with one touch operation. To mute the output, press the FADE MUTING button on the Remote Control. Then, the output will be faded out and becomes 0. To release muting, press the FADE MUTING button once again. Then, the output will be faded in to the original level. English Basic Operations Showing the Time (CLOCK/DISPLAY) You can show the current time on the display.
FS-SD5&7&9_A1.
FS-SD5&7&9_A1.fm Page 12 Thursday, June 1, 2000 9:26 AM ● Preset Tuning using the Unit Press the PRESET TUNING button to select the desired preset number. Its band and frequency are displayed. 6 Repeat above steps 1 to 5 for each station you want to store in memory with a preset number. To change the preset stations, repeat the same steps as above. • In AM broadcast, reception sensitivity will be changed by turning the AM loop antenna. Turn the AM loop antenna for best reception.
FS-SD5&7&9_A2.
FS-SD5&7&9_A2.fm Page 14 Thursday, June 1, 2000 9:29 AM To Unload a CD Take out the CD as shown below. To pause, press the CD #¥8 button. The playback time blinks on the display. To cancel pause, press the same button again. Play continues from the point where it was paused. To Select a Track or Passage within a Track During playback, press the 4 or ¢ (< or >) button to select the track you want. • The selected track starts playing.
FS-SD5&7&9_A2.fm Page 15 Thursday, June 1, 2000 9:29 AM English Using the CD Player 6 Press the SET button. Program order number UP Random Play The tracks will play in no special order when you use this mode. SET (After 2 seconds) DOWN 1 The “RANDOM” indicator lights up on the display. Total playback time of the programmed tracks 7 Repeat steps 5 and 6 to select the other tracks for the program. You can see the total playback time of programmed tracks on the display.
FS-SD5&7&9_A3.
FS-SD5&7&9_A3.
FS-SD5&7&9_A3.fm Page 18 Thursday, June 1, 2000 9:30 AM 1 Set the minute you want the Unit to be turned off, using the ¢ and 4 buttons. Setting the ON time (Example: 10:15). 1. Press the TIMER button on the Unit for more than two seconds. The Timer indicator lights up and the hour digit of the current ON time blinks on the display. • When the clock is not set, “CLOCK” and “ADJUST” appear alternately on the display. Set the clock first.
FS-SD5&7&9_A3.fm Page 19 Thursday, June 1, 2000 9:30 AM English Using the Timers Setting the SLEEP Timer (Using the Remote Control) Use the Sleep Timer to turn the System off after a certain number of minutes when it is playing. By setting the Sleep Timer, you can fall asleep to music and know that your System will turn off by itself rather than play all night. ■ You can only set the Sleep Timer when the System is on and a source is playing. 1 Play a CD or tune in to the desired station.
FS-SD5&7&9_A3.fm Page 20 Thursday, June 1, 2000 9:30 AM Handle your CDs carefully, and they will last a long time. Compact Discs • Only CDs bearing this mark can be used with this System. However, continued use of irregular shape CDs (heart-shape, octagonal, etc.) can damage the System. Cleaning the Lens If the lens in the CD pickup is dirty, dropout, etc., could degrade sound. Open the Top Cover and clean the lens as shown. • Use a blower (available from a camera store) to blow dust off the lens.
FS-SD5&7&9_A3.fm Page 21 Thursday, June 1, 2000 9:30 AM English Troubleshooting • If you are having a problem with your System, check this list for a possible solution before calling for service. Symptom No sound is heard. • If you cannot solve the problem from the hints given here, or the System has been physically damaged, call a qualified person, such as your dealer, for service. Possible Cause • Headphones are connected. • Check all connections and make corrections. (See pages 4 to 8.
FS-SD5&7&9_A3.fm Page 22 Thursday, June 1, 2000 9:30 AM Amplifier 2XWSXWý3RZHU ,QSXWý6HQVLWLYLW\î,PSHGDQFHýõìýN+]ô 0'î$8;ý,1 2XWSXWý6HQVLWLYLW\î,PSHGDQFHýõìýN+]ô 0'î$8;ý287 &'ý',*,7$/ý287ýõ2SWLFDOýRXWô 6SHDNHUýWHUPLQDOV 6XEZRRIHUýRXW 3KRQHV English Specifications 32 W (16 W + 16 W) at 4 ohms (Max.
FS-SD5R_SP Introduction.fm Page 1 Thursday, June 1, 2000 9:59 AM Introducción Gracias por comprar el Sistema de Componentes Compactos de JVC. Esperamos que cumpla sus expectativas al cien por cien y que lo disfrute durante muchos años. Lea detenidamente este manual de instrucciones antes de empezar a utilizarlo. En él encontrará toda la información que precisa para configurar y utilizar el equipo. Si tiene alguna duda después de haber leído el manual, póngase en contacto con su distribuidor.
FS-SD5R_SP TOC.fm Page 2 Thursday, June 1, 2000 9:59 AM Índice Introducción ....................................................................................................... 1 Características ............................................................................................................................ 1 Cómo está organizado este manual ............................................................................................ 1 ADVERTENCIAS .............................................
FS-SD5R_SP1.fm Page 3 Thursday, June 1, 2000 10:00 AM Primeros pasos Accesorios Español Compruebe que le han entregado con el equipo todos los elementos siguientes. Cable de alimentación (1) Antena de cuadro para AM (1) Mando a distancia (1) Pilas (2) Antena monofilar de FM (1) Cables de los altavoces (2) Separadores (6) (sólo en los modelos FS-SD7 / SD9) Adaptor de enchufe de CA (Excepto para Argentina) (1) Si le faltara algún elemento, póngase inmediatamente en contacto con su distribuidor.
FS-SD5R_SP1.fm Page 4 Thursday, June 1, 2000 10:00 AM Primeros pasos CUIDADO: • Realice todas las conexiones antes de enchufar el equipo a la red.
FS-SD5R_SP1.fm Page 5 Thursday, June 1, 2000 10:00 AM Primeros pasos Conexión de la antena de AM Panel posterior del aparato Español SUB WOOFER CD DIGITAL OUT OUT SPEAKERS IMPEDANCE 4 IN 16 L R MD / AUX ANTENNA AC IN AM EXT FM(75 ) COAXIAL AM LOOP Antena de cuadro para AM (incluida) ANTENNA AM EXT FM(75 ) COAXIAL AM LOOP Fije la antena de cuadro para AM a la base encajando las pestañas del cuadro en las ranuras de la base. Gire la antena de cuadro hasta obtener la mejor recepción.
FS-SD5R_SP1.fm Page 6 Thursday, June 1, 2000 10:00 AM Primeros pasos CUIDADO: • Realice todas las conexiones antes de enchufar el equipo a la red. 1. Abra cada uno de los terminales e introduzca el cable del altavoz. 2. Conecte los cables de los altavoces empezando por los terminales de altavoz situados en el equipo y luego conéctelos a los terminales que hay en los altavoces. Conecte los cables con una línea negra a los terminales (–) y los cables sin línea negra a los terminales (+). 3.
FS-SD5R_SP1.fm Page 7 Thursday, June 1, 2000 10:00 AM Primeros pasos Colocación de los separadores Español CUIDADO: Observaci ación • Elija un lugar seguro donde colocar los altavoces, de manera que no puedan caer al suelo en caso de que se les dé un golpe o se produzca un temblor de tierra. (FS-SD7) (FS-SD9) Separador Separador FS-SD7 / SD9 Fije los separadores a la base del altavoz para proteger la caja, evitar que se deslice y absorber las vibraciones de la caja.
FS-SD5R_SP1.fm Page 8 Thursday, June 1, 2000 10:00 AM Primeros pasos Cómo enchufar el cable de alimentación Inserte el cable de alimentación suministrado en la toma de CA del panel posterior del equipo de manera que quede fijo. AC IN CUIDADO: • UTILICE SÓLO EL CABLE DE ALIMENTACIÓN SUMINISTRADO POR JVC PARA EVITAR QUE SE PRODUZCAN ANOMALÍAS O DAÑOS EN EL SISTEMA.
FS-SD5R_SP1.
FS-SD5R_SP1.fm Page 10 Thursday, June 1, 2000 10:00 AM Disminución gradual del sonido (FADE MUTING) Cómo ver la hora (CLOCK/DISPLAY) Podrá hacer que el sonido disminuya gradualmente hasta desaparecer pulsando un solo botón. Para activar esta función, pulse el botón FADE MUTING del mando a distancia. El volumen empezará a disminuir hasta llegar a 0. Para restablecer el sonido, vuelva a pulsar el botón FADE MUTING. El volumen empezará a aumentar hasta recuperar el nivel anterior.
FS-SD5R_SP1.
FS-SD5R_SP1.fm Page 12 Thursday, June 1, 2000 10:00 AM Funcionamiento del sintonizador 5 Pulse el botón SET antes de que transcurran 5 segundos. En la pantalla aparece durante 2 segundos el mensaje “STORED”, tras lo cual vuelve a aparecer indicada la frecuencia de la emisora sintonizada. 6 • En AM, podrá mejorar la recepción de las emisoras girando la antena de cuadro especial para esta banda. Gírela hasta que capte bien la señal.
FS-SD5R_SP2.
FS-SD5R_SP2.fm Page 14 Thursday, June 1, 2000 10:01 AM Cómo utilizar el reproductor de CD Cómo sacar un CD Saque el CD tal como se indica en la ilustración. Para hacer una pausa, pulse el botón CD #¥8. El tiempo de reproducción parpadea en la pantalla. Para cancelar la pausa, pulse de nuevo el mismo botón. Se reanuda la reproducción desde el punto en el que se activó la pausa. Durante la reproducción, pulse el botón 4 o ¢ (< o >) para seleccionar la pista deseada.
FS-SD5R_SP2.fm Page 15 Thursday, June 1, 2000 10:01 AM Cómo utilizar el reproductor de CD 6 Pulse el botón SET. Número de pista del programa UP Reproducción Aleatoria Las pistas se reproducirán en una secuencia aleatoria. SET (Después de 2 segundos) 1 DOWN Pulse el botón RANDOM del mando a distancia. Español En la pantalla se encenderá el indicador “RANDOM”. Tiempo total de reproducción de las pistas programadas 7 Repita los pasos 5 y 6 para seleccionar las demás pistas que quiera programar.
FS-SD5R_SP3.
FS-SD5R_SP3.
FS-SD5R_SP3.fm Page 18 Thursday, June 1, 2000 10:01 AM Cómo utilizar los temporizadores Elija los minutos a los que quiere que se desconecte el equipo utilizando también los botones ¢ y 4. Cómo ajustar la hora de inicio (por ejemplo: 10:15). 1. Pulse el botón TIMER del equipo durante al menos segundos. El indicador del temporizador se encenderá y la hora de inicio seleccionada anteriormente parpadeará en la pantalla.
FS-SD5R_SP3.fm Page 19 Thursday, June 1, 2000 10:01 AM Cómo utilizar los temporizadores Español Ajuste del temporizador de desconexión SLEEP (Con mando a distancia) Utilice el temporizador de desconexión “Sleep” para que el equipo se apague automáticamente al cabo de unos minutos. Al ajustar el temporizador “Sleep”, puede dormirse escuchando música con la seguridad de que el equipo se apagará sólo y que no funcionará toda la noche.
FS-SD5R_SP3.fm Page 20 Thursday, June 1, 2000 10:01 AM Cuidado y mantenimiento Discos compactos • En este equipo sólo se pueden utilizar los CD que lleven este distintivo. El uso continuado de discos de perfil irregular (en forma de corazón, octogonales, etc.) puede dañar el equipo. Limpieza de la lente. Si la lente de un lector de CD se ensucia o salta, etc. el sonido perderá calidad. Abra la tapa superior y limpie la lente como se muestra en la ilustración.
FS-SD5R_SP3.fm Page 21 Thursday, June 1, 2000 10:01 AM Solución de problemas • Si tiene problemas con el equipo, compruebe en esta lista la posible solución antes de acudir al servicio técnico. Síntoma Español No se oye ningún sonido. • Si no puede solucionar el problema o si el sistema se ha dañado físicamente, avise a un técnico cualificado, como por ejemplo su distribuidor oficial, para que lleve a cabo la reparación. Causa posible • Las conexiones son incorrectas o están flojas.
FS-SD5R_SP3.fm Page 22 Thursday, June 1, 2000 10:01 AM Características técnicas Reproductor de CD Relación señal/ruido Fluctuación y trémolo Sintonizador Sintonizador FM Intervalo de sintonización Sintonizador AM Intervalo de sintonización 32 W (16 W + 16 W) a 4 ohmios (máx.
FS-SD5&7&9_Cover4.fm Page 23 Thursday, June 1, 2000 10:19 AM Mains (AC) Line Instruction (not applicable for Europe, U.S.A., Canada, Australia, and U.K.) Instrucción sobre la línea de la red (CA) (no aplicable para Europa, EE.UU.