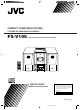
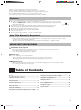
COMPACT COMPONENT SYSTEM SYSTEME DE COMPOSANTS COMPACT FS-V100 — Consists of CA-FSV100 and SP-UXV100. AUTO TAPE SELECTOR TAPE AUTO REVERSE COMPACT DIGITAL AUDIO VERTICAL DISC LOADING MECHANISM POWER SLEEP AUX DISPLAY TAPE FM MODE FM/AM COMPACT COMPONENT SYSTEM AUTO PRESET STANDBY AHB PRO TIMER VOLUME POWER UP REPEAT AUX PROGRAM SET REC RANDOM DOWN REV.
Warnings, Cautions and Others Mises en garde, précautions et indications diverses CAUTION RISK OF ELECTRIC SHOCK DO NOT OPEN CAUTION: TO REDUCE THE RISK OF ELECTRIC SHOCK, DO NOT REMOVE COVER (OR BACK). NO USER SERVICEABLE PARTS INSIDE. REFER SERVICING TO QUALIFIED SERVICE PERSONNEL.
For Canada/pour le Canada For Canada/pour le Canada CAUTION: TO PREVENT ELECTRIC SHOCK, MATCH WIDE BLADE OF PLUG TO WIDE SLOT, FULLY INSERT. ATTENTION: POUR EVITER LES CHOCS ELECTRIQUES, INTRODUIRE LA LAME LA PLUS LARGE DE LA FICHE DANS LA BORNE CORRESPONDANTE DE LA PRISE ET POUSSER JUSQUAU FOND.
Instructions for safe use (Statement in accordance with the UL standards) 1) Read Instructions — Read carefully this instructions for your safe use before this appliance is installed, wireconnected, and operated. 2) Retain Instructions — For your future reference, retain this instruction. 3) Follow Instructions — Follow and obey all warnings, cautions and instructions marked on this appliance and this instruction.
Thank you for purchasing the JVC Compact Component System. We hope it will be a valued addition to your home, giving you years of enjoyment. Be sure to read this instruction manual carefully before operating your new stereo system. In it you will find all the information you need to set up and use the system. If you have any query that is not answered by the manual, please contact your dealer. Features Here are some of the things that make your System both powerful and simple to use.
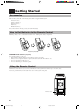
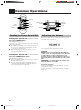
Getting Started Accessories Make sure that you have all of the following items, which are supplied with the System. AC Power Cord (1) AM Loop Antenna (1) Remote Control (1) Batteries (2) FM Wire Antenna (1) If any of these items are missing, contact your dealer immediately. How to Put Batteries in the Remote Control Match the polarity (+ and –) on the batteries with the + and – markings in the battery compartment. R6(SUM-3)/AA(15F) CAUTION: Handle batteries properly.
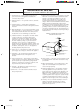
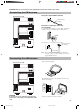
CAUTION: Make all connections before plugging the System into an AC power outlet. Connecting the FM Antenna Using the supplied Wire Antenna Rear Panel of the Unit FM Wire Antenna (supplied) R L Using the coaxial type connector (not supplied) A 75 Ω antenna with coaxial type connector (IEC or DIN 45325) should be connected to the FM (75 Ω) COAXIAL terminal. L R SPEAKERS IMPEDANCE MIN 4Ω If reception is poor, connect the outdoor antenna.
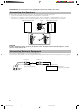
CAUTION: Make all connections before plugging the System into an AC power outlet. Connecting the Speakers For each speaker, connect one end of the speaker wire to the speaker terminals on the back of the System. 1. Open each of the terminals and insert the speaker wires firmly, then close the terminals. 2. Connect the red (+) and black (–) wires of the right side speaker to the red (+) and black (–) terminals marked R on the System.
Connecting the AC Power Cord Firmly insert the supplied AC power cord into the AC inlet on the back of the Unit. AC IN AC power cord CAUTIONS: • ONLY USE JVC POWER CORD PROVIDED WITH THIS SYSTEM TO AVOID MALFUNCTION OR DAMAGE TO THE SYSTEM. • BE SURE TO UNPLUG THE POWER CORD FROM THE OUTLET WHEN YOU ARE GOING OUT OR WHEN THE SYSTEM IS NOT IN USE FOR AN EXTENDED PERIOD OF TIME.
Common Operations POWER POWER SLEEP AUX DISPLAY TAPE FM MODE FM/AM AUTO PRESET CD DISPLAY CD BASS AHB PRO REPEAT UP PROGRAM SET DOWN RANDOM AHB PRO UP BASS TREBLE STANDBY lamp POWER STANDBY AUX AHB PRO REC TIMER VOLUME POWER REV MODE DOWN CLOCK CD CANCEL VOLUME OPEN/CLOSE TREBLE VOLUME +, – TAPE FM/AM AHB PRO VOLUME +, – CLOCK CD PHONES PHONES DOWN MULTI CONTROL UP REMOTE CONTROL RM-SFSV10J Turning the Power On and Off Turning the System on ––––––––––––––– Adj
Reinforcing the Bass Sound (AHB PRO) You can reinforce the bass sound to maintain rich, full bass at low volume (you can use this effect only for playback): To get the effect, press the AHB (Active Hyper Bass) PRO button. The BASS indicator lights up on the display. To cancel the effect, press the button again. The BASS indicator goes out. Controlling the Tone (Bass/ Treble) You can control the tone by changing the bass and treble.
Using the Tuner STANDBY AUX AHB PRO REC TIMER VOLUME POWER POWER SLEEP AUX 4 UP < DISPLAY TAPE FM MODE FM/AM FM MODE AUTO PRESET FM/AM ¢ AUTO PRESET CD CD REPEAT UP PROGRAM SET RANDOM DOWN AHB PRO BASS TREBLE REV MODE CLOCK CD OPEN/CLOSE TAPE FM/AM CD FM/AM ¢ 4 PHONES DOWN MULTI CONTROL UP > SET DOWN CANCEL VOLUME MONO STEREO FM mode indicators REMOTE CONTROL RM-SFSV10J Band display, Frequency display, Preset channel When the System is in use, the display shows ot
4 Press the UP, DOWN, > or < button within 5 seconds to select the preset number. UP or > button: Increases the preset number by 1. DOWN or < button: Decreases the preset number by 1. • When the > or < button is held down, the preset number changes rapidly. 5 Press the SET button within 5 seconds. “STORED” appears and after 2 seconds, the display returns to the broadcast frequency display. 6 Repeat above steps 1 to 5 for each station you want to store in memory with a preset number.
Using the CD Player DIGITAL AUDIO VERTICAL DISC LOADING MECHANISM CD Cover POWER SLEEP 4 CD 0 REPEAT PROGRAM RANDOM < AUX DISPLAY TAPE FM MODE FM/AM CD CD REPEAT UP PROGRAM SET RANDOM DOWN AHB PRO BASS TREBLE 7 AUTO PRESET CANCEL VOLUME CD #¥8 POWER ¢ UP > SET CANCEL DOWN COMPACT COMPONENT SYSTEM FS-V100 STANDBY AUX AHB PRO REC TIMER VOLUME POWER REV MODE CLOCK CD OPEN/CLOSE TAPE FM/AM CD PHONES DOWN MULTI CONTROL UP REMOTE CONTROL RM-SFSV10J CD OPEN/ CLOSE 0 CD #
Basics of Using the CD Player — Normal Play 4 Press the PROGRAM button. The System enters the programing mode and the PROGRAM indicator lights up. PROGRAM Playing a CD –––––––––––––––––––––––––– PROGRAM RANDOM 1 Insert a CD. 5 Press the > or < button to select the track to program. 2 Press the CD #/8 button. The first track of the CD begins playing. Track number • • > button: Increases the track number by 1. < button: Decreases the track number by 1.
Playing at Random The tracks will play in no particular order when you use this mode. Press the RANDOM button on the Remote Control. The RANDOM indicator lights up on the display, and tracks will be played in random order. To skip a track during playback, press the ¢ button (or the > or UP button on the Remote Control) to jump to the next randomly selected track. Press the 4 button (or the < or DOWN button on the Remote Control) to jump back to the start of a track being played.
Using the Cassette Deck (Listening to a Tape) STANDBY AUX AHB PRO REC TIMER REV MODE CLOCK POWER SLEEP AUX TAPE @ # 4 REV.
Using the Cassette Deck (Recording) STANDBY POWER SLEEP AUX TAPE @ # DISPLAY TAPE FM MODE FM/AM AUTO PRESET CD CD #¥8 CD REPEAT UP PROGRAM SET RANDOM DOWN AHB PRO AUX AHB PRO REC TIMER REV MODE CLOCK VOLUME POWER BASS TREBLE 7 REC REV. MODE TAPE @ # 7 CD OPEN/CLOSE TAPE FM/AM CD CD #¥8 PHONES DOWN MULTI CONTROL UP Tape Direction indicator CANCEL VOLUME REC indicator REC REMOTE CONTROL RM-SFSV10J When the System is in use, the display shows other items as well.
CD Direct Recording Everything on the CD goes onto the tape in the order it is on the CD, or according to the order you have set in a program. One track recording–––––––––––––––––– 1 Insert a blank or erasable tape into the Cassette Deck. 1 Insert a blank or erasable tape into the Cassette Deck. 2 Play the track on the CD you wish to record. 2 Insert a CD. 3 Press the REC button on the Unit. 3 Press the CD #/8 button. 4 Press the 7 button.
Using External Equipment POWER SLEEP AUX AUX DISPLAY TAPE FM MODE FM/AM AUTO PRESET CD CD REPEAT UP PROGRAM SET STANDBY AHB PRO AHB PRO BASS DOWN RANDOM BASS TREBLE CANCEL VOLUME AUX AUX AHB PRO REC TIMER REV MODE CLOCK VOLUME POWER TREBLE CD OPEN/CLOSE TAPE FM/AM CD PHONES VOLUME +, – DOWN MULTI CONTROL REMOTE CONTROL RM-SFSV10J Listening to External Equipment You can connect an audio equipment — used only as a playback device.
Using the Timers POWER POWER SLEEP Timer indicator STANDBY SLEEP AUX DISPLAY TAPE FM MODE FM/AM AUTO PRESET CD MD/ AUX AHB PRO REC TIMER VOLUME POWER POWER REV MODE TIMER CLOCK CLOCK CD CD SLEEP ON OFF CLOCK OPEN/CLOSE REPEAT UP PROGRAM SET RANDOM DOWN TAPE DISPLAY MODE FM/AM CD PHONES DOWN AHB PRO BASS TREBLE MULTI CONTROL UP ¢ CANCEL 4 VOLUME The timers let you control listening and recording functions automatically.
4 Select the music source. 1. Press the TIMER button on the Unit. “TUNER” flashes on the display. 2. Press the ¢ or 4 button to select the music source you want to listen to. The display changes as shown below. 5 Set the volume level. 1. Press the TIMER button on the Unit. The current volume setting flashes on the display. 2. Press the ¢ or 4 button to select the volume level. -: The current volume level will be used.
7 Press the ¢ or 4 button until “TUNER” appears and the REC indicator lights up on the display. The display changes as shown below. 8 Set the volume level. 1. Press the TIMER button on the Unit. The current volume setting flashes on the display. 2. Press the ¢ or 4 button to select the volume level. -: The current volume level will be used. 0 to 40 : When the timer is turned on, the volume will be automatically set to the selected level.
Care and Maintenance Handle your CDs carefully, and they will last a long time. • Compact Discs • If there are fingerprints, etc. on the lens, gently wipe clean with a cotton swab. Only CDs bearing this mark can be used with this System. However, continued use of irregular shape CDs (heart-shape, octagonal, etc.) can damage the System.
Troubleshooting • • If you are having a problem with your System, check this list for a possible solution before calling for service. If you cannot solve the problem from the hints given here, or the System has been physically damaged, call a qualified person, such as your dealer, for service. Possible Cause Symptom No sound is heard. Poor radio reception Action • Connections are incorrect, or loose. • • Headphones are connected. • • • Antennas are disconnected.
QUALITY SERVICE HOW TO LOCATE YOUR JVC SERVICE CENTER TOLL FREE : 1-800-537-5722 http://www.jvcservice.com Dear customer: In order to receive the most satisfaction from your purchase, read the instruction booklet before operating the unit. In the event that repair is necessary, or for the address nearest your location, please refer to the factory service center list below or within the Continental United States, Call 1-800-537-5722 for your authorized servicer.
LIMITED WARRANTY AUDIO-1 JVC COMPANY OF AMERICA warrants this product and all parts thereof, except as set forth below ONLY TO THE ORIGINAL PURCHASER AT RETAIL to be FREE FROM DEFECTIVE MATERIAL AND WORKMANSHIP from the date of original retail purchase for the period as shown below. (“The Warranty Period.”) PARTS LABOR 1YR 1YR THIS LIMITED WARRANTY IS VALID ONLY IN THE FIFTY(50) UNITED STATES, THE DISTRICT OF COLUMBIA AND IN COMMONWEALTH OF PUERTO RICO.
VICTOR COMPANY OF JAPAN, LIMITED EN COVER.