
Digital Video Camera Instruction Manual


VIDEO RECORDING
VIDEO RECORDING & PLAYBACK
EN 11
MasterPage: Video_Right
NOTES:
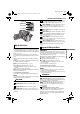
● Focusing may become unstable during Zooming. In this
case, set the zoom while in Record-Standby, lock the focus
by using the manual focus (墌 pg. 21), then zoom in or out
in Record mode.
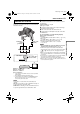
●
Zooming is possible to a maximum of 900X, or it can be switched
to 16X magnification using the optical zoom. (
墌
pg. 15)
● Zoom magnification of over 16X is done through Digital
image processing, and is therefore called Digital Zoom.
● During Digital zoom, the quality of image may suffer.
● Macro shooting (as close as approx. 5 cm to the subject) is
possible when the Power Zoom Lever is set all the way to “W”.
Also see “TELE MACRO” in MANUAL Menu on page 15.
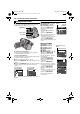
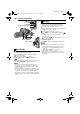
Journalistic Shooting
In some situations, different
shooting angles may provide
more dramatic results. Hold the
camcorder in the desired position
and tilt the LCD monitor in the
most convenient direction. It can
rotate 270° (90° downward, 180°
upward).
Self Recording
Open the LCD monitor and tilt
it upward to 180° so that it
faces forward, then point the
lens toward yourself and start
recording.
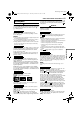
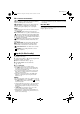
Time Code
During recording, a time code is recorded on the tape.
This code is to confirm the location of the recorded scene
on the tape during playback.
* Frames are not displayed during recording.
If recording starts from a blank portion, the time code
begins counting from “00:00:00” (minute:second:frame).
If recording starts from the end of a previously recorded
scene, the time code continues from the last time code
number.
If during recording a blank portion is left partway through
the tape, the time code is interrupted. When recording is
resumed, the time code starts counting up again from
“00:00:00”. This means the camcorder may record the
same time codes as those existing in a previously
recorded scene. To prevent this, perform “Recording
From The Middle Of A Tape” (See below) in the following
cases;
● When shooting again after playing back a recorded tape.
● When power shuts off during shooting.
● When a tape is removed and re-inserted during shooting.
● When shooting using a partially recorded tape.
● When shooting on a blank portion located partway through
the tape.
● When shooting again after shooting a scene then opening/
closing the cassette holder cover.
Recording From The Middle Of A Tape
1) Play back a tape or use Blank Search (墌 pg. 12) to
find the spot at which you want to start recording, then
engage the Still Playback mode. (墌 pg. 12)
2) Set the Power Switch to “A” or “M” while pressing
down the Lock Button located on the switch, then start
recording.
NOTES:
● The time code cannot be reset.
● During fast-forwarding and rewinding, the time code
indication does not move smoothly.
● The time code is displayed only when “TIME CODE” is set
to “ON”. (墌 pg. 16)
When a blank portion is recorded on a tape
Proper recording
10
x
W
T
1
x
W
T
10
x
W
T
20
x
W
T
40
x
W
T
Digital zoom zone
Zoom in (T: Telephoto)
Zoom out (W: Wide angle)
16X zoom zone
Approximate zoom ratio
Self Recording
12:34:24
Minutes
Seconds
Frames*
(25 frames = 1 second)
Display
Time code
00:00:00
Tape
Already
recorded scene
Blank
Newly recorded
scene
Time code
05:43:21
Time code
00:00:00
Shooting start
point
Shooting stop
point
Shooting start
point
Time code
00:00:00
Tape
Already
recorded scene
New
scene
Latest scene
Time code
05:43:21
Time code
05:44:00
Shooting start
point
Shooting start
point
Shooting start
point
GR-D34EX_05Video.fm Page 11 Thursday, November 27, 2003 8:18 AM