
Operation Manual


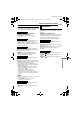

MasterPage: Video_Heading0_Right
EN
21
VIDEO RECORDING & PLAYBACK
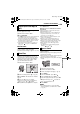
VIDEO PLAYBACK
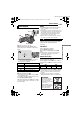
1 Load a cassette. (墌 pg. 16)
2 Set the Power Switch to “PLAY” while
pressing down the Lock Button located on the
switch.
● The above screen (referring to the control lever
(墌 pg. 11)) will be displayed for approx. 3
seconds on the LCD Monitor.
3 To start playback, press 4/9.
4 To stop playback, press 8.
● During Stop mode, press 3 to rewind, or 5
to fast-forward the tape.
● Press SET to display the guide operation screen.
To control the speaker volume
Slide the Power Zoom Lever (VOL. +/–) towards
“+” to turn up the volume, or towards “–” to turn
down the volume.
NOTES:
● The playback picture can be viewed in the LCD
monitor, viewfinder or on a connected TV.
(墌 pg. 23)
● If Stop mode continues for 5 minutes when power
is supplied from a battery, the camcorder shuts off
automatically. To turn the camcorder on again,
push back and pull out the viewfinder again or
close and re-open the LCD monitor.
● When a cable is connected to the AV connector,
the sound is not heard from the speaker.
Appears when pictures recorded in the HDV
format are detected. The pictures in the HDV
format cannot be played back with this
camcorder.
Still Playback
Pauses during video playback.
1) Press 4/9 during playback.
2) To resume normal playback, press 4/9
again.
● If still playback continues for more than about
3 minutes, the camcorder’s Stop mode is
automatically engaged.
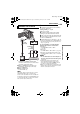
Variable Shuttle Search
Allows to variable-speed search in either
direction during video playback.
1) During playback, press 5 once or twice for
forward search, or 3 once or twice for reverse
search.
2) To resume normal playback, press 4/9.
● During playback, press and hold 5 or 3. The
search continues as long as you hold the button.
Once you release the button, normal playback
resumes.
● A slight mosaic effect appears on the display
during Shuttle Search. This is not a malfunction.
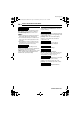
Normal Playback
Operation To select
4/9 Move the control lever up
8 Move the control lever down
5 Move the control lever right
3 Move the control lever left
3
Speaker
5
Lock Button
MENU
4/9
8
VOL. +/–
Power
Switch
SET
HDV
3 5
x-10 x-3 x3 x10
A
TTENTION:
During Shuttle Search,
parts of the picture may
not be clearly visible,
particularly on the left side
of the screen.
During Shuttle Search,
parts of the picture may
not be clearly visible
across the screen.
GR-D720EK_GR-D740EK.book Page 21 Wednesday, January 31, 2007 4:04 PM