
User's Manual


11
RECORDING
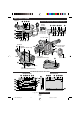
Set REC MODE, S-VHS (S-VHS ET)**, TAPE
LENGTH and DATE/TIME in SYSTEM MENU.
(
pg. 18 – 22, “MENU SETTINGS”)
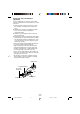
1 Remove the lens cap. Set the Power Switch @
to “ ” or “ ” while pressing down the Lock
Button
! located on the switch.
Shooting while using the viewfinder: Make sure
the LCD monitor* is closed and locked.
Shooting while using the LCD monitor*: Make
sure the LCD monitor* is fully open.
The camcorder enters the Record-Standby mode
and “PAUSE”
D is displayed.
• The viewfinder and LCD monitor cannot be used
simultaneously on this camcorder. Therefore,
when opening the LCD monitor and tilting it
upward to 180°, you cannot view any image in the
viewfinder, however you can shoot yourself while
viewing your own image in the LCD monitor.
2 Press the Recording Start/Stop Button 0.
P appears while recording is in progress.
• To stop recording, press the Recording Start/Stop
Button
0. The camcorder re-enters the Record-
Standby mode.
To Adjust The Brightness Of The LCD Monitor*:
When the Power Switch
@ is set to “ ”, adjust
“LCD BRIGHT” in SYSTEM MENU (
pg. 18, 22).
When the Power Switch
@ is set to “ ” or
“OFF”, this adjustment cannot be performed.
* Applicable models only.
** GR-SXM50/SX26 only.
PLAYBACK
1 Load a tape ( pg. 8, “Loading/Unloading A
Cassette”).
2 Set the Power Switch @ to “ ” while
pressing down the Lock Button
! located on the
switch. To start playback, press
4
/6 &.
To stop playback temporarily (Still Playback), press
4
/6 &. To stop playback, press 5 r. Press
2
e to rewind, or
3
* to fast-forward the tape.
High-speed picture search (Shuttle Search) is
possible by pressing
2
e or
3
* during
playback (holding
2
e or
3
* down during
playback continues search until released). To
resume normal playback, press
4
/6 &.
For VIDEO RECORDING/VIDEO PLAYBACK
• The camcorder shuts off automatically after about
5 minutes in the Record-Standby or Stop mode.
To turn on again, set the Power Switch
@ to
“OFF”, then to “
”, “ ” or “ ”.
• When the Power Switch
@ is set to “ ”, “ ” or
“
” and the LCD monitor* is opened at an
angle of 60 degrees or more, the LCD monitor*
switches on and the viewfinder switches off
automatically to save power.
• The playback picture can be viewed in the
viewfinder (with the LCD monitor* shut), on the
LCD monitor* or on a connected TV (
pg. 15,
“Connections To A TV/VCR”).
• To remove the indications,
pg. 21, DISPLAY or
OSD OUTPUT in SYSTEM MENU.
• To control the speaker* volume, rotate the MENU
Wheel
1 towards “+” to turn up, or towards “–” to
turn down. While shooting, sound is not heard
from the speaker*.
• Noise bars appear and pictures may become
monochrome or darken during Shuttle Search.
This is normal.
• If TBC (
pg. 14) is engaged during Still
Playback, noise bars will not appear
(GR-SXM50/
SX26 only).
* Applicable models only.
01 GR-SXM50EX_EN 10/29/03, 11:36 AM11