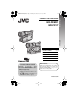
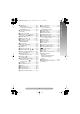
COMPACT VHS CAMCORDER ENGLISH GR-FXM41 GR-FX17 INSTRUCTIONS GR-FXM41EN(EK).fm Page 1 Monday, November 8, 2004 10:03 AM CONTENTS GETTING STARTED 4~8 RECORDING/PLAYBACK PAL AUTOMATIC DEMONSTRATION Automatic Demonstration takes place when “DEMO MODE” is set to “ON” (factory-preset). 9 BASIC FEATURES 9 ~ 11 MENU SETTINGS 12 ~ 15 TERMS 20 Dear Customer, Thank you for purchasing the JVC Compact VHS camcorder. Before use, please read “SAFETY PRECAUTIONS” ( pg.
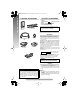
PROVIDED ACCESSORIES GR-FXM41EN(EK).fm Page 2 Monday, November 8, 2004 10:03 AM PROVIDED ACCESSORIES OPTIONAL ACCESSORIES • Battery Packs BN-V12U, BN-V20U, BNV400U • Compact VHS ( ) Cassettes EC-60/ 45/30 • Active Carrying Bag CB-V7U • Cassette Adapter C-P8U Some accessories are not available in some areas. Please consult your nearest JVC dealer for details on accessories and their availability.
CAUTIONS SOME DO’S AND DON’TS ON THE SAFE USE OF EQUIPMENT This camcorder is designed to be used with PAL-type colour television signals. It cannot be used for playback with a television of a different standard. However, live recording and LCD monitor*/ viewfinder playback are possible anywhere. • Use the JVC BN-V10U/ V12U/ V20U/ V400U battery packs and, to recharge them or to supply power to the camcorder from an AC outlet, use the provided multi-voltage AC Adapter.
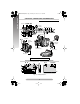
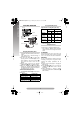
GETTING STARTED GR-FXM41EN(EK).fm Page 4 Monday, November 8, 2004 4:47 PM CONTROLS, CONNECTORS AND INDICATORS Refer to this diagram while reading the instructions.
1• MENU Wheel [–, +]............................. pg. 12 • BRIGHT Wheel [–, +]* ........................ pg. 14 • Speaker Volume Control [VOL.]* .......... pg. 9 • TRACKING Wheel [–, +]..................... pg. 10 25- Second Recording Button................... pg. 9 [5 SEC. REC] 3Power Zoom Lever [T/W] ...................... pg. 10 ;Tape Length Indicator............................ pg. 15
GETTING STARTED GR-FXM41EN(EK).fm Page 6 Monday, November 8, 2004 4:06 PM Using the Battery Pack GETTING STARTED Perform step 1) of “Charging the Battery Pack”. Approximate recording time (unit: min.
• The following steps have the same function as “REFRESH” ( pg. 6). 1) Attach the battery to the camcorder with no cassette inserted. 2) Set the Power Switch # to “ ” or “ ” while pressing down the Lock Button ". • During charging or discharging, the camcorder cannot be operated. • Charging and discharging are not possible if the wrong type of battery is used. • When charging the battery pack for the first time or after a long storage period, the CHARGE lamp $ may not light.
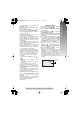
GETTING STARTED GR-FXM41EN(EK).fm Page 8 Monday, November 8, 2004 4:06 PM Grip Adjustment Tripod Mounting 1) Separate the Velcro strip. 2) Pass your right hand through the loop and grasp the grip. 3) Adjust so that your thumb and fingers can easily operate the Recording Start/Stop Button ! and Power Zoom Lever 3. Refasten the Velcro strip. Align the screw and camera direction stud on the tripod with the tripod mounting socket -. Then tighten the screw.
• The playback picture can be viewed in the viewfinder (with the LCD monitor* shut), on the LCD monitor* or on a connected TV ( pg. 10, “Connections To A TV/VCR”). • To control the speaker* volume 6, rotate the MENU Wheel 1 towards “+” to turn up, or towards “–” to turn down. While shooting, sound is not heard from the speaker*. • Noise bars appear and pictures may become monochrome or darken during Shuttle Search. This is normal. RECORDING Set REC MODE, TAPE LENGTH and DATE/ TIME. ( pg.
BASIC FEATURES GR-FXM41EN(EK).fm Page 10 Monday, November 8, 2004 10:03 AM Tracking 4) To cancel the Manual Focus, press FOCUS 4. “ ” { disappears and Auto Focus is applied. • When the focus level cannot be adjusted any farther or closer, “ ” or “ ” will blink. Eliminates noise bars that appear on-screen during playback. To activate Manual Tracking: 1) Press the TRACKING Wheel 1 for approx. 2 seconds. “MT” 5 appears. 2) Rotate the TRACKING Wheel 1 so that the noise bars disappear.
• If your TV/VCR has a 21-pin connector, use the provided Cable Adapter. 3) Load the cassette adapter into the VCR and play the tape back. • To record on a VCR using a compact cassette and the adapter, cover the adapter’s recording safety hole with Adhesive tape. 4) To unload the cassette, turn the dial 5 in the direction of "UNLOADING" all the way until it stops. • The color shown in the window 4 changes from green \ red \ blue (indicating unloading is possible).
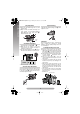
MENU SETTINGS GR-FXM41EN(EK).fm Page 12 Monday, November 8, 2004 10:40 AM • When the background is overly dark or the subject light. 1) Rotate the MENU Wheel 1 to select “MANUAL”, then press it. 2) To brighten the image, rotate the MENU Wheel 1 downward. To darken the image, rotate the MENU Wheel 1 upward. The exposure control level increases/decreases (maximum ±06). MENU SETTINGS The Menu Screen cannot be accessed while recording. 1) Set the Power Switch # to “ ” while pressing down the Lock Button ".
CAMERA MENU NEGAPOSI: The colours of a picture are reversed. MOSAIC: Turns recorded scenes into a mosaic pattern. STRETCH: Doubles the width of the picture horizontally STABILIZER The Picture Stabiliser compensates for unstable images caused by camera-shake, particularly at high magnification. ON : The Picture Stabiliser is activated. [ appears. OFF: The Picture Stabiliser is deactivated. [ disappears. • Accurate stabilisation may not be possible in certain conditions including excessive hand shake.
MENU SETTINGS GR-FXM41EN(EK).fm Page 14 Monday, November 8, 2004 10:03 AM paper fills the screen. If it is difficult to focus on the white paper, adjust focus manually ( pg. 9, “Auto/Manual Focus”). Press the MENU Wheel 1 in until “MWB” } begins blinking. When the setting is completed, “MWB” } stops blinking. • Once you adjust white balance manually, the setting is retained even if the power is turned off or the battery is removed.
VCR MENU REC TIME You can shoot a series of pictures, each slightly different, of the same object for a brief selected period of time (Animation). REC MODE should be set to “SP”. Select the desired recording time and press the Recording Start/Stop Button ! after focusing on the subject. • Fade-or wipe-in/out cannot be performed. • This function is cancelled when the power is turned off or when the cassette is ejected. • To use this function, it is recommended that SCROLL in TITLE SETUP ( pg.
TROUBLESHOOTING GR-FXM41EN(EK).fm Page 16 Monday, November 8, 2004 10:03 AM TROUBLESHOOTING Before consulting your JVC dealer, please check the following to see if you can correct the problem yourself. Vertical white lines appear when shooting a very bright object. • This sometimes occurs when the contrast between the back-ground and the object is great. It is not a defect of the camcorder. The tape is running, but there is no playback picture. • The TV has not been set to its VIDEO mode or channel.
CAUTIONS General Battery Precautions Please make note of the following rules for battery use. When misused, the batteries can leak or explode. 1) Do not use any different size of batteries from those specified. 2) Be sure to insert batteries in the correct direction. 3) Do not use rechargeable batteries. 4) Do not expose the batteries to excessive heat as they can leak or explode. 5) Do not dispose of the batteries in a fire.
CAUTIONS GR-FXM41EN(EK).fm Page 18 Monday, November 8, 2004 10:03 AM … near a heater. … in dusty places such as a beach. For Your Maintenance 1) After Use 1 Turn off the camcorder. 2 Open the LCD monitor* to an angle of over 60 degrees. Press EJECT for approximately 2 seconds to open the cassette holder, then remove the cassette. 3 Close and lock the cassette holder by pressing the Close button. 4 Close and lock the LCD monitor*. 5 Slide BATTERY RELEASE to remove the battery pack.
SPECIFICATIONS Camcorder General Format Power source Pickup Lens : VHS PAL standard : DC 11 V (Using AC Adapter) DC 6 V (Using battery pack) Power consumption Viewfinder on : 3.7 W (GR-FXM41 only) 3.5 W (GR-FX17 only) LCD monitor on : 4.3 W (GR-FXM41 only) Filter diameter Viewfinder White balance adjustment LCD monitor* Signal system : PAL-type Video recording system Luminance : FM recording Colour : Converted sub-carrier direct recording Conforms to VHS standard Cassette : cassette Tape speed SP : 23.
TERMS GR-FXM41EN(EK).fm Page 20 Monday, November 8, 2004 10:03 AM TERMS A P AC Adapter....................................................pg. 6 Animation Recording...................................pg. 15 Auto Date Record........................................pg. 14 Auto Focus ....................................................pg. 9 Auto Shut Off.................................................pg. 9 Picture Stabiliser .........................................pg. 13 Playback ..........................
NOTE 21 NOTE GR-FXM41EN(EK).
NOTE GR-FXM41EN(EK).
NOTE 23 NOTE GR-FXM41EN(EK).
GR-FXM41EN(EK).