INSTRUCTIONS ENGLISH LYT1201-001A COMPACT VHS CAMCORDER GR-SXM50 GR-FXM404 GR-FXM40 GR-SX26 GR-FX16 625 VHS PAL S-VHS is compatible with GR-SXM50/SX26 only EX Printed in Malaysia 1003-AS-YL-PJ COPYRIGHT© 2003 VICTOR COMPANY OF JAPAN, LTD Dear Customer, Thank you for purchasing the JVC Compact VHS camcorder. Before use, please read “PRECAUTIONS” ( pg. 3, 4) to ensure safe use of this product.
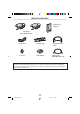
PROVIDED ACCESSORIES • Battery Pack BN-V10U • AC Adapter AP-V14E OR AP-V15E • Power Cord • Shoulder Strap • A/V (Audio/Video) Cable • Lens Cap • Cable Adapter • S-Video Cable (GR-SXM50/SX26 only) NOTE: In order to maintain optimum performance of the camcorder, provided cables may be equipped with one or more core filter. If a cable has only one core filter, the end that is closest to the filter should be connected to the camcorder.
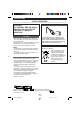
PRECAUTIONS SAFETY PRECAUTIONS CAUTIONS WARNING: TO PREVENT FIRE OR SHOCK HAZARD, DO NOT EXPOSE THIS UNIT TO RAIN OR MOISTURE. CAUTIONS To avoid electric shock or damage to the unit, first firmly insert the small end of the power cord into the AC Adapter until it is no longer wobbly, and then plug the larger end of the power cord into an AC outlet. • To prevent shock, do not open the cabinet. No user serviceable parts inside. Refer servicing to qualified personnel.
When the equipment is installed in a cabinet or on a shelf, make sure that it has sufficient space on all sides to allow for ventilation (10 cm or more on both sides, on top and at the rear). Do not block the ventilation holes. (If the ventilation holes are blocked by a newspaper, or cloth etc. the heat may not be able to get out.) No naked flame sources, such as lighted candles, should be placed on the apparatus.
INDEX A P AC Adapter ................................................................. pg. 6 Animation Recording ................................................ pg. 21 Auto Date Record .................................................... pg. 21 Auto Focus ............................................................... pg. 12 Auto Shut Off ........................................................... pg. 11 Picture Stabiliser ...................................................... pg. 18 Playback ..........
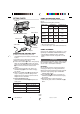
GETTING STARTED USING THE BATTERY PACK Perform step 1) of “CHARGING THE BATTERY PACK”. Hook on. Approximate recording time (unit: min.
Date/Time Settings • The following steps have the same function as “REFRESH” ( pg. 6). 1. Attach the battery to the camcorder with no cassette inserted. 2. Set the Power Switch @ to “ ” or “ ” while pressing down the Lock Button ! located on the switch. • During charging or discharging, the camcorder cannot be operated. • Charging and discharging is not possible if the wrong type of battery is used.
Grip Adjustment Tripod Mounting 1) Separate the Velcro strip. 2) Pass your right hand through the loop and grasp the grip. 3) Adjust so that your thumb and fingers can easily operate the Recording Start/Stop Button 0 and Power Zoom Lever 3. Refasten the Velcro strip. Align the screw and camera direction stud on the tripod with the tripod mounting socket Q. Then tighten the screw. CAUTION Q When using a tripod, be sure to open and extend its legs fully to stabilise the camcorder.
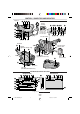
CONTROLS, CONNECTORS AND INDICATORS Eyepiece 1 2 3 4 Refer to this diagram while reading the instructions. During shooting # $ % ^& * ( 5 Keep the lens cap attached to the camcorder. 6 7 8 ) q w e r Cassette holder 90 ! @ Viewfinder i Speaker (applicable models only) t 90° 180° Turn the gear to take up slack.
1 • MENU Wheel [–, +] ................................ pg. 18 • BRIGHT Wheel [–, +]*1 ........................... pg. 11 • Speaker Volume Control [VOL.]*1 ........... pg. 11 • TRACKING Wheel [–, +] ........................ pg. 14 2 • Snapshot Button [SNAPSHOT]*2 ........... pg. 12 • 5-Second Recording Button [5 SEC. REC]*3 ...................................... pg. 12 3 Power Zoom Lever [T/W] ......................... pg. 13 4 • Manual Focus Button [ FOCUS] ........ pg.
RECORDING PLAYBACK Set REC MODE, S-VHS (S-VHS ET)**, TAPE LENGTH and DATE/TIME in SYSTEM MENU. ( pg. 18 – 22, “MENU SETTINGS”) 1 Load a tape ( pg. 8, “Loading/Unloading A Cassette”). 1 Remove the lens cap. Set the Power Switch @ to “ ” or “ ” while pressing down the Lock Button ! located on the switch. Shooting while using the viewfinder: Make sure the LCD monitor* is closed and locked. Shooting while using the LCD monitor*: Make sure the LCD monitor* is fully open.
BASIC FEATURES Snapshot Backlight Compensation (GR-SXM50/SX26 only) You can record still images that look like photographs onto a tape. 1) Perform step 1) of “RECORDING” ( pg. 11). 2) Press SNAPSHOT 2. • There is a momentary camera shutter-type blackout together with the sound effect of a shutter closing. • Snapshot is also available during playback. However, the shutter sound is not heard. 5Sec. Rec (5-sec.
Video Light (GR-SXM50/FXM404/SX26 only) Zooming To brighten the scene when natural lighting is too dim. Pressing LIGHT # changes the Video Light mode sequentially as shown below. To produce the zoom in/out effect. Digital circuitry extends the maximum magnification offered by optical zoom. This system is called Digital Zoom. • Slide the Power Zoom Lever 3 towards “T” to zoom in, or “W” to zoom out. • The further you slide the Power Zoom Lever 3, the quicker the zoom action.
Tracking Counter Memory Eliminates noise bars that appear on-screen during playback. To activate Manual Tracking: 1) Press the TRACKING Wheel 1 for approx. 2 seconds. “MT” z appears. 2) Rotate the TRACKING Wheel 1 so that the noise bars disappear. • To return to Auto Tracking, press the TRACKING Wheel 1 for approx. 2 seconds or set the Power ” again. “AT” z Switch @ to “OFF” and then “ blinks. When Auto Tracking finishes, the indication disappears.
Connections To A TV/VCR Tape Dubbing 1) Make sure all units are turned off. 2) Connect the camcorder to a TV or VCR. If using both TV and VCR, connect the VCR output to the TV input. 3) Turn on all units. Set the VCR to its AUX input mode, and set the TV to its VIDEO mode. • Use the AC Adapter as the power supply. • Be sure to adjust the TV sound volume to its minimum level to avoid a sudden burst of sound when the camcorder is turned on.
Using The Cassette Adapter (optional) Use this to play back an S-VHS-C/VHS-C video cassette recorded with this camcorder on a S-VHS/ VHS VCR. 1) Slide the battery cover up to remove it, install one “AA (R6)” size battery, then reattach the cover. 2) Slide the latch to open the compartment door, then insert the cassette and close the compartment door. 3) Load the cassette adapter into the VCR and play the tape back. 4) Slide the latch and the compartment door opens automatically.
INSTRUCTIONS Eyepiece 1 2 3 4 Refer to this diagram while reading the instructions. During shooting # $ % ^& * ( 5 Keep the lens cap attached to the camcorder. 6 7 8 ) q w e r Cassette holder 90 ! @ Viewfinder i Speaker (applicable models only) t 90° 180° Turn the gear to take up slack.
MENU SETTINGS CAMERA MENU 1 Set the Power Switch @ to “ ” while pressing down the Lock Button ! located on the switch. 2 Press the MENU Wheel 1 in. The Menu Screen appears. Rotate the MENU Wheel 1 to select the desired function. • To go from CAMERA MENU to SYSTEM MENU, rotate the MENU Wheel 1 to select “4TO SYSTEM MENU” and press it. SYSTEM MENU is composed of 2 pages. To go to the next page, rotate the MENU Wheel 1 to select “4NEXT” and press it.
M.W.B. TITLE If the white balance is correct, all other colours will be accurately reproduced. AUTO : White balance is adjusted automatically. FINE : Outdoors on a sunny day. CLOUD : Outdoors on a cloudy day. HALOGEN : A video light or similar type of lighting is used. MWB: White balance is set manually. Hold a sheet of plain white paper in front of the subject. Adjust zoom or position yourself so that the white paper fills the screen.
SYSTEM MENU This Menu Screen cannot be accessed while recording. REC MODE Allows you to set the recording mode. “LP” (Long Play) is more economical, providing twice the recording time. • If the recording mode is switched during recording, the playback picture will be blurred at the switching point. D. ZOOM Zooming is possible from 16X (the optical zoom limit), to a maximum of 50X or 700X digital magnification. When set to “OFF” only optical zoom (maximum 16x magnification) can function. S.
TAPE LENGTH INT. TIME Allows you to set the tape length depending on the tape used: T30=30 minutes, T45=45 minutes, T50=50 minutes, T60=60 minutes. • Tape remaining time W is correct only if the correct tape length has been selected. You can record sequentially at preset time spans. Leaving the camcorder aimed at a specific subject, you can record subtle changes over an extended period of time (Time-Lapse). REC MODE should be set to “SP”.
MENU LANG. LCD BRIGHT (Applicable models only) Allows you to select the language (ENGLISH or RUSSIAN) used in all messages displayed on screen. To adjust the brightness of the LCD monitor, perform the following steps quickly (within approx. 1 second by each interval): DEMO MODE 1) Select “LCD BRIGHT” in SYSTEM MENU. The “BRIGHT ON” message appears. 2) Press the BRIGHT Wheel 1 in to return to normal screen. 3) Rotate the BRIGHT Wheel 1 to display the bright level indicator k.
ADVANCED FEATURES Fade/Wipe Effects Night-Scope (GR-SXM50/SX26 only) Fade- or wipe-in works at recording start, and fadeor wipe-out works at recording end. Makes dark subjects or areas even brighter than they would be under good natural lighting. 1) Set the Power Switch @ to “ ” or “ ” while pressing down the Lock Button ! located on the switch. 2) Press NIGHT q repeatedly until the desired mode appears. A NIGHT AUTO: The shutter speed is automatically adjusted (maximum 1/2 sec.).
Programme AE With Special Effects 1) Set the Power Switch @ to “ ” while pressing down the Lock Button ! located on the switch. 2) Press P.AE ^ repeatedly until the desired mode appears. • To cancel the effect, press P.AE ^ repeatedly until “OFF” appears. • Only one mode can be engaged at a time. • In the “High Speed Shutter” or “Sports” modes, picture colour may be adversely affected if the subject is lit by alternating discharge-type light sources such as flourescent or mercury-vapour lights.
TROUBLESHOOTING Before consulting your JVC dealer, please check the following to see if you can correct the problem yourself. Vertical white lines appear when shooting a very bright object. • This sometimes occurs when the contrast between the back-ground and the object is great. It is not a defect of the camcorder. Bright, crystal-shaped spots appear in the LCD monitor and the viewfinder. • Sunlight is directly entering the lens. This is not a defect of the camcorder.
CAUTIONS Video Light (for applicable models) 2. To prevent damage and prolong service life . . . .... do not subject to unnecessary shock. .... avoid repeated charging without fully discharging. .... charge in an environment where temperatures are within the tolerances shown in the chart below. This is a chemical reaction type battery—cooler temperatures impede chemical reaction, while warmer temperatures can prevent complete charging. .... store in a cool, dry place.
2. Avoid using the unit . . . .... in places subject to excessive humidity or dust. .... in places subject to soot or steam such as near a cooking stove. .... in places subject to excessive shock or vibration. .... near a television set. .... near appliances generating strong magnetic or electric fields (speakers, broadcasting antennas, etc.). .... in places subject to extremely high (over 40°C) extremely low (under 0°C) temperatures. 3. DO NOT leave the unit . . . .... in places of over 50°C. ....
SPECIFICATIONS Camcorder Pickup Lens General Format Power source : S-VHS (GR-SXM50/SX26 only)/ VHS PAL standard : DC 11 V (Using AC Adapter) (Using battery pack) DC 6 V Power consumption Viewfinder on : 3.7 W (GR-SXM50/FXM404/ FXM40 only) 3.5 W (GR-SX26/FX16 only) LCD monitor* on : 4.3 W Video light** : 3.0 W * Applicable models only. ** GR-SXM50/FXM404/SX26 only.