
User Guide

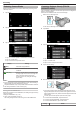
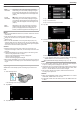
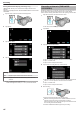
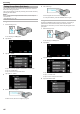
Table Of Contents
- Beginner's Guide
- Holiday Season/Christmas
- Wedding
- Travel
- Amusement Park
- Getting Started
- Precautions on Recording and Playing Back 3D Images
- Verifying the Accessories
- Charging the Battery Pack
- Grip Adjustment
- Inserting an SD Card
- Using the Touch Screen
- Clock Setting
- Changing the Display Language
- Holding this Unit
- Tripod Mounting
- Using the Remote Control
- Attaching Headphones
- Attaching an External Microphone
- Using this Unit Overseas
- Optional Accessories
- Recording
- Taking Videos in 3D Mode
- Taking Still Images in 3D Mode
- Taking Videos in Intelligent Auto Mode
- Taking Still Images in Intelligent Auto Mode
- Adjusting Parallax During Recording
- Manual Recording
- Reducing Camera Shake
- Capturing Subjects Clearly (TOUCH PRIORITY AE/AF)
- Recording at Intervals (TIME-LAPSE RECORDING)
- Taking Group Shots (Self-timer)
- Remaining Recording Time/Battery Power
- Playback
- Editing
- Copying
- Copying Files
- Creating Discs with a DVD Writer
- Creating Discs with an External Blu-ray Drive
- Creating a Disc Using a Connected Blu-ray Recorder
- Dubbing Files by Connecting to a DVD Recorder
- Using a USB External Hard Disk Drive
- Dubbing Files to a VHS Tape Using a VCR
- Copying Files to an SD Card
- Moving Files to an SD Card
- Copying to Windows PC
- Menu Settings
- Operating the Menu
- Main Menu for Video Recording
- SCENE SELECT
- FOCUS
- FOCUS ASSIST
- FOCUS ASSIST COLOR
- BRIGHTNESS ADJUST
- SHUTTER SPEED
- APERTURE PRIORITY
- WHITE BALANCE
- BACKLIGHT COMP.
- TELE MACRO (2D mode only)
- TOUCH PRIORITY AE/AF
- DIS
- GAIN UP
- WIND CUT
- GRID
- TIME-LAPSE RECORDING
- 3D VIDEO REC FORMAT (3D mode only)
- VIDEO QUALITY
- ZOOM (2D mode only)
- x.v.Color (2D mode only)
- USER BUTTON SETTING
- 3D SOUND
- MIC LEVEL
- MIC LEVEL SETTING
- HEADPHONE VOL. ADJ.
- Main Menu for Still Image Recording
- Main Menu for Video Playback
- Main Menu for Still Image Playback
- Common Menu
- CLOCK ADJUST
- DATE DISPLAY STYLE
- LANGUAGE
- MONITOR BRIGHTNESS
- REC MEDIA FOR VIDEO
- REC MEDIA FOR IMAGE
- OPERATION SOUND
- AUTO POWER OFF
- QUICK RESTART
- REMOTE
- DEMO MODE
- TOUCH SCREEN ADJUST
- 3D DISPLAY WARNING (3D mode only)
- VIDEO OUTPUT (2D mode only)
- HDMI OUTPUT
- HDMI CONTROL
- AUTO FINALIZE
- FACTORY PRESET
- UPDATE
- FORMAT BUILT-IN MEM.
- FORMAT SD CARD
- ERASE ALL DATA
- Names of Parts
- Indications on the LCD monitor
- Troubleshooting
- Battery Pack
- Recording
- Recording cannot be performed.
- Recording stops automatically.
- The continuous shooting speed of still images is slow.
- The focus is not adjusted automatically.
- Zoom does not work.
- Mosaic-type noise occurs when recording scenes with fast movements or extreme changes in brightness.
- Vertical lines appear on recorded images.
- Card
- Playback
- Sound or video is interrupted.
- The same image is displayed for a long time.
- The motion is choppy.
- Cannot find a recorded file.
- No date/time display.
- Images do not appear on the TV properly.
- Images are projected vertically on the TV.
- The image displayed on TV is too small.
- Unable to delete file.
- When connected to the TV via the HDMI mini cable, proper images and sounds are not output.
- 3D images cannot be seen on a 3D compatible TV properly.
- Editing/Copying
- Computer
- Screen/Image
- Other Problems
- The buttons on the touch screen do not work.
- The unit operates slowly when switching between video mode and still image mode, or when switching the power on or off.
- The image is grainy.
- This unit heats up.
- Make a backup of important recorded data.
- When connected to the TV via the HDMI mini cable, proper images and sounds are not output.
- The language on the display changed.
- HDMI-CEC functions do not work properly, and the TV does not work in conjunction with this unit.
- Error Message?
- CHECK LENS COVER
- SET DATE/TIME!
- COMMUNICATION ERROR
- FORMAT ERROR!
- DATA DELETION ERROR
- ERROR IN BUILT-IN MEMORY!
- MEMORY CARD ERROR!
- NOT FORMATTED
- RECORDING FAILURE
- PLAYBACK FAILED
- VIDEO MANAGEMENT FILE IS DAMAGED, RECOVERY IS REQUIRED TO RECORD/PLAYBACK, RECOVER?
- UNSUPPORTED FILE!
- THIS FILE IS PROTECTED
- CHECK CARD'S WRITE PROTECTION SWITCH
- INSUFFICIENT AVAILABLE SPACE
- SCENE QUANTITY EXCEEDED LIMIT
- NUMBER OF FOLDERS OVERFLOW
- FILE QUANTITY LIMIT EXCEEDED
- CAMERA TEMPERATURE IS TOO COLD KEEP CAMERA POWER ON PLEASE WAIT
- RECORDING CANCELLED
- UNABLE TO RECORD PROPERLY IN 3D PLEASE SWITCH TO 2D FOR RECORDING
- TOO MUCH PARALLAX BETWEEN LEFT & RIGHT IMAGES. YOU MAY NOT BE ABLE TO VIEW THE 3D IMAGES
- Maintenance
- Specifications

Using the Control Dial for Recording
You can use the control dial to change the settings for “FOCUS”,
“BRIGHTNESS ADJUST”, “SHUTTER SPEED”, “APERTURE PRIORITY”,
“WHITE BALANCE”, and “PARALLAX ADJUSTMENT”.
1
Press the ADJ button for about 3 seconds to display the control menu.
.
0
A menu screen containing the functions that can adjusted by the
control dial is displayed.
2
Select the function with the control dial.
.
0
For details on setting the items and values of each function, refer to
the following.
A BRIGHTNESS ADJUST
“Adjusting Brightness” (A p. 38)
B FOCUS
“Adjusting Focus Manually” (A p. 37)
C SHUTTER SPEED
“Setting Shutter Speed” (A p. 39)
D APERTURE PRIORITY
“Setting Aperture” (A p. 39)
E WHITE BALANCE
“Setting White Balance” (A p. 40)
F PARALLAX ADJUSTMENT
“Adjusting Parallax During Recording” (A p. 34)
G CLEAR
Select this to set all values adjusted by the ADJ button to “AUTO”.
3
Press the ADJ button.
.
0
The setting screen for the selected function appears.
4
Adjust the assigned function and record.
.
0
Change the setting using the control dial.
0
Press the ADJ button to set to “AUTO” or activate an assigned
function.
0
To change the setting of a different function, press the ADJ button for
about 3 seconds. The control menu appears. Go back to step 2 and
select a different function.
Memo :
0
By assigning “BRIGHTNESS ADJUST”, “FOCUS”, “SHUTTER SPEED”,
or “APERTURE PRIORITY” to the control dial, you can adjust the function
while recording.
0
Only one function can be operated by the control dial. The settings of all
other functions will remain unchanged. (Example: When focus is being
adjusted, the settings of brightness and shutter speed remain
unchanged.)
0
When “CLEAR” is selected, all values adjusted by the ADJ button will be
set to “AUTO”.
(Exits the control menu.)
Caution :
0
Settings cannot be changed by tapping on the screen while the control
dial is being used. Change the setting with the control dial.(except
PARALLAX ADJUSTMENT)
0
When “3D VIDEO REC FORMAT” is set to “MP4(MVC)” and recording is
performed together with HDMI output, the control menu will not be
displayed.
Recording
43