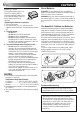
MINI VIDEO PRINTER GV-HT1 ENGLISH Please visit our CyberCam Homepage on the World Wide Web and answer our Consumer Survey (in English only): http://www.jvc-victor.co.jp/index-e.html For Customer Use: Enter below the Model No. and Serial No. which is located on the bottom of cabinet. Retain this information for future reference. Model No. INSTRUCTIONS Serial No.
EN Dear Customer, Thank you for purchasing this Printer. Before use, please read the safety information and precautions contained in the following pages to ensure safe use of this product. Using This Instruction Manual •All major sections and subsections are listed in the Table Of Contents (墌 pg. 8, 9). •Notes appear after most subsections. Be sure to read these as well. •Basic and advanced features/operation are separated for easier reference. It is recommended that you . . . ...
EN IMPORTANT PRODUCT SAFETY INSTRUCTIONS Electrical energy can perform many useful functions. But improper use can result in potential electrical shock or fire hazards. This product has been engineered and manufactured to assure your personal safety. In order not to defeat the built-in safeguards, observe the following basic rules for its installation, use and servicing. ATTENTION: Follow and obey all warnings and instructions marked on your product and its operating instructions.
EN USE SERVICING 1. Accessories 1. Servicing To avoid personal injury: • Do not place this product on an unstable cart, stand, tripod, bracket or table. It may fall, causing serious injury to a child or adult, and serious damage to the product. • Use only with a cart, stand, tripod, bracket, or table recommended by the manufacturer or sold with the product. • Use a mounting accessory recommended by the manufacturer and follow the manufacturer’s instructions for any mounting of the product.
CAUTIONS EN Exercise caution when moving the printer. If you drop the unit, do not attempt to use it. If during use you notice that the cabinet is damaged, shut the printer down, remove power supply unit it and contact your JVC dealer. Use of the printer under these conditions can lead to fire or electric shock. ABOUT THERMAL HEADS DO NOT place heavy objects on the AC power adapters cords, or leave the cord near any heatgenerating appliance, as this can damage the cords.
CAUTIONS EN Battery Packs The supplied battery pack is a lithium-ion battery. Before using the supplied battery pack or an optional battery pack, be sure to read the following Terminals cautions: 1. Turn on the power. 2. Set “power save” to “off” and remove the batteries when the power is automatically turned off. 1. To avoid hazard . . . .... do not burn. .... do not short-circuit the terminals. .... do not modify or disassemble. ....
EN 7 Declaration of Conformity Model Number : GV-HT1U Trade Name : JVC Responsible party : US JVC CORP. Address : 41 Slater Drive, Elmwood Park, N. J. 07407 Telephone Number : (201) 794–3900 This device complies with Part 15 of FCC Rules. Operation is subject to the following two conditions: (1) This device may not cause harmful interference, and (2) this device must accept any interference received, including interference that may cause undesired operation.
MAJOR FEATURES EN This equipment is a portable printer that is light enough to bring along with a camcorder or digital still camera on a trip or outing. It can be used in a wide variety of applications. Easy to read LCD Display The messages and icons displayed on the LCD panel show at a glance the operating state of the printer. E Printing from Camcorder Any camcorder with an output terminal can be connected to the printer for instant printing of the desired photo anywhere.
EN You can print the picture of your choice on standard paper, stickers. A number of special effects are available in addition to normal printing. Multipix On a page you can print 2, 6 or 8 images. Calendar Printing You can use pictures of your choice to print your own calendar. 12 1998 SUN MON TUE WED THU 1 2 6 7 8 9 13 14 15 16 20 21 22 23 27 28 29 30 FRI SAT 3 4 5 10 11 12 17 18 19 24 25 26 31 Frame Print Internal frames can be superimposed on an image for printing stickers.
CONTENTS EN CAUTIONS 5 MAJOR FEATURES 8 CONTROLS, INDICATORS AND CONNECTORS 12 Front View .................................................................................... 12 Rear View ..................................................................................... 13 Bottom View .................................................................................. 13 Operation buttons ............................................................................
EN ADJUSTMENTS 11 39 Adjusting Image Quality – Adjustments before Printing –.............................. 39 Saving Energy – Power Save – ............................................................ 40 Switching between Moving Picture and Still Picture – Memory Mode Selections – ... 41 TROUBLESHOOTING 42 PRINTING FROM THE PERSONAL COMPUTER 45 SPECIFICATIONS 46 INDEX 47 FOR SERVICING (Only in U.S.A.) 48 WARRANTY (Only in U.S.A.
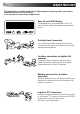
EN CONTROLS, INDICATORS AND CONNECTORS Front View LCD Panel Displays messages and icons during operation to indicate printer operating status. MENU Button Turns menu items on and off. MEMORY/SELECT Button Display MEMORY Button Press to store an input image. SELECT Button Selects menu items. E Function See page Message field Indicates menu settings and printer status. 15, 42 Indicates remaining battery power. PRINT/SET Button PRINT Button Press this button after storing an image to print it.
EN 13 Rear View Battery compartment Paper out/manual feed slot Open the lid to load or remove battery. · Finished prints are ejected from this exit. · Single sheets of paper are inserted here during manual feed. Ink cassette compartment Open the lid to load or remove ink cassette. Bottom View Paper compartment door switch Slide this switch to open the paper compartment. Paper compartment door Open this door to load paper.
EN CONTROLS, INDICATORS AND CONNECTORS (Continued) 䢇Operation buttons Use these buttons to perform operations from storing to printing images, selecting and setting menu items. Use the buttons and follow the instructions given on the LCD panel. MENU MEMORY PRINT SELECT SET 䢇Memory and Print Operations Mode overview MEMORY PRINT · Press to store input video image. · Press to print stored video image.
EN 䢇Menu Setting List Desired Action Set video source Menu item input · Print sample · Superimpose frame list Superimpose frame Setting video → infrared → PC sample → frame list frame set. off → frame 1 → frame 2 → frame 3 frame 4 → frame 5 → frame 6 frame 7 → frame 8 → frame 9 Enter print mode print mode standard → multi-2 → multi-6 multi-8 → calendar Add special print effect effect Adjust brightness or tint adj.
CONNECTIONS (Video Connections) EN Printing from source with video output terminals VIDEO Source TV Connect to video output terminals Connect to video input terminal (yellow) (yellow) Video cable (Supplied with a video source or optional) (yellow) Video cable 2 (Provided) Jack cover (black) Video cable 1 (Provided) PC (black) Connect to video IN jack IN OUT DC IN (yellow) Connect to video OUT jack Notes: • Make sure that the printer is properly connected to the video source.
CONNECTIONS (IrDA Reception) EN 17 Printing from a Digital Still Camera with IrTran-P This is a standard for transmitting data using infrared transmission. Equipment that conform to this standard can transmit to each other regardless of make. Digital still camera with IrTran-P Approx. 15˚ Approx. 15˚ Up to 1.6 ft (50 cm) The distance at which transmission is possible varies with the equipment used.
SUPPLYING THE POWER EN Charging the battery Use the provided AA-V68 AC adapter/Charger for charging the battery. Batteries that have not been completely depleted can also be charged. 1 To AC outlet 2 Battery BN-V607 Power cord Charge indicator 1 Power lamp Charge indicator 2 AC Adapter/Charger AA-V68 DC output terminal (Blinks during charging → Lights continuously when charging completes.) 3 AC ADAPTER/CHARGER 1 CONNECT •Connect the power cord to a wall outlet.
EN Loading the Battery 19 Using AC power The battery (BN-V607) is not charged when shipped. Charge it using the AC adapter before use. 2 When using the printer indoors, you can use the AC Adapter instead of a battery. DC IN Jack To AC outlet 1, 3 DC IN 2 1 DC cord 1 OPEN THE BATTERY COMPARTMENT LID Power lamp •Slide and open the battery compartment lid in the direction of the arrow.
INSTALLATION OF INK CASSETTE EN Installing the Ink cassette Before printing, load printing paper and ink kit as shown below. 2 3 1, 4 INK CASSETTE COM1 OPENING PARTMENT LID INK •To open the ink cassette compartment lid, slide it in the direction of the arrow as far as it will go. SLACK IN THE INK 2 REMOVING RIBBON, IF ANY •Insert a ball-point pen or the like and rotate the roller in the indicated direction.
EN 21 About blank Paper sheet Set (optional) One of the following accessories is required in printing with this printer. SET CONTENTS USES PV-C20AU (Standard type) Standard paper: 20 sheets Ink cassette (20 prints) To print the scene of your choice to make commemorative shots. PV-C12SAU (Sticker type) Sticker paper: 12 sheets Ink cassette (12 prints) Make personalized stickers for pasting on cards, etc.
LOADING THE BLANK PAPER EN Loading Blank Paper To print, load Blank paper sheet set. OPEN 1, 3 2 Printing surface (white side) OPEN PAPER COMPARTMENT 1 OPEN DOOR A •Slide the paper compartment door switch in the direction of the arrow to open the paper compartment door. BLANK PAPER 2 LOAD •Riffle through the paper so that each sheet is separated from the next and place it with the printing surface (white side) facing inside. •Make sure that the paper does not rise above tab A .
PREPARATION EN 23 䢇 Before printing, make sure everything is set up and ready. 1. Connect the printer to the video source to be printed from. (墌pg. 16). •To use IrTran-P, transmit the images after turning on the power as described in step 5. 2. Have a Blank Paper Sheet Set ready (墌pg. 21). 3. Install the ink cassette in the printer (墌pg. 20). 4. Open the paper compartment door and place the printing paper (墌pg. 22). •Use the printing paper in the same box as the ink cassette. 5. Turn on the power.
PRINTING FROM VIDEO SOURCE WITH VIDEO TERMINALS EN This is the standard method for printing from a video source with video terminals. It allows you to easily connect your Camcorder, VCR or other video source with video terminals to the printer. 6 7 MENU 1, 4 LCD panel MEMORY PRINT SELECT SET 2 3 Preparations •Make the connections (墌pg. 16). Selecting Menu Item MENU THE MENU BUTTON 1 PRESS •This action displays the printer menu on the LCD panel.
EN 25 Print Operations THE VIDEO SOURCE TO PLAY5 SET BACK MODE •For details, refer to the instruction manual supplied with the video source. THE MEMORY BUTTON 6 PRESS WHEN THE IMAGE YOU WISH TO PRINT APPEARS MENU MENU MEMORY PRINT SELECT SET MEMORY PRINT SELECT SET •This action stores the image you wish to print. •The message, “Please wait ...” is displayed on the LCD panel while the image is being stored. The message, “Store in memory” is displayed when the image has been stored.
PRINTING FROM IrTran-P EQUIPPED DIGITAL STILL CAMERA EN The printer can receive and print images from an IrTran-P equipped digital still camera. Since no cables are required, this printing method is ideal at wedding receptions, parties or the like. 7 8 MENU 1, 4 MEMORY PRINT SELECT SET 2 3 IrDA receiving window Preparations •Make the connections (墌pg. 17). •Place the digital still camera and printer within a 1.6 ft (50 cm) distance of each other.
EN 27 Digital Still Camera Operations THE DIGITAL STILL CAMERA 5 SELECT IMAGE YOU WISH TO PRINT •For details, refer to the instruction manual supplied with the camera. THE CAMERA IMAGE TO 6 TRANSFER THE PRINTER Note: Transmission may become unstable or impossible due to external light, the state of battery depletion and the distance or angle between the equipment. •Orient the infrared sending window on the digital still camera so that it faces the IrTran-P receiving window on the printer.
MISCELLANEOUS PRINTING OPERATIONS EN Superimposing the Frame of Choice on the Image – Frame Printing – •You can print a frame around an image. •Select one frame you wish to use out of the nine available frames. You can use sticker paper to print titles for greeting cards and so on. 6 7 MENU 1, 4 MEMORY PRINT SELECT SET 2 3 Preparations •Make the connections (墌pg. 16). Selecting Menu Item MENU THE MENU BUTTON 1 PRESS •This action displays the printer menu on the LCD panel.
EN 29 Print Operations THE VIDEO SOURCE TO PLAY5 SET BACK MODE •For details, refer to the instruction manual supplied with the video source. THE MEMORY BUTTON 6 PRESS WHEN THE IMAGE YOU WISH TO PRINT APPEARS MENU MENU MEMORY PRINT SELECT SET MEMORY PRINT SELECT SET •This action stores the image you wish to print. •The message, “Please wait ...” is displayed on the LCD panel while the image is being stored. indicates the •The memory icon following conditions.
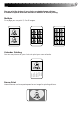
MISCELLANEOUS PRINTING OPERATIONS (Cont.) EN Printing Multiple Images on the Same Paper – MULTI Print – You can print 2, 6 or up to 8 images on a single paper. This makes it easy to customize printing to suit the application. You can use sticker paper to print titles for season's greetings and so on. 6 7 MENU 1, 4 MEMORY PRINT SELECT SET 2 3 Preparations •Make the connections (墌pg. 16). Selecting Menu Item MENU THE MENU BUTTON 1 PRESS •This action displays the printer menu on the LCD panel.
EN 31 Print Operations THE VIDEO SOURCE TO PLAY5 SET BACK MODE •For details, refer to the instruction manual supplied with the video source. THE MEMORY BUTTON 6 PRESS WHEN THE IMAGE YOU WISH TO PRINT APPEARS MENU MENU MEMORY PRINT SELECT SET MEMORY PRINT SELECT SET •This action stores the image you wish to print. •The image stored in memory is displayed in the selected number of multiple images. •The message, “Please wait ...” is displayed on the LCD panel while the image is being stored.
MISCELLANEOUS PRINTING OPERATIONS (Cont.) EN Combining Image and Calendar – Calendar Printing – You can turn your favorite picture into a calendar.
EN MENU 33 THE MENU BUTTON TWICE 4 PRESS TO CONFIRM THE ENTRY •When entering the year and month in step 3, press the MENU button only once. Print Operations THE VIDEO SOURCE TO PLAY5 SET BACK MODE •For details, refer to the supplied instruction manual. THE MEMORY BUTTON 6 PRESS WHEN THE IMAGE YOU WISH TO PRINT APPEARS MENU MENU MEMORY PRINT SELECT SET MEMORY PRINT SELECT SET •This action stores the image you wish to print. •The message, “Please wait ...
MISCELLANEOUS PRINTING OPERATIONS (Cont.) EN Printing Using Special Effects – Special Effects – You can print an image in “sepia” or “black and white”. 6 7 MENU 1, 4 MEMORY PRINT SELECT SET ,,,, ,,,, ,,,, ,,,, 2 3 Preparations •Make the connections (墌pg. 16). Selecting Menu Item MENU THE MENU BUTTON 1 PRESS •This action displays the printer menu on the LCD panel. MEMORY SELECT e f f e c t o f f THE SELECT BUTTON 2 PRESS •Press the SELECT button repeatedly until “effect” appears.
EN ,,,,, ,,,,, ,,,,, ,,,,, ,,,,, ,,,,, ,,,,,, MENU MENU 35 Print Operations THE VIDEO SOURCE TO PLAY5 SET BACK MODE •For details, refer to the instruction manual supplied with the video source. THE MEMORY BUTTON 6 PRESS WHEN THE IMAGE YOU WISH TO PRINT APPEARS MEMORY PRINT SELECT SET MEMORY PRINT SELECT SET •This action stores the image you wish to print. •The message, “Please wait ...” is displayed on the LCD panel while the image is being stored.
MISCELLANEOUS PRINTING OPERATIONS (Cont.) EN Manual Feed This function allows you to print one page at a time using manual feed. 6 8 MENU 1, 4 MEMORY PRINT SELECT SET 2 3 7 Preparation •Make the connections (墌pg. 16). Selecting Menu Item MENU THE MENU BUTTON 1 PRESS •This action displays the printer menu on the LCD panel. MEMORY SELECT Y T ma n . o f f f e e d “man. feed” appears. PRINT SET MENU ma n .
EN 37 Print Operations THE VIDEO SOURCE TO PLAYBACK MODE 5 SET •For details, refer to the instruction manual supplied with the video source. THE MEMORY BUTTON 6 PRESS WHEN THE IMAGE YOU WISH TO PRINT APPEARS MENU MEMORY PRINT SELECT SET •This action stores the image you wish to print. •The message, “Please wait ...” is displayed on the LCD panel while the image is being stored. indicates the following •The memory icon conditions.
MISCELLANEOUS PRINTING OPERATIONS (Cont.) EN Printing Reversed Images – Mirror Images – You can, if you wish, reverse a printed image. MENU 1, 4 MEMORY PRINT SELECT SET 2 3 Preparations •Make the connections (墌pg. 16). Selecting Menu Item MENU THE MENU BUTTON 1 PRESS •This action displays the printer menu on the LCD panel. MEMORY SELECT Y T m i r r o r o f f “mirror” appears.
ADJUSTMENTS EN 39 Adjusting Image Quality – Adjustments before Printing – When “video” is set in the menu item “input”, you can adjust the brightness and tint before printing. MENU 1, 4 MEMORY PRINT SELECT SET 2 3 Preparations •Make the connections (墌pg. 16). •Select “video” in the “input” menu (墌pg. 24). MENU Selecting Menu Item •The tint and the brightness of the image can be adjusted only before storing it. THE MENU BUTTON 1 PRESS •This action displays the printer menu on the LCD panel.
ADJUSTMENTS (Cont.) EN Saving Energy – Power Save – •The printer is equipped with a power saving feature to reduce battery power consumption. •When the printer is turned on and not used for 5 minutes, the save mode automatically turns it off. MENU 1, 4 MEMORY PRINT SELECT SET 2 3 Preparations •Make the connections (墌pg. 16). Selecting Menu Item MENU THE MENU BUTTON 1 PRESS •This action displays the printer menu on the LCD panel.
EN 41 Switching between Moving Picture and Still Picture – Memory Mode Selection – •When “video” is set in the menu item “input”, you can select between moving picture or still picture. •The moving picture setting has a feature for suppressing blur and thus lends itself to capturing images from camcorder or VCRs. •The still picture setting turns off the blur suppressing function and is therefore best suited to storing still images from digital still cameras and so on.
TROUBLESHOOTING EN Meaning of Messages Displayed on the LCD panel Message ● Appears when: 䡲 Action: page Please wait... ●Image data is being stored or printing has started. Connect video in ●The video source and the printer are not connected or the cable has been disconnected. 䡲Connect the video cable according to the instructions on page 16. 16 No video signal ●An attempt is made to store an image from a video source that has been turned off. 䡲Turn on the video source.
EN 43 OTHER PROBLEMS: This printer contains microprocessors. External electronic noise or interference could cause malfunctioning. In such a case, switch the power off. Then turn on the power and check again. If Check to see if No power is applied to the printer.
TROUBLESHOOTING (cont.) EN WHEN PAPER JAMS 1 TURN OFF THE POWER AND TURN IT BACK ON AGAIN POWER •The jammed paper is ejected from the PAPER OUT/MANUAL FEED slot. Paper When paper jam is not removed using procedure 1. MENU 2, 5 MEMORY PRINT SELECT SET 3 4 5 2 PRESS THE MENU BUTTON MENU •This action displays the printer menu on the LCD panel. MEMORY SELECT Y T f o rm o f f f e e d MENU •Press the SELECT button repeatedly until “form feed” appears.
PRINTING FROM THE PERSONAL COMPUTER PRINTING FROM THE PERSONAL COMPUTER EN 45 In order to print from the PC, an optional PC connection kit HS-V11 is required. Customers who have purchased a JVC Digital Still Camera such as GC-S1 with which Picture Navigator software and PC connection cable are provided in the same package are enabled to print images from their personal computer. 5Before connection, turn off the power on your PC and Video Printer for safety.
SPECIFICATIONS EN Power supply DC 6 V} (with AC adapter) DC 7.2 V} (with lithium-ion battery) Power consumption 11 W Print format WAX Thermal Permeation Print area 70 mm x 52 mm (area depends on print format) Paper size 86 x 54 mm Print quality 598 (horiz.) dots x 448 (vert.) dots Resolution 217 dpi Print speed (processing time) Approx. 70 sec (excluding data transfer and processing) Connectors · IrDA input: infrared receiver (one on front panel) (conforms to IrDA Ver. 1.
INDEX EN 47 B O Battery compartment lid ............................ 19 Operation buttons ..................................... 14 C P Calendar print ........................................... 32 Charging the battery .................................. 18 Connections ....................................... 16, 17 Paper compartment door switch ......... 13, 22 PC connection jack ................................... 12 PRINT button ............................................
FOR SERVICING (Only in U.S.A.) EN HOW TO LOCATE YOUR JVC SERVICE CENTER TOLL FREE: 1-800-252-5722 Dear customer: In order to receive the most satisfaction from your purchase, read the instruction booklet before operating the unit. In the event that repair is necessary, or for the address nearest your location, please refer to the factory service center list below or within the Continental United States, call 1-800252-5722 for your authorized servicer.
WARRANTY (Only in U.S.A.) EN LIMITED WARRANTY 49 CONSUMER VIDEO 1-90 JVC COMPANY OF AMERICA warrants this product and all parts thereof, except as set forth below ONLY TO THE ORIGINAL PURCHASER AT RETAIL to be FREE FROM DEFECTIVE MATERIALS AND WORKMANSHIP from the date of original retail purchase for the period as shown below.
EN MEMO .................................................................................................................................................... .................................................................................................................................................... .................................................................................................................................................... ...................................................
MEMO EN 51 .................................................................................................................................................... .................................................................................................................................................... .................................................................................................................................................... ...................................................
EN GV-HT1 VICTOR COMPANY OF JAPAN, LIMITED COPYRIGHT© 1998 VICTOR COMPANY OF JAPAN, LTD.