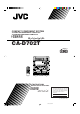
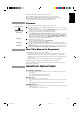
COMPACT COMPONENT SYSTEM SISTEMAS DE COMPONENTES COMPACTOS SISTEMA DE COMPONENTE COMPACTO CA-D702T COMPACT DIGITAL AUDIO PROGRAM /RANDOM DISC REPEAT DISC EDIT DISC FM PRO LOGIC 3CH LOGIC AM TEST TONE SHIFT – CENTER LEVEL + CENTER MODE – REAR LEVEL + DELAY TIME SOUND MODE L BALANCE R FM MODE ECHO S.A.
Warnings, Cautions and Others Avisos, precauciones y otras notas Advertências, precauções e outras notas IMPORTANT for the U.K. DO NOT cut off the mains plug from this equipment. If the plug fitted is not suitable for the power points in your home or the cable is too short to reach a power point, then obtain an appropriate safety approved extension lead or consult your dealer. BE SURE to replace the fuse only with an identical approved type, as originally fitted.
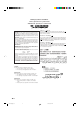
IMPORTANT FOR LASER PRODUCTS / IMPORTANTE PARA PRODUCTOS LÁSER / IMPOTANTE PARA PRODUTOS LASER / / REPRODUCTION OF LABELS / REPRODUCCIÓN DE ETIQUETAS / REPRODUÇÃO DE ETIQUETAS / 1 CLASSIFICATION LABEL, PLACED ON REAR ENCLOSURE 2 WARNING LABEL, PLACED INSIDE THE UNIT 1 ETIQUETA DE CLASIFICACIÓN, PEGADA EN LA PARTE POSTERIOR DE LA CAJA 2 ETIQUETA DE ADVERTENCIA, PEGADA EN EL INTERIOR DE LA UNIDAD 1 ETIQUETA DE CLASSIFICAÇÃO LOCALIZADA NA PARTE POSTERIOR DA CAIXA DO APARELHO.
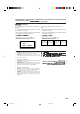
Caution: Proper Ventilation To avoid risk of electric shock and fire, and to prevent damage, locate the apparatus as follows: 1 Front: No obstructions and open spacing. 2 Sides/ Top/ Back: No obstructions should be placed in the areas shown by the dimensions below. 3 Bottom: Place on the level surface. Maintain an adequate air path for ventilation by placing on a stand with a height of 10 cm or more.
English Thank you for purchasing the JVC Compact Component System. We hope it will be a valued addition to your home, giving you years of enjoyment. Be sure to read this instruction manual carefully before operating your new stereo system. Here you will find all the information you need to set up and use the system. For questions that are not be answered in the manual, contact your dealer. Features Here are some of the things that make your System powerful and easy to use.
English Table of Contents Features ...................................................................... 1 How This Manual Is Organized ................................. 1 IMPORTANT PRECAUTIONS ................................ 1 Getting Started ................................................ 3 Accessories ................................................................ 3 Setting the VOLTAGE SELECTOR Switch.............. 3 How to Put Batteries in the Remote Control .............
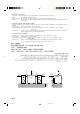
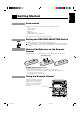
English Getting Started Accessories Check that you have all of the following items, which are supplied with the System. AM Loop Antenna (1) Remote Control (1) Batteries (2) FM Wire Antenna (1) AC Plug Adaptor (except for Argentina) (1) If any of these items is missing, contact your dealer immediately. Setting the VOLTAGE SELECTOR Switch To avoid damaging the System, set the voltage before plugging in the Unit.
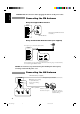
English CAUTION: Make all connections before plugging the Unit into an AC power outlet. Connecting the FM Antenna Using the Supplied Wire Antenna Extend the supplied FM Wire Antenna horizontally. FM Wire Antenna Using an FM 75-Ohm Antenna Cable (not supplied) If reception is poor, connect the outside antenna. Outside FM Antenna Wire 2 1 3 Before attaching a 75-ohm coaxial lead (the kind with a round wire going to an outside antenna), disconnect the supplied FM Wire Antenna.
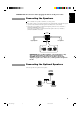
English CAUTION: Make all connections before plugging the Unit into an AC power outlet. Connecting the Speakers Refer to instructions for speakers as well when you connect speakers. For each speaker, connect one end of the speaker wires to the speaker terminals on the back of the System. 1. Open each of the terminals and insert the speaker wires firmly, then close the terminals. 2.
English Connecting Auxiliary Equipment VCR or other equipment To listen to this source, press AUX. AUX RIGHT LEFT Now you can plug the AC power cord into the wall outlet, and your System is at your command! COMPU PLAY COMPU PLAY is JVC’s feature that lets you control the most frequently used functions of the System with a single touch. One Touch Operation starts playing a CD, turns on the radio, plays a tape, etc. with a single press of the play button for that function.
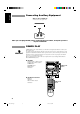
English Common Operations PROGRAM /RANDOM SET DISC REPEAT MULTI CONTROL DISC EDIT DISC STANDBY indicator SOUND MODE TIMER/CLOCK PHONES SEA CONTROL CANCEL/DEMO S.A. BASS VOLUME AUX FM PRO LOGIC TEST TONE SHIFT CENTER MODE SLEEP + DELAY TIME SOUND MODE L BALANCE R – REAR LEVEL –, + BALANCE L, R CENTER LEVEL REAR LEVEL – FM MODE / ECHO S.A.
English Setting the Clock Before operating the unit, set the correct time. You can set the clock whether the Unit is on or off. 1 1. Press TIMER/CLOCK. The hour digits begin flashing. Flashing 2. Press 4 P. DOWN or ¢ P. UP on the MULTI CONTROL to set the hours. 2, 4 Press ¢ P. UP to increase the hour. Press 4 P. DOWN to decrease the hour. Holding down continuously changes the hour setting more rapidly. 3. Press SET. The minute digits begin flashing. 4. Press 4 P. DOWN or ¢ P.
For private listening Connect a pair of headphones to the PHONES jack. No sound comes out of the speakers. Be sure to turn down the volume before connecting or putting on headphones. Balance Adjustment ———————————————————— You can use the Remote Control to adjust the left and right balance of the speakers. SHIFT 1. Press SHIFT. 2. Press BALANCE L (10) or R (+10). L BALANCE R The display changes to show the balance adjustment.
English Sound Modes The System has some preset sound effects that give you control of the way your music sounds, so you can tailor it for your room and for the quality of the source. We can give you some idea of how each one affects the music, but the only way to really tell is to try them yourself. You can also create up to three of your own customized S.E.A. (Sound Effect Amplifier) settings and store them in the Unit’s memory (MANUAL 1, MANUAL 2, MANUAL 3).
Press 4 P. DOWN or ¢ P. UP on the MULTI CONTROL to select the tone range you want to adjust. You can adjust “LOW”, “MID” or “HIGH” tone. Flashing Flashing Flashing Press TUNING DOWN 1 or ¡ TUNING UP on the MULTI CONTROL to adjust the level. The level can be adjusted between –3 and +3 in 7 steps. 4. Press SET. “MANUAL 1” appears on the display. 5. Press 4 P. DOWN or ¢ P. UP on the MULTI CONTROL to select the MANUAL number for the memory. 6. Press SET again. “MEMORY” appears for 2 seconds.
English Listening to Auxiliary Equipment By playing the sound from auxiliary equipment through the System, you can gain control over how the music or program sounds. Once the connected equipment is playing through the System, you can apply the sound effects. First make sure that the auxiliary equipment is properly connected to the System. (See page 6). 1. Turn down the volume level to 0. 2. Press AUX. “AUX” appears on the display. The AUX button on the Unit lights up.
English Dolby Surround PROGRAM /RANDOM DISC REPEAT DISC EDIT DISC PRO LOGIC / 3CH LOGIC Operation keys PRO LOGIC FM AM 3CH LOGIC TEST TONE SHIFT CENTER MODE SLEEP – CENTER LEVEL + – REAR LEVEL + DELAY TIME SOUND MODE L BALANCE R FM MODE / ECHO S.A.
English Preparing the Dolby Surround To use the Dolby Surround effects, you need to prepare the various settings. These settings are set using the Remote Control. The Dolby Surround settings are: Center Speaker Mode Center Speaker mode contains the following four settings. PHANTOM: Select this setting if you have not connected a center speaker. The left and right front speakers project the sound to give the effect of a center speaker.
Speaker Arrangements for Dolby Pro Logic ———————— Layout when using the center speaker and rear speakers Front Speaker TV Center Speaker Rear Speaker Front Speaker Rear Speaker Layout when using the rear speakers Front Speaker TV Front Speaker Rear Speaker Rear Speaker Setting-up Dolby Pro Logic ———————————————— 1. Press PRO LOGIC/3CH LOGIC to select PRO LOGIC.
English Getting Ready to Use Dolby 3 Channel Logic Speaker Arrangements for Dolby 3 Channel Logic ———— Front Speaker TV Center Speaker Front Speaker Setting-up Dolby 3ch Logic ———————————————— 1. Press PRO LOGIC/3CH LOGIC to select 3CH LOGIC. Each time you press the button, Dolby Surround programs change as follows: = PRO LOGIC = 3CH LOGIC = OFF = (back to the beginning) or SHIFT \ 3CH LOGIC When using the Remote Control, press SHIFT then press the 3CH LOGIC (2).
English Using the Tuner PROGRAM /RANDOM DISC REPEAT DISC SET EDIT DISC MULTI CONTROL FM/AM When TUNER is selected as the source, the button lights up. FM AM PRO LOGIC FM AM 3CH LOGIC TEST TONE SHIFT CENTER MODE SLEEP – CENTER LEVEL + – REAR LEVEL + DELAY TIME SOUND MODE L BALANCE R FM MODE / ECHO S.A.
English Switching between Frequency Bands ——————————— On the Unit Press FM/AM. Each time you press the button, the band alternates between FM and AM. COMPU PLAY When FM/AM is pressed while the power is on standby, the power is automatically turned on. On the Remote Control To tune in FM stations, press FM. To tune in AM stations, press AM. AM FM or COMPU PLAY When FM or AM is pressed while the power is on standby, the power is automatically turned on.
When an FM stereo broadcast is hard to receive or noisy, press FM MODE/ECHO on the Remote Control so that the MONO indicator lights up on the display. Reception improves, but there is no stereo effect. FM MODE / ECHO To restore the stereo effect, press FM MODE/ECHO on the Remote Control so that the MONO indicator goes out. In this stereo mode, the STEREO indicator lights up and you can hear stereo effects, when a program is broadcast in stereo.
English Using the CD Player PROGRAM/RANDOM REPEAT Disc Trays PRO LOGIC 0 AM FM TEST TONE SHIFT – CENTER LEVEL 3CH LOGIC + CENTER MODE SLEEP – REAR LEVEL + DELAY TIME SOUND MODE PROGRAM /RANDOM DISC REPEAT Number keys DISC EDIT DISC buttons DISC FM MODE / ECHO S.A.
English Loading CDs 1. Press 0 on the CD Player you want to insert the disc onto. “OPEN” appears on the display and the disc tray slides out. COMPU PLAY When 0 is pressed while the power is on standby, the power is automatically turned on. 2. Place a CD, with its label side up, onto the tray. ATTENTION: To avoid malfunctions when you play a CD, set the CD in the right place at the center of the tray. CD Tray 3. Press 0 to close the tray. CORRECT INCORRECT “CLOSE” appears on the display. 4.
English CD CONTROL On the Remote Control Press CD CONTROL then press 3. \ DISC 1 The source is set to CD and play starts from the first track of the currently selected CD whose disc number shown on the CD indicator. • If the above operation is carried out while the power is on standby, the power is automatically turned on. DISC 2 Press DISC (1 to 3) of the disc you want to play. DISC 3 The source is set to CD and play starts from the first track of the selected CD.
English Programing the Playing Order of the Tracks You can change the order in which the discs and tracks play, and select only the discs and tracks you want from among those loaded in the CD Player. You can program up to 32 steps in any desired order from among the discs in the CD player. You can only program the CD Player when it is stopped. On the Unit PROGRAM /RANDOM 1. Press PROGRAM/RANDOM. “PROGRAM” appears on the display and the PROGRAM indicator lights up.
English 3. Press the number keys (1 to 10 and +10) to select the tracks. PRO LOGIC 3CH LOGIC The indications on the display stop flashing and remains lit. The selected track numbers light up and the step number appears on the display. • Example: For track 5, press 5. For track 15, press +10 then 5. For track 20, press +10 then 10. For track 32, press +10 three times, then 2. TEST TONE – CENTER LEVEL + CENTER MODE – REAR LEVEL + DELAY TIME L BALANCE R 4.
You can have all the discs, the program or the individual track currently playing repeat as many times as you like. REPEAT Press REPEAT on the Unit. Each time you press the button, the Repeat Modes change as follows. = REPEAT ALL = REPEAT 1 = No indicator = (back to the beginning) REPEAT ALL: Repeats all the tracks on the CDs, or all the tracks in the program. REPEAT 1: Repeats one track on one CD. To exit Repeat Mode, press REPEAT until the Repeat Mode indicator on the display goes out.
English Using the Cassette Deck (Playing) PROGRAM /RANDOM DISC REPEAT DISC EDIT DISC FM PRO LOGIC 3CH LOGIC AM TEST TONE SHIFT CENTER MODE SLEEP + DELAY TIME SOUND MODE L BALANCE R FM MODE / ECHO S.A.BASS REPEAT – CENTER LEVEL + – REAR LEVEL TAPE A TAPE B DIRECTION DISC 1 DISC 2 DISC 3 CD CONTROL AUX MULTI CONTROL TAPE ™ £ When TAPE is selected as the source, the button lights up.
English Regular Play When the power is already on, you can use this basic procedure: 1. Press down 0 for the deck you want to use. 2. When the cassette holder opens, put a cassette in, with the exposed part of the tape down, toward the base of the Unit. • If the cassette holder does not open, turn the power off, then back on and press down 0 again. 3. Close the holder gently. When both Deck A and Deck B contain a tape, the last deck to have a tape inserted is selected.
English Music Scan works by detecting a 4-second long blank at the beginning of each selection, so it will not work well if your tape has • • • • • • No blank at the beginning of a selection. Noise (often caused by much use or poor quality dubbing) which fills the blank with noise. Long, very soft passages or pauses in a selection. The scan will detect these as 4-second long blanks. If this happens, just scan again until you reach the selection you want.
English Using the Cassette Deck (Recording) PROGRAM /RANDOM DISC REPEAT DISC EDIT EDIT DISC FM PRO LOGIC 3CH LOGIC AM TEST TONE SHIFT CENTER MODE SLEEP – CENTER LEVEL + – REAR LEVEL + DELAY TIME SOUND MODE L BALANCE R FM MODE / ECHO S.A.
English CAUTION: If recordings you have made have excessive noise or static, the Unit may be too close to a TV which was on during recording. Either turn off the TV or increase the distance between the TV and the System. Standard Recording This is the basic method for recording any source. The System also has special ways for recording CD to tape, and tape to tape, which save your time and effort, as well as give you some special effects.
When recording an AM broadcast, beats may be produced which are not heard when listening to the broadcast. In this case, press PROGRAM/RANDOM on the CD Player to eliminate the beats. 1. Set to AM station and start recording. PROGRAM /RANDOM 2. Press PROGRAM/RANDOM repeatedly until the beats are eliminated.
English 5. Press SET. The tracks to be recorded on side B appear on the display. • Each time you press the button, the tracks to be recorded on side A and side B appear on the display alternately. 6. Insert a blank or erasable cassette in Deck B. When you want to record on both sides of a tape, press REVERSE MODE to turn Reverse mode on. 7. Press CD REC START . The Unit plays the CD and starts recording. If the tape has not been rewound, the Unit rewinds the tape before starting to record the CD.
English Using the Timer PROGRAM /RANDOM DISC FM AM 3CH LOGIC TEST TONE SHIFT CENTER MODE SLEEP REPEAT DISC EDIT PRO LOGIC DISC – CENTER LEVEL + – REAR LEVEL + DELAY TIME SOUND MODE L BALANCE R FM MODE / ECHO S.A.BASS REPEAT TAPE A TAPE B DIRECTION DISC 1 DISC 2 DISC 3 CD CONTROL AUX SET MULTI CONTROL SLEEP TIMER/CLOCK TAPE CONTROL REC PAUSE + VOLUME – RM-SED702TXU REMOTE CONTROL Display Clock, timer-on time etc.
English Setting the Daily Timer With this timer you can wake up to music from a CD, tape, your favorite radio program. You can set the Daily Timer whether the Unit is on or off. Procedure For Setting the Daily Timer 1. Press TIMER/CLOCK so that “DAILY” appears on the display. The DAILY indicator flashes on the display.
1. To listen to FM, press 4 P. DOWN or ¢ P. UP on the MULTI CONTROL repeatedly until “TUNER FM” flashes and press SET. To listen to AM, press 4 P. DOWN or ¢ P. UP on the MULTI CONTROL repeatedly until “TUNER AM” flashes and press SET. or 2. Press 4 P. DOWN or ¢ P. UP on the MULTI CONTROL repeatedly to select the station to be listened to as a preset channel and press SET. To use a Cassette Deck as the source: Press 4 P. DOWN or ¢ P.
English CAUTION: If the Unit is unplugged, or a power failure occurs, the timer setting will be erased in a few days. If the settings are erased in this way, reset the timer settings. Setting the Recording Timer With the Recording Timer you can make a tape of a radio broadcast automatically whether or not you are home.
Once the Recording Timer has been used, the setting is maintained but the Timer is set to off. To turn the Recording Timer off before the timer starts, press TIMER/CLOCK repeatedly until “REC” appears on the display, then press CANCEL/DEMO. “OFF” appears on the display and the REC indicator goes out. To record at the same time again, press TIMER/CLOCK repeatedly until “REC” appears on the display, then press SET.
English Timer Priority Since each timer can be set independently, you may wonder what happens if the settings overlap. Here are the priorities for each timer: The Recording Timer always has priority. This means that: • If another timer is set to come on during a time when the Recording Timer is operating, the other timer just will not come on at all, so you will always get the entire program on tape.
English Using the Microphone PROGRAM /RANDOM DISC REPEAT DISC EDIT DISC SOUND MODE VOLUME MIC 1 MIC 2 MIC LEVEL PRO LOGIC FM MODE / ECHO FM AM 3CH LOGIC TEST TONE SHIFT CENTER MODE SLEEP – CENTER LEVEL + – REAR LEVEL + DELAY TIME SOUND MODE L BALANCE R FM MODE / ECHO S.A.
English SOUND MODE 3. Press SOUND MODE repeatedly until “KARAOKE” appears on the display. The or (Karaoke) indicator lights up. 4. Start the source CD, tape or other equipment. 5. Adjust the volume control and MIC LEVEL, as you sing into the microphone. Important Information on Karaoke Because a radio signal is not as reliable as signals coming from a tape or CD, you may not always get satisfactory results using the radio as a source for Karaoke.
English Microphone Mixing When using special Karaoke sources for karaoke, use the following procedure. 1. Turn MIC LEVEL to MIN. 2. Connect the microphone (not supplied) by plugging it into the MIC jack on the front panel. 3. Start the source CD, tape, or other equipment. 4. Adjust the volume and MIC LEVEL, as you sing into the microphone. To apply echo to the microphone sound, follow the steps in “Digital Echo”. (See page 40.) Recording Microphone Mixing ——————————————— 1.
English Care and Maintenance Compact Discs Cassette Tapes Handle your compact discs, cassette tapes, and Cassette Deck carefully, and they will last a long time. • • • • • • • • Remove the CD from the case by holding it at the edges while pressing the center hole lightly. Do not touch the shiny surface of the CD, or bend the CD. Put the CD back in its case after use to prevent warping. Be careful not to scratch the surface of the CD when placing it back in the case.
• • English Troubleshooting If you are having a problem with your System, check this list for a possible solution before calling for service. If you cannot solve the problem from the hints given here, or the Unit has been physically damaged, call a qualified person, such as your dealer, for service. Symptom Possible Cause Action No sound is heard. Connections are incorrect, or loose. Check all connections and make corrections. (See pages 4 - 6.) Unable to record.
English Specifications Amplifier Section Output Power (IEC 268-3/DIN) Front 45 watts per channel, min. RMS, both channels driven, into 6 ohms at 1 kHz, with no more than 0.9% total harmonic distortion. Center 25 watts min. RMS, both channels driven, into 8 ohms at 1 kHz, with no more than 0.9% total harmonic distortion. Rear 12.5 watts per channel, min. RMS, both channels driven, into 16 ohms at 1 kHz, with no more than 0.9% total harmonic distortion.
Mains (AC) Line Instruction (not applicable for Europe, U.S.A., Canada, and U.K.) Instrucción sobre la línea de la red (CA) (no aplicable para Europa, EE.UU., Canadá, ni el Grã-Bretanha) Instrução sobre a tensão da rede eléctrica (CA) (não aplicável para a Europa, os E.U.A.