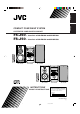
English Français COMPACT COMPONENT SYSTEM SYSTEME DE COMPOSANTS COMPACT FS-J60— Consists of CA-FSJ60 and SP-UXJ60 FS-J50— Consists of CA-FSJ50 and SP-UXJ50 RM-SFSJ60U REMOTE CONTROL SP-UXJ60 CA-FSJ60 SP-UXJ60 RM - SFSJ50U REMOTE CONTROL SP-UXJ50 CA-FSJ50 INSTRUCTIONS MANUEL D’INSTRUCTIONS SP-UXJ50 For Customer Use: Enter below the Model No. and Serial No. which are located either on the rear, bottom or side of the cabinet. Retain this information for future reference. Model No. Serial No.
Warnings, Cautions and Others Mises en garde, précautions et indications diverses CAUTION—STANDBY/ON CAUTION RISK OF ELECTRIC SHOCK DO NOT OPEN CAUTION: TO REDUCE THE RISK OF ELECTRIC SHOCK, DO NOT REMOVE COVER (OR BACK). NO USER SERVICEABLE PARTS INSIDE. REFER SERVICING TO QUALIFIED SERVICE PERSONNEL.
Note to CATV system installer: For Canada/pour le Canada This reminder is provided to call the CATV system installer’s attention to Section 820-40 of the NEC which provides guidelines for proper grounding and, in particular, specifies that the cable ground shall be connected to the grounding system of the building, as close to the point of cable entry as practical. CAUTION: TO PREVENT ELECTRIC SHOCK, MATCH WIDE BLADE OF PLUG TO WIDE SLOT, FULLY INSERT.
English Introduction We would like to thank you for purchasing one of our JVC products. Before operating this unit, read this manual carefully and thoroughly to obtain the best possible performance from your unit, and retain this manual for future reference. About This Manual This manual is organized as follows: • The manual mainly explains operations using the buttons on the remote control.
English Contents Location of the Buttons and Control ..................................... 3 Front Panel ........................................................................................... 3 Remote Control .................................................................................... 5 Getting Started ........................................................................ 6 Supplied Accessories ............................................................................
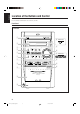
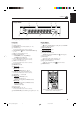
English Location of the Buttons and Control Become familiar with the buttons and control on your unit. Front Panel Front Panel 1 w FOR FS-J50: 2 e 3 4 r 5 t 6 7 y 8 u 9 i COMPACT COMPONENT SYSTEM FS-J60 p q 3 EN01-13_FS-J60&50[C]f.pm6 3 03.1.
English Continued Display Window 1 2 3 [DAILY REC SLEEP]REC PRGM ST RANDOM ALL 5 6 4 SURROUND BASS MONO AHB 7 8 9 p See the pages in parentheses for details.
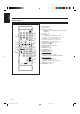
English Remote Control See the pages in parentheses for details. STANDBY/ON 1 2 8 3 DISPLAY 1 4 5 6 CLOCK /TIMER 7 8 9 SLEEP 10 +10 UP BASS q w SET 6 7 p TREBLE 2 3 4 5 9 CANCEL DOWN e CD TAPE FM/AM AUX CD REV.
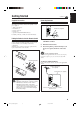
English Getting Started Continued Supplied Accessories Connecting Antennas Make sure that you have all the following items. The number in parentheses indicates the quantity of each piece supplied. • AM loop antenna (1) • FM antenna (1) • Remote control (1) • Batteries (2) • Speaker cords (ONLY FOR FS-J60) (4) FM antenna A ENN ANT FM antenna (supplied) EXT P AM M LOO A 75 FM XIAL A CO If anything is missing, consult your dealer immediately.
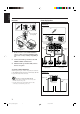
English Connecting Speakers AM antenna 1 2 FOR FS-J60: 1 A ENN ANT EXT P AM M LOO A 75 FM XIAL A CO Vinyl-covered wire (not supplied) 2 3 3 Grey AM loop antenna (supplied) RIGHT Speaker cord LEFT MAIN SPEAKERS RIGHT LEFT Red Speaker cord SUBWOOFERS CAUTION: SPEAKER IMPEDANCE 6 -16 1 If the cords are covered with insulation, Black Blue remove a short section of insulation at the end of each cord by twisting and pulling it off.
English 1 If the cords are covered with insulation, remove a short section of insulation at the end of each cord by twisting and pulling it off. 2 Press and hold the clamp of the speaker terminal as illustrated. 3 Insert the end of the speaker cord into the terminal. Match the polarity between the unit and the speaker terminals: ª to ª and · to ·. 4 Release your finger from the clamp.
English Common Operations Setting the Clock To change the clock Before operating the unit any further, first set the unit’s clock. When you plug the AC power cord into the wall outlet, “AM 12:00” starts flashing on the display. You can set the clock whether the unit is on or off. • There is a time limit in doing the following steps. If the setting is canceled before you finish, start over from step 1. • For FS-J60 only, you can also use CLOCK/TIMER on the unit for this operation.
English Continued Adjusting the Volume To reinforce the bass sound You can adjust the volume level only while the unit is turned on. The volume level can be adjusted between “VOL MIN” and “VOLUME 1” – “VOLUME 40 (VOL MAX).” On the remote control: Press VOLUME + to increase the volume or press VOLUME – to decrease it. VOLUME On the unit: Turn VOLUME + / – control clockwise (+) to increase the volume or counterclockwise (–) to decrease it.
English Selecting the Display Color (ONLY FOR FS-J60) To enjoy the heavy sound (ONLY FOR FS-J60) You can enjoy the heavy sound. The function boosts low and high frequency sounds—Sound Turbo. Press SOUND TURBO. • Each time you press the button, the Sound Turbo is turned on and off alternately. When it is turned on, the BASS indicator lights up on the display. SOUND TURBO You can select the display color (COLOR 1 – COLOR 5 and AUTO mode). • AUTO mode changes the color (COLOR 1 to COLOR 5) gradually.
Tuning in to a Station 1 Press FM/AM to select the band. English Listening to FM and AM Broadcasts Continued Presetting Stations FM/AM The unit automatically turns on and tunes in to the previously received station—either FM or AM. • Each time you press the button, the band alternates between FM and AM. You can preset 30 FM and 15 AM stations. In some cases, test frequencies have been already memorized for the tuner since the factory examined the tuner preset function before shipment.
English Tuning in to a Preset Station On the remote control ONLY: 1 Press FM/AM to select the band. FM/AM The unit automatically turns on and tunes in to the previously received station—either FM or AM. • Each time you press the button, the band alternates between FM and AM. 2 UP Press UP or DOWN to select a preset number. DOWN To tune in to a preset station directly using the number buttons On the remote control ONLY: Pressing the number button(s) allows you to select the preset number you want.
This unit has been designed to play back the following discs —CD, CD-R, and CD-RW. When playing a CD-R or CD-RW User-edited CD-Rs (CD-Recordable) and CD-RWs (CD-ReWritable) can be played only if they are already “finalized.” • Usually you can play back your original CD-Rs or CDRWs recorded in music CD format. However, sometimes they may not play depending on their characteristics or recording conditions. • Before playing CD-Rs or CD-RWs, read their instructions or cautions carefully.
English Basic Disc Operations 2 To stop playing for a moment PRGM ST CD To resume playing, press CD 3/8 again. • If a program has been stored in memory, the program is called up. 3 To go to another track Press UP or DOWN to select the track number, then press SET. • You can select the track number directly using the number button(s). (See “To go to another track directly using the number buttons.”) Before or during play, press ¢ or 4 repeatedly.
English Repeating Tracks—Repeat Play To modify the program On the remote control ONLY: Before or after playing, you can erase the last programed track by pressing CANCEL. • Each time you press the button, the last programed track is erased from the program. CANCEL To add tracks in the program before playing, simply select the track numbers you want to add by following step 3 of the programming procedure. To erase the program, press 7 before or after playing. • Disc ejection also erases the program.
English Playing Back Tapes You can play back type I tapes. To stop playing, press 7. Playing Back a Tape 1 To fast-wind to the left or to the right, press ¢ or 4 while the tape is not running. The tape direction indicator (3 or 2) starts flashing rapidly on the display. Press PUSH OPEN 0 on the unit. PUSH OPEN To remove the cassette, press PUSH OPEN 0 on the unit. • If the tape is playing, stop it first. To play both sides—Reverse Mode 2 Put a cassette in with the exposed part of the tape down.
English Recording Continued Recording on a Tape IMPORTANT: • It may be unlawful to record or play back copyrighted material without the consent of the copyright owner. • The recording level is automatically set correctly, so it is not affected by the other sound settings. Thus, during recording you can adjust the sound you are actually listening to without affecting the recording level. • If recordings you have made have excessive noise or static, the unit may be too close to a TV.
English Disc Direct Recording One Track Recording Everything on the disc goes onto the tape in the order it is on the disc, or according to the order you have set in Program Play. This recording method is convenient when you record tracks while playing the disc. You can record just your favorite songs on the tape. On the unit ONLY: On the unit ONLY: 1 Put a recordable cassette in with the exposed part of the tape down. 1 Put a recordable cassette in with the exposed part of the tape down.
English Using the Timers Continued There are three timers available—Daily Timer, Recording Timer, and Sleep Timer. Before using the timers, you need to set the unit’s clock (see page 9). 2 Set the on-time when you want the unit to turn on. 1) Press UP or DOWN to set the hour, then press CLOCK/TIMER. 2) Press UP or DOWN to set the minute, then press CLOCK/TIMER. The unit enters off-time setting mode. Using Daily Timer and Recording Timer UP You can set the timer whether the unit is on or off.
English 5 Press UP or DOWN to set the volume level, then press CLOCK/TIMER. • You can select the volume level (“VOLUME – –” and “VOLUME 0” to “VOLUME 40”). If you select “VOLUME – –,” the volume is set to the previous level when the unit was turned off. • To turn off the volume while the Recording Timer (REC TUNER) is working, set the volume level “VOLUME 0.” The unit enters the clock setting mode. 6 Using Sleep Timer With the Sleep Timer, you can fall asleep to music.
English Maintenance To get the best performance from the unit, keep your discs, tapes, and mechanism clean. Cleaning the unit Handling cassette tapes • Stains on the unit Should be wiped off with a soft cloth. If the unit is heavily stained, wipe it with a cloth soaked in water-diluted neutral detergent and wrung well, then wipe clean with a dry cloth. • If the tape is loose in its cassette, take up the slack by inserting a pencil in one of the reels and rotating.
English Troubleshooting If you are having a problem with your unit, check this list for a possible solution before calling for service. If you cannot solve the problem from the hints given here, or the unit has been physically damaged, call a qualified person, such as your dealer, for service. Symptom No sound is heard. Cause Action • Connections are incorrect or loose. • Check all connections and make corrections. (See pages 6 – 8.) • Disconnect the headphones. • Headphones are connected.
Design and specifications are subject to change without notice. English Specifications FS-J60 (CA-FSJ60 and SP-UXJ60) FS-J50 (CA-FSJ50 and SP-UXJ50) Amplifier Amplifier Output Power: SUBWOOFERS: 60 W per channel, min. RMS, driven into 6 Ω at 1 kHz with no more than 10% total harmonic distortion. 90 W (45 W + 45 W) at 6 Ω (10% THD) MAIN SPEAKERS: 18 W per channel, min. RMS, driven into 6 Ω at 1 kHz with no more than 10% total harmonic distortion.
Français Introduction Nous vous remercions pour avoir acheté un de nos produits JVC. Avant d’utiliser cet appareil, lisez attentivement ce mode d’emploi afin d’obtenir les meilleures performances de l’appareil, et conservez-le à titre d’information. À propos de ce mode d’emploi Ce mode d’emploi est organisé de la façon suivante: • Ce mode d’emploi explique principalement le fonctionnement de l’appareil en utilisant les touches de la télécommande.
Table des matières Emplacement des touches et des commandes ....................... 3 Panneau avant ....................................................................................... 3 Télécommande ..................................................................................... 5 Français Pour commencer ...................................................................... 6 Accessoires fournis ..............................................................................
Emplacement des touches et des commandes Familiarisez-vous avec les touches et les commandes de votre appareil. Français Panneau avant Panneau avant 1 w POUR LE FS-J50: 2 e 3 4 r 5 t POUR LE FS-J50: 6 7 y 8 u 9 i COMPACT COMPONENT SYSTEM FS-J60 p q 3 FR01-13_FS-J60&50[C]f.
À suivre Fenêtre d’affichage 2 3 [DAILY REC SLEEP]REC PRGM ST RANDOM ALL 5 6 4 Français 1 SURROUND BASS MONO AHB 7 8 9 p Référez-vous aux pages entre parenthèses pour plus de détails.
Télécommande Français Référez-vous aux pages entre parenthèses pour plus de détails. STANDBY/ON 1 2 8 3 DISPLAY 1 4 5 6 CLOCK /TIMER 7 8 9 SLEEP 10 +10 UP BASS q w SET 6 7 p TREBLE 2 3 4 5 9 CANCEL DOWN e CD TAPE FM/AM AUX CD REV.
Pour commencer À suivre Accessoires fournis Connexion des antennes Vérifiez que vous avez bien tous les accessoires suivants. Le nombre entre parenthèses indique le nombre de pièces fournies. • Antenne cadre AM (1) • Antenne FM (1) • Télécommande (1) • Piles (2) • Cordons d’enceinte (POUR LE FS-J60 UNIQUEMENT) (4) Antenne FM A Français ENN ANT Antenne FM (fournie) EXT P AM M LOO A 75 FM XIAL A CO Si quelque chose manquait, consultez immédiatement votre revendeur.
Connexion des enceintes Antenne AM 2 POUR LE FS-J60: Français 1 1 A ENN ANT EXT P AM M LOO A 75 FM XIAL A CO Fil recouvert de vinyle (non fourni) 2 3 3 Gris Antenne cadre AM (fournie) Cordons d’enceinte RIGHT LEFT MAIN SPEAKERS RIGHT LEFT SUBWOOFERS Rouge Cordons d’enceinte CAUTION: SPEAKER IMPEDANCE 6 -16 1 Si les cordons sont recouverts par un Noir Bleu isolant, retirez la petite partie de l’isolant à l’extrémité de chaque cordon en tordant et en tirant l’isolant.
isolant, retirez la petite partie de l’isolant à l’extrémité de chaque cordon en tordant et en tirant l’isolant. 2 Maintenez pressé le serre-câble de la prise d’enceinte comme montré sur l’illustration. 3 Insérez une extrémité du cordon d’enceinte dans la prise. Faire correspondre les polarités entre l’appareil et les prises d’enceinte: ª à ª et · à ·. 4 Relâchez les serre-fils.
Fonctionnement commun Français Réglage de l’horloge Pour ajuster de nouveau l’horloge Avant de continuer à utiliser l’appareil, réglez d’abord l’horloge intégrée à cet appareil. Quand vous branchez le cordon d’alimentation secteur sur une prise murale, “AM 12:00” clignote sur l’affichage. Vous pouvez régler l’horloge quand l’appareil est allumé ou éteint. • Il y a une durée limite pour réaliser les étapes suivantes. Si le réglage est annulé avant la fin, recommencez à partir de l’étape 1.
À suivre 1 Vous pouvez ajuster le niveau de volume uniquement quand l’appareil est sous tension. Vous pouvez régler le niveau du volume entre “VOL MIN” et “VOLUME 1” – “VOLUME 40 (VOL MAX)”. Sur la télécommande: Appuyez sur VOLUME + pour augmenter le volume ou appuyez sur VOLUME – pour le diminuer. Appuyer sur BASS pour ajuster le niveau des graves ou appuyer sur TREBLE pour ajuster le niveau des aigus.
Pour obtenir un son lourd (POUR LE FS-J60 UNIQUEMENT) Français Vous pouvez obtenir un son lourd. La fonction accentue les sons basses et hautes fréquences—Sound Turbo. Appuyez sur SOUND TURBO. • Chaque fois que vous appuyez sur la touche, la fonction Sound Turbo est mise alternativement en et hors service. Quand elle est en service, l’indicateur BASS s’allume sur l’affichage.
Écoute d’émissions FM et AM 1 Appuyez sur FM/AM pour choisir la gamme. Préréglage des stations FM/AM L’appareil se met automatiquement sous tension et accorde la dernière station— accordée FM ou AM. • Chaque fois que vous appuyez sur la touche, la bande alterne entre FM et AM. 2 Vous pouvez prérégler 30 stations FM et 15 stations AM. Dans certains cas, des tests de fréquences ont déjà été mémorisés dans le tuner lors de la vérification de la fonction de préréglage avant l’expédition.
Accord d’une station préréglée Sur la télécommande UNIQUEMENT: Français 1 Appuyez sur FM/AM pour choisir la gamme. FM/AM L’appareil se met automatiquement sous tension et accorde la dernière station —accordée FM ou AM. • Chaque fois que vous appuyez sur la touche, la bande alterne entre FM et AM. 2 UP Appuyez sur UP ou DOWN pour choisir un numéro de préréglage.
Lecture de Disques Lors de la reproduction d’un CD-R ou d’un CD-RW Les CD-R (enregistrables) et les CD-RW (réinscriptibles) édités par l’utilisateur peuvent être reproduits uniquement s’ils ont déjà été “finalisés”. • Normalement, vous pouvez reproduire vos CD-R ou CDRW originaux enregistrés au format de CD musical. Cependant, il se peut que certains ne puissent pas être reproduits en fonction de leurs caractéristiques ou des conditions d’enregistrement.
Fonctionnement de base de la platine disque 2 Français PRGM ST Pour arrêter la lecture momentanément CD Pour reprendre la lecture, appuyez de nouveau sur CD 3/8. • Si un programme a été mémorisé, ce programme est rappelé. 3 Appuyez sur UP ou DOWN pour choisir le numéro de plage, puis appuyez sur SET. • Il est possible de choisir directement les numéros de plage en utilisant les touches numériques. (Voir “Pour aller directement à une autre plage en utilisant les touches numériques”).
Sur la télécommande UNIQUEMENT: CANCEL Avant ou après de commencer la lecture, vous pouvez effacer la dernière plage programmée en appuyant sur la touche CANCEL. • Chaque fois que vous appuyez sur la touche, la dernière plage programmée est effacée du programme. Pour ajouter des plages dans un programme avant la reproduction, choisissez simplement les numéros de plage que vous souhaitez ajouter en suivant l’étape 3 de la procédure de programmation.
Lecture de cassettes Vous pouvez reproduire des cassettes de type I. Pour arrêter la lecture en cours, appuyez sur 7. Français Lecture d’une cassette 1 Appuyez sur PUSH OPEN 0 sur l’appareil. PUSH OPEN Pour bobiner rapidement vers la gauche ou vers la droite, appuyez sur ¢ ou 4 quand la bande est à l’arrêt. L’indicateur de sens de la bande (3 ou 2) clignote rapidement sur l’affichage. Pour retirer la cassette, appuyez sur PUSH OPEN 0 sur l’appareil.
Enregistrement À suivre Enregistrement sur une cassette • Il peut être illégal d’enregistrer ou de reproduire des matériaux protégés par des droits d’auteur sans l’autorisation du propriétaire des droits. • Le niveau d’enregistrement est réglé correctement automatiquement et il n’est pas affecté par les autres réglages sonores. Alors, vous pouvez ajuster le son que vous êtes en train d’écouter, pendant un enregistrement, sans affecter le niveau d’enregistrement.
Français Enregistrement direct de disque Enregistrement d’une plage Tout le contenu du disque est enregistré sur la cassette dans l’ordre du disque, ou en fonction de l’ordre réglé pour la lecture programmée. Cette méthode d’enregistrement est pratique pour l’enregistrement des plages d’un disque pendant la lecture de ce disque. Vous pouvez de cette façon enregistrer vos morceaux favoris sur une cassette.
Utilisation des minuteries 2 Réglez l’heure à laquelle vous souhaitez que l’appareil se mette sous tension. 1) Appuyez sur UP ou DOWN pour régler les heures, puis appuyez sur CLOCK/TIMER. 2) Appuyez sur UP ou DOWN pour régler les minutes, puis appuyez sur CLOCK/TIMER. L’appareil entre en mode de réglage de l’heure de fin. Utilisation de la minuterie quotidienne et d’enregistrement UP CLOCK /TIMER Vous pouvez régler la minuterie que l’appareil soit sous ou hors tension.
5 Appuyer sur UP ou DOWN pour régler le niveau de volume puis appuyer sur CLOCK/TIMER. Français • Vous pouvez choisir le niveau de volume (“VOLUME – –” et “VOLUME 0” à “VOLUME 40”). Si vous choisissez “VOLUME – –”, le volume est réglé sur le dernier niveau de volume réglé avant la mise hors tension de l’appareil. • Pour couper le son pendant qu’un enregistrement par minuterie (REC TUNER) est en cours, réglez le niveau de volume sur “VOLUME 0”. L’appareil entre en mode de réglage de l’horloge.
Entretien Nettoyage de l’appareil Manipulation des cassettes • Taches sur l’appareil Elles doivent être enlevées avec un chiffon doux. Si l’appareil est très taché, essuyez-le avec un chiffon humidifié avec une solution détergente neutre diluée dans l’eau et frottez ensuite avec un chiffon sec. • Si la bande est lâche dans la cassette, retirez le mou en insérant un stylo dans l’une des bobines et en tournant. • Si la bande est lâche, elle peut être étirée, coupée ou se prendre dans la cassette.
Guide de dépannage Français Si vous rencontrez des problèmes avec cet appareil, consultez cette liste avant d’appeler un réparateur. Si vous ne pouvez pas résoudre le problème avec les conseils donnés ci-dessous, ou si l’appareil a été endommagé physiquement, appelez une personne qualifiée, telle que votre revendeur, pour faire réparer l’appareil. Symptôme Cause Action Aucun son n’est entendu. • Les connexions sont incorrectes ou lâches. • Le casque d’écoute est branché.
La conception et les spécifications sont sujettes à changement sans notification. FS-J60 (CA-FSJ60 et SP-UXJ60) FS-J50 (CA-FSJ50 et SP-UXJ50) Amplificateur Amplificateur Puissance de sortie: SUBWOOFERS: 60 W par canal, min. efficace, les deux canaux entraînés sur 6 Ω à 1 kHz avec moins de 10% de distorsion harmonique totale. 90 W (45 W + 45 W) à 6 Ω (10% THD) MAIN SPEAKERS: 18 W par canal, min. efficace, les deux canaux entraînés sur 6 Ω à 1 kHz avec moins de 10% de distorsion harmonique totale.
VICTOR COMPANY OF JAPAN, LIMITED 0203MWMMDWJEM EN, FR © 2003 VICTOR COMPANY OF JAPAN, LIMITED Cover_FS-J60&50[C]f.pm6 2 03.1.