English MICRO COMPONENT SYSTEM UX-S77 —Consists of CA-UXS77 and SP-UXS77 — CA-UXS77 SP-UXS77 D I G I T A L INSTRUCTIONS GVT0131-010A [US/UN]
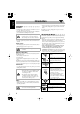
Warnings, Cautions and Others CAUTION—STANDBY/ON button! Disconnect the mains plug to shut the power off completely (all lamps and indications go off). The STANDBY/ON button in any position does not disconnect the mains line. • When the unit is on standby, the STANDBY/ON lamp lights in red. • When the unit is turned on, the STANDBY/ON lamp lights in green. The power can be remote controlled. CAUTION To reduce the risk of electrical shocks, fire, etc.: 1. Do not remove screws, covers or cabinet. 2.
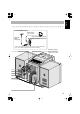
Caution: Proper Ventilation To avoid risk of electric shock and fire, and to prevent damage, locate the apparatus as follows 1. Front:No obstructions and open spacing. 2. Sides/ Top/ Back:No obstructions should be placed in the areas shown by the dimensions below. 3. Bottom:Place on the level surface. Maintain an adequate air path for ventilation by placing on a stand with a height of 10 cm or more.
IMPORTANT FOR LASER PRODUCTS 1. CLASS 1 LASER PRODUCT 2. CAUTION: Do not open the top cover. There are no user serviceable parts inside the Unit; leave all servicing to qualified service personnel. 3. CAUTION: Visible and invisible laser radiation when open and interlock failed or defeated. Avoid direct exposure to beam. 4. REPRODUCTION OF LABEL: CAUTION LABEL, PLACED INSIDE UNIT.
Introduction ............................................................ 2 Advanced Tape Operations .................................32 Precautions ..........................................................................2 How to Read This Manual ..................................................2 Recording on a Tape .........................................................32 Synchronized Disc Recording...........................................33 Getting Started ......................................
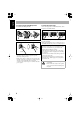
English Introduction Precautions Installation • Install in a place which is level, dry and neither too hot nor too cold—between 5°C and 35°C. • Install the System in a location with adequate ventilation to prevent internal heat buildup in the System. DO NOT install the System in a location near heat sources, or in a place subject to direct sunlight, excessive dust or vibration. • Leave sufficient distance between the System and the TV. • Keep the speakers away from the TV to avoid interference with TV.
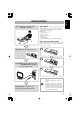
Step 1:Unpack the package and check the accessories. English Getting Started Step 1: Unpack After unpacking, check to be sure that you have all the following items. The number in parentheses indicates the quantity of each piece supplied. • FM antenna (1) • AM loop antenna (1) • Remote control (1) • Composite video cord (1) • Batteries (2) • AC plug adaptor (1) If any item is missing, consult your dealer immediately.
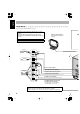
English Step 3: Hook Up If you need more detailed information, see page 6. Illustrations of the input/output terminals below are typical examples. When you connect other components, refer also to their manuals since the terminal names actually printed on the rear may vary. AM loop antenna (supplied) Turn it until the best reception is obtained. Turn the power off to all components before connections. VCR, etc.
English For better FM/AM reception AM loop antenna Keep it connected. Vynile-covered wire (not supplied) Outdoor FM antenna (not supplied) Extend it horizontally. Disconnect the supplied FM antenna, and connect to an outdoor FM antenna using a 75 Ω wire with coaxial type connector (IEC or DIN45325). FM antenna (supplied) Extend it so that you can obtain the best reception.
English To assemble and connect the AM loop antenna To connect the speaker cords To assemble the AM loop antenna Connect the right speaker to the RIGHT terminals, and the left speaker to the LEFT terminals. 1 Open To connect the AM loop antenna 1 Hold 3 Release 2 Insert • If the AM loop antenna wire or speaker cords are covered with vinyl, remove the vinyl to expose the tip of the antenna by twisting the vinyl.
English To connect the AV COMPU LINK cords Adjusting the Voltage Selector This system allows you to use JVC’s TV with simple operations; by starting playing back a disc, the TV automatically turns on and changes the input mode to the appropriate position so that you can view the playback picture.
English Before Operating the System DVD Video—digital audio formats Playable Disc Types This unit has been designed to play back the following discs: Disc Type Mark (Logo) Video Format DVD Video 3 or ALL DVD Audio Video CD (VCD) Super Video CD (SVCD) Region Code* Number NTSC or PAL DIGITAL VIDEO SUPER VIDEO COMPACT Audio CD DIGITAL AUDIO CD-R CD-RW DVD-R DVD-RW The System can play back CD-R or CD-RW recorded in the Audio CD, Video CD, SVCD, MP3, WMA, and JPEG formats.
English Parts Index Refer to the pages to see how to use the buttons and controls.
English Display Indicators The indications on the display teach you a lot of things while you are operating the System. Before operating the System, be familiar with when and how the indicator illuminates on the display. WMA MP3 1DISC REC ALL GR. SLEEP MONO 3D PHONIC ST PRGM RAND BONUS B.S.P 123 REC A.STANDBY 1 Disc tray indicators • 1-5: Disc tray number indicators. • (tray indicator): – Lights when the disc is detected. – Flashes while playing back a disc. – Goes off when there is no disc in the tray.
English Indications on the main display while operating a disc While playing back a disc: While disc play is stopped: • DVD Video: • DVD Video: Chapter no. Elapsed playing time Total title no. 1 2 3 4 5 1 2 3 4 5 • By pressing DISPLAY, you can show the current title and chapter numbers for a few seconds. • DVD Audio: • DVD Audio: Group no. Elapsed playing time Track no. 1 2 3 4 5 Track no. 1 2 3 4 5 • By pressing DISPLAY, you can show the current group and track numbers for a few seconds.
English Daily Operations—Playback 1 10 keys SET RETURN MENU 3D PHONIC TOP MENU , , , ENTER 2 DISC SELECT 8,7 1/¡ GROUP/TITLE 4/¢ 3 SHIFT FM/PLAY MODE, REV.MODE In this manual, the operation using the remote control is mainly explained; however, you can use the buttons and controls on the main unit if they have the same (or similar) name and marks. 1 Turn on the power. The STANDBY/ON lamp on the main unit lights in green.
English Listening to the Radio Remote ONLY To preset the stations To select the AM tuner interval spacing You can preset 30 FM and 15 AM stations. Some countries space AM stations 9 kHz spacing, and other countries use 10 kHz spacing. 1 Tune in to a station you want to preset. You can change the AM tuner intervals while the System is on stand by and the last selected source is AM. 2 • You can also store the monaural reception mode for FM preset stations if selected.
English Playing Back a Disc On-screen guide icons Before operating a disc, be familiar how a disc is recorded. • DVD Video comprises of “Titles” which includes “Chapters,” DVD Audio/MP3/WMA comprise of “Groups” which include “Tracks,” and CD/SVCD/VCD comprise of only “Tracks.” • For JPEG playback, see “Operations on the CONTROL Screen” on page 30. • During DVD Video playback, the following icons may appear on the TV screen: At the beginning of a scene containing multiaudio sounds.
Remote ONLY To locate a particular portion To play back using the disc menu While playing a disc except MP3/WMA... SLOW – English Remote ONLY x2 x5 x10 x20 x60 You can operate a disc—DVD and SVCD/VCD with Playback Control (PBC)—using the disc menu shown on the TV screen. x2 x5 x10 x20 x60 7 SLOW + • No sound comes out while searching on DVD Video/ SVCD/VCD. For DVD Video/DVD Audio: 1 Show the disc menu. TOP MENU MENU To return to normal playback, press DVD/CD 3.
English 7 For SVCD/VCD with PBC: While playing a disc with PBC, “PBC” appears on the display. When disc menu appears on the TV screen, select an item on the menu. Playback of the selected item starts. AUDIO SUB TITLE 1 2 ANGLE 3 ZOOM 4 VFP 7 6 5 3D PHONIC DVD LEVEL 8 PAGE - 9 PAGE + Playing Back a Tape To insert a tape You can play back type I tapes. Push Close With the tape side facing outside 10 10 Insert Examples: To select number 5, press 5.
English Daily Operations—Sound&Other Adjustments Adjusting the Volume Remote control You can adjust the volume level from level 0 (VOL MIN) to level 50 (VOL MAX). Main unit: Remote control: VOLUME VFP DVD LEVEL DISPLAY SET , , , ENTER VOLUME To drop the volume in a moment FADE MUTING SLEEP CLOCK/ TIMER BASS/ TREBLE SHIFT RHYTHM AX Remote ONLY To restore the volume, press again, or adjust the volume level. DIMMER A.
English Presetting Automatic DVD Sound Increase Remote ONLY Level You can dim the display window. The DVD sound is sometimes recorded at a lower level than for other discs and sources. You can set the increase level for the currently loaded DVD, so you do not have to adjust the volume every time you change the source. DVD LEVEL 9 NORMAL MIDDLE HIGH DIMMER NORMAL Original recording level. MIDDLE Output level is increased (less than “HIGH”). HIGH Output level is increased (more than “MIDDLE”).
Setting the Clock 1 Select “USER1” or “USER2.” 2 • Follow steps 1 and 2 explained on page 18. Select a parameter you want to adjust. ENTER English To adjust the picture tone Remote ONLY Without setting the built-in clock, you cannot use Daily Timers (see page 35) and Sleep Timer. • To exit from the clock setting, press CLOCK/TIMER as required. • To go back to the previous step, press CANCEL. 1 Activate the clock setting mode.
English Turning Off the Power Remote ONLY Automatically To turn off the unit after playback is over—Auto Standby On Canceled A.STANDBY When Auto Standby is in use, the A.STANDBY indicator lights on the display. When disc or tape play stops, the A.STANDBY indicator starts flashing. If no operation is done for about 3 minutes while the indicator is flashing, the System turns off (stands by) automatically.
Selecting the Sound Track Remote control SUB TITLE AUDIO ZOOM ANGLE 10 keys English Unique DVD/VCD Operations Remote ONLY For DVD Video: While playing back a chapter containing audio languages, you can select the language to listen to. For DVD Audio: While playing back a track containing audio channels, you can select the audio channel to listen to. For SVCD/VCD: When playing back a track, you can select the audio channel to play.
English Remote ONLY Selecting the Subtitle Language For DVD Video: While playing back a chapter containing subtitles in different languages, you can select the subtitle language to display on the TV screen. For SVCD: While playing, you can select the subtitles even if no subtitles are recorded on the disc. • You can also select the subtitle language using the onscreen bar (see page 27).
Remote ONLY 2 Select slow motion speed. SLOW – While playing back a track (of DVD Audio) linked to browsable still pictures (BSP), you can select the still picture (turn the page) to be shown on the TV screen. • If a track is linked to browsable still pictures (BSP), they are usually shown in turn automatically during playback. • You can also select the page using the on-screen bar (see page 27). SLOW + Forward slow motion starts. Reverse slow motion* starts.
English Advanced Disc Operations Programming the Playing Order— Remote control Remote ONLY Program Play You can arrange the playing order of the chapters or tracks (up to 99) before you start playback. 1 10 keys Before starting playback, activate Program Play.
Start playback. Playing at Random—Random Play Playback starts in the order you have programmed. DVD/CD To pause: Remote ONLY You can play the chapters or tracks of all loaded discs at random. • Random Play cannot be used for some DVDs. 1 To skip a step: English 4 To stop: Before starting playback, activate Random Play. FM/PLAY MODE GROUP/TITLE PROGRAM RANDOM Canceled To release, press DVD/CD 3. 1 2 3 4 5 RAND To check the programmed contents 2 Before or after playback...
English Remote ONLY Playing Repeatedly ALL Repeats all discs in all tray or all programmed tracks. • You can also select the repeat mode using the on-screen bar (see page 28). 1 Repeats the current chapter/track. Repeat Play GR. Repeats the current title/group. 1DISC Repeats the current disc. You can repeat playback. • For DVD Video: While playing... Canceled REPEAT A-B REPEAT 1 Canceled GR.
English On-Screen Disc Operations On-screen Bar Information Remote control You can check the disc information (except for MP3/WMA/ JPEG disc) and use some functions through the on-screen bar.
English Remote ONLY Operations Using the On-screen Bar For detailed operations of the following functions, see also “Operations Using the On-screen Bar” on the left. Ex.: Selecting a subtitle (French) for DVD Video: While a disc is selected as the source... Changing the time information 1 You can change the time information in the on-screen bar and the display window on the main unit. Display the on-screen bar with the pull-down menu. ON SCREEN 1 Display the on-screen bar with the pull-down menu.
English Time Search 4 Select the repeat mode you want. ALL Repeats all discs or all programmed track. You can move to a particular point by specifying the elapsed playing time from the beginning. A-B Repeats a desired portion (see next column). TITLE Repeats the current title. GROUP Repeats the current group. DISC Repeats the disc (except for DVD). 1 While playing (without PBC for SVCD/VCD), display the on-screen bar with the pull-down menu.
English 4 Enter the desired chapter/track number. AUDIO SUB TITLE ANGLE 1 2 3 ZOOM 4 VFP 7 6 5 3D PHONIC DVD LEVEL 8 PROGRESSIVE 0 9 Examples: To select chapter/track 5, press 5. To select chapter/track 15, press 1, then 5. To select chapter/track 30, press 3, then 0. • To correct a misentry, press the 10 keys until the desired number shown in the pop-up window. 5 Finish the setting. ENTER The System starts playing the searched chapter or track.
Moves the bar to the track list. English To move the highlight bar between group list and track list To repeat slide-show for JPEG While playing or before starting playback... REPEAT A-B REPEAT GR. 1DISC Canceled ALL Moves the bar to the group list. To select a group/track in the list Move the highlight bar to a desired item. • If you move the highlight bar while playing back an MP3/ WMA disc, the selected track starts playback automatically. GR. Repeats the current group.
English Advanced Tape Operations IMPORTANT It may be unlawful to record or play back copyrighted material without the consent of the copyright owner. Remote control Recording on a Tape You can use type I tapes for recording. • To play a tape, see page 16. 1 Insert a recordable cassette. Push DVD/CD3 DISC SELECT Insert Close TAPE 23 FM/AM/AUX 7 DISC REC MODE With the tape side facing outside REV.MODE SHIFT 2 Check the tape running direction and Reverse mode settings on the display.
4 Select and start playing the source—“FM,” “AM,” “DVD/CD,” or “AUX.” • When recording a disc, you can also use “Synchronized Disc Recording” (see below). 4 Select the Recording mode. DISC REC MODE ONE DISC Canceled On the main unit To stop recording: ONE DISC Records the entire disc. ALL DISC Records the all loaded discs continuously (except for DVD Video/DVD Audio). 1ST TRK Records the first track of each disc (only for SVCD/VCD/CD).
English To record only your favorite track You can specify tracks to be recorded on the tape while listening to a disc. • This function is not available for DVD Video. 1 Start playing a disc. DVD/CD 2 While a track you want to record on the tape is playing... REC On the main unit 3 The disc player returns to the beginning of that track and the track is recorded on the tape. After recording the track, the disc player and cassette deck automatically stop.
Setting the Timer Remote control STANDBY/ ON SET CANCEL English Timer Operations Remote ONLY Using Daily Timer, you can wake up with your favorite music. On the other hand, with Recording Timer, you can make a tape of a radio broadcast automatically. • You can store three Daily Timer settings and one Recording Timer setting; however, you can activate only one of Daily Timers or Recording Timer at the same time. • To exit from the timer setting, press CLOCK/TIMER as required.
English 3 For Daily Timers: Select the playback source— “TUNER FM,” “TUNER AM,” “TAPE,” “DISC” or “AUX.” 1 2 3 4 5 How Recording Timer actually works When Recording Timer has been set, Timer ( ) indicator and the REC indicator are lit on the display. Recording Timer works only once. 1 3 For Recording Timer: Select the playback source—“TUNER FM,”“TUNER AM” or “AUX.” 4 For “TUNER FM” and “TUNER AM”: Select a preset channel.
English Setup Menu Operations . Operating Procedure Remote control Remote ONLY You can use the Setup Menus only when a disc is selected as the source and its playback is not yet started. Ex.: Selecting “STILL PICTURE” for “FILE TYPE”: 1 Display the Setup Menu. SET UP 10 keys MENU LANGUAGE ENGLISH AUDIO LANGUAGE ENGLISH SUBTITLE ENGLISH ON SCREEN LANGUAGE ENGLISH SELECT , , , ENTER SET UP LANGUAGE ENTER 2 USE TO SELECT. USE ENTER TO CONFIRM TO EXIT, PRESS [SET UP] .
English 6 7 PICTURE Setup Menu You can select the desired options concerning a picture or monitor screen. Finish the setting. ENTER 7 PICTURE Repeat steps 3 to 4 to set other items on the same Setup Menu. Repeat steps 2 to 4 to set other items on another Setup Menu. MONITOR TYPE 4:3 LB PICTURE SOURCE AUTO SCREEN SAVER ON FILE TYPE AUDIO SELECT ENTER To erase the Setup Menu USE TO SELECT. USE ENTER TO CONFIRM TO EXIT, PRESS [ SET UP ] .
7 AUDIO Setup Menu You can adjust the sound settings of the System. AUDIO Select one of the following: AUTO: Normally select this. When playing back a disc containing both video and film sources, the System automatically changes the processing to match it to the picture type (film or video source) of the current chapter. FILM: English PICTURE SOURCE You can obtain optimal picture quality by selecting an appropriate option—picture source type (either video source or film source).
English D. RANGE COMPRESSION AV COMPULINK MODE You can compress the dynamic range (the difference between the loudest sound and the softest sound) to enjoy a powerful sound even at a low volume level when listening to Dolby Digital software. This is useful at night. • The effectiveness varies depends on a software. When connecting the System to a JVC’s TV with the AV COMPU LINK remote control system, select the proper setting.
—Parental Lock Select “COUNTRY CODE,” then display the pop-up window. Remote ONLY PARENTAL LOCK ENTER You can restrict playback of DVD Video containing violent scenes and those unsuitable for your family members. Once you have set the rating level, such violent scenes (for which a higher level than you set is assigned) may be skipped or changed to another scene (depending on how the disc is programmed). _NA ___ SELECT ENTER 6 To set Parental Lock USE TO SELECT.
English To change the setting To release Parental Lock temporarily 1 When you set a strict rating level, some discs may not be played back at all. When you try to play such a disc, the following screen appears on the TV. Display the PARENTAL LOCK sub menu. • Follow steps 1 to 4 of “To set Parental Lock”. PARENTAL LOCK COUNTRY CODE MY SET LEVEL 4 PASSWORD ____ PARENTAL LOCK TEMPORARY RELEASE EXIT NOT RELEASE ____ PASSWORD SELECT PASSWORD? ••• PRESS 0 ~ 9 KEY TO EXIT, PRESS [SET UP].
Learning More about This System Getting Started (see pages 3 to 7) Changing the Scanning Mode: • To enjoy the progressive video picture, connect a TV with the progressive video input using component video cord. Before Operating the System (see pages 8 to 11) Playable Disc Types: • If you play back an NTSC disc with this setting set to “PAL,” you can watch the playback pictures (the disc will be reproduced using “PAL 60” format), but the TV screen may roll over upward and downward rapidly.
English • You cannot use Program Play and Random Play for JPEG discs. • You cannot eject tray while in Program Play. Playing at Random—Random Play: • The 4 button does not work for skipping chapters or tracks, but only work for going back to the beginning of the current chapter or track. On-Screen Disc Operations (see pages 27 to 31) • For JPEG files playback... – It is recommended that you record a file at 640 x 480 resolution.
English Maintenance To remove the speaker grilles To get the best performance of the System, keep your discs and mechanism clean. Handling discs • When removing the disc from its case, hold it at the edge while pressing the center hole lightly. • Do not touch the shiny surface of the disc, or bend the disc. • Put the disc back in its case after use to prevent warping. • Be careful not to scratch the surface of the disc. • Avoid exposure to direct sunlight, temperature extremes, and moisture.
English Troubleshooting If you are having a problem with your System, check this list for a possible solution before calling for service. General: Adjustments or settings are suddenly canceled before you finish. ] There is a time limit. Repeat the procedure again. Operations are disabled. ] The built-in microprocessor may malfunction due to external electrical interference. Unplug the AC power cord and then plug it back in. Unable to operate the System from the remote control.
English Language Code List AA AB AF AM AR AS AY AZ BA BE BG BH BI BN BO BR CA CO CS CY DA DZ EL EO ET EU FA FI FJ FO FY GA GD GL GN GU HA HI HR HU HY IA IE IK IN IS IW JI Afar Abkhazian Afrikaans Ameharic Arabic Assamese Aymara Azerbaijani Bashkir Byelorussian Bulgarian Bihari Bislama Bengali, Bangla Tibetan Breton Catalan Corsican Czech Welsh Danish Bhutani Greek Esperanto Estonian Basque Persian Finnish Fiji Faroese Frisian Irish Scots Gaelic Galician Guarani Gujarati Hausa Hindi Croatian Hungarian Arme
English Country/Area Codes List √ AD AE AF AG AI AL AM AN AO AQ AR AS AT AU AW AZ BA BB BD BE BF BG BH BI BJ BM BN BO BR BS BT BV BW BY BZ CA CC CF CG CH CI CK CL CM CN CO CR CU CV CX CY CZ DE DJ 48 Andorra United Arab Emirates Afghanistan Antigua and Barbuda Anguilla Albania Armenia Netherlands Antilles Angola Antarctica Argentina American Samoa Austria Australia Aruba Azerbaijan Bosnia and Herzegovina Barbados Bangladesh Belgium Burkina Faso Bulgaria Bahrain Burundi Benin Bermuda Brunei Darussalam Bol
Nepal Nauru Niue New Zealand Oman Panama Peru French Polynesia Papua New Guinea Philippines Pakistan Poland Saint Pierre and Miquelon Pitcairn Puerto Rico Portugal Palau Paraguay Qatar Réunion Romania Russian Federation Rwanda Saudi Arabia Solomon Islands Seychelles Sudan SE SG SH SI SJ SK SL SM SN SO SR ST SV SY SZ TC TD TF TG TH TJ TK TM TN TO TP TR Sweden Singapore Saint Helena Slovenia Svalbard and Jan Mayen Slovakia Sierra Leone San Marino Senegal Somalia Suriname Sao Tome and Principe El Salvador Sy
English General Specifications Power requirement: Amplifier section Output Power: HIGH: LOW: 40 W (20 W+ 20 W) at 4 Ω (10% THD) 50 W (25 W+ 25 W) at 4 Ω (10% MAX) 40 W (20 W+ 20 W) at 4 Ω (10% THD) 50 W (25 W+ 25 W) at 4 Ω (10% MAX) Analog input: AUX: Sensitivity/Impedance (at 1 kHz) 400 mV/47 kΩ (at “AUX LEVEL 1”) 200 mV/47 kΩ (at “AUX LEVEL 2”) Digital output: DVD OPTICAL DIGITAL OUT: –21 dBm to –15 dBm (660 nm ±30 nm) VIDEO OUT: Color system:NTSC/PAL selectable VIDEO (composite): 1 V(p-p)/75 Ω S-
Mains (AC) Line Instruction (not applicable for Europe, U.S.A., Canada, Australia, and U.K.
English SISTEMAS DE MICROCOMPONENTES SISTEMA DE MICRO COMPONENTES UX-S77 —Consists of CA-UXS77 and SP-UXS77 Português Español MICRO COMPONENT SYSTEM D I G I T A L INSTRUCTIONS MANUAL DE INSTRUCCIONES INSTRUÇÕES GVT0131-004A [UW]
Warnings, Cautions and Others Avisos, precauciones y otras notas Advertências, precauções e outras notas CAUTION—STANDBY/ON CUIDADO—botão STANDBY/ON button! Disconnect the mains plug to shut the power off completely (all lamps and indications go off). The STANDBY/ON button in any position does not disconnect the mains line. • When the unit is on standby, the STANDBY/ON lamp lights in red. • When the unit is turned on, the STANDBY/ON lamp lights in green. The power can be remote controlled.
CAUTION: Proper Ventilation To avoid risk of electric shock and fire, and to prevent damage, locate the apparatus as follows: 1. Front: No obstructions and open spacing. 2. Sides/ Top/ Back: No obstructions should be placed in the areas shown by the dimensions below. 3. Bottom: Place on a level surface. Maintain an adequate air path for ventilation by placing on a stand with a height of 10 cm or more.
IMPORTANT FOR LASER PRODUCTS 1. CLASS 1 LASER PRODUCT 2. CAUTION: Do not open the top cover. There are no user serviceable parts inside the unit; leave all servicing to qualified service personnel. 3. CAUTION: Visible and invisible laser radiation when open and interlock failed or defeated. Avoid direct exposure to beam. 4. REPRODUCTION OF LABEL: CAUTION LABEL, PLACED INSIDE UNIT. IMPORTANTE PARA PRODUCTOS LÁSER 1. PRODUCTO LÁSER CLASE 1 2. PRECAUCIÓN: No abra la tapa superior.
Introduction ............................................................ 2 Advanced Tape Operations .................................32 Precautions ..........................................................................2 How to Read This Manual ..................................................2 Recording on a Tape .........................................................32 Synchronized Disc Recording...........................................33 Getting Started ......................................
English Introduction Precautions Installation • Install in a place which is level, dry and neither too hot nor too cold—between 5°C and 35°C. • Install the System in a location with adequate ventilation to prevent internal heat buildup in the System. DO NOT install the System in a location near heat sources, or in a place subject to direct sunlight, excessive dust or vibration. • Leave sufficient distance between the System and the TV. • Keep the speakers away from the TV to avoid interference with TV.
Step 1:Unpack the package and check the accessories. English Getting Started Step 1: Unpack After unpacking, check to be sure that you have all the following items. The number in parentheses indicates the quantity of each piece supplied. • FM antenna (1) • AM loop antenna (1) • Remote control (1) • Composite video cord (1) • Batteries (2) • AC plug adaptor (1) If any item is missing, consult your dealer immediately.
English Step 3: Hook Up If you need more detailed information, see page 6. Illustrations of the input/output terminals below are typical examples. When you connect other components, refer also to their manuals since the terminal names actually printed on the rear may vary. AM loop antenna (supplied) Turn it until the best reception is obtained. Turn the power off to all components before connections. VCR, etc.
English For better FM/AM reception AM loop antenna Keep it connected. Vynile-covered wire (not supplied) Outdoor FM antenna (not supplied) Extend it horizontally. Disconnect the supplied FM antenna, and connect to an outdoor FM antenna using a 75 Ω wire with coaxial type connector (IEC or DIN45325). FM antenna (supplied) Extend it so that you can obtain the best reception.
English To assemble and connect the AM loop antenna To connect the speaker cords To assemble the AM loop antenna Connect the right speaker to the RIGHT terminals, and the left speaker to the LEFT terminals. 1 Open To connect the AM loop antenna 1 Hold 3 Release 2 Insert • If the AM loop antenna wire or speaker cords are covered with vinyl, remove the vinyl to expose the tip of the antenna by twisting the vinyl.
English To connect the AV COMPU LINK cords Adjusting the Voltage Selector This system allows you to use JVC’s TV with simple operations; by starting playing back a disc, the TV automatically turns on and changes the input mode to the appropriate position so that you can view the playback picture.
English Before Operating the System DVD Video—digital audio formats Playable Disc Types This unit has been designed to play back the following discs: Disc Type Mark (Logo) Video Format DVD Video 4 or ALL DVD Audio Video CD (VCD) Super Video CD (SVCD) Region Code* Number NTSC or PAL DIGITAL VIDEO SUPER VIDEO COMPACT Audio CD DIGITAL AUDIO CD-R CD-RW DVD-R DVD-RW The System can play back CD-R or CD-RW recorded in the Audio CD, Video CD, SVCD, MP3, WMA, and JPEG formats.
English Parts Index Refer to the pages to see how to use the buttons and controls.
English Display Indicators The indications on the display teach you a lot of things while you are operating the System. Before operating the System, be familiar with when and how the indicator illuminates on the display. WMA MP3 1DISC REC ALL GR. SLEEP MONO 3D PHONIC ST PRGM RAND BONUS B.S.P 123 REC A.STANDBY 1 Disc tray indicators • 1-5: Disc tray number indicators. • (tray indicator): – Lights when the disc is detected. – Flashes while playing back a disc. – Goes off when there is no disc in the tray.
English Indications on the main display while operating a disc While playing back a disc: While disc play is stopped: • DVD Video: • DVD Video: Chapter no. Elapsed playing time Total title no. 1 2 3 4 5 1 2 3 4 5 • By pressing DISPLAY, you can show the current title and chapter numbers for a few seconds. • DVD Audio: • DVD Audio: Group no. Elapsed playing time Track no. 1 2 3 4 5 Track no. 1 2 3 4 5 • By pressing DISPLAY, you can show the current group and track numbers for a few seconds.
English Daily Operations—Playback 1 10 keys SET RETURN MENU 3D PHONIC TOP MENU , , , ENTER 2 DISC SELECT 8,7 1/¡ GROUP/TITLE 4/¢ 3 SHIFT FM/PLAY MODE, REV.MODE In this manual, the operation using the remote control is mainly explained; however, you can use the buttons and controls on the main unit if they have the same (or similar) name and marks. 1 Turn on the power. The STANDBY/ON lamp on the main unit lights in green.
English Listening to the Radio Remote ONLY To preset the stations To select the AM tuner interval spacing You can preset 30 FM and 15 AM stations. Some countries space AM stations 9 kHz spacing, and other countries use 10 kHz spacing. 1 Tune in to a station you want to preset. You can change the AM tuner intervals while the System is on stand by and the last selected source is AM. 2 • You can also store the monaural reception mode for FM preset stations if selected.
English Playing Back a Disc On-screen guide icons Before operating a disc, be familiar how a disc is recorded. • DVD Video comprises of “Titles” which includes “Chapters,” DVD Audio/MP3/WMA comprise of “Groups” which include “Tracks,” and CD/SVCD/VCD comprise of only “Tracks.” • For JPEG playback, see “Operations on the CONTROL Screen” on page 30. • During DVD Video playback, the following icons may appear on the TV screen: At the beginning of a scene containing multiaudio sounds.
Remote ONLY To locate a particular portion To play back using the disc menu While playing a disc except MP3/WMA... SLOW – English Remote ONLY x2 x5 x10 x20 x60 You can operate a disc—DVD and SVCD/VCD with Playback Control (PBC)—using the disc menu shown on the TV screen. x2 x5 x10 x20 x60 7 SLOW + • No sound comes out while searching on DVD Video/ SVCD/VCD. For DVD Video/DVD Audio: 1 Show the disc menu. TOP MENU MENU To return to normal playback, press DVD/CD 3.
English 7 For SVCD/VCD with PBC: While playing a disc with PBC, “PBC” appears on the display. When disc menu appears on the TV screen, select an item on the menu. Playback of the selected item starts. AUDIO SUB TITLE 1 2 ANGLE 3 ZOOM 4 VFP 7 6 5 3D PHONIC DVD LEVEL 8 PAGE - 9 PAGE + Playing Back a Tape To insert a tape You can play back type I tapes. Push Close With the tape side facing outside 10 10 Insert Examples: To select number 5, press 5.
English Daily Operations—Sound&Other Adjustments Adjusting the Volume Remote control You can adjust the volume level from level 0 (VOL MIN) to level 50 (VOL MAX). Main unit: Remote control: VOLUME VFP DVD LEVEL DISPLAY SET , , , ENTER VOLUME To drop the volume in a moment FADE MUTING SLEEP CLOCK/ TIMER BASS/ TREBLE SHIFT RHYTHM AX Remote ONLY To restore the volume, press again, or adjust the volume level. DIMMER A.
English Presetting Automatic DVD Sound Increase Remote ONLY Level You can dim the display window. The DVD sound is sometimes recorded at a lower level than for other discs and sources. You can set the increase level for the currently loaded DVD, so you do not have to adjust the volume every time you change the source. DVD LEVEL 9 NORMAL MIDDLE HIGH DIMMER NORMAL Original recording level. MIDDLE Output level is increased (less than “HIGH”). HIGH Output level is increased (more than “MIDDLE”).
Setting the Clock 1 Select “USER1” or “USER2.” 2 • Follow steps 1 and 2 explained on page 18. Select a parameter you want to adjust. ENTER English To adjust the picture tone Remote ONLY Without setting the built-in clock, you cannot use Daily Timers (see page 35) and Sleep Timer. • To exit from the clock setting, press CLOCK/TIMER as required. • To go back to the previous step, press CANCEL. 1 Activate the clock setting mode.
English Turning Off the Power Remote ONLY Automatically To turn off the unit after playback is over—Auto Standby On Canceled A.STANDBY When Auto Standby is in use, the A.STANDBY indicator lights on the display. When disc or tape play stops, the A.STANDBY indicator starts flashing. If no operation is done for about 3 minutes while the indicator is flashing, the System turns off (stands by) automatically.
Selecting the Sound Track Remote control SUB TITLE AUDIO ZOOM ANGLE 10 keys English Unique DVD/VCD Operations Remote ONLY For DVD Video: While playing back a chapter containing audio languages, you can select the language to listen to. For DVD Audio: While playing back a track containing audio channels, you can select the audio channel to listen to. For SVCD/VCD: When playing back a track, you can select the audio channel to play.
English Remote ONLY Selecting the Subtitle Language For DVD Video: While playing back a chapter containing subtitles in different languages, you can select the subtitle language to display on the TV screen. For SVCD: While playing, you can select the subtitles even if no subtitles are recorded on the disc. • You can also select the subtitle language using the onscreen bar (see page 27).
Remote ONLY 2 Select slow motion speed. SLOW – While playing back a track (of DVD Audio) linked to browsable still pictures (BSP), you can select the still picture (turn the page) to be shown on the TV screen. • If a track is linked to browsable still pictures (BSP), they are usually shown in turn automatically during playback. • You can also select the page using the on-screen bar (see page 27). SLOW + Forward slow motion starts. Reverse slow motion* starts.
English Advanced Disc Operations Programming the Playing Order— Remote control Remote ONLY Program Play You can arrange the playing order of the chapters or tracks (up to 99) before you start playback. 1 10 keys Before starting playback, activate Program Play.
Start playback. Playing at Random—Random Play Playback starts in the order you have programmed. DVD/CD To pause: Remote ONLY You can play the chapters or tracks of all loaded discs at random. • Random Play cannot be used for some DVDs. 1 To skip a step: English 4 To stop: Before starting playback, activate Random Play. FM/PLAY MODE GROUP/TITLE PROGRAM RANDOM Canceled To release, press DVD/CD 3. 1 2 3 4 5 RAND To check the programmed contents 2 Before or after playback...
English Remote ONLY Playing Repeatedly ALL • You can also select the repeat mode using the on-screen bar (see page 28). Repeats all discs in all tray or all programmed tracks. 1 Repeats the current chapter/track. Repeat Play GR. Repeats the current title/group. 1DISC Repeats the current disc. You can repeat playback. • For DVD Video: While playing... Canceled REPEAT A-B REPEAT 1 Canceled GR.
English On-Screen Disc Operations On-screen Bar Information Remote control You can check the disc information (except for MP3/WMA/ JPEG disc) and use some functions through the on-screen bar.
English Remote ONLY Operations Using the On-screen Bar For detailed operations of the following functions, see also “Operations Using the On-screen Bar” on the left. Ex.: Selecting a subtitle (French) for DVD Video: While a disc is selected as the source... Changing the time information 1 You can change the time information in the on-screen bar and the display window on the main unit. Display the on-screen bar with the pull-down menu. ON SCREEN 1 Display the on-screen bar with the pull-down menu.
English Time Search 4 Select the repeat mode you want. ALL Repeats all discs or all programmed track. You can move to a particular point by specifying the elapsed playing time from the beginning. A-B Repeats a desired portion (see next column). 1 While playing (without PBC for SVCD/VCD), display the on-screen bar with the pull-down menu. • Except for DVD: Time Search can be used before starting playback. 2 Select . 3 Display the pop-up window. TITLE Repeats the current title.
English 4 Enter the desired chapter/track number. AUDIO SUB TITLE ANGLE 1 2 3 ZOOM 4 VFP 7 6 5 3D PHONIC DVD LEVEL 8 PROGRESSIVE 0 9 Examples: To select chapter/track 5, press 5. To select chapter/track 15, press 1, then 5. To select chapter/track 30, press 3, then 0. • To correct a misentry, press the 10 keys until the desired number shown in the pop-up window. 5 Finish the setting. ENTER The System starts playing the searched chapter or track.
Moves the bar to the track list. English To move the highlight bar between group list and track list To repeat slide-show for JPEG While playing or before starting playback... REPEAT A-B REPEAT GR. 1DISC Canceled ALL Moves the bar to the group list. To select a group/track in the list Move the highlight bar to a desired item. • If you move the highlight bar while playing back an MP3/ WMA disc, the selected track starts playback automatically. GR. Repeats the current group.
English Advanced Tape Operations IMPORTANT It may be unlawful to record or play back copyrighted material without the consent of the copyright owner. Remote control Recording on a Tape You can use type I tapes for recording. • To play a tape, see page 16. 1 Insert a recordable cassette. Push DVD/CD3 DISC SELECT Insert Close TAPE 23 FM/AM/AUX 7 DISC REC MODE With the tape side facing outside REV.MODE SHIFT 2 Check the tape running direction and Reverse mode settings on the display.
4 Select and start playing the source—“FM,” “AM,” “DVD/CD,” or “AUX.” • When recording a disc, you can also use “Synchronized Disc Recording” (see below). 4 Select the Recording mode. DISC REC MODE ONE DISC Canceled On the main unit To stop recording: ONE DISC Records the entire disc. ALL DISC Records the all loaded discs continuously (except for DVD Video/DVD Audio). 1ST TRK Records the first track of each disc (only for SVCD/VCD/CD).
English To record only your favorite track You can specify tracks to be recorded on the tape while listening to a disc. • This function is not available for DVD Video. 1 Start playing a disc. DVD/CD 2 While a track you want to record on the tape is playing... REC On the main unit 3 The disc player returns to the beginning of that track and the track is recorded on the tape. After recording the track, the disc player and cassette deck automatically stop.
Setting the Timer Remote control STANDBY/ ON SET CANCEL English Timer Operations Remote ONLY Using Daily Timer, you can wake up with your favorite music. On the other hand, with Recording Timer, you can make a tape of a radio broadcast automatically. • You can store three Daily Timer settings and one Recording Timer setting; however, you can activate only one of Daily Timers or Recording Timer at the same time. • To exit from the timer setting, press CLOCK/TIMER as required.
English 3 For Daily Timers: Select the playback source— “TUNER FM,” “TUNER AM,” “TAPE,” “DISC” or “AUX.” 1 2 3 4 5 How Recording Timer actually works When Recording Timer has been set, Timer ( ) indicator and the REC indicator are lit on the display. Recording Timer works only once. 1 3 For Recording Timer: Select the playback source—“TUNER FM,”“TUNER AM” or “AUX.” 4 For “TUNER FM” and “TUNER AM”: Select a preset channel.
English Setup Menu Operations . Operating Procedure Remote control Remote ONLY You can use the Setup Menus only when a disc is selected as the source and its playback is not yet started. Ex.: Selecting “STILL PICTURE” for “FILE TYPE”: 1 Display the Setup Menu. SET UP 10 keys MENU LANGUAGE ENGLISH AUDIO LANGUAGE ENGLISH SUBTITLE ENGLISH ON SCREEN LANGUAGE ENGLISH SELECT , , , ENTER SET UP LANGUAGE ENTER 2 USE TO SELECT. USE ENTER TO CONFIRM TO EXIT, PRESS [SET UP] .
English 6 7 PICTURE Setup Menu You can select the desired options concerning a picture or monitor screen. Finish the setting. ENTER 7 PICTURE Repeat steps 3 to 4 to set other items on the same Setup Menu. Repeat steps 2 to 4 to set other items on another Setup Menu. MONITOR TYPE 4:3 LB PICTURE SOURCE AUTO SCREEN SAVER ON FILE TYPE AUDIO SELECT ENTER To erase the Setup Menu USE TO SELECT. USE ENTER TO CONFIRM TO EXIT, PRESS [ SET UP ] .
7 AUDIO Setup Menu You can adjust the sound settings of the System. AUDIO Select one of the following: AUTO: Normally select this. When playing back a disc containing both video and film sources, the System automatically changes the processing to match it to the picture type (film or video source) of the current chapter. FILM: English PICTURE SOURCE You can obtain optimal picture quality by selecting an appropriate option—picture source type (either video source or film source).
English D. RANGE COMPRESSION AV COMPULINK MODE You can compress the dynamic range (the difference between the loudest sound and the softest sound) to enjoy a powerful sound even at a low volume level when listening to Dolby Digital software. This is useful at night. • The effectiveness varies depends on a software. When connecting the System to a JVC’s TV with the AV COMPU LINK remote control system, select the proper setting.
—Parental Lock Select “COUNTRY CODE,” then display the pop-up window. Remote ONLY PARENTAL LOCK ENTER You can restrict playback of DVD Video containing violent scenes and those unsuitable for your family members. Once you have set the rating level, such violent scenes (for which a higher level than you set is assigned) may be skipped or changed to another scene (depending on how the disc is programmed). _BR ___ SELECT ENTER 6 To set Parental Lock USE TO SELECT.
English To change the setting To release Parental Lock temporarily 1 When you set a strict rating level, some discs may not be played back at all. When you try to play such a disc, the following screen appears on the TV. Display the PARENTAL LOCK sub menu. • Follow steps 1 to 4 of “To set Parental Lock”. PARENTAL LOCK COUNTRY CODE BR SET LEVEL 4 PASSWORD ____ PARENTAL LOCK TEMPORARY RELEASE EXIT NOT RELEASE ____ PASSWORD SELECT PASSWORD? ••• PRESS 0 ~ 9 KEY TO EXIT, PRESS [SET UP].
Learning More about This System Getting Started (see pages 3 to 7) Changing the Scanning Mode: • To enjoy the progressive video picture, connect a TV with the progressive video input using component video cord. Before Operating the System (see pages 8 to 11) Playable Disc Types: • If you play back an NTSC disc with this setting set to “PAL,” you can watch the playback pictures (the disc will be reproduced using “PAL 60” format), but the TV screen may roll over upward and downward rapidly.
English • You cannot use Program Play and Random Play for JPEG discs. • You cannot eject tray while in Program Play. Playing at Random—Random Play: • The 4 button does not work for skipping chapters or tracks, but only work for going back to the beginning of the current chapter or track. On-Screen Disc Operations (see pages 27 to 31) • For JPEG files playback... – It is recommended that you record a file at 640 x 480 resolution.
English Maintenance To remove the speaker grilles To get the best performance of the System, keep your discs and mechanism clean. Handling discs • When removing the disc from its case, hold it at the edge while pressing the center hole lightly. • Do not touch the shiny surface of the disc, or bend the disc. • Put the disc back in its case after use to prevent warping. • Be careful not to scratch the surface of the disc. • Avoid exposure to direct sunlight, temperature extremes, and moisture.
English Troubleshooting If you are having a problem with your System, check this list for a possible solution before calling for service. General: Adjustments or settings are suddenly canceled before you finish. ] There is a time limit. Repeat the procedure again. Operations are disabled. ] The built-in microprocessor may malfunction due to external electrical interference. Unplug the AC power cord and then plug it back in. Unable to operate the System from the remote control.
English Language Code List AA AB AF AM AR AS AY AZ BA BE BG BH BI BN BO BR CA CO CS CY DA DZ EL EO ET EU FA FI FJ FO FY GA GD GL GN GU HA HI HR HU HY IA IE IK IN IS IW JI Afar Abkhazian Afrikaans Ameharic Arabic Assamese Aymara Azerbaijani Bashkir Byelorussian Bulgarian Bihari Bislama Bengali, Bangla Tibetan Breton Catalan Corsican Czech Welsh Danish Bhutani Greek Esperanto Estonian Basque Persian Finnish Fiji Faroese Frisian Irish Scots Gaelic Galician Guarani Gujarati Hausa Hindi Croatian Hungarian Arme
English Country/Area Codes List √ AD AE AF AG AI AL AM AN AO AQ AR AS AT AU AW AZ BA BB BD BE BF BG BH BI BJ BM BN BO BR BS BT BV BW BY BZ CA CC CF CG CH CI CK CL CM CN CO CR CU CV CX CY CZ DE DJ 48 Andorra United Arab Emirates Afghanistan Antigua and Barbuda Anguilla Albania Armenia Netherlands Antilles Angola Antarctica Argentina American Samoa Austria Australia Aruba Azerbaijan Bosnia and Herzegovina Barbados Bangladesh Belgium Burkina Faso Bulgaria Bahrain Burundi Benin Bermuda Brunei Darussalam Bol
Nepal Nauru Niue New Zealand Oman Panama Peru French Polynesia Papua New Guinea Philippines Pakistan Poland Saint Pierre and Miquelon Pitcairn Puerto Rico Portugal Palau Paraguay Qatar Réunion Romania Russian Federation Rwanda Saudi Arabia Solomon Islands Seychelles Sudan SE SG SH SI SJ SK SL SM SN SO SR ST SV SY SZ TC TD TF TG TH TJ TK TM TN TO TP TR Sweden Singapore Saint Helena Slovenia Svalbard and Jan Mayen Slovakia Sierra Leone San Marino Senegal Somalia Suriname Sao Tome and Principe El Salvador Sy
English General Specifications Power requirement: Amplifier section Output Power: HIGH: LOW: 40 W (20 W+ 20 W) at 4 Ω (10% THD) 50 W (25 W+ 25 W) at 4 Ω (10% MAX) 40 W (20 W+ 20 W) at 4 Ω (10% THD) 50 W (25 W+ 25 W) at 4 Ω (10% MAX) Analog input: AUX: Sensitivity/Impedance (at 1 kHz) 400 mV/47 kΩ (at “AUX LEVEL 1”) 200 mV/47 kΩ (at “AUX LEVEL 2”) Digital output: DVD OPTICAL DIGITAL OUT: –21 dBm to –15 dBm (660 nm ±30 nm) VIDEO OUT: Color system:NTSC/PAL selectable VIDEO (composite): 1 V(p-p)/75 Ω S-
Mains (AC) Line Instruction (not applicable for Europe, U.S.A., Canada, Australia, and U.K.) Instrucción sobre la línea de la red (CA) (no aplicable para Europa, EE.UU., Canadá, Australia, ni el Grã-Bretanha) Instrução sobre a tensão da rede eléctrica (CA) (não aplicável para a Europa, os E.U.A.
MICRO COMPONENT SYSTEM UX-S77 —Consists of CA-UXS77 and SP-UXS77 D I G I T A L INSTRUCTIONS GVT0131-003A [UJ]
Warnings, Cautions and Others CAUTION—STANDBY/ON button! Disconnect the mains plug to shut the power off completely (all lamps and indications go off). The STANDBY/ON button in any position does not disconnect the mains line. • When the unit is on standby, the STANDBY/ON lamp lights in red. • When the unit is turned on, the STANDBY/ON lamp lights in green. The power can be remote controlled. CAUTION To reduce the risk of electrical shocks, fire, etc.: 1. Do not remove screws, covers or cabinet. 2.
CAUTION: Proper Ventilation To avoid risk of electric shock and fire, and to prevent damage, locate the apparatus as follows: 1. Front: No obstructions and open spacing. 2. Sides/ Top/ Back: No obstructions should be placed in the areas shown by the dimensions below. 3. Bottom: Place on a level surface. Maintain an adequate air path for ventilation by placing on a stand with a height of 10 cm or more.
IMPORTANT FOR LASER PRODUCTS 1. CLASS 1 LASER PRODUCT 2. CAUTION: Do not open the top cover. There are no user serviceable parts inside the unit; leave all servicing to qualified service personnel. 3. CAUTION: Visible and invisible laser radiation when open and interlock failed or defeated. Avoid direct exposure to beam. 4. REPRODUCTION OF LABEL: CAUTION LABEL, PLACED INSIDE UNIT.
Contents Introduction ............................................................ 2 Advanced Tape Operations .................................32 Precautions ..........................................................................2 How to Read This Manual ..................................................2 Recording on a Tape .........................................................32 Synchronized Disc Recording...........................................33 Getting Started .............................
Introduction Precautions Installation • Install in a place which is level, dry and neither too hot nor too cold—between 5°C and 35°C. • Install the System in a location with adequate ventilation to prevent internal heat buildup in the System. DO NOT install the System in a location near heat sources, or in a place subject to direct sunlight, excessive dust or vibration. • Leave sufficient distance between the System and the TV. • Keep the speakers away from the TV to avoid interference with TV.
Getting Started Step 1:Unpack the package and check the accessories. Step 1: Unpack After unpacking, check to be sure that you have all the following items. The number in parentheses indicates the quantity of each piece supplied. • FM antenna (1) • AM loop antenna (1) • Remote control (1) • Composite video cord (1) • Batteries (2) • AC plug adaptor (1) If any item is missing, consult your dealer immediately.
Step 3: Hook Up If you need more detailed information, see pages 6 and 7. Illustrations of the input/output terminals below are typical examples. When you connect other components, refer also to their manuals since the terminal names actually printed on the rear may vary. AM loop antenna (supplied) Turn it until the best reception is obtained. Turn the power off to all components before connections. VCR, etc.
For better FM/AM reception AM loop antenna Keep it connected. Vynile-covered wire (not supplied) Outdoor FM antenna (not supplied) Extend it horizontally. Disconnect the supplied FM antenna, and connect to an outdoor FM antenna using a 75 Ω wire with coaxial type connector (IEC or DIN45325). FM antenna (supplied) Extend it so that you can obtain the best reception.
To assemble and connect the AM loop antenna To connect the speaker cords To assemble the AM loop antenna Connect the right speaker to the RIGHT terminals, and the left speaker to the LEFT terminals. 1 Open To connect the AM loop antenna 1 Hold 3 Release 2 Insert • If the AM loop antenna wire or speaker cords are covered with vinyl, remove the vinyl to expose the tip of the antenna by twisting the vinyl.
To connect the AV COMPU LINK cords Adjusting the Voltage Selector This system allows you to use JVC’s TV with simple operations; by starting playing back a disc, the TV automatically turns on and changes the input mode to the appropriate position so that you can view the playback picture.
Before Operating the System DVD Video—digital audio formats Playable Disc Types This unit has been designed to play back the following discs: Disc Type Mark (Logo) Video Format DVD Video 1 or ALL DVD Audio Video CD (VCD) Super Video CD (SVCD) Region Code* Number NTSC DIGITAL VIDEO SUPER VIDEO COMPACT Audio CD DIGITAL AUDIO CD-R CD-RW DVD-R DVD-RW The System can play back CD-R or CD-RW recorded in the Audio CD, Video CD, SVCD, MP3, WMA, and JPEG formats.
Parts Index Refer to the pages to see how to use the buttons and controls.
Display Indicators The indications on the display teach you a lot of things while you are operating the System. Before operating the System, be familiar with when and how the indicator illuminates on the display. WMA MP3 1DISC REC ALL GR. SLEEP MONO 3D PHONIC ST PRGM RAND BONUS B.S.P 123 REC A.STANDBY 1 Disc tray indicators • 1-5: Disc tray number indicators. • (tray indicator): – Lights when the disc is detected. – Flashes while playing back a disc. – Goes off when there is no disc in the tray.
Indications on the main display while operating a disc While playing back a disc: While disc play is stopped: • DVD Video: • DVD Video: Chapter no. Elapsed playing time Total title no. 1 2 3 4 5 1 2 3 4 5 • By pressing DISPLAY, you can show the current title and chapter numbers for a few seconds. • DVD Audio: • DVD Audio: Group no. Elapsed playing time Track no. 1 2 3 4 5 Track no. 1 2 3 4 5 • By pressing DISPLAY, you can show the current group and track numbers for a few seconds.
Daily Operations—Playback 1 10 keys SET RETURN MENU 3D PHONIC TOP MENU , , , ENTER 2 DISC SELECT 8,7 1/¡ GROUP/TITLE 4/¢ 3 SHIFT FM/PLAY MODE, REV.MODE In this manual, the operation using the remote control is mainly explained; however, you can use the buttons and controls on the main unit if they have the same (or similar) name and marks. 1 Turn on the power. The STANDBY/ON lamp on the main unit lights in green.
Listening to the Radio Remote ONLY To preset the stations To select the AM tuner interval spacing You can preset 30 FM and 15 AM stations. Some countries space AM stations 9 kHz spacing, and other countries use 10 kHz spacing. 1 Tune in to a station you want to preset. You can change the AM tuner intervals while the System is on stand by and the last selected source is AM. 2 • You can also store the monaural reception mode for FM preset stations if selected. Activate the preset number entry mode.
Playing Back a Disc On-screen guide icons Before operating a disc, be familiar how a disc is recorded. • DVD Video comprises of “Titles” which includes “Chapters,” DVD Audio/MP3/WMA comprise of “Groups” which include “Tracks,” and CD/SVCD/VCD comprise of only “Tracks.” • For JPEG playback, see “Operations on the CONTROL Screen” on page 30. • During DVD Video playback, the following icons may appear on the TV screen: At the beginning of a scene containing multiaudio sounds.
Remote ONLY To locate a particular portion To play back using the disc menu While playing a disc except MP3/WMA... SLOW – Remote ONLY x2 x5 x10 x20 x60 You can operate a disc—DVD and SVCD/VCD with Playback Control (PBC)—using the disc menu shown on the TV screen. x2 x5 x10 x20 x60 7 SLOW + • No sound comes out while searching on DVD Video/ SVCD/VCD. For DVD Video/DVD Audio: 1 Show the disc menu. TOP MENU MENU To return to normal playback, press DVD/CD 3.
7 For SVCD/VCD with PBC: While playing a disc with PBC, “PBC” appears on the display. When disc menu appears on the TV screen, select an item on the menu. Playback of the selected item starts. AUDIO SUB TITLE 1 2 ANGLE 3 ZOOM 4 VFP 7 6 5 3D PHONIC DVD LEVEL 8 PAGE - 9 PAGE + Playing Back a Tape To insert a tape You can play back type I tapes. Push Close With the tape side facing outside 10 10 Insert Examples: To select number 5, press 5. To select number 15, press +10, then 5.
Daily Operations—Sound&Other Adjustments Adjusting the Volume Remote control You can adjust the volume level from level 0 (VOL MIN) to level 50 (VOL MAX). Main unit: Remote control: VOLUME VFP DVD LEVEL DISPLAY SET , , , ENTER VOLUME To drop the volume in a moment FADE MUTING SLEEP CLOCK/ TIMER BASS/ TREBLE SHIFT RHYTHM AX Remote ONLY To restore the volume, press again, or adjust the volume level. DIMMER A.
Presetting Automatic DVD Sound Increase Remote ONLY Level You can dim the display window. The DVD sound is sometimes recorded at a lower level than for other discs and sources. You can set the increase level for the currently loaded DVD, so you do not have to adjust the volume every time you change the source. DVD LEVEL 9 NORMAL MIDDLE HIGH DIMMER NORMAL Original recording level. MIDDLE Output level is increased (less than “HIGH”). HIGH Output level is increased (more than “MIDDLE”).
To adjust the picture tone Setting the Clock 1 Select “USER1” or “USER2.” 2 • Follow steps 1 and 2 explained on page 18. Select a parameter you want to adjust. ENTER Remote ONLY Without setting the built-in clock, you cannot use Daily Timers (see page 35) and Sleep Timer. • To exit from the clock setting, press CLOCK/TIMER as required. • To go back to the previous step, press CANCEL. 1 Activate the clock setting mode.
Turning Off the Power Remote ONLY Automatically To turn off the unit after playback is over—Auto Standby On Canceled A.STANDBY When Auto Standby is in use, the A.STANDBY indicator lights on the display. When disc or tape play stops, the A.STANDBY indicator starts flashing. If no operation is done for about 3 minutes while the indicator is flashing, the System turns off (stands by) automatically. • Auto Standby does not work while you are listening to radio (FM/AM) and the external component (AUX).
Unique DVD/VCD Operations Selecting the Sound Track Remote control SUB TITLE AUDIO ZOOM ANGLE 10 keys Remote ONLY For DVD Video: While playing back a chapter containing audio languages, you can select the language to listen to. For DVD Audio: While playing back a track containing audio channels, you can select the audio channel to listen to. For SVCD/VCD: When playing back a track, you can select the audio channel to play. • You can also select the audio track using the on-screen bar (see page 27).
Remote ONLY Selecting the Subtitle Language For DVD Video: While playing back a chapter containing subtitles in different languages, you can select the subtitle language to display on the TV screen. For SVCD: While playing, you can select the subtitles even if no subtitles are recorded on the disc. • You can also select the subtitle language using the onscreen bar (see page 27).
Selecting Browsable Still Pictures Remote ONLY 2 Select slow motion speed. SLOW – While playing back a track (of DVD Audio) linked to browsable still pictures (BSP), you can select the still picture (turn the page) to be shown on the TV screen. • If a track is linked to browsable still pictures (BSP), they are usually shown in turn automatically during playback. • You can also select the page using the on-screen bar (see page 27). SLOW + Forward slow motion starts. Reverse slow motion* starts.
Advanced Disc Operations Programming the Playing Order— Remote control Remote ONLY Program Play You can arrange the playing order of the chapters or tracks (up to 99) before you start playback. 1 10 keys Before starting playback, activate Program Play. FM/PLAY MODE PROGRAM CANCEL Canceled , ENTER 4/¢ FM/PLAY MODE SHIFT RANDOM 1 2 3 4 5 DVD/CD3 8,7 PRGM On the display PROGRAM No 1 2 3 4 5 6 7 8 9 10 REPEAT A-B REPEAT Disc Group/Title Track/Chapter USE NUMERIC KEYS TO PROGRAM TRACKS.
4 Start playback. Playing at Random—Random Play Playback starts in the order you have programmed. DVD/CD You can play the chapters or tracks of all loaded discs at random. • Random Play cannot be used for some DVDs. 1 To skip a step: To pause: Remote ONLY To stop: Before starting playback, activate Random Play. FM/PLAY MODE GROUP/TITLE PROGRAM RANDOM Canceled To release, press DVD/CD 3. 1 2 3 4 5 RAND To check the programmed contents 2 Before or after playback... In the reverse order.
Remote ONLY Playing Repeatedly ALL • You can also select the repeat mode using the on-screen bar (see page 28). Repeats all discs in all tray or all programmed tracks. 1 Repeats the current chapter/track. Repeat Play GR. Repeats the current title/group. 1DISC You can repeat playback. • For DVD Video: While playing... Canceled REPEAT A-B REPEAT 1 Canceled GR. A-B Repeat ALL You can repeat playback of a desired portion by specifying the beginning (point A) and the ending (point B).
On-Screen Disc Operations On-screen Bar Information Remote control You can check the disc information (except for MP3/WMA/ JPEG disc) and use some functions through the on-screen bar.
Remote ONLY Operations Using the On-screen Bar For detailed operations of the following functions, see also “Operations Using the On-screen Bar” on the left. Ex.: Selecting a subtitle (French) for DVD Video: While a disc is selected as the source... Changing the time information 1 You can change the time information in the on-screen bar and the display window on the main unit. Display the on-screen bar with the pull-down menu. ON SCREEN 1 Display the on-screen bar with the pull-down menu.
Time Search 4 Select the repeat mode you want. ALL Repeats all discs or all programmed track. You can move to a particular point by specifying the elapsed playing time from the beginning. A-B Repeats a desired portion (see next column). 1 While playing (without PBC for SVCD/VCD), display the on-screen bar with the pull-down menu. • Except for DVD: Time Search can be used before starting playback. 2 Select . 3 Display the pop-up window. TITLE Repeats the current title.
4 Enter the desired chapter/track number. AUDIO SUB TITLE ANGLE 1 2 3 ZOOM 4 VFP 7 6 5 3D PHONIC DVD LEVEL 8 PROGRESSIVE 0 9 Examples: To select chapter/track 5, press 5. To select chapter/track 15, press 1, then 5. To select chapter/track 30, press 3, then 0. • To correct a misentry, press the 10 keys until the desired number shown in the pop-up window. 5 Finish the setting. ENTER The System starts playing the searched chapter or track.
To move the highlight bar between group list and track list Moves the bar to the track list. To repeat slide-show for JPEG While playing or before starting playback... REPEAT A-B REPEAT GR. 1DISC Canceled ALL Moves the bar to the group list. To select a group/track in the list Move the highlight bar to a desired item. • If you move the highlight bar while playing back an MP3/ WMA disc, the selected track starts playback automatically. GR. Repeats the current group. 1DISC Repeats the current disc.
Advanced Tape Operations IMPORTANT It may be unlawful to record or play back copyrighted material without the consent of the copyright owner. Remote control Recording on a Tape You can use type I tapes for recording. • To play a tape, see page 16. 1 Insert a recordable cassette. Push DVD/CD3 DISC SELECT Insert Close TAPE 23 FM/AM/AUX 7 DISC REC MODE With the tape side facing outside REV.MODE SHIFT 2 Check the tape running direction and Reverse mode settings on the display.
3 4 Select and start playing the source—“FM,” “AM,” “DVD/CD,” or “AUX.” • When recording a disc, you can also use “Synchronized Disc Recording” (see below). 4 Select the Recording mode. DISC REC MODE ONE DISC Canceled Start recording. REC On the main unit To stop recording: ONE DISC Records the entire disc. ALL DISC Records the all loaded discs continuously (except for DVD Video/DVD Audio). 1ST TRK Records the first track of each disc (only for SVCD/VCD/CD).
To record only your favorite track You can specify tracks to be recorded on the tape while listening to a disc. • This function is not available for DVD Video. 1 Start playing a disc. DVD/CD 2 While a track you want to record on the tape is playing... REC On the main unit 3 The disc player returns to the beginning of that track and the track is recorded on the tape. After recording the track, the disc player and cassette deck automatically stop. Repeat steps 2 and 3 to record other tracks you want.
Timer Operations Setting the Timer Remote control STANDBY/ ON SET CANCEL Remote ONLY Using Daily Timer, you can wake up with your favorite music. On the other hand, with Recording Timer, you can make a tape of a radio broadcast automatically. • You can store three Daily Timer settings and one Recording Timer setting; however, you can activate only one of Daily Timers or Recording Timer at the same time. • To exit from the timer setting, press CLOCK/TIMER as required.
3 For Daily Timers: Select the playback source— “TUNER FM,” “TUNER AM,” “TAPE,” “DISC” or “AUX.” 1 2 3 4 5 How Recording Timer actually works When Recording Timer has been set, Timer ( ) indicator and the REC indicator are lit on the display. Recording Timer works only once. 1 3 For Recording Timer: Select the playback source—“TUNER FM,”“TUNER AM” or “AUX.” 4 For “TUNER FM” and “TUNER AM”: Select a preset channel. For “DISC”: Select the disc number, group/title number, then the track/chapter number.
Setup Menu Operations . Operating Procedure Remote control Remote ONLY You can use the Setup Menus only when a disc is selected as the source and its playback is not yet started. Ex.: Selecting “STILL PICTURE” for “FILE TYPE”: 1 Display the Setup Menu. SET UP 10 keys MENU LANGUAGE ENGLISH AUDIO LANGUAGE ENGLISH SUBTITLE ENGLISH ON SCREEN LANGUAGE ENGLISH SELECT , , , ENTER SET UP LANGUAGE ENTER 2 USE TO SELECT. USE ENTER TO CONFIRM TO EXIT, PRESS [SET UP] .
6 7 PICTURE Setup Menu You can select the desired options concerning a picture or monitor screen. Finish the setting. ENTER 7 PICTURE Repeat steps 3 to 4 to set other items on the same Setup Menu. Repeat steps 2 to 4 to set other items on another Setup Menu. MONITOR TYPE 4:3 LB PICTURE SOURCE AUTO SCREEN SAVER ON FILE TYPE AUDIO SELECT ENTER To erase the Setup Menu USE TO SELECT. USE ENTER TO CONFIRM TO EXIT, PRESS [ SET UP ] .
PICTURE SOURCE You can obtain optimal picture quality by selecting an appropriate option—picture source type (either video source or film source). 7 AUDIO Setup Menu You can adjust the sound settings of the System. AUDIO Select one of the following: AUTO: Normally select this. When playing back a disc containing both video and film sources, the System automatically changes the processing to match it to the picture type (film or video source) of the current chapter.
D. RANGE COMPRESSION AV COMPULINK MODE You can compress the dynamic range (the difference between the loudest sound and the softest sound) to enjoy a powerful sound even at a low volume level when listening to Dolby Digital software. This is useful at night. • The effectiveness varies depends on a software. When connecting the System to a JVC’s TV with the AV COMPU LINK remote control system, select the proper setting.
5 Restricting the Review —Parental Lock Select “COUNTRY CODE,” then display the pop-up window. Remote ONLY ENTER You can restrict playback of DVD Video containing violent scenes and those unsuitable for your family members. Once you have set the rating level, such violent scenes (for which a higher level than you set is assigned) may be skipped or changed to another scene (depending on how the disc is programmed). GB UG NONE PASSWORD _UY ___ USE TO SELECT.
To change the setting To release Parental Lock temporarily 1 When you set a strict rating level, some discs may not be played back at all. When you try to play such a disc, the following screen appears on the TV. Display the PARENTAL LOCK sub menu. • Follow steps 1 to 4 of “To set Parental Lock”. PARENTAL LOCK COUNTRY CODE US SET LEVEL 4 PASSWORD ____ PARENTAL LOCK TEMPORARY RELEASE EXIT NOT RELEASE ____ PASSWORD SELECT PASSWORD? ••• PRESS 0 ~ 9 KEY TO EXIT, PRESS [SET UP].
Additional Information Learning More about This System Getting Started (see pages 3 to 7) Changing the Scanning Mode: • To enjoy the progressive video picture, connect a TV with the progressive video input using component video cord. Daily Operations—Playback (see pages 12 to 16) Listening to the Radio: • If you store a new station into an occupied preset number, the previously stored station in that number will be erased.
Playing at Random—Random Play: • The 4 button does not work for skipping chapters or tracks, but only work for going back to the beginning of the current chapter or track. On-Screen Disc Operations (see pages 27 to 31) • For JPEG files playback... – It is recommended that you record a file at 640 x 480 resolution. (If a file has been recorded at a resolution of more than 640 x 480, it will take a long time to be shown.) – This System can play only baseline JPEG files.
Maintenance To remove the speaker grilles To get the best performance of the System, keep your discs and mechanism clean. Handling discs • When removing the disc from its case, hold it at the edge while pressing the center hole lightly. • Do not touch the shiny surface of the disc, or bend the disc. • Put the disc back in its case after use to prevent warping. • Be careful not to scratch the surface of the disc. • Avoid exposure to direct sunlight, temperature extremes, and moisture.
Troubleshooting If you are having a problem with your System, check this list for a possible solution before calling for service. General: Adjustments or settings are suddenly canceled before you finish. ] There is a time limit. Repeat the procedure again. Operations are disabled. ] The built-in microprocessor may malfunction due to external electrical interference. Unplug the AC power cord and then plug it back in. Unable to operate the System from the remote control.
Language Code List AA AB AF AM AR AS AY AZ BA BE BG BH BI BN BO BR CA CO CS CY DA DZ EL EO ET EU FA FI FJ FO FY GA GD GL GN GU HA HI HR HU HY IA IE IK IN IS IW JI Afar Abkhazian Afrikaans Ameharic Arabic Assamese Aymara Azerbaijani Bashkir Byelorussian Bulgarian Bihari Bislama Bengali, Bangla Tibetan Breton Catalan Corsican Czech Welsh Danish Bhutani Greek Esperanto Estonian Basque Persian Finnish Fiji Faroese Frisian Irish Scots Gaelic Galician Guarani Gujarati Hausa Hindi Croatian Hungarian Armenian Inte
Country/Area Codes List AD AE AF AG AI AL AM AN AO AQ AR AS AT AU AW AZ BA BB BD BE BF BG BH BI BJ BM BN BO BR BS BT BV BW BY BZ CA CC CF CG CH CI CK CL CM CN CO CR CU CV CX CY CZ DE DJ 48 Andorra United Arab Emirates Afghanistan Antigua and Barbuda Anguilla Albania Armenia Netherlands Antilles Angola Antarctica Argentina American Samoa Austria Australia Aruba Azerbaijan Bosnia and Herzegovina Barbados Bangladesh Belgium Burkina Faso Bulgaria Bahrain Burundi Benin Bermuda Brunei Darussalam Bolivia Brazil
NP NR NU NZ OM PA PE PF PG PH PK PL PM PN PR PT PW PY QA RE RO RU RW SA SB SC SD Nepal Nauru Niue New Zealand Oman Panama Peru French Polynesia Papua New Guinea Philippines Pakistan Poland Saint Pierre and Miquelon Pitcairn Puerto Rico Portugal Palau Paraguay Qatar Réunion Romania Russian Federation Rwanda Saudi Arabia Solomon Islands Seychelles Sudan SE SG SH SI SJ SK SL SM SN SO SR ST SV SY SZ TC TD TF TG TH TJ TK TM TN TO TP TR Sweden Singapore Saint Helena Slovenia Svalbard and Jan Mayen Slovakia Sie
General Specifications Power requirement: Amplifier section Output Power: HIGH: LOW: 40 W (20 W+ 20 W) at 4 Ω (10% THD) 50 W (25 W+ 25 W) at 4 Ω (10% MAX) 40 W (20 W+ 20 W) at 4 Ω (10% THD) 50 W (25 W+ 25 W) at 4 Ω (10% MAX) Analog input: AUX: Sensitivity/Impedance (at 1 kHz) 400 mV/47 kΩ (at “AUX LEVEL 1”) 200 mV/47 kΩ (at “AUX LEVEL 2”) Digital output: DVD OPTICAL DIGITAL OUT: –21 dBm to –15 dBm (660 nm ±30 nm) VIDEO OUT: Color system:NTSC VIDEO (composite): 1 V(p-p)/75 Ω S-VIDEO: Y (luminance) 1 V
MEMO
Mains (AC) Line Instruction (not applicable for Europe, U.S.A., Canada, Australia, and U.K.