DX-U20_9[U]c_s.
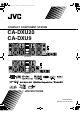
DX-U20_9[U]c_s.book Page 1 Wednesday, March 4, 2009 1:21 PM Warnings, Cautions and Others CAUTION To reduce the risk of electrical shocks, fire, etc.: 1. Do not remove screws, covers or cabinet. 2. Do not expose this appliance to rain or moisture. CAUTION The button in any position does not disconnect the mains line. Disconnect the mains plug to shut the power off completely (the STANDBY lamp goes off).
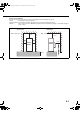
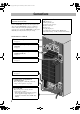
DX-U20_9[U]c_s.book Page 2 Wednesday, March 4, 2009 1:21 PM Caution: Proper Ventilation To avoid risk of electric shock and fire, and to prevent damage, locate the apparatus as follows: 1. Front: No obstructions and open spacing. 2. Sides/Top/Back: No obstructions should be placed in the areas shown by the dimensions below. 3. Bottom: Place on the level surface. Maintain an adequate air path for ventilation by placing on a stand with a height of 10 cm or more.
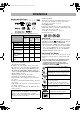
DX-U20_9[U].book Page 1 Wednesday, March 4, 2009 10:59 AM Introduction Playable Disc/File Types INFO DIGITAL VIDEO COMPACT SUPER VIDEO DIGITAL AUDIO About color system This System accommodates both NTSC and PAL system and can play back discs/files recorded in either system. To change the color system, see page 6. Note on Region Code DVD players and DVD Video have their own Region Code numbers. This System can play back only DVD Video with an appropriate Region Code number.
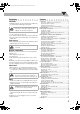
DX-U20_9[U].book Page 2 Wednesday, March 4, 2009 10:59 AM Precautions Contents Installation Connections ................................................................................... 3 Connecting a USB Mass Storage Class Device.......................... 6 Preparing the Remote Control .................................................... 6 Canceling the Demonstration ..................................................... 6 Changing the Color System and Scanning Mode.......................
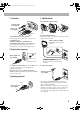
DX-U20_9[U].book Page 3 Wednesday, March 4, 2009 10:59 AM Connections Do not connect the AC power cord until all other connections have been made. • Connect VIDEO OUT directly to the video input of your TV. Connecting VIDEO OUT to a TV via a VCR may interfere with your viewing when playing back a copyprotected source. Connecting VIDEO OUT to an integrated TV/VCR system may interfere with your viewing. The illustration is CA-DXU20. 1 From the video input of TV/monitor See page 4.
DX-U20_9[U].book Page 4 Wednesday, March 4, 2009 10:59 AM 1 TV/monitor 4 AM/FM antenna To assemble the AM loop antenna Composite video cord (supplied) S-Video cord (not supplied) Green Red Blue Component video cord (not supplied) • To select progressive scanning mode (see page 6), use COMPONENT jacks. • Connect the VIDEO jack, S-VIDEO jack, or COMPONENT jacks; whichever you want to use. • You can get better picture quality in the order of— Composite video s S-video s Component video.
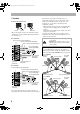
DX-U20_9[U].book Page 5 Wednesday, March 4, 2009 10:59 AM 5 Speakers To connect the speaker cords 1Push 2Insert 3Release • When connecting the speaker cords, match their polarity with that of the speaker terminals: blue/red/green/white to (+) and black to (–). • The front and center speakers and subwoofer(s) are magnetically shielded to avoid color distortions on TVs. However, if not installed properly, it may cause color distortions. So, pay attention to the following when installing the speakers.
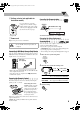
DX-U20_9[U].book Page 6 Wednesday, March 4, 2009 10:59 AM 6 Voltage selector (not applicable for Australian models) Canceling the Demonstration Use a screwdriver to rotate the voltage selector so that the voltage mark is pointing to the same voltage as where you are plugging in the unit. (See also the back cover page.) Main Unit ONLY 2 sec. DEMO OFF DEMO START To start the demonstration, select DEMO START.
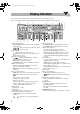
DX-U20_9[U].book Page 7 Wednesday, March 4, 2009 10:59 AM Display Indication The indications on the display tell you a lot of things while you are operating the System. Before operating the System, be familiar with when and how the indicator illuminates on the display. 1 9 p q 2 3 w e 4 r 1 Audio signal indicators • L/R/C/LS/RS/LFE: lights to indicate the incoming audio channel signals. • : lights to indicate the speakers from which sound is emitted.
DX-U20_9[U].book Page 8 Wednesday, March 4, 2009 10:59 AM Daily Operations—Playback In this manual, the operations using the remote control are mainly explained; however, you can use the buttons and controls on the main unit if they have the same (or similar) name and marks. 1 Turn on the power. The STANDBY lamp on the main unit goes off. • Without pressing AUDIO, the System also turns on by pressing one of the source selecting buttons in the next step. 2 Select the source.
DX-U20_9[U].book Page 9 Wednesday, March 4, 2009 10:59 AM To tune in to a station Adjusting the Volume While FM or AM is selected... The volume level can be adjusted in 32 steps (VOLUME MIN, VOLUME 1 – VOLUME 30, and VOLUME MAX). Remote control: 1 sec. SLOW Main unit: AUDIO Frequency starts changing on the display. When a station (frequency) with sufficient signal strength is tuned in, the frequency search stops. • When you repeatedly press the button, the frequency changes step by step.
DX-U20_9[U].book Page 10 Wednesday, March 4, 2009 10:59 AM 4 Store the station. To connect a USB mass storage class device • To connect a USB mass storage class device, see page 6. • Always set volume level to the minimum level when connecting or disconnecting the USB mass storage class device. • To disconnect the USB mass storage class device safely, turn off the System before disconnecting the device. ENTER /SET To tune in to a preset station 1 Select the band (FM or AM).
DX-U20_9[U].book Page 11 Wednesday, March 4, 2009 10:59 AM To return to normal playback, press DVD/CD 3 or USB MEMORY 3. To select a disc DISC 1 DISC 4 DISC 2 DISC 3 • For DivX files, each time you press the cursor 3 or 2, you can skip to a scene of 30 seconds or 5 minutes away depending on the DivX file. DISC 5 Playback starts. Remote ONLY To select a title/group While playing...
DX-U20_9[U].book Page 12 Wednesday, March 4, 2009 10:59 AM 7 For SVCD/VCD with PBC While playing a disc with PBC, “PBC” appears on the display instead of the playing time. When disc menu appears on the TV screen, select an item on the menu. Playback of the selected item starts. • To select a number, see “How to MARK ABC DEF 1 2 3 select a number” on page 8.
DX-U20_9[U].book Page 13 Wednesday, March 4, 2009 10:59 AM Daily Operations—Sound & Other Adjustments Adjusting the Speaker Output Level Remote Control Remote ONLY AUDIO TV AUDIO TV INFO You can adjust the speaker output level from –6 (dB) to +6 (dB). Initial setting: +4 (dB). • You can also use the setup menu to adjust the speaker output level (see page 45). • This function is not available when the surround mode is set to “STEREO” or Mic Mixing is activated.
DX-U20_9[U].book Page 14 Wednesday, March 4, 2009 10:59 AM Applying an Optimal Bass Sound Effect Creating Your Own Sound Modes —VARIO BASS —User Mode You can adjust bass sound characteristics to create a sound suitable for the playback source of your preference. You can adjust the preset Sound Modes to create your own Sound Modes which suit your taste. The changed settings can be stored as the USER1, USER2 and USER3 Modes. VARIO BASS AUTO OFF LITE.n.
DX-U20_9[U].book Page 15 Wednesday, March 4, 2009 10:59 AM Selecting the Surround Modes INFO • While Surround Mode is activated, lights up. indicator • For “DVD/CD” and “USB” (multi-channel software): SURROUND MODE AUTO DOLBY D/DTS/PPCM/LPCM*1 STEREO *1 Selectable Surround Mode varies depending on the software. *2 MOVIE (Dolby Pro Logic II Movie) and MUSIC (Dolby Pro Logic II Music) cannot be used for DivX file.
DX-U20_9[U].book Page 16 Wednesday, March 4, 2009 10:59 AM To adjust the picture tone Setting the Clock 1 Select “USER1” or “USER2.” 2 Remote ONLY INFO Without setting the built-in clock, you cannot use any timers except the Sleep Timer. • To exit from the clock setting, press CLOCK/TIMER as required. • To correct a misentry during the process, press CANCEL. You can return to the previous step. • Follow steps 1 and 2 on page 15. Select a parameter you want to adjust.
DX-U20_9[U].book Page 17 Wednesday, March 4, 2009 10:59 AM Unique Video Disc/File Operations Selecting the Audio Track Remote Control INFO For DVD Video/DivX: While playing back a chapter/file containing audio languages, you can select the language to listen to. For DVD-VR/SVCD/VCD: While playing back a chapter/ track, you can select the audio channel to play. • You can also select the audio track using the on-screen bar (see page 24).
DX-U20_9[U].book Page 18 Wednesday, March 4, 2009 10:59 AM Remote ONLY Selecting the Subtitle Language For DVD Video/DivX: While playing back a chapter/file containing subtitles in different languages, you can select the subtitle language to display on the TV screen. For DVD-VR: While playing, you can turn the subtitle on or off. For SVCD: While playing, SUB TITLE button functions even if no subtitles are recorded on the disc.
DX-U20_9[U].book Page 19 Wednesday, March 4, 2009 10:59 AM Special Picture Playback INFO Zoom Remote ONLY • For JPEG/ASF files, see page 28. Pause playback While playing... While playing... FM /PLAY MODE ZOOM ZOOM 1 ZOOM OFF ZOOM 2 ZOOM 3 ZOOM 6 ZOOM 4 ZOOM 5 Playback pauses. To resume normal playback, press DVD/CD 3 or USB MEMORY 3. As the number increases, magnification also increases. You can move the zoomed-in area by pressing 2/3/5/K.
DX-U20_9[U].book Page 20 Wednesday, March 4, 2009 10:59 AM Advanced Playback Operations Programming the Playing Order Remote Control —Program Play AUDIO TV AUDIO TV 1 Before starting playback, activate Program Play. FM /PLAY MODE FM/PLAY MODE, , INFO You can arrange the playing order of the chapters/tracks/ files (up to 99) before you start playback. • Program Play cannot be used for files in a USB mass storage class device, Video files/JPEG files on a disc and DVD-VR.
DX-U20_9[U].book Page 21 Wednesday, March 4, 2009 10:59 AM To skip: PREV To pause: NEXT To stop*: Playing at Random—Random Play Remote ONLY You can play the contents of all the loaded discs at random. • Random Play cannot be used for files in a USB mass storage class device, Video files/JPEG file on a disc, DVD-VR and some DVDs. FM /PLAY MODE To release, press DVD/CD 3. 1 Before starting playback, activate Random Play. FM /PLAY MODE * Resume does not work for Program Play.
DX-U20_9[U].book Page 22 Wednesday, March 4, 2009 10:59 AM Playing Repeatedly—Repeat Play Remote ONLY You can repeat playback. • You can also select the repeat mode using the on-screen bar (see page 23. Not applicable for AV files and JPEG file.) • For Video file/JPEG file and DVD-VR, see page 28. • The indicator(s) lights on the display as follows to indicate the current repeat mode. P1 Repeats the current chapter/track/file/step. P Repeats the current title/group/program.
DX-U20_9[U].book Page 23 Wednesday, March 4, 2009 10:59 AM On-Screen Operations On-screen Bar Information Remote control You can check the playback information and use some functions through the on-screen bar. (Not applicable for Audio file and JPEG file.) AUDIO TV AUDIO On-screen bars DVD Video USB MEMORY 3 1 TV DVD/CD 3 PG PL DVD-VIDEO TIME OFF 3 4 5 6 7 8 9 10 0 10 1/3 1 DVD-VR TIME 2 CHAP.
DX-U20_9[U].book Page 24 Wednesday, March 4, 2009 10:59 AM 1 Disc type/source type 2 Playback information Operations Using the Remote ONLY On-screen Bar INFO Indication Meanings Dolby D/DTS/ PPCM/LPCM Audio format 3/2.1 ch/ 2/0.0 ch Channel number Basic operation procedures through the on-screen bar are as follows: Ex.: Selecting a subtitle (French) for DVD Video: While a disc is selected as the source... PROGRAM/ RANDOM Current play mode 1 Display the on-screen bar with the pull-down menu.
DX-U20_9[U].book Page 25 Wednesday, March 4, 2009 10:59 AM To change the time information 4 Select the repeat mode you want. You can change the time information in the on-screen bar and the display window on the main unit. ALL Repeats all discs or all programmed tracks. 1 Display the on-screen bar with the pull-down menu. A-B Repeats a desired portion (see below). TITLE Repeats the current title. GROUP Repeats the current group. Dolby D 3/2.
DX-U20_9[U].book Page 26 Wednesday, March 4, 2009 10:59 AM 6 Select the end point (B). Chapter/Track Search A-B Repeat starts. The selected portion plays repeatedly. ENTER /SET You can search for the number of the item to play. For DVD Video/DVD-VR: Chapter 1 While playing a disc, display the on-screen bar with the pull-down menu. To cancel A-B Repeat, repeat steps 1 to 3, and select “OFF” in step 4. 2 Select CHAP. or TRACK . 3 Display the pop-up window. Dolby D 3/2.
DX-U20_9[U].book Page 27 Wednesday, March 4, 2009 10:59 AM Control screen for AV files/JPEG files Operations Using the Control Screen Remote ONLY For DVD-VR, AV files and JPEG files: You can search for and play the desired items through the control screen. The control screen automatically appears on the TV screen when the System detects Audio files on the loaded disc or connected USB mass storage class device. (For Video files/ JPEG file, it appears when playback is stopped.) Ex.
DX-U20_9[U].book Page 28 Wednesday, March 4, 2009 10:59 AM To start playback For JPEG file: The selected file (still picture) is displayed until you change it. ENTER /SET To repeat slide-show for JPEG file While playing or before starting playback... • When repeating JPEG file on disc: P REPEAT P 1 DISC ( DISC/ REPEAT DISC) ( GROUP/ REPEAT GROUP) P ALL DISC Canceled Slide-show playback starts. Each file (still picture) is shown on the screen for a few seconds, then changes one after another.
DX-U20_9[U].book Page 29 Wednesday, March 4, 2009 10:59 AM Recording Operations You can record following sources onto a USB mass storage class device or Type I tape.
DX-U20_9[U].book Page 30 Wednesday, March 4, 2009 10:59 AM • You can also select a group from a list shown on the TV screen. Recording from a CD onto a USB device You can record tracks in digital recording from a Audio CD onto a USB device. • Do not vibrate the System while recording/editing tracks. Take care especially while “WAIT” and “EDITING” are shown on the display. It may damage the recorded tracks on the System. • See page 52 for more information about the warning messages shown on the display.
DX-U20_9[U].book Page 31 Wednesday, March 4, 2009 10:59 AM Recording onto a Tape INFO You can use type I tapes for recording. • To play a tape, see page 12. 4 Start recording. To stop recording 1 Insert a recordable cassette into deck B. Push Insert or Close Dubbing Tapes 2 Check the tape running direction and Reverse Mode settings on the display. Main Unit ONLY You can record a tape from deck A to deck B. 1 Change the source to “TAPE”.
DX-U20_9[U].book Page 32 Wednesday, March 4, 2009 10:59 AM Synchronized Recording onto a Tape INFO You can start and stop both playback and tape recording at the same time. • This function is available only for CD/VCD/SVCD/DVD Video and Audio files. • Not available with Random Play. 1 Load a disc or connect a USB mass storage class device and insert a recordable cassette. 2 Check the tape running direction and Reverse Mode 3 settings on the display. • See step 2 of “Recording onto a Tape” on page 31.
DX-U20_9[U].book Page 33 Wednesday, March 4, 2009 10:59 AM Editing Operations Giving (Editing) Titles to Tracks/Groups Remote control Remote ONLY AUDIO TV USB MEMORY 3 AUDIO TV INFO You can give titles to the tracks (up to 24 characters) and groups (up to 28 characters) in the USB device. • While playing, you cannot edit track/group titles. • See page 52 for more information about the warning messages shown on the display. 1 Connect a USB device to the (REC/PLAY) terminal.
DX-U20_9[U].book Page 34 Wednesday, March 4, 2009 10:59 AM 5 Confirm the selection. To give a title to a new group before recording • When you record tracks into “NEW GROUP” on a USB device (see step 4 of “Recording from a CD onto a USB device” on page 30), you can give a group title before starting to record. ENTER /SET 6 Enter a title. 1 After selecting “NEW GROUP” in step 4... ON SCREEN Character type TITLE/DEL Ex.
DX-U20_9[U].book Page 35 Wednesday, March 4, 2009 10:59 AM How to enter titles Remote ONLY 1 Select the character type. DISPLAY/ CHARA To enter a space Select the space from “Symbols.” (See “Available Characters” below.) • You can also enter a space at the end of a title by pressing 3. or To quit title entry A (upper case) 1 (number) Available Characters 2 Enter a character. MARK ABC DEF 1 2 3 GHI JKL MNO 4 5 6 PQRS TUV WXYZ 7 8 9 0 • The entered titles are not stored.
DX-U20_9[U].book Page 36 Wednesday, March 4, 2009 10:59 AM Erasing Tracks or Groups Remote ONLY You can erase tracks/groups on the USB device. • Once the tracks are erased, you cannot resume them. 1 Connect a USB device to the 4 Select the track/group erase mode. ON SCREEN TITLE/DEL (REC/PLAY) terminal. TTL EDIT Flash memory device or other storage 2 Select “USB” as the source and stop playback. Canceled TTL DEL GRP DEL TTL DEL For deleting a track. GRP DEL For deleting a group.
DX-U20_9[U].book Page 37 Wednesday, March 4, 2009 10:59 AM Enjoying Karaoke • When you activate the Mic Mixing or Vocal Masking, the surround modes you selected will be changed to “ALL CH ST” temporarily (“AUTO” will be changed to “ALL CH ST” and “STEREO” will remain as “STEREO”).
DX-U20_9[U].book Page 38 Wednesday, March 4, 2009 10:59 AM Adjusting the Sound Track for Karaoke Scoring Your Karaoke Skill L CHANNEL This System can score your Karaoke skill by comparing your singing along with the vocal on the playback source. • This function is available only for disc/USB mass storage class device playback. • It is recommended to select the sound track as follows (see also page 17): For Karaoke DVD Video: Select a sound track with vocal.
DX-U20_9[U].book Page 39 Wednesday, March 4, 2009 10:59 AM After the song ends, playback stops and the score board appears on the TV screen with fanfare. To apply an echo to your voice 1 Ex.: KARAOKE SETTING KARAOKE SCORE BOARD 85 POINTS KEYCON * ECHO Your score SCORE LVL* FANFARE * MIC VOL Very good!! The latest top 3 1 2 3 ST ND RD 93 POINTS 85 POINTS 73 POINTS 8 kcal 8.0 2 * Appears only when “DVD/CD” or “USB” is selected as the source with Mic Mixing activated. Adjust the echo level.
DX-U20_9[U].book Page 40 Wednesday, March 4, 2009 10:59 AM Remote ONLY To change the scoring level To change the mic volume You can change the scoring level of Karaoke Scoring. • This function is available only for disc/USB mass storage class device playback. You can adjust the mic volume at any time. Remote control: Main unit: 1 Select “DVD/CD” or “USB” as the source. 2 Connect the microphone(s) (not supplied) to the MIC1 and/or MIC2 jack. Mic Mixing will be automatically activated.
DX-U20_9[U].book Page 41 Wednesday, March 4, 2009 10:59 AM 6 Start playback. Reserving Karaoke Songs —Karaoke Program Play DVD/CD Remote ONLY INFO You can determine the playback order of the titles, chapters, tracks or files on the disc player. You can program up to 12 steps. • This function is not available for files in a USB mass storage class device. 1 Select “DVD/CD” as the source. 2 Turn the MIC LEVEL to “0”.
DX-U20_9[U].book Page 42 Wednesday, March 4, 2009 10:59 AM Timer Operations Remote ONLY Setting the Timer Remote control AUDIO AUDIO TV AUDIO TV INFO Using Daily Timer, you can wake up with your favorite song. On the other hand, with Recording Timer, you can make a tape of a radio broadcast automatically. • You cannot activate Daily Timer and Recording Timer at the same time. (Activating one timer deactivates the other timer.) • To correct a misentry during the process, press CANCEL.
DX-U20_9[U].book Page 43 Wednesday, March 4, 2009 10:59 AM 3 Turn off the System (on standby) if you have set the timer with the System turned on. To turn on the timer again, repeat step 1 and press ENTER/SET in step 2. AUDIO Turning Off the Power Automatically Remote ONLY With Sleep Timer, you can fall asleep while listening to music. How Recording Timer works When Recording Timer has been set, the timer indicator ( ) and the REC indicator are lit on the display. Recording Timer works only once.
DX-U20_9[U].book Page 44 Wednesday, March 4, 2009 10:59 AM Setup Menu Operations Basic Procedure Remote Control INFO You can change the settings of the System. • The Setup menu can be used only when “DVD/CD” or “USB” is selected as the source. AUDIO TV AUDIO 1 Press SET UP while playback is stopped. LANGUAGE TV , , , , ENTER/SET SET UP 2 3 4 5 MENU LANGUAGE ENGLISH AUDIO LANGUAGE ENGLISH SUBTITLE ENGLISH ON SCREEN LANGUAGE ENGLISH Press 3 (or 2) to select the menu.
DX-U20_9[U].book Page 45 Wednesday, March 4, 2009 10:59 AM AUDIO menu Item Contents DIGITAL AUDIO OUTPUT Set this item correctly when using the OPTICAL DIGITAL OUTPUT terminal on the rear. PCM ONLY: When connecting to audio equipment which is compatible with only linear PCM signals. DOLBY DIGITAL/PCM: When connecting to a Dolby Digital decoder or an amplifier with built-in Dolby Digital decoder.
DX-U20_9[U].book Page 46 Wednesday, March 4, 2009 10:59 AM Operating the TV Operating the TV Remote control You can operate JVC’s or other manufacturers’ TV using the remote control supplied for this System. 1 Slide the AUDIO/TV selector to “TV.” AUDIO TV TV/VIDEO TV AUDIO AUDIO Volume buttons for TV TV TV 2 Press and hold until the following steps are completed.
DX-U20_9[U].book Page 47 Wednesday, March 4, 2009 10:59 AM Additional Information Learning More about This System Connections (see pages 3 to 6) Changing the Color System and Scanning Mode: • If you play back an NTSC disc/file with the color system set to “PAL (PROG),” the disc/file will be reproduced using “PAL 60” format; however, if the TV does not support this format, the screen may not display properly.
DX-U20_9[U].book Page 48 Wednesday, March 4, 2009 10:59 AM – This System can play only baseline JPEG files*. Progressive JPEG files* or lossless JPEG files* cannot be played. * Baseline JPEG format: Used for digital cameras, web, etc. Progressive JPEG format: Used for web. Lossless JPEG format: An old type and rarely used now. • For MPEG-1/MPEG-2 playback... – This System can play back MPEG-1/MPEG-2 files with the extension code <.mpg> or <.mpeg> (regardless of the letter case—upper/lower).
DX-U20_9[U].book Page 49 Wednesday, March 4, 2009 10:59 AM On-Screen Operations (see pages 23 to 28) Operations Using the On-screen Bar: • A-B Repeat is possible only within the same title or within the same track. Recording Operations (see pages 29 to 32) General: • You cannot change the source during recording. Recording onto a Tape: • There is leader tape which cannot be recorded onto at the start and the end of cassette tapes.
DX-U20_9[U].book Page 50 Wednesday, March 4, 2009 10:59 AM • You cannot use Karaoke Scoring during Program Play, Random Play, or recording. However, you can turn Karaoke Scoring on and off by using KARAOKE SCORING button during these play modes. • The ranking (top 3) is cleared when you turn off the System. • For some VCD, the Karaoke Scoring result may not appear at the end of the track if PBC is activated. In this case, press 7 to view your scoring result.
DX-U20_9[U].book Page 51 Wednesday, March 4, 2009 10:59 AM • Use a head demagnetizer (available at electronics and audio shops) to demagnetize the heads (when the System is turned off). To protect your recording Cassettes have two small tabs on the back to protect from unexpected erasure or rerecording. To protect your recording, remove these tabs. To re-record on a protected tape, cover the holes with adhesive tape. Cleaning the System • Stains should be wiped off with a soft cloth.
DX-U20_9[U].book Page 52 Wednesday, March 4, 2009 10:59 AM Recording Operations: “CANNOT REC” appears on the display. sThe System cannot perform recording. Unable to record into the USB device. sThe capacity of the USB device is full. Erase some tracks. sThere have been 999 tracks or group on the USB device you want to record into. Erase unwanted tracks. sThe USB device is write-protected. sThe connected USB device is incompatible to this System. Unable to record onto the tape.
DX-U20_9[U].
DX-U20_9[U].book Page 54 Wednesday, March 4, 2009 10:59 AM Specifications Amplifier section Output Power: FRONT SPEAKERS: 185 W per channel, min. RMS, driven into 4 Ω at 1 kHz with no more than 10% total harmonic distortion. CENTER SPEAKER: CA-DXU20: 160 W per channel, min. RMS, driven into 6 Ω at 1 kHz with no more than 10% total harmonic distortion. CA-DXU9: 50 W per channel, min. RMS, driven into 6 Ω at 1 kHz with no more than 10% total harmonic distortion.
DX-U20_9[U].book Page 55 Wednesday, March 4, 2009 10:59 AM Parts Index Remote control Button AUDIO TV 7 l / 7 Page 8, 43 46 10, 12, 21, 28, 30, 33, 35, 36, 38 9, 11, 12, 19, 22, 25 Button MIC MIX h MIC VOL +, – D ON SCREEN W AUDIO CANCEL e CHANNEL LEVEL CLOCK/ TIMER I S 16, 42, 43 DISC1-5 DIMMER 2 g 11, 30 16 DISPLAY/ CHARA DVD/CD 3 f 16, 35 8 8, 10, 11, 19-21, 28, 38-41 15 9 .
DX-U20_9[U].
DX-U20_9[U]c_s.book Page 2 Wednesday, March 4, 2009 1:21 PM CAUTION for mains (AC) line BEFORE PLUGGING IN, do check that your mains (AC) line voltage corresponds with the position of the voltage selector switch provided on the outside of this equipment and, if different, reset the voltage selector switch, to prevent from a damage or risk of fire/electric shock. Excluding Australian model.