
User Manual
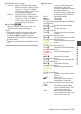
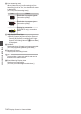
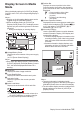
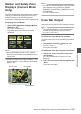
Table Of Contents
- Introduction
- Preparations
- Settings and Adjustments Before Use
- Power Supply
- Power Status Display
- Turning On/Off the Power
- Initial Settings
- Displays on the LCD Monitor and Viewfinder
- Adjusting the LCD Monitor and Viewfinder
- Assignment of Functions to User Buttons
- Tally Lamp and LED
- Recording Media
- Usable Cards
- Usable SSD Media
- Estimated Recordable Time of SD Cards
- Estimated Recordable Time of SSD Media
- Inserting an SD Card
- Removing the SD Card
- Switching the SD cards
- Inserting the SSD Media Adapter
- Formatting (Initializing) of Recording Media
- Repairing the Recording Media
- Clips Recorded to Recording Media
- About the Operation Lock Feature (KEYLOCK)
- Shooting
- Basic Shooting Procedures
- Selecting System Definition, File Format and Video Format
- Zoom Operation
- Focus Operation
- Adjusting the Focusing by Face Detection
- Adjusting the Brightness
- Adjusting the Iris
- Setting the Gain
- Setting the Electronic Shutter
- Setting the ND Filter
- Adjusting the White Balance
- Adjusting the Camera Image
- Using the Image Stabilizer
- Audio Recording
- Monitoring Audio Sound During Recording Using a Headphone
- Time Code and User’s Bit
- Setting Time Code Generator
- Setting the User’s Bit
- Synchronizing Time Code on Another Camera
- Setting Zebra Pattern
- Setting Spot Meter
- Acquiring Positioning Information by GPS
- Viewing Recorded Videos Immediately (Clip Review)
- Displaying the Histogram
- Recording Simultaneously at Two Different Definitions
- Series Rec
- Dual Rec
- Backup Rec
- Special Recording
- Splitting the Clips Freely (Clip Cutter Trig)
- Configuring Infrared Recording
- Playback
- Menu Display and Detailed Settings
- Display/Status Screen
- Camera Features
- Connecting External Devices
- Network
- Functions of Network Connection
- Preparing Network Connection
- Connecting to the Network
- Importing Metadata
- Uploading a Recorded Video Clip
- FTP Resume Feature
- Connecting from a Web Browser
- Editing Metadata
- Uploading a Recording Clip via a Web Browser
- View Remote Feature
- Camera Control Function
- Changing the Settings via a Web Browser
- Managing the Network Connection Settings File
- Performing Live Streaming
- Return Video/Audio from the Network (Return over IP)
- IFB (Return Audio)
- Tagging Feature
- Overlay
- Others
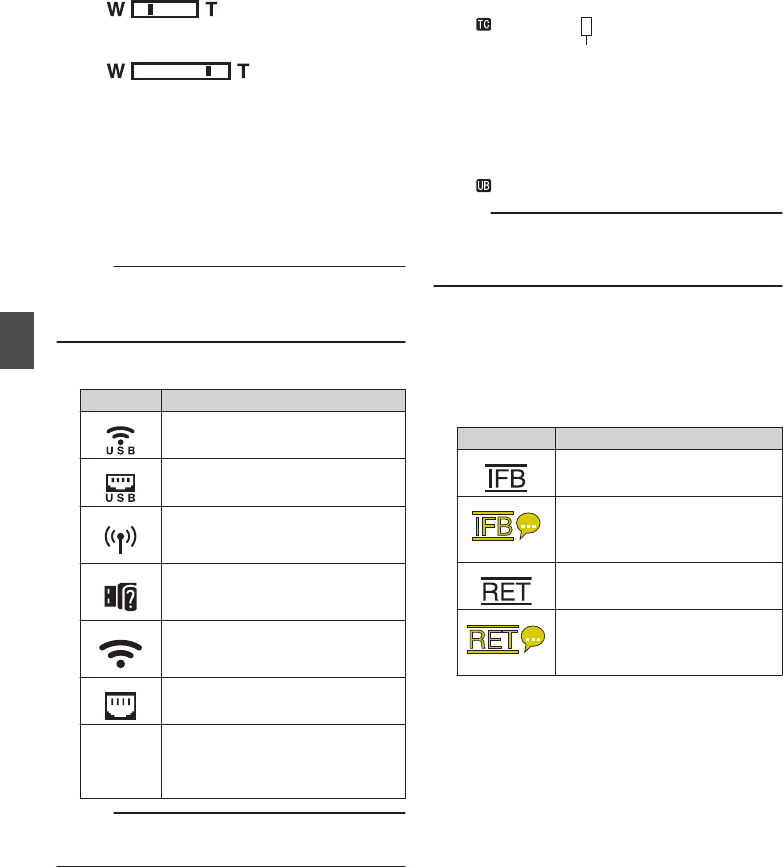
Y
Zoom Display
0
Displays the zoom position. (Zoom bar or
value)
Dynamic Zoom Off:
.
Dynamic Zoom On:
.
0
The zoom bar will only be displayed for 3
seconds after the zoom operation is
activated.
0
The value will always be displayed.
Dynamic Zoom Off: Z00 to Z99
Dynamic Zoom On: DZ000 to DZ149
0
When [Digital Extender
] is configured to “On”,
“F” is displayed to the right of the zoom
display.
Memo :
0
The mode of display (value or bar) can be
configured in [LCD/VF]
B [Display Type] B
[Zoom].
Z
Network Connection Icon
The network connection status is displayed.
Icon Status
.
Wireless LAN connection from the
host terminal (USB) is established
.
Wired LAN connection from the
host terminal (USB) is established
.
Cellular adapter connection from
the host terminal (USB) is
established
.
When a USB adapter different
from the connection settings is
detected
.
Built-in wireless LAN connection is
established
A
.
LAN terminal connection is
established
(No
display)
0
When an unusable USB
adapter is detected
0
When the LAN cable is not
connected
Memo :
0
Yellow display indicates preparation for
connection in progress.
a
Time Code (I)/User’s Bit (J) Display
0
Displays the time code (hour: minute:
second: frame) or user’s bit data.
0
Example of time code display:
Display Screen
.
00:00:00:00
*
* Colon (:) denotes non-drop frames and dot
(.) denotes drop frames.
0
Example of user’s bit display:
Display Screen
.
FF EE DD 20
Memo :
0
Use [LCD/VF] B [Display Type
]
B [TC/UB] to
toggle between the time code display and user’s
bit display.
b
Time Code Lock Indicator
When the built-in time code generator is
synchronized to the external time code data
input during the synchronization of time code
with another camera recorder, Z lights up.
c
IFB/RET Mark
Displays the
status of the IFB or Return over IP.
Icon Status
.
During audio feed only
.
(Yellow)
When an error occurs during
audio feed only
.
During video+audio feed
.
(Yellow)
When an error occurs during
video+audio feed
162
Display Screen in Camera Mode
Display/Status Screen