
User Manual
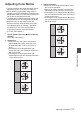
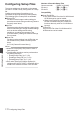
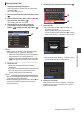
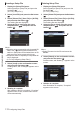
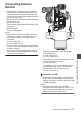
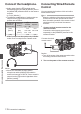
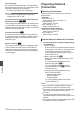
Table Of Contents
- Introduction
- Preparations
- Settings and Adjustments Before Use
- Power Supply
- Power Status Display
- Turning On/Off the Power
- Initial Settings
- Displays on the LCD Monitor and Viewfinder
- Adjusting the LCD Monitor and Viewfinder
- Assignment of Functions to User Buttons
- Tally Lamp and LED
- Recording Media
- Usable Cards
- Usable SSD Media
- Estimated Recordable Time of SD Cards
- Estimated Recordable Time of SSD Media
- Inserting an SD Card
- Removing the SD Card
- Switching the SD cards
- Inserting the SSD Media Adapter
- Formatting (Initializing) of Recording Media
- Repairing the Recording Media
- Clips Recorded to Recording Media
- About the Operation Lock Feature (KEYLOCK)
- Shooting
- Basic Shooting Procedures
- Selecting System Definition, File Format and Video Format
- Zoom Operation
- Focus Operation
- Adjusting the Focusing by Face Detection
- Adjusting the Brightness
- Adjusting the Iris
- Setting the Gain
- Setting the Electronic Shutter
- Setting the ND Filter
- Adjusting the White Balance
- Adjusting the Camera Image
- Using the Image Stabilizer
- Audio Recording
- Monitoring Audio Sound During Recording Using a Headphone
- Time Code and User’s Bit
- Setting Time Code Generator
- Setting the User’s Bit
- Synchronizing Time Code on Another Camera
- Setting Zebra Pattern
- Setting Spot Meter
- Acquiring Positioning Information by GPS
- Viewing Recorded Videos Immediately (Clip Review)
- Displaying the Histogram
- Recording Simultaneously at Two Different Definitions
- Series Rec
- Dual Rec
- Backup Rec
- Special Recording
- Splitting the Clips Freely (Clip Cutter Trig)
- Configuring Infrared Recording
- Playback
- Menu Display and Detailed Settings
- Display/Status Screen
- Camera Features
- Connecting External Devices
- Network
- Functions of Network Connection
- Preparing Network Connection
- Connecting to the Network
- Importing Metadata
- Uploading a Recorded Video Clip
- FTP Resume Feature
- Connecting from a Web Browser
- Editing Metadata
- Uploading a Recording Clip via a Web Browser
- View Remote Feature
- Camera Control Function
- Changing the Settings via a Web Browser
- Managing the Network Connection Settings File
- Performing Live Streaming
- Return Video/Audio from the Network (Return over IP)
- IFB (Return Audio)
- Tagging Feature
- Overlay
- Others
Connecting to the
Network
1
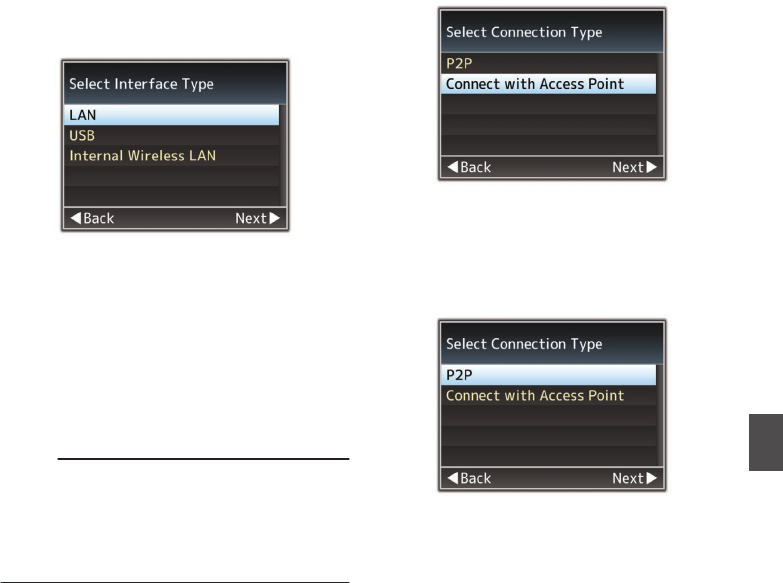
Select the interface in the [Wizard].
0
Select “LAN”, “USB” or “Internal Wireless
LAN
”A in [Network] B [Connection
Setup] B [Wizard].
0
When “USB” is selected, the adapter that is
connected to the
[HOST] terminal (USB) is
recognized and displayed.
.
2
Configure the settings according to the
selected interface.
o
Wired LAN connection (“LAN” or “USB”-
“Ethernet
”)
Configure
the settings as follows according to
the screen.
0
IP address setting (DHCP or manual)
0
IP Address
0
Subnet mask
0
Default gateway
0
DNS Server
Memo :
0
When an
address is manually assigned in a NAT
environment, it is also necessary to set the
default gateway correctly besides conversion of
the address at the router’s end in order to
perform operations such as access to the
Internet from an external network via the router.
o
Wireless LAN
connection (“Internal Wireless
LAN”A or “USB”-“Wireless LAN”)
0
When
“Connect
with Access Point” or “P2P”-
“WPS” is selected on the [Select Connection
Type] screen.
Configure the settings as follows according to
the screen.
0
Mode of connection
0
Configuration method
.
0
When “P2P”-“
Manual” is selected on the
[Select Connection Type] screen.
Configure the settings as follows according to
the screen.
0
Mode of connection
0
Configuration method
.
* For “P2P”-“Manual”
connections, it is necessary
to configure the [Passphrase] according to the
steps below after the above settings are
configured.
A
Set the camera recorder to the Camera
mode, and display [
Connection Setup]
(status screen).
0
Press the [STATUS] button on the
camera recorder to display the status
screen.
Press the cross-shaped button (H I) to
display [Connection Setup].
0
Check to ensure that the [SSID] and
[
Passphrase] that you have set in the
wizard are displayed.
Connecting to the Network
179
Network