
User Manual

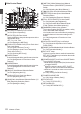
Table Of Contents
- Introduction
- Preparations
- Settings and Adjustments Before Use
- Power Supply
- Power Status Display
- Turning On/Off the Power
- Initial Settings
- Displays on the LCD Monitor and Viewfinder
- Adjusting the LCD Monitor and Viewfinder
- Assignment of Functions to User Buttons
- Tally Lamp and LED
- Recording Media
- Usable Cards
- Usable SSD Media
- Estimated Recordable Time of SD Cards
- Estimated Recordable Time of SSD Media
- Inserting an SD Card
- Removing the SD Card
- Switching the SD cards
- Inserting the SSD Media Adapter
- Formatting (Initializing) of Recording Media
- Repairing the Recording Media
- Clips Recorded to Recording Media
- About the Operation Lock Feature (KEYLOCK)
- Shooting
- Basic Shooting Procedures
- Selecting System Definition, File Format and Video Format
- Zoom Operation
- Focus Operation
- Adjusting the Focusing by Face Detection
- Adjusting the Brightness
- Adjusting the Iris
- Setting the Gain
- Setting the Electronic Shutter
- Setting the ND Filter
- Adjusting the White Balance
- Adjusting the Camera Image
- Using the Image Stabilizer
- Audio Recording
- Monitoring Audio Sound During Recording Using a Headphone
- Time Code and User’s Bit
- Setting Time Code Generator
- Setting the User’s Bit
- Synchronizing Time Code on Another Camera
- Setting Zebra Pattern
- Setting Spot Meter
- Acquiring Positioning Information by GPS
- Viewing Recorded Videos Immediately (Clip Review)
- Displaying the Histogram
- Recording Simultaneously at Two Different Definitions
- Series Rec
- Dual Rec
- Backup Rec
- Special Recording
- Splitting the Clips Freely (Clip Cutter Trig)
- Configuring Infrared Recording
- Playback
- Menu Display and Detailed Settings
- Display/Status Screen
- Camera Features
- Connecting External Devices
- Network
- Functions of Network Connection
- Preparing Network Connection
- Connecting to the Network
- Importing Metadata
- Uploading a Recorded Video Clip
- FTP Resume Feature
- Connecting from a Web Browser
- Editing Metadata
- Uploading a Recording Clip via a Web Browser
- View Remote Feature
- Camera Control Function
- Changing the Settings via a Web Browser
- Managing the Network Connection Settings File
- Performing Live Streaming
- Return Video/Audio from the Network (Return over IP)
- IFB (Return Audio)
- Tagging Feature
- Overlay
- Others

Regular Inspection (Maintenance)
o
Under normal environment, dust will
accumulate on the camera recorder when it is
used over a long period. Dust may enter the
camera recorder
especially if it is used outdoors.
This may affect the image and sound quality of
the camera recorder. Check and replace the fan
after every 9000 hours (suggested guideline).
You can check the usage time of the fan in
[System] B [System Information] B [Fan Hour].
(A P149 [ Fan Hour ] )
If the fan is used for more than 9000 hours
without replacement, “Fan Maintenance
Required” will be displayed every time you turn
on the power.
SDHC/SDXC Cards
o
SDHC/SDXC card
is referred to as “SD card” or
“recording media” in this manual.
o
This camera recorder saves the recorded
images and audio sound on the SD card (sold
separately) in the card slot.
o
If the SD card contains files recorded by devices
other than this camera recorder or files that are
saved from a PC, the recordable time may be
shorter or data may not be properly recorded. In
addition, the remaining space on the card may
not increase even when files are deleted using
a PC.
o
For details on the combinations of usable SD
card and format setting, refer to the following.
(A P48 [Format Setting and Usable SD Card
Combinations] )
* Using cards other than those from Panasonic,
TOSHIBA or SanDisk may result in recording
failure or data loss.
Handling of SD Cards
o
The status indicator lights up in red when data
on the SD card is being accessed.
Do not remove the SD card during data access
(such as
recording, playback, or formatting). Do
not turn off the power or remove the battery and
AC adapter during access either.
o
Do not use or store the SD card in a place that
is subject to static electricity or electrical noise.
o
Do not place the SD card near locations that are
exposed to strong magnetic fields or radio
waves.
o
Inserting the SD card incorrectly may result in
damage of this unit or the SD card.
o
We are not liable for any accidental loss of data
stored on the SD card. Please back up any
important data.
o
Make use of the SD card within the prescribed
conditions of use.
Do not use it at the following locations.
Places that are subject to direct sunlight, high
humidity or corrosion, places near thermal
equipment, sandy or dusty places, or in a car
under the sun with the doors and windows
closed.
o
Do not
bend or drop the SD card, or subject it to
strong impact or vibration.
o
Do not splash the SD card with water.
o
Do not dismantle or modify the SD card.
o
Do not touch the terminals with your hands or
with a metal object.
o
Do not allow dust, dirt, water, or foreign objects
to adhere to the terminals.
o
Do not remove the labels or stick other labels or
stickers on the SD cards.
o
Do not use pencils or ballpoint pens to write on
the SD cards. Always use oil-based pens.
o
If you format (initialize) the SD card, all data
recorded on the card, including video data and
setup files, will be deleted.
o
You are recommended to use cards that are
formatted (initialized) on this camera recorder.
0
The SD card may be damaged if the camera
recorder is not operated correctly. Formatting
(Initializing) the SD card may allow it to
operate correctly.
0
SD cards that have been formatted
(initialized) on other cameras, computers or
peripheral equipment may not operate
correctly. In this case, format (initialize) the SD
card on this camera recorder.
o
If you want to wipe out all information by
completely erasing the data, we recommend
either using commercially available software
that is specially designed for that purpose, or by
physically destroying the SD card with a
hammer, etc. When formatting or erasing data
using the camera recorder, only the file
administration information is changed. The data
is not completely erased from the SD card.
o
Some commercially available SD cards may be
harder to be removed from this unit. Remove
them by hooking onto the groove on the cards.
0
It will be easier to remove the cards after
several times.
0
Do not stick any stickers on the cards.
.
Groove
o
The SD card may pop out when it is being
removed. Be careful not to lose the card.
Precautions for Proper Use
21
Introduction