
User Manual
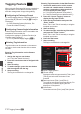
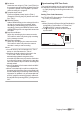
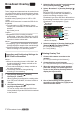
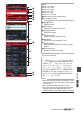
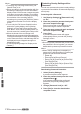
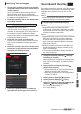
Table Of Contents
- Introduction
- Preparations
- Settings and Adjustments Before Use
- Power Supply
- Power Status Display
- Turning On/Off the Power
- Initial Settings
- Displays on the LCD Monitor and Viewfinder
- Adjusting the LCD Monitor and Viewfinder
- Assignment of Functions to User Buttons
- Tally Lamp and LED
- Recording Media
- Usable Cards
- Usable SSD Media
- Estimated Recordable Time of SD Cards
- Estimated Recordable Time of SSD Media
- Inserting an SD Card
- Removing the SD Card
- Switching the SD cards
- Inserting the SSD Media Adapter
- Formatting (Initializing) of Recording Media
- Repairing the Recording Media
- Clips Recorded to Recording Media
- About the Operation Lock Feature (KEYLOCK)
- Shooting
- Basic Shooting Procedures
- Selecting System Definition, File Format and Video Format
- Zoom Operation
- Focus Operation
- Adjusting the Focusing by Face Detection
- Adjusting the Brightness
- Adjusting the Iris
- Setting the Gain
- Setting the Electronic Shutter
- Setting the ND Filter
- Adjusting the White Balance
- Adjusting the Camera Image
- Using the Image Stabilizer
- Audio Recording
- Monitoring Audio Sound During Recording Using a Headphone
- Time Code and User’s Bit
- Setting Time Code Generator
- Setting the User’s Bit
- Synchronizing Time Code on Another Camera
- Setting Zebra Pattern
- Setting Spot Meter
- Acquiring Positioning Information by GPS
- Viewing Recorded Videos Immediately (Clip Review)
- Displaying the Histogram
- Recording Simultaneously at Two Different Definitions
- Series Rec
- Dual Rec
- Backup Rec
- Special Recording
- Splitting the Clips Freely (Clip Cutter Trig)
- Configuring Infrared Recording
- Playback
- Menu Display and Detailed Settings
- Display/Status Screen
- Camera Features
- Connecting External Devices
- Network
- Functions of Network Connection
- Preparing Network Connection
- Connecting to the Network
- Importing Metadata
- Uploading a Recorded Video Clip
- FTP Resume Feature
- Connecting from a Web Browser
- Editing Metadata
- Uploading a Recording Clip via a Web Browser
- View Remote Feature
- Camera Control Function
- Changing the Settings via a Web Browser
- Managing the Network Connection Settings File
- Performing Live Streaming
- Return Video/Audio from the Network (Return over IP)
- IFB (Return Audio)
- Tagging Feature
- Overlay
- Others
E
Set button
Sends the
text strings in [Title 1] and [Title 2] to
the camera recorder and the tag data of the clip
is updated. Update of the tag data is possible
while recording is in progress.
F
Template input button
Enters a template phrase into the [Title 1].
(Example) Pressing the [KO] button enters KO
into “Title 1”.
G
REMOVE Button
Adds a REMOVE flag to the .xchange file of the
clip that is currently being recorded. When
recording is paused during Clip Continuous
recording, pressing the REMOVE button adds
a REMOVE flag to the .xchange file that was last
recorded.
H
Stop Record Button
Stops clip recording by the camera recorder.
This button is active only during clip recording
by the camera recorder.
I
Start Record Button
Starts clip recording by the camera recorder.
This button is active only when the camera
recorder is ready to start recording.
Memo :
0
You can enter up to 64 characters for “Title 1
”
and up to 128 characters for “Title 2”.
0
Changing (including clearing) the text in the
“Title 1
” and “Title 2
” boxes does not
automatically update the tag data of the
recorded clip. Make sure to press the Set button
to confirm the change. Changes in the tag data
cannot be made to clips for which recording has
already ended.
0
Input of tag data in file formats other than MOV
is not guaranteed.
0
When a recorded clip is split into multiple files,
the same
tag information may not be saved to all
the files depending on the timing at which the tag
information is updated. It is recommended that
a SDXC card be used with [System] B Record
Set B [4GB File Spanning(SDXC)] configured to
“Off”.
Synchronizing GPS Time Code
Time code information can be synchronized with
the date/time information acquired from the GPS.
(A P85 [Acquiring Positioning Information by
GPS] )
Setting Time Code Generator
Set
[TC/UB] B [TC Generator]
to “Free Run(GPS)”.
(A P124 [ TC Generator ] )
Memo :
0
When [System] B [Record Set] B
[Rec Mode] is
configured to “Interval Rec” or “Frame Rec”,
“Free Run(GPS)” cannot be selected.
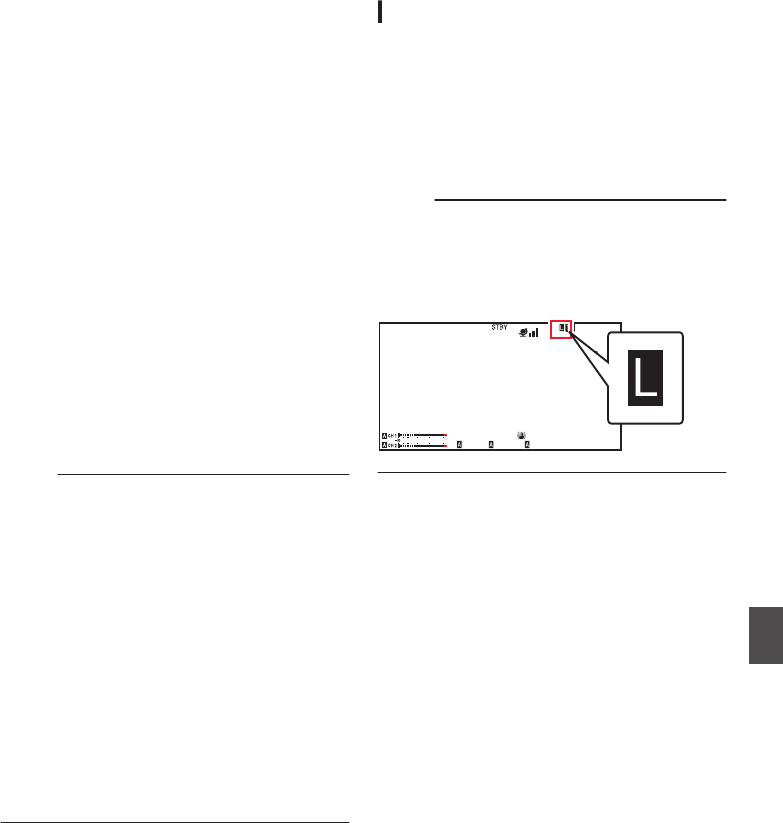
0
The Z icon lights up when the time code is
synchronized.
.
1
/60
F2. 8
AE
±0
ND1
/64
12 :34 : 56
ISO
102400
00: 00:00.00
5 . 6 f t
B 5600
K
4030 20 10 0
Tagging Feature L
213
Network