
User Manual


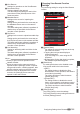
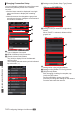

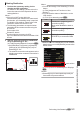

Table Of Contents
- Introduction
- Preparations
- Shooting
- Basic Shooting Procedures
- Selecting System Definition, File Format and Video Format
- Zoom Operation
- Focus Operation
- Adjusting the Focusing by Face Detection
- Adjusting the Brightness
- Adjusting the Iris
- Setting the Gain
- Setting the Electronic Shutter
- Setting the ND Filter
- Adjusting the White Balance
- Adjusting the Camera Image
- Using the Image Stabilizer
- Audio Recording
- Monitoring Audio Sound During Recording Using a Headphone
- Time Code and User’s Bit
- Setting Time Code Generator
- Setting the User’s Bit
- Setting Zebra Pattern
- Viewing Recorded Videos Immediately (Clip Review)
- Recording Simultaneously at Two Different Definitions
- Series Rec
- Dual Rec
- Backup Rec
- Special Recording
- Splitting the Clips Freely (Clip Cutter Trig)
- Playback
- Menu Display and Detailed Settings
- Display/Status Screen
- Camera Features
- Connecting External Devices
- Connecting to the Network
- Functions of Network Connection
- Preparing Network Connection
- Importing Metadata
- Uploading a Recorded Video Clip
- Connecting from a Web Browser
- Editing Metadata
- Uploading a Recording Clip via a Web Browser
- View Remote Feature
- Camera Control Function
- Configuring Settings via a Browser
- Managing the Network Connection Settings File
- Performing Live Streaming
- Others

Starting Distribution
1
Perform the necessary setting for the
decoder and PC application.
For details on the settings, please refer to the
instruction manual of the respective devices
and applications.
Memo :
0
If there is an NAT router within the
communication path between the camera and
the decoder, port forwarding setup is required.
For details on the settings, please refer to the
instruction manual of the router in use.
0
The following parameters are required when
connecting to this camera recorder using the
RTSP/RTP.
Port number: 554
Stream ID: stream
0
Use the following to access via URL.
rtsp://<IP
address of the camera recorder>:554/
stream
2
With the network connection established,
set
[Live Streaming] to “On”.
(A P
142 [Preparing Network Connection K] )
0
Set [Main Menu] B [System] B [Network]/
[Settings] B [Live Streaming Set] B [Live
Streaming] to “On”.
0
The
network connection mark appears on the
display screen when a network connection is
established.
.
100min
50min
282min
3840x2160
30p 150M
1/100
F1. 6
18
dB
AE+6
ND 1 / 1 6
12 : 34 : 56
Jan 24,2015
00: 00: 00.00
4030 20 10 0
5 . 6 f t
P 15 00 0K
Memo :
0
You can also assign
“Live Streaming” to a user
button.
(A P
39 [Assignment of Functions to User
Buttons] )
0
You can view the status of distribution on the
LCD monitor.
(A P131 [Live streaming mark K] )
Icon Status
.
(Red)
Distribution in progress (good
connection quality)
Blinks when distribution starts or
stops
.
(Red)
Distribution in progress (poor
connection quality)
.
(Yellow)
Waiting for connection (during
RTSP/RTP) or connection failed
0
When the 5 icon
is displayed, you can view the
details of the error on the [Network] screen of the
status screen.
.
Cause of Error
192.168.0.1
HM200
P2P
MAC Address
IP Address
Passphrase
Security Type
SSID
Ty p e
Network
Live Streaming
WPA2
Multicast Is Not Supported.
(A P
173 [List of Live Streaming Error Displays
K] )
Caution :
0
Streaming may be interrupted temporarily 24
hours after the process started.
Performing Live Streaming K
169
Connecting to the Network
K