
User Manual
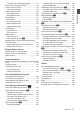

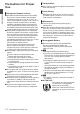
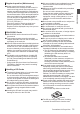


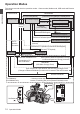
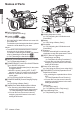
Table Of Contents
- Introduction
- Preparations
- Shooting
- Basic Shooting Procedures
- Selecting System Definition, File Format and Video Format
- Zoom Operation
- Focus Operation
- Adjusting the Focusing by Face Detection
- Adjusting the Brightness
- Adjusting the Iris
- Setting the Gain
- Setting the Electronic Shutter
- Setting the ND Filter
- Adjusting the White Balance
- Adjusting the Camera Image
- Using the Image Stabilizer
- Audio Recording
- Monitoring Audio Sound During Recording Using a Headphone
- Time Code and User’s Bit
- Setting Time Code Generator
- Setting the User’s Bit
- Setting Zebra Pattern
- Viewing Recorded Videos Immediately (Clip Review)
- Recording Simultaneously at Two Different Definitions
- Series Rec
- Dual Rec
- Backup Rec
- Special Recording
- Splitting the Clips Freely (Clip Cutter Trig)
- Playback
- Menu Display and Detailed Settings
- Display/Status Screen
- Camera Features
- Connecting External Devices
- Connecting to the Network
- Functions of Network Connection
- Preparing Network Connection
- Importing Metadata
- Uploading a Recorded Video Clip
- Connecting from a Web Browser
- Editing Metadata
- Uploading a Recording Clip via a Web Browser
- View Remote Feature
- Camera Control Function
- Configuring Settings via a Browser
- Managing the Network Connection Settings File
- Performing Live Streaming
- Others

Names of Parts
.
A
F
B
D
E
C
A
Built-in Microphone
(A P
65 [Audio Recording] )
B
Handle Unit K
(A P24 [Handle Unit K] )
* GY-HM170U/GY-HM170E does not come with
the handle unit.
For details on purchasing the handle unit, please
contact the local dealers in your area.
Memo :
0
The handle unit is detached from the camera
recorder unit in the factory shipment.
For details on attaching the handle unit, please
refer to [Attaching the Handle Unit K] .
(A P
27 [Attaching the Handle Unit K] )
C
[MODE] Camera/Media
Mode Selection Button
(A P18 [Operation Modes] )
D
[POWER ON/OFF] Lock Power ON/OFF Switch
Turns ON/OFF the power.
0
Hold
down the lock button (blue) in the center
to toggle ON/OFF.
0
When the power is turning OFF, “P.OFF”
appears on the LCD monitor and viewfinder.
0
Wait for 5 seconds or more to turn on the
power again.
(A P
32 [Turning On/Off the Power] )
E
[POWER/CHARGE] Power/Charging Display
Lamp
(A P29 [Using a Battery Pack] )
F
[AWB/9] Auto White Balance/User 9 Button
0
For executing Auto White Balance and
switching the registered color temperature.
(A
P60 [Adjusting the White Balance] )
0
You can also use it as a user button by
assigning a specific feature in the menu
setting to this button.
.
H
L
K
M
I
J
N
G
o Bottom
O
G
Visibility Adjustment Lever
(A P
37 [Adjusting the LCD Monitor and
Viewfinder] )
H
Battery
(A P29 [Using a Battery Pack] )
I
Viewfinder
(A P37 [Adjusting the LCD Monitor and
Viewfinder] )
J
Eyepiece
Prevents external light from entering the
viewfinder screen and cameraman’s vision.
K
[REC/7] Record Trigger Button
0
Starts/stops recording.
(A P46
[Basic Shooting Procedures] )
0
You can also use it as a user button by
assigning a specific feature in the menu
setting to this button.
L
Zoom Lever at the Grip
(A P
49 [Using the Zoom Lever at the Grip] )
M
[EXPANDED FOCUS/8] Expanded Focus
Assist/User 8 Button
0
For switching the expanded focus ON or
OFF.
(A P
52 [Expanded Focus Function] )
0
You can also use it as a user button by
assigning a specific feature in the menu
setting to this button.
N
Tally Lamp
(A P
39 [Tally Lamp] )
(A P174 [Blinking of the Tally Lamp] )
O
Tripod Mounting Hole
(A P29 [Attaching the Tripod] )
20
Names of Parts
Introduction