
User Manual
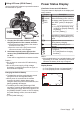

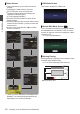


Table Of Contents
- Introduction
- Preparations
- Shooting
- Basic Shooting Procedures
- Selecting System Definition, File Format and Video Format
- Zoom Operation
- Focus Operation
- Adjusting the Focusing by Face Detection
- Adjusting the Brightness
- Adjusting the Iris
- Setting the Gain
- Setting the Electronic Shutter
- Setting the ND Filter
- Adjusting the White Balance
- Adjusting the Camera Image
- Using the Image Stabilizer
- Audio Recording
- Monitoring Audio Sound During Recording Using a Headphone
- Time Code and User’s Bit
- Setting Time Code Generator
- Setting the User’s Bit
- Setting Zebra Pattern
- Viewing Recorded Videos Immediately (Clip Review)
- Recording Simultaneously at Two Different Definitions
- Series Rec
- Dual Rec
- Backup Rec
- Special Recording
- Splitting the Clips Freely (Clip Cutter Trig)
- Playback
- Menu Display and Detailed Settings
- Display/Status Screen
- Camera Features
- Connecting External Devices
- Connecting to the Network
- Functions of Network Connection
- Preparing Network Connection
- Importing Metadata
- Uploading a Recorded Video Clip
- Connecting from a Web Browser
- Editing Metadata
- Uploading a Recording Clip via a Web Browser
- View Remote Feature
- Camera Control Function
- Configuring Settings via a Browser
- Managing the Network Connection Settings File
- Performing Live Streaming
- Others

Adjusting the Viewfinder
You can change the brightness and peaking of the
viewfinder screen according to your usage
conditions.
Changing the brightness of the screen will not
affect the recorded images.
.
2
1
3
Caution :
0
A high-definition viewfinder is used on this
camera
recorder in order to provide an accurate
focusing environment. Due to the characteristic
of the display device, colors may appear on the
images when you blink your eyes. This is not a
malfunction. It does not affect the recorded
images, SDI output K, AV output, or HDMI
output.
1
Pull out the viewfinder.
2
Incline the viewfinder vertically to a
position that enables easy viewing.
3
Adjust the visibility using the visibility
adjustment lever.
Adjust the visibility adjustment lever to sharpen
the image on the viewfinder screen.
4
Adjust the brightness, contour, and
contrast of the viewfinder screen.
0
Use the [VF Bright
] menu to adjust the
brightness of the viewfinder screen.
[Main Menu] B [LCD/VF] B [VF Bright]
(A P
105 [ VF Bright ] )
0
Use the [LCD/VF Peaking] menu to adjust the
contour of the viewfinder.
(The contour of the LCD monitor will also be
adjusted at the same time.)
[Main Menu] B [LCD/VF] B [LCD/VF
Peaking]
(A P
105 [ LCD/VF Peaking ] )
0
Use the [VF Contrast] menu to adjust the
contrast of the viewfinder screen.
[Main Menu] B [LCD/VF] B [VF Contrast]
(A P105
[ VF Contrast ] )
Memo :
0
If [Main Menu] B [LCD/VF
] B [VF SW] is set to
“Enable”, pull out the viewfinder before making
any adjustment.
(A P
104 [ VF SW ] )
Displaying in Black and White
You can display the viewfinder screen in black
and white.
0
[Main Menu] B [LCD/VF] B [
VF Color] item
B Press Set button (R) B Select “Off” B
Press Set button (R).
(A P
104 [ VF Color ] )
38
Adjusting the LCD Monitor and Viewfinder
Preparations