
User Manual
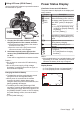


Table Of Contents
- Introduction
- Preparations
- Shooting
- Basic Shooting Procedures
- Selecting System Definition, File Format and Video Format
- Zoom Operation
- Focus Operation
- Adjusting the Focusing by Face Detection
- Adjusting the Brightness
- Adjusting the Iris
- Setting the Gain
- Setting the Electronic Shutter
- Setting the ND Filter
- Adjusting the White Balance
- Adjusting the Camera Image
- Using the Image Stabilizer
- Audio Recording
- Monitoring Audio Sound During Recording Using a Headphone
- Time Code and User’s Bit
- Setting Time Code Generator
- Setting the User’s Bit
- Setting Zebra Pattern
- Viewing Recorded Videos Immediately (Clip Review)
- Recording Simultaneously at Two Different Definitions
- Series Rec
- Dual Rec
- Backup Rec
- Special Recording
- Splitting the Clips Freely (Clip Cutter Trig)
- Playback
- Menu Display and Detailed Settings
- Display/Status Screen
- Camera Features
- Connecting External Devices
- Connecting to the Network
- Functions of Network Connection
- Preparing Network Connection
- Importing Metadata
- Uploading a Recorded Video Clip
- Connecting from a Web Browser
- Editing Metadata
- Uploading a Recording Clip via a Web Browser
- View Remote Feature
- Camera Control Function
- Configuring Settings via a Browser
- Managing the Network Connection Settings File
- Performing Live Streaming
- Others

Assignment of Functions
to User Buttons
You can assign functions to the following buttons
and use them as user buttons.
By
assigning functions to the buttons, the usability
of the camera recorder can be enhanced.
Perform settings in the menu items corresponding
to each button.
Button Menu Item
[F.ASSIST/1] Button [USER1]
[TC/2] Button [USER2]
[LOLUX/3] Button [USER3]
[C.REVIEW/4] Button [USER4]
[ZEBRA/5] Button [USER5]
[OIS/6] Button [USER6]
[REC/7] Button [USER7]
[EXPANDED FOCUS/8] Button [USER8]
[AWB/9] Button [USER9]
LCD Cross-Shaped Button (J) [LCD KEY▲]
LCD Cross-Shaped Button (K) [LCD KEY▼]
LCD Cross-Shaped Button (H) [LCD KEY◀]
LCD Cross-Shaped Button (I) [LCD KEY▶]
.
1
Assign functions to the buttons from the
menu.
Specify each item in [Main Menu] B [Camera
Function] B [User Switch Set] B [USER1]-
[USER9], [LCD KEY▲], [LCD KEY▶], [LCD
KEY▼], [LCD KEY◀].
(A P98 [User Switch Set Item] )
Memo :
0
Operations of the user buttons are interlocked
with the menu settings.
0
When the menu screen is displayed, these
buttons
function as the menu operation buttons.
(A P92 [Basic Operations in Menu Screen] )
Tally Lamp
This is the indicator lamp for recording and
warning.
The operation changes according to the menu
settings.
The lamp blinks when the battery or remaining
space on the SD card is low. (Camera mode only)
*
Specify the setting in [Main Menu] B [System]
B [Tally Lamp].
(A P113 [ Tally Lamp ] )
.
Tally Lamp
(Front)
Handle Tally
Lamp
Menu setting
[Tally Lamp]
Off On
Functional
information
Warning -
J
Caution -
o
Recording status Recording -
R
Special recording * -
R
R
:
Lights up
J
:
Blinks four times in 1 second
o
:
Blinks once in 1 second
*
Paused state during special recording ([Clip
Continuous]).
(A P79 [Clip Continuous Rec] )
Memo :
0
Blinking takes priority over lighting up.
Assignment of Functions to User Buttons
39
Preparations