
User Manual


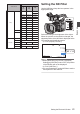
Table Of Contents
- Introduction
- Preparations
- Shooting
- Basic Shooting Procedures
- Selecting System Definition, File Format and Video Format
- Zoom Operation
- Focus Operation
- Adjusting the Focusing by Face Detection
- Adjusting the Brightness
- Adjusting the Iris
- Setting the Gain
- Setting the Electronic Shutter
- Setting the ND Filter
- Adjusting the White Balance
- Adjusting the Camera Image
- Using the Image Stabilizer
- Audio Recording
- Monitoring Audio Sound During Recording Using a Headphone
- Time Code and User’s Bit
- Setting Time Code Generator
- Setting the User’s Bit
- Setting Zebra Pattern
- Viewing Recorded Videos Immediately (Clip Review)
- Recording Simultaneously at Two Different Definitions
- Series Rec
- Dual Rec
- Backup Rec
- Special Recording
- Splitting the Clips Freely (Clip Cutter Trig)
- Playback
- Menu Display and Detailed Settings
- Display/Status Screen
- Camera Features
- Connecting External Devices
- Connecting to the Network
- Functions of Network Connection
- Preparing Network Connection
- Importing Metadata
- Uploading a Recorded Video Clip
- Connecting from a Web Browser
- Editing Metadata
- Uploading a Recording Clip via a Web Browser
- View Remote Feature
- Camera Control Function
- Configuring Settings via a Browser
- Managing the Network Connection Settings File
- Performing Live Streaming
- Others

Memo :
0
Pressing and holding the
[FULL AUTO] button
to enter the Full Auto mode also activates the
automatic brightness adjustment (AE) mode. In
this case, the White Balance also enters into
Auto mode forcibly.
0
Pressing and holding the [AE LEVEL] button
clears the value specified and fixes at
“AE±0”
(recommended value).
0
The convergence speed of the automatic
adjustment
for automatic brightness adjustment
(AE) can be set in the menu.
(A P96 [ AE Speed ] )
0
If one or more of the items (Gain, Iris and
Shutter) have been set to Auto mode, the value
of the corresponding items when the user button
that is assigned “AE Lock” is pressed can be
fixed.
(A P
99 [ AE/FAW Lock ] )
0
If one or more of the items (Gain, Iris and
Shutter) have been set to Auto mode, the
automatic brightness adjustment (AE) mode is
enabled.
Adjusting the Brightness Manually
Press and hold the [FULL AUTO] button to set to
Full Auto mode, some or all of the items (Iris, Gain
and Shutter Speed) can be manually adjusted.
1
Press and hold the [FULL AUTO] button to
set Full Auto mode to off.
2
Adjust the Iris, Gain and Shutter speed.
(A P
55 [Adjusting the Iris] )
(A P57 [Setting the Gain] )
(A P58 [Setting the Electronic Shutter] )
Memo :
0
The brightness cannot be manually adjusted in
the Full Auto mode.
0
If Iris, Gain and Shutter Speed are manually
adjusted, the [AE Level
] setting is temporarily
disabled.
Adjusting the Iris
Adjust
the aperture of the lens iris according to the
brightness of the subject.
.
Iris Dial
Auto Iris (Automatic Adjustment) Mode
1
Press and hold the [FULL AUTO] button to
set Full Auto mode to off.
2
Press the [IRIS A/M] button to set to the
Auto Iris mode.
The iris is automatically adjusted according to
the brightness of the object.
The lens aperture value (F-number) is not
displayed in the Auto Iris mode.
Memo :
0
Pressing and holding the [FULL AUTO] button
to enter the Full Auto mode also activates the
Auto Iris mode. In this case, the Gain, Shutter
and White Balance also enter into Auto mode
forcibly.
The
switching operation of the [IRIS A/M] button
is disabled in the Full Auto mode.
0
The iris open/close limit can be set in
[Main
Menu] B [Camera Function] B [Auto Iris Limit
(OPEN)]/[Auto Iris Limit (CLOSE)] during Auto
Iris.
(A P96
[ Auto Iris Limit (OPEN) ] )
(A P96 [ Auto Iris Limit (CLOSE) ] )
0
To set the target level (brighter/darker) of the
auto iris, you can press and hold the [AE
LEVEL] button on the side of the camera
recorder and then change the level using the J /
K volume button.
0
The convergence speed of the auto iris can be
set in the menu.
(A P96
[ AE Speed ] )
Adjusting the Brightness
55
Shooting