
User Manual
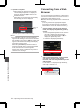
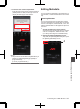
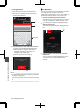
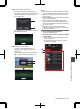
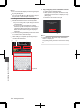
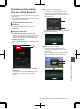
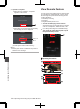
Table Of Contents
- Introduction
- Preparations
- Settings and Adjustments Before Use
- Power Supply
- Power Status Display
- Turning On/Off the Power
- Initial Settings
- Displays on the LCD Monitor and Viewfinder
- Adjusting the LCD Monitor and Viewfinder
- Adjusting the Monitor Speaker
- Adjusting Back Focus
- Assignment of Functions to User Buttons
- Tally Lamp
- SD Card
- About the Operation Lock Feature
- Shooting
- Basic Shooting Procedures
- Selecting a Recording Format
- Zoom Operation
- Focus Operation
- Adjusting the Focus by Face Detection
- Adjusting the Brightness
- Adjusting the Iris
- Setting the Gain
- Setting the Electronic Shutter
- Setting the ND Filter
- Adjusting the White Balance
- Adjusting the Camera Image
- Using the Image Stabilizer
- Audio Recording
- Audio Output during Recording
- Time Code and User’s Bit
- Setting Time Code Generator
- Setting the User’s Bit
- Synchronizing the Time Code with an External Time Code Generator
- Setting Zebra Pattern
- Setting Spot Meter
- Acquiring Positioning Information by GPS
- Viewing Recorded Videos Immediately (Clip Review)
- Using the Histogram
- Recording Simultaneously at Two Different Definitions
- Splitting the Clips Freely (Clip Cutter Trig)
- Dual Rec
- Backup Rec
- Special Recording
- Playback
- Connecting External Devices
- Managing/Editing Clips on a PC
- Connecting External Monitor
- Connecting a Earphone
- Connecting Wired Remote Control
- Connecting a Remote Control Unit
- Functions Operable from the Remote Control Unit
- Inputting SDI Signals from an External Device
- Inputting External Synchronizing Signals (Genlock)
- Displaying Return Videos from an External Device
- Studio System
- Connecting to the Network
- Functions of Network Connection
- Preparing Network Connection
- Importing Metadata
- Uploading a Recorded Video Clip
- Connecting from a Web Browser
- Editing Metadata
- Uploading a Recording Clip via a Web Browser
- View Remote Feature
- Camera Control Function
- Changing the Settings via a Web Browser
- Managing the Network Connection Settings File
- Performing Live Streaming
- Others

o Switching from a web browser
A
You will see a message indicating “It is
necessary to change the camera mode to
"Remote Edit Mode". Change the mode.” on
the web browser.
.
A
B
ChangeCancel
It is necessary to change the camera
mode to "Remote Edit Mode".
Change the mode.
B
Tap (click) [Change] to switch the camera to
the Remote Edit mode.
.
Exit
Remote Edit Mode
o Switching from the camera
A
“Change to Remote Edit Mode?” is
displayed on the display screen of the
camera unit.
B
Select [Change] and press the Set button
(R) to switch to the Remote Edit mode.
.
B
A
Exit
Remote Edit Mode
Cancel
Change
Remote Edit Mode?
Change to
Memo :
0
When the menu or status is displayed, display
of the confirmation screen will be put on hold.
0
If the menu is displayed on the camera recorder,
close the menu.
0
If the status is displayed on the camera recorder,
close the status display.
0
Pressing the Set button (R) on the camera
recorder while in the Remote Edit Mode ends
the Remote Edit Mode forcibly and switches to
the Camera mode.
0
When FTP upload via the camera unit is
currently in progress, switching to the Remote
Edit mode is disabled.
4
Select the Metadata Edit mode.
Select the [Metadata] tab.
5
Select the clip for which you want to rewrite
the metadata.
0
A list of the recorded clips appears on the
[Clip List] screen.
0
Tap (click) the clip for which you want to
rewrite the metadata.
.
4
5
Editing Metadata
185
Connecting to the Network