
User Manual
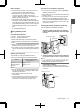
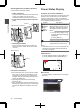
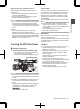
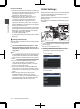
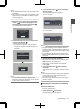
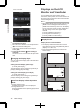
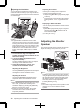
Table Of Contents
- Introduction
- Preparations
- Settings and Adjustments Before Use
- Power Supply
- Power Status Display
- Turning On/Off the Power
- Initial Settings
- Displays on the LCD Monitor and Viewfinder
- Adjusting the LCD Monitor and Viewfinder
- Adjusting the Monitor Speaker
- Adjusting Back Focus
- Assignment of Functions to User Buttons
- Tally Lamp
- SD Card
- About the Operation Lock Feature
- Shooting
- Basic Shooting Procedures
- Selecting a Recording Format
- Zoom Operation
- Focus Operation
- Adjusting the Focus by Face Detection
- Adjusting the Brightness
- Adjusting the Iris
- Setting the Gain
- Setting the Electronic Shutter
- Setting the ND Filter
- Adjusting the White Balance
- Adjusting the Camera Image
- Using the Image Stabilizer
- Audio Recording
- Audio Output during Recording
- Time Code and User’s Bit
- Setting Time Code Generator
- Setting the User’s Bit
- Synchronizing the Time Code with an External Time Code Generator
- Setting Zebra Pattern
- Setting Spot Meter
- Acquiring Positioning Information by GPS
- Viewing Recorded Videos Immediately (Clip Review)
- Using the Histogram
- Recording Simultaneously at Two Different Definitions
- Splitting the Clips Freely (Clip Cutter Trig)
- Dual Rec
- Backup Rec
- Special Recording
- Playback
- Connecting External Devices
- Managing/Editing Clips on a PC
- Connecting External Monitor
- Connecting a Earphone
- Connecting Wired Remote Control
- Connecting a Remote Control Unit
- Functions Operable from the Remote Control Unit
- Inputting SDI Signals from an External Device
- Inputting External Synchronizing Signals (Genlock)
- Displaying Return Videos from an External Device
- Studio System
- Connecting to the Network
- Functions of Network Connection
- Preparing Network Connection
- Importing Metadata
- Uploading a Recorded Video Clip
- Connecting from a Web Browser
- Editing Metadata
- Uploading a Recording Clip via a Web Browser
- View Remote Feature
- Camera Control Function
- Changing the Settings via a Web Browser
- Managing the Network Connection Settings File
- Performing Live Streaming
- Others

Built-In Battery
0
The date/time and time code data are stored
using the built-in rechargeable battery.
0
When power is connected to the camera
recorder, the built-in battery always gets
charged. When the power is disconnected, the
battery gradually discharges.
0
The battery will be totally discharged if left
unused for 3 months and the date/time and time
code data will be reset. When this happens, set
the [POWER ON/OFF] switch to “ON” to display
the [Initial Setting] screen, then set the date/
time.
(A P34 [Initial Settings] )
Using a Battery Pack
Recommended Batteries
U model : Dionic90 (Anton/Bauer)
E model : Endura-HL9 (IDX)
* Models with an E suffix are for the European
market and the UL Listing mark is not applicable.
Caution :
0
Make use of the recommended batteries. Heavy
batteries may fall off if not used correctly.
0
For details on how to charge the battery, please
refer to the [instruction manual] of the battery in
use.
Battery Operating Time
The following are the approximate times for
continuous operation on fully-charged batteries.
Battery
Continuous Recording
Time (At 25 °C)
Dionic90 (U model) Approx. 2.8 h
Endura-HL9 (E
model)
Approx. 2.7 h
Memo :
0
Actual operating times may differ depending on
the age of the battery, charging condition, and
operating environment.
0
Operating time is shortened in cold
environment.
0
The operating time may shorten when power
zoom is used, accessories are connected, or
when the LCD monitor is frequently used.
Precautions for the Battery Operation
0
Do not remove the battery when the [POWER
ON/OFF] switch is “ON”.
0
Do not insert or remove the DC cable when the
battery is in use.
0
Leaving the camera recorder unused with the
battery inside will deplete the battery power
even if you set the [POWER ON/OFF] switch to
“OFF”. Remove the battery if you are not using
the camera recorder.
Attaching/Detaching the Battery (U Model)
Use the Dionic90 (Anton/Bauer) battery.
1
Align the battery guide pins (x3) with the
battery adapter guide hole, and insert them
directly.
.
Guide Pins
Guide Hole (x3)
2
Slide the battery in the direction indicated
by the arrow until a “click” sound is heard.
Memo :
0
If the guide pins are not inserted straight, the
battery will not be attached correctly.
3
Detaching the Battery
Press down the release lever and slide the
battery toward you to detach it from the camera
recorder.
.
Battery
Release Lever
Power Supply
31
Preparations