MasterPage: Cover M5E3PAL.book Page 1 Tuesday, August 2, 2005 4:04 PM ENGLISH 7 GETTING STARTED HARD DISK CAMCORDER GZ-MG50E/EK GZ-MG40E/EK GZ-MG30E/EK GZ-MG20E/EK VIDEO RECORDING & PLAYBACK 22 STILL IMAGE RECORDING & PLAYBACK 28 ADVANCED OPERATIONS 31 MENU SETTINGS 48 REFERENCES 52 To deactivate the demonstration, set “DEMO MODE” to “OFF”. (墌 pg.
MasterPage: Body_Left M5E3PAL.book Page 2 Tuesday, August 2, 2005 4:04 PM 2 EN Major Features of this Camera Built-in Hard Disk Editing Files on your PC This hard disk camera records images to a large, built-in hard disk drive (HDD) instead of a DV tape like conventional video cameras. This enables extended hours of high-resolution, MPEG2 video recording. USB 2.0 enables the smooth transfer of video and still images to a computer.
MasterPage: Reference_Heading0_Right M5E3PAL.book Page 3 Tuesday, August 2, 2005 4:04 PM EN ADVANCED OPERATIONS Contents 3 31 RECORDING FEATURES ..................................... 31 GETTING STARTED 7 Provided Accessories ...................................... 7 Index .............................................................. 10 Power ............................................................. 14 Operation Mode ............................................. 17 Language Setting ..............
MasterPage: Safty_Left M5E3PAL.book Page 4 Tuesday, August 2, 2005 4:04 PM 4 EN Dear Customer, Thank you for purchasing this hard disk camera. Before use, please read the safety information and precautions contained in the pages 4 – 6 to ensure safe use of this product. SAFETY PRECAUTIONS IMPORTANT (for owners in the U.K.) Connection to the mains supply in the United Kingdom. DO NOT cut off the mains plug from this equipment.
MasterPage: Safty_Right M5E3PAL.book Page 5 Tuesday, August 2, 2005 4:04 PM EN Information for Users on Disposal of Old Equipment [European Union] This symbol indicates that the electrical and electronic equipment should not be disposed as general household waste at its end-of-life. Attention: Instead, the product should be handed over to This symbol is only the applicable collection valid in the European point for the recycling of Union.
MasterPage: Safty_Left M5E3PAL.book Page 6 Tuesday, August 2, 2005 4:04 PM 6 EN DON’T leave equipment switched on when it is unattended unless it is specifically stated that it is designed for unattended operation or has a standby mode. Switch off using the switch on the equipment and make sure that your family knows how to do this. Special arrangements may need to be made for infirm or handicapped people.
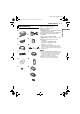
MasterPage: Heading0_Right M5E3PAL.book Page 7 Tuesday, August 2, 2005 4:04 PM Provided Accessories EN 7 a AC Adapter AP-V14E or AP-V17E b Power Cord (AP-V14E only) c Battery Pack BN-VF707U d Audio/Video Cable e USB Cable (Refer to the software installation and USB connection guide.
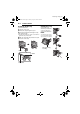
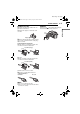
MasterPage: Body_Left M5E3PAL.book Page 8 Tuesday, August 2, 2005 4:04 PM 8 EN GETTING STARTED Attaching the Shoulder Strap Attaching the Lens Cap Follow the illustration. To protect the lens, attach the provided lens cap to the camera as shown in the illustration. 1 Open the velcro strip. 2 Thread the strap through the eyelet. 3 Fold it back and thread it through the strap guide and the buckle. ● To adjust the length of the strap, loosen and then tighten the strap in the buckle.
MasterPage: Start_Right M5E3PAL.book Page 9 Tuesday, August 2, 2005 4:04 PM EN 9 Attaching the Core Filter LCD Monitor Attach the core filters to the cables. The core filter reduces interference. Pull on the end of the LCD monitor and open the LCD monitor fully. It can rotate 270°. 1 Release the stoppers on both ends of the core filter. Stopper 2 Run the cable through the core filter, leaving approx. 3 cm of cable between the cable plug and the core filter.
MasterPage: Heading0_Left M5E3PAL.book Page 10 Tuesday, August 2, 2005 4:04 PM 10 EN GETTING STARTED Index ATTENTION: ● Be careful not to cover b, c, d, and e during shooting. ● Be careful not to cover Y during playback.
MasterPage: Start_Right M5E3PAL.book Page 11 Tuesday, August 2, 2005 4:04 PM EN Controls Indicators a Mode Switch [MODE] (墌 pg. 17) b Light Button [LIGHT] (墌 pg. 31) c Information Button [INFO/ ] (墌 pg. 38) d Play/Pause Button [49] (墌 pg. 24, 29) e Forward Search Button [ (5)] (墌 pg. 25)/ U Power/Charge Lamp [POWER/CHARGE] Right Button [ ]/Auto/Manual Mode Switch [ / ] (墌 pg. 17) f Forward Skip Button [ ] (墌 pg. 25)/Down Button [ ]/Manual Set Button [ SET] (墌 pg.
MasterPage: Body_Left M5E3PAL.book Page 12 Tuesday, August 2, 2005 4:04 PM 12 EN GETTING STARTED Indications on LCD Monitor During Video Recording only During both Video and Still Image Recording [0h56m] 11:30 10.11. 2005 a Mode Indicator (墌 pg. 17) b Wide Mode Indicator (墌 pg. 50) c Wind Cut Indicator (墌 pg. 50) d Picture Quality: [U] (ultra fine), [F] (fine), [N] (normal), [E] (economy) (墌 pg. 50) a Manual Mode Indicator (墌 pg. 17) : Auto Mode : Manual Mode b Tele Macro Mode Indicator (墌 pg.
MasterPage: Start_Right M5E3PAL.book Page 13 Tuesday, August 2, 2005 4:04 PM GETTING STARTED 13 During Still Image Playback 11:30 10. 11. 2005 10. 11. 2005 a Mode Indicator (墌 pg. 17) b Play List Playback Indicator (Appears when play list is played back. 墌 pg. 43) c Picture Quality: [U] (ultra fine), [F] (fine), [N] (normal), [E] (economy) (墌 pg. 50) d Playback Mode (墌 pg.
MasterPage: Body_Left M5E3PAL.book Page 14 Tuesday, August 2, 2005 4:04 PM 14 EN GETTING STARTED 1 Set the power switch to OFF. 2 With the arrow on the battery pack pointing Power This camera’s 2-way power supply system lets you choose the most appropriate source of power. Do not use provided power supply units with other equipment. downward, push the battery pack slightly against the battery pack mount. Charging the Battery Pack place.
MasterPage: Start_Right M5E3PAL.book Page 15 Tuesday, August 2, 2005 4:04 PM GETTING STARTED ● This product includes patented and other proprietary technology and will operate only with JVC Data Battery. Use the JVC BNVF707U/VF714U/VF733U battery packs. Using generic non-JVC batteries can cause damage to the internal charging circuitry. ● If the protective cap is attached to the battery pack, remove it first. ● During charging, the camera cannot be operated.
MasterPage: Body_Left M5E3PAL.book Page 16 Tuesday, August 2, 2005 4:04 PM 16 EN GETTING STARTED Data Battery System Using AC Power You can check the remaining battery power and the recordable time. Perform step 4 in “Charging the Battery Pack”. 1 Make sure the battery is attached. 2 Open the LCD monitor fully. 3 Press INFO/ repeatedly, and the battery status screen appears. ● It is displayed for approx. 3 seconds if the button is pressed and released quickly, and for approx.
MasterPage: Start_Right M5E3PAL.book Page 17 Tuesday, August 2, 2005 4:04 PM GETTING STARTED EN 17 To turn on the camera, set the power switch to or while pressing down the lock button located on the switch. Select the recording/playback mode using the MODE switch. : Video mode (墌 pg. 22, 24) : Still image mode (墌 pg. 28, 29) To turn off the camera, set the power switch to OFF. 3 Auto/Manual Mode ● The power/charge lamp turns on.
MasterPage: Body_Left M5E3PAL.book Page 18 Tuesday, August 2, 2005 4:04 PM 18 EN GETTING STARTED Language Setting Date/Time Settings The language on the display can be changed. (墌 pg. 48, 49) 1 Set the power switch to or . 2 Press MENU. The menu screen appears. 3 Press / to CAMERA SETTING select [DISPLAY], then press 49. BASIC SETTING REC MEDIA SETTING DISPLAY QUALITY WIDE MODE WIND CUT 4 Press / to select [LANGUAGE], then press 49. 5 Press / to select the desired language, then press 49.
MasterPage: Start_Right M5E3PAL.book Page 19 Tuesday, August 2, 2005 4:04 PM GETTING STARTED Grip Adjustment The brightness of the display can be adjusted. 1 Adjust the velcro strip. 2 Pass your right hand 1 Set the power switch to through the loop and grasp the grip. or while pressing down the lock button located on the switch. 2 Open the LCD monitor fully. (墌 pg. 9) 3 Press MENU. The menu screen appears. 4 Press / to select [DISPLAY], then press 49. 5 Press / to select [BRIGHT], and press 49.
MasterPage: Body_Left M5E3PAL.book Page 20 Tuesday, August 2, 2005 4:04 PM 20 EN GETTING STARTED Inserting/Removing an SD Card Formatting a Recording Medium You can use an SD card as a recording medium in the SD slot. See page 62 for the guaranteed media to work with this camera. You can format (initialise) the built-in hard disk (HDD) or SD cards. You have to format the newly-purchased SD cards with this camera before using them.
MasterPage: Start_Right M5E3PAL.book Page 21 Tuesday, August 2, 2005 4:04 PM GETTING STARTED Select the recording medium before starting recording or playback. (墌 pg. 48, 49) Example: When recording still images to an SD card 1 Set the power switch to or . 2 Press MENU. The menu screen appears. 3 Press / to select DIS [REC MEDIA SETTING], then press 49. CAMERA SETTING BASIC SETTING REC MEDIA SETTING DISPLAY QUALITY WIDE MODE 4 Press / to select [IMAGE MODE], then press 49. NO.
MasterPage: Heading0_Left M5E3PAL.book Page 22 Tuesday, August 2, 2005 4:04 PM 22 EN VIDEO RECORDING & PLAYBACK NOTES: Video Recording Power Switch Lock Button Zoom Lever MODE Recording Start/Stop Button 1 Set the power switch to 2 Set the MODE switch to . . ● The camera is programmed to record videos on the built-in hard disk by the factory-preset. To switch the recording medium, see pages 21, 48 and 49. ● To change the picture quality, see pages 48 and 50. ● To use the light, see page 31.
MasterPage: Basic_Right M5E3PAL.book Page 23 Tuesday, August 2, 2005 4:04 PM VIDEO RECORDING & PLAYBACK Zooming 23 To zoom in Slide the zoom lever towards T (telephoto). To zoom out Slide the zoom lever towards W (wide-angle). T: Telephoto ● The S-Video cable is optional. Be sure to use the YTU94146A S-Video cable. Consult the JVC Service Centre described on the sheet included in the package for details on its availability. Make sure to connect the end with a core filter to the camera.
MasterPage: Body_Left M5E3PAL.book Page 24 Tuesday, August 2, 2005 4:04 PM 24 EN VIDEO RECORDING & PLAYBACK To play back files in the [EXTMOV] folder If the data cannot be recorded properly, the video files are saved to the [EXTMOV] folder. (墌 pg. 22) To play back the files in the [EXTMOV] folder, press the recording start/stop button or START/ STOP button on the remote control while the index screen is displayed in step 2, and then proceed to step 3 after [MPG] is displayed.
MasterPage: Basic_Right M5E3PAL.book Page 25 Tuesday, August 2, 2005 4:04 PM How to Use the Scroll Bar You can use the vertical scroll bar on the index screen to find the desired files quickly. The scroll bar is useful when deleting files (墌 pg. 39), creating play list (墌 pg. 42), etc. 1 Slide the zoom lever towards W to select the scroll bar on the index screen. Scroll bar VIDEO 7/53 2 Press / to display the next or previous page. ● If you press and hold / , the high speed search starts.
MasterPage: Body_Left M5E3PAL.book Page 26 Tuesday, August 2, 2005 4:04 PM 26 EN VIDEO RECORDING & PLAYBACK Connecting to a TV, VCR or VDR To S connector Playback on a TV 1 Make sure all units are turned off. 2 Connect the camera to a TV, VCR or VDR as shown in the illustration. If using a VCR or VDR, go to step 3. If not, go to step 4. Open the cover. 3 Connect the VCR/VDR output to the TV input, referring to your VCR/VDR’s instruction manual.
MasterPage: Basic_Right M5E3PAL.book Page 27 Tuesday, August 2, 2005 4:04 PM VIDEO RECORDING & PLAYBACK EN 27 Playback Using the Remote Control Buttons and Functions The full-function remote control unit can operate this camera from a distance as well as the basic operations (playback, stop, pause, fast-forward and rewind) of your VCR. The remote control uses one lithium battery (CR2025). 1 Pull out the battery 2 1 1 holder by pushing the lock tab.
MasterPage: Heading0_Left M5E3PAL.book Page 28 Tuesday, August 2, 2005 4:04 PM 28 EN STILL IMAGE RECORDING & PLAYBACK Zooming Still Image Recording Use the zoom function for close-up or wideangle shooting. For details, see page 23. Power Switch Continuous Shooting Lock Button Zoom Lever MODE Recording Start/Stop Button 1 Set the power switch to 2 Set the MODE switch to . . ● The camera is programmed to record still images on the built-in hard disk by the factory-preset.
MasterPage: Basic_Right M5E3PAL.book Page 29 Tuesday, August 2, 2005 4:04 PM STILL IMAGE RECORDING & PLAYBACK EN 29 Slide Show Still Image Playback You can playback all the images stored in recording media automatically. 1 Set the power switch to 2 Set the MODE switch to Power Switch Lock Button MODE Zoom Lever . . ● A still image is displayed. ● To switch the medium to be played back, see pages 21, 48 and 49.
MasterPage: Body_Left M5E3PAL.book Page 30 Tuesday, August 2, 2005 4:04 PM 30 EN STILL IMAGE RECORDING & PLAYBACK How to Use the Scroll Bar Playback Zoom You can use the vertical scroll bar on the index screen to find the desired files quickly. The scroll bar is useful when deleting files (墌 pg. 39), setting DPOF (墌 pg. 46), etc. You can magnify the playback image up to 5x. 1 Slide the zoom lever towards W to select the scroll bar on the index screen.
MasterPage: Menu_Heading0_Right M5E3PAL.book Page 31 Tuesday, August 2, 2005 4:04 PM RECORDING FEATURES Backlight Compensation / Backlight compensation brightens the subject quickly. With simple operation, dark portions of the subject are brightened by increasing the exposure. . ) so that is displayed. 3 Press ( ) once so that the indicator appears. Spot Exposure Control . ) so that is displayed. 3 Press ( ) twice so that the indicator appears. ● The spot metering area frame centre.
MasterPage: Body_Left M5E3PAL.book Page 32 Tuesday, August 2, 2005 4:04 PM 32 EN RECORDING FEATURES Manual Exposure Manual Settings in MSET Menu / You can use manual recording functions easily by selecting items in the MSET menus. How to Select a Menu Item 1 Set the power switch to 2 Press and hold ( / . ) so that is 1 Select [AE] in the MSET menu. (墌 pg. 32) 2 If [AUTO] is selected, press . (video mode displayed. 3 Press ( ). The menu screen appears.
MasterPage: Menu_Right M5E3PAL.book Page 33 Tuesday, August 2, 2005 4:04 PM RECORDING FEATURES Manual Focus The camera's Full Range AF system offers continuous focusing ability from close-up to infinity. However, the correct focus may not be obtained depending on the shooting condition. In this case, use the manual focus mode. 1 Select [AF] in the MSET menu. (墌 pg. 32) 2 If [AUTO] is selected, press , then press 49. 3 Press ( to focus on a nearer subject. ) Press to focus on a further subject.
MasterPage: Body_Left M5E3PAL.book Page 34 Tuesday, August 2, 2005 4:04 PM 34 EN RECORDING FEATURES White Balance The white balance is usually adjusted automatically for correctness of the colour reproduction under various lighting. However, you can also select the following modes according to the shooting situations. 1 Select [WB] in the MSET menu. (墌 pg. 32) 2 Press / to select the desired mode. MWB: For adjusting the white balance manually depending on the light source.
MasterPage: Menu_Right M5E3PAL.book Page 35 Tuesday, August 2, 2005 4:04 PM RECORDING FEATURES Shutter Speed You can set the shutter speed manually. A fast shutter speed can freeze the motion of a fastmoving subject and a slow shutter speed can blur the subject to give the impression of motion. 1 Select [S.SP] in the MSET menu. (墌 pg. 32) 2 If [AUTO] is selected, press . 3 Press / to select the desired shutter speed. The shutter speed is displayed. You can select the shutter speed from the followings.
MasterPage: Body_Left M5E3PAL.book Page 36 Tuesday, August 2, 2005 4:04 PM 36 EN RECORDING FEATURES Program AE Effect You can use the program AE settings for specific shooting situations. You can add special effects to your recording images. 1 Select [P.AE] in the MSET menu. (墌 pg. 32) 2 Press / to select the desired mode. 1 Select [EF] in the MSET menu. (墌 pg. 32) 2 Press / to select the desired mode. TWILIGHT: Makes evening scenes look more natural.
MasterPage: Menu_Heading0_Right M5E3PAL.book Page 37 Tuesday, August 2, 2005 4:04 PM PLAYBACK FEATURES Playback Effects 37 / You can view videos with various effects of scene transition. You can view videos or still images with special image effects. 1 Set the power switch to . 2 Set the MODE switch to . 3 Press MENU. The menu screen appears. 4 Press / to select [WIPE/FADER], then 1 Set the power switch to . 2 Set the MODE switch to or . 3 Press MENU. The menu screen appears.
MasterPage: Heading0_Left M5E3PAL.book Page 38 Tuesday, August 2, 2005 4:04 PM 38 EN MANAGING FILES Viewing File Information / You can view the file information in playback mode. Information on Video Files Press INFO/ while video playback is paused. File information appears. FILE: File name FOLDER: Folder name DATE/TIME: Date and time of the recording PB TIME: Playback time (length of the file) QUALITY: Image quality (墌 pg. 50) PROTECT: File protection status (墌 pg.
MasterPage: Menu_Right M5E3PAL.book Page 39 Tuesday, August 2, 2005 4:04 PM MANAGING FILES To protect all files / to select [PROTECT ALL], then / to select [EXECUTE], then press 49. 6 Press Deleting Files 39 / You can delete unnecessary files. press 49. Deleting by the To release protection of all files 1 Set the power switch to . 2 Select the file type (video or still image) using ● All files are protected. 5 Select [CANCEL ALL], then press 49. 6 Press / to select [EXECUTE], then press 49.
MasterPage: Body_Left M5E3PAL.book Page 40 Tuesday, August 2, 2005 4:04 PM 40 EN MANAGING FILES To delete by selecting multiple files 5 Press / to select [FILE SELECT], then press 49. ● The index screen appears. 6 Press / / / to select the file you want to delete, then press 49. ● To select other files, repeat step 6. ● The scroll bar can also be used with the zoom lever and pressing / . (墌 pg. 25, 30) ● If you slide the zoom lever towards T, the preview screen is displayed.
MasterPage: Menu_Right M5E3PAL.book Page 41 Tuesday, August 2, 2005 4:04 PM MANAGING FILES You can copy or move still image files between the built-in hard disk (HDD) and SD card using the on-screen display. Before proceeding to following steps, ● Make sure that SD card is inserted in the SD slot. ● Make sure that enough free space is left in the copy/move destination medium. 1 Set the power switch to or . 2 Press MENU. The menu screen appears. 3 Press / to select [REC MEDIA SETTING], then press 49.
MasterPage: Body_Left M5E3PAL.book Page 42 Tuesday, August 2, 2005 4:04 PM 42 EN MANAGING FILES Resetting the File Number / By resetting the file number (name), a new folder will be made. The new files you are going to make will be stored in the new folder. It is convenient to separate the new files from previously recorded files. 1 Set the power switch to or . 2 Press MENU. The menu screen appears. 3 Press / to select [REC MEDIA SETTING], then press 49. 4 Press / to select [NO.
MasterPage: Menu_Right M5E3PAL.book Page 43 Tuesday, August 2, 2005 4:04 PM MANAGING FILES 1 After step 10, press to select a thumbnail image of the play list. 2 Press / to select a scene you want to check. 3 Press 49. The playback of the play list starts from the selected scene. ● The playback stops at the end of the play list automatically. ● To stop playback midway, press 49, then slide the zoom lever towards W.
MasterPage: Body_Left M5E3PAL.book Page 44 Tuesday, August 2, 2005 4:04 PM 44 EN MANAGING FILES Add/Delete Files in Play List Changing Play List Name You can edit existing play lists by adding or deleting files. The default name of play list is its creation date and time. You can change the name on the keyboard screen as you like. 1 Set the power switch to . 2 Set the MODE switch to . 3 Press MENU. The menu screen appears. 4 Press / to select [PLAY LIST], then press 49.
MasterPage: Menu_Right M5E3PAL.book Page 45 Tuesday, August 2, 2005 4:04 PM MANAGING FILES EN 45 Deleting Play List Dubbing Using Play List You can delete unnecessary play lists. Dubbing to an external device using a play list is possible. press 49. 5 Press / to select [DELETE], then press 49. The table of play lists appears. 6 Press / to select a play list you want to delete. ● The thumbnail appears on the upper right side. ● To delete all play lists at once, select [DELETE ALL].
MasterPage: Body_Left M5E3PAL.book Page 46 Tuesday, August 2, 2005 4:04 PM 46 EN MANAGING FILES To print all still images (One print for each) DPOF Print Setting 1 Display the DPOF menu screen. (墌 “To print This camera is compatible with DPOF (Digital Print Order Format). You can set which images to be printed and the number of prints with this camera. This feature is useful to print with a DPOF-compatible printer or bring a recording medium to photo lab for print.
MasterPage: Menu_Right M5E3PAL.book Page 47 Tuesday, August 2, 2005 4:04 PM MANAGING FILES If your printer is compatible with PictBridge, still images can be printed easily by connecting the camera with the USB cable directly to the printer. DPOF setting can also be used. (墌 pg. 46) NOTE: After selecting [DIRECT PRINT] in the menu, connect the USB cable. To print by selecting a still image 1 Set the power switch to . 2 Set the MODE switch to . 3 Press MENU. The menu screen appears.
MasterPage: Heading0_Left M5E3PAL.book Page 48 Tuesday, August 2, 2005 4:04 PM 48 EN MENU SETTINGS Changing the Menu Settings You can change the menu settings to customize your camera. Access the desired menu screen by following the steps below, then change the various settings. Common Menus for All Modes [ ] = Factory-preset BASIC SETTING PRESET EXECUTE: Resets all settings to the factorypreset. [CANCEL]: Returns to the menu screen without executing reset.
MasterPage: Menu_Right M5E3PAL.book Page 49 Tuesday, August 2, 2005 4:04 PM MENU SETTINGS DROP DETECTION OFF: Disables the function. [ON]: Turns off the power automatically to prevent HDD damage when the camera is accidentally dropped. (墌 pg. 21) CAUTION: Setting this function to off increases the chances of damaging the internal hard disk if the camera is accidentally dropped.
MasterPage: Body_Left M5E3PAL.book Page 50 Tuesday, August 2, 2005 4:04 PM 50 EN MENU SETTINGS NOTES: Video Recording Menus ● Accurate stabilization may not be possible if hand shake is excessive, or depending on the shooting condition. In this case, the indicator blinks or goes out. ● Switch off this mode when recording with the camera on the tripod. [ ] = Factory-preset QUALITY Select the desired picture quality.
MasterPage: Menu_Right M5E3PAL.book Page 51 Tuesday, August 2, 2005 4:04 PM MENU SETTINGS Still Image Playback Menus [ ] = Factory-preset [ ] = Factory-preset QUALITY [FINE] / STANDARD Select the desired image quality. 墌 “DPOF Print Setting” (墌 pg. 46) IMAGE SIZE* [1152 x 864] / 1024 x 768 / 640 x 480 Select the desired image size. * Not available for GZ-MG30E/EK/GZ-MG20E/EK.
MasterPage: Heading0_Left M5E3PAL.book Page 52 Tuesday, August 2, 2005 4:04 PM 52 EN REFERENCES Troubleshooting The camera is a microcomputer-controlled device. External noise and interference (from a TV, a radio, etc.) might prevent it from functioning properly. H To solve the problem, follow the Instructions below at first. H If the problem is not solved, reset the camera. (Refer to “To reset the camera” below.) H If the problem still exists, please consult your nearest JVC dealer.
MasterPage: Menu_Right M5E3PAL.book Page 53 Tuesday, August 2, 2005 4:04 PM REFERENCES The recorded image is white ● Shutter speed is set to NIGHTSCOPE or slow speed. HNIGHTSCOPE and slow speed are only for use in dark conditions. (墌 pg. 35) Playback Playback cannot be performed. ● Recording medium is not selected properly. HSelect the recording medium. (墌 pg. 21, 48, 49) ● Playback starts, but there is no picture on the connected TV. HSet the TV's input mode or channel appropriate for video playback.
MasterPage: Body_Left M5E3PAL.book Page 54 Tuesday, August 2, 2005 4:04 PM 54 EN REFERENCES Other problems The power/charge lamp on the camera does not light during charging. ● Charging is difficult in places subject to extremely high/low temperatures. HTo protect the battery, it is recommended to charge it in places with a temperature of 10°C to 35°C. (墌 pg. 58) The data process is too slow after the power is switched on or the mode is changed. ● There is a large number of still images (approx.
MasterPage: Menu_Right M5E3PAL.book Page 55 Tuesday, August 2, 2005 4:04 PM REFERENCES The following indications appear on the screen. (Battery indicator) Displays the battery remaining power. Remaining power level High Exhausted ● As the battery power comes close to nil, the battery indicator blinks. When the battery power is exhausted, power turns off automatically. SET DATE/TIME! ● Appears when the date/time is not set. (墌 pg.
MasterPage: Body_Left M5E3PAL.book Page 56 Tuesday, August 2, 2005 4:04 PM 56 EN REFERENCES NO VIDEO MANAGEMENT FILE VIDEO FILES HAVE BEEN MOVED TO MPEG FOLDER The data cannot be recorded properly, or the video management file is deleted or not found. Video files have been moved to MPEG (EXTMOV) folder. (墌 pg. 22) PLAY LIST’S MANAGEMENT INFORMATION IS BROKEN. REMAKE PLAY LIST AGAIN. The management information of play list is broken. Create the play list again. (墌 pg.
MasterPage: Menu_Right M5E3PAL.book Page 57 Tuesday, August 2, 2005 4:04 PM REFERENCES Before cleaning, turn off the camera and remove the battery pack and AC adapter. To clean the exterior Wipe gently with a soft cloth. Put the cloth in diluted mild soap and wring it well to wipe off heavy dirt. Then wipe again with a dry cloth. To clean the LCD monitor Wipe gently with a soft cloth. Be careful not to damage the monitor. To clean the lens Wipe gently with lens cleaning paper.
MasterPage: Body_Left M5E3PAL.book Page 58 Tuesday, August 2, 2005 4:04 PM 58 EN REFERENCES ● To prevent damage and prolong service life ... do not subject to unnecessary shock. ... charge in an environment where temperatures are within the tolerances shown in the chart below. This is a chemical reaction type battery — cooler temperatures impede chemical reaction, while warmer temperatures can prevent complete charging. ... store in a cool, dry place.
MasterPage: Menu_Right M5E3PAL.book Page 59 Tuesday, August 2, 2005 4:04 PM REFERENCES EN 59 Main Unit How to Handle a CD-ROM ● For safety, DO NOT ... open the camera’s chassis. ... disassemble or modify the unit. ... short-circuit the terminals of the battery pack. Keep it away from metallic objects when not in use. ... allow inflammables, water or metallic objects to enter the unit. ... remove the battery pack or disconnect the power supply while the power is on. ...
MasterPage: Body_Left M5E3PAL.book Page 60 Tuesday, August 2, 2005 4:04 PM 60 EN REFERENCES Specifications Camera For general Power supply DC 11 V (Using AC adapter) DC 7.2 V (Using battery pack) Power consumption Approx. 4.5 (4.8)* W * When using the LED light Dimensions (W x H x D) 67 mm x 70 mm x 109 mm Weight Approx. 320 g (without battery, lens cap and strap) Approx. 380 g (incl.
MasterPage: Menu_Right M5E3PAL.book Page 61 Tuesday, August 2, 2005 4:04 PM REFERENCES For still image Format JPEG Image size GZ-MG50E/EK/GZ-MG40E/EK: 3 modes (1152 x 864 / 1024 x 768 / 640 x 480) GZ-MG30E/EK/GZ-MG20E/EK: Only 1 mode (640 x 480) Picture quality 2 modes (FINE/STANDARD) For connectors AV S-Video output: Y: 1.0 V (p-p), 75 Ω, analogue C: 0.29 V (p-p), 75 Ω, analogue Video output: 1.0 V (p-p), 75 Ω, analogue Audio output: 300 mV (rms), 1 kΩ, analogue, stereo USB Mini USB-B type, USB 1.1/2.
MasterPage: Body_Left M5E3PAL.book Page 62 Tuesday, August 2, 2005 4:04 PM 62 EN REFERENCES Recording Time and Number of Images The tables below show the approximate recording time and number of storable images. The number increases or decreases depending on the conditions such as image size and/or picture quality. The first column in the table indicates the conditions. 8 Compatible recording media The following SD cards have been guaranteed to work with this camera.
MasterPage: Menu_Right M5E3PAL.
MasterPage: Reference_Heading0_Right M5E3PAL.book Page 64 Tuesday, August 2, 2005 4:04 PM EN TERMS A M AC Adapter ....................................................... 16 Manual Exposure ........................................ 32, 33 Manual Focus ................................................... 33 MSET Menu ..................................................... 32 B Backlight Compensation ..................................... 31 Battery Pack .....................................................
M5E3_InstallGuide.
MasterPage: Body M5E3_InstallGuide.book Page 2 Wednesday, July 6, 2005 11:53 AM JVC SOFTWARE LICENSE AGREEMENT . Contents JVC SOFTWARE LICENSE AGREEMENT .... 2 Notice for Users ............................................... 6 System Requirements ..................................... 8 Software Installation (Windows®) .................. 11 Connections (Windows®) ............................... 13 Viewing the Contents of a Recording Medium (Windows®) ................................................
MasterPage: Body M5E3_InstallGuide.book Page 3 Wednesday, July 6, 2005 11:53 AM 3 RESTRICTION ON THE PROGRAM (1) You may not reverse engineer, decompile, disassemble, revise or modify the Program, except to the extent that expressly permitted by applicable law. (2) You may not copy or use the Program, in whole or in part, other than as expressly specified in this Agreement.
MasterPage: Body M5E3_InstallGuide.book Page 4 Wednesday, July 6, 2005 11:53 AM 7 EXPORT CONTROL You agree that You will not ship, transfer or export the Program or underlying information and technology to any countries to which Japan and other relevant countries have initiated an embargo on such goods. 9 GENERAL (1) No modification, change, addition, deletion or other alternation of or to this Agreement will be valid unless reduced to writing and signed by an authorized representative of JVC.
MasterPage: Body M5E3_InstallGuide.book Page 5 Wednesday, July 6, 2005 11:53 AM CAUTION: ● Operate this equipment according to the operating procedures described in this manual. ● Use only the provided CD-ROM. Never use any other CD-ROM to run this software. ● Do not attempt to modify this software. ● Changes or modifications not approved by JVC could void user’s authority to operate the equipment.
MasterPage: BodyAcross M5E3_InstallGuide.book Page 6 Wednesday, July 6, 2005 11:53 AM Notice for Users Use of this software is authorized according to the terms of the software license. JVC When contacting the nearest JVC office or agency in your country about this software (refer to the JVC Worldwide Service Network at http://www.jvc-victor.co.jp/english/worldmap/index-e.html), please fill out the following and have the appropriate information ready.
MasterPage: BodyAcross M5E3_InstallGuide.book Page 7 Wednesday, July 6, 2005 11:53 AM PIXELA For technical inquiries, please contact the PIXELA User Support Center in your region. Region North America Europe Asia Location Los Angeles U.K. Philippines Please check the PIXELA website for latest information and downloading. http://www.pixela.co.jp/oem/jvc/e/index.
MasterPage: BodyAcross M5E3_InstallGuide.book Page 8 Wednesday, July 6, 2005 11:53 AM System Requirements Windows® 8 Digital Photo Navigator The following requirements must be satisfied to connect a camera to a PC and to use Digital Photo Navigator.
MasterPage: BodyAcross M5E3_InstallGuide.book Page 9 Wednesday, July 6, 2005 11:53 AM 8 CyberLink DVD Solution The following requirements must be satisfied to use CyberLink DVD Solution.
MasterPage: BodyAcross M5E3_InstallGuide.book Page 10 Wednesday, July 6, 2005 11:53 AM Macintosh 8 Capty MPEG Edit EX The following requirements must be satisfied to use Capty MPEG Edit EX. Hardware : iMac G4, iMac G5, iBook G4, Power Mac G5, PowerBook G4, eMac, Mac Mini OS : Mac OS X (v10.2.8, v10.3.1 to v10.3.
MasterPage: Body M5E3_InstallGuide.book Page 11 Wednesday, July 6, 2005 11:53 AM 1 Load the provided CD-ROM into the PC. Software Installation (Windows®) After a moment, the [SETUP] screen appears. Follow the procedure described below to install the software. From the [SETUP] screen in step 2, you can install the following drivers or software. Before start installing, quit any other software you are using. (Check that there are no other application icons on the status bar.) Digital Photo Navigator 1.
MasterPage: Body M5E3_InstallGuide.book Page 12 Wednesday, July 6, 2005 11:53 AM 5 Click [Next]. 8 Click [Next]. [License Agreement] screen appears. [Setup Type] screen appears. 6 Click [Yes]. 9 Select the program(s) you want to install, then click [Next]. [Customer Information] screen appears. 7 Confirm your information and click [Next]. ● It is possible to change the information. [Setup Status] screen appears.
MasterPage: Body M5E3_InstallGuide.book Page 13 Wednesday, July 6, 2005 11:53 AM NOTES: ● If PowerDirector/PowerProducer/PowerDVD have already been installed on the PC, uninstall them before installing the provided software. Video files captured with this camera can only be handled on the provided software. Please install and use the provided software (PowerDirector Express NE, PowerProducer 2 Gold NE, PowerDVD 5 NE).
MasterPage: Body M5E3_InstallGuide.book Page 14 Wednesday, July 6, 2005 11:53 AM When using Windows® 2000: Viewing the Contents of a Recording Medium (Windows®) 1 If you want to view the contents in the SD Memory Card, make sure that the card is set in the camera. 2 Set the camera’s power switch to the playback mode while pressing down the lock button located on the switch. The camera turns on. 3 Connect the camera to the PC with a USB cable. ( pg.
MasterPage: Body M5E3_InstallGuide.book Page 15 Wednesday, July 6, 2005 11:53 AM Folder structure within the recording medium Video files: Stored in the [PRGxxx] folder (where xxx is a number), within the [SD_VIDEO] folder. Still image files: Stored in the [xxxJVCSO] folder (where xxx is a number), within the [DCIM] folder. Recording medium [100JVCSO] [101JVCSO] [102JVCSO] [SD_VIDEO] [MGR_INFO] [PRG001] [PRG001.PGI] [MOV001.MOD] [MOV001.
MasterPage: Body M5E3_InstallGuide.book Page 16 Wednesday, July 6, 2005 11:53 AM NOTES: Copying Files to the PC (Windows®) ● Never disconnect the USB cable while the ACCESS lamp on the camera lights or blinks. ● File transfer takes considerable time in PCs. Usage of a PC that supports USB 2.0 is required. Still images and video files that are stored in a recording medium can be copied to the PC and played back on the PC.
MasterPage: Body M5E3_InstallGuide.book Page 17 Wednesday, July 6, 2005 11:53 AM Disconnecting the USB cable (Windows®) Playing Back Files on the PC (Windows®) Still images Use an application that can handle the JPEG file format. To view a still image, double-click the still image file (extension “.jpg”). Before loading or unloading recording mediums or turning off the PC, first disconnect the USB cable and turn off the camera. 1 Confirm that the ACCESS lamp on the camera does not light or blink.
MasterPage: Body M5E3_InstallGuide.book Page 18 Wednesday, July 6, 2005 11:53 AM 4 Click [OK]. ® User’s Guide/Help/Readme (Windows®) Windows 2000: If a message indicating that the device can be safely removed appears, click [OK] and then click [Close]. This manual only refers to software installation and PC connection. For more details of each software, refer to its User’s Guide/Help/Readme. 8 CyberLink DVD Solution Following steps are the example of CyberLink PowerDirector Express NE.
MasterPage: Body M5E3_InstallGuide.book Page 19 Wednesday, July 6, 2005 11:53 AM 8 Digital Photo Navigator The User’s Guide is included on the CD-ROM in PDF format. Right-click the CD-ROM icon in [My Computer], then click [Open]. Double-click the [Docs] folder, then double-click the [PhotoNavi] folder. Open the "Start.pdf" file and click the button of the desired language. Note that Adobe® Acrobat® ReaderTM or Adobe® Reader® must be installed to read PDF files.
MasterPage: Body M5E3_InstallGuide.book Page 20 Wednesday, July 6, 2005 11:53 AM 5 Copy the entire [SD_VIDEO] folder. Playing Back Copied Video (Windows®) When returning folders backed up to the PC back to the camera, be sure to first erase the [SD_VIDEO] folder in the camera HDD before copying the [SD_VIDEO] folder of the PC. Creating play lists using multiple files and viewing video 1 Click the bottom right of the operation panel to create a playlist using multiple files.
MasterPage: Body M5E3_InstallGuide.book Page 21 Wednesday, July 6, 2005 11:53 AM How To Create DVDs simply (Windows®) (Example of transition) 1 Start PowerDirector Express NE and click [Load a media folder] of the import button, then select the folder that you have copied to PC to register it to the library. 3 Select [Produce a Disc], and then click [Next]. 2 Drag and drop the videos from the library to the timeline/storyboard in the playback order.
MasterPage: Body M5E3_InstallGuide.book Page 22 Wednesday, July 6, 2005 11:53 AM 4 Select [DVD Format] and click [Next]. ● If the video is [ULTRA FINE], [FINE], or [NORMAL], select [High Quality NTSC (or PAL) DVD]. If the video is [ECONOMY], select [Long Play NTSC (or PAL) DVD]. Encoding is not performed on unedited video, and high-speed processing is performed at the original image quality. ● Insert a check mark for [Use SVRT to save rendering time].
MasterPage: Body M5E3_InstallGuide.book Page 23 Wednesday, July 6, 2005 11:53 AM 8 Remove the check mark for [Include Menu] Creating a DVD with Titles (Windows®) in the [Preview] screen, and then click []]. 1 Connect the camera to the PC with the USB cable, or remove the SD Memory Card from the camera and connect it to the PC using the card reader. Copy the video file folder (ex. “PRG001”) in the recording medium to the PC.
MasterPage: Body M5E3_InstallGuide.book Page 24 Wednesday, July 6, 2005 11:53 AM 3 Drag and drop the videos from the library 4 Select [Create a File (Everio Series)], and to the timeline/storyboard in the playback order. ● If necessary, edit transition or title on the timeline/storyboard. Click [Produce] after finish editing. ● Video in 4:3 aspect ratio and 16:9 aspect ratio cannot be edited together.
MasterPage: Body M5E3_InstallGuide.book Page 25 Wednesday, July 6, 2005 11:53 AM 6 Click [Start]. 11Click [Open media files]. The file that was This starts conversion of the edited file. The file is saved to the location displayed in the storage location. Before creating slideshows or titles on a DVD that includes video in 16:9 aspect ratio, still images must first undergo the squeeze process. saved before is opened.
MasterPage: Body M5E3_InstallGuide.book Page 26 Wednesday, July 6, 2005 11:53 AM 5 Click [Continue] on the Introduction Software Installation (Macintosh) screen. Read Me screen appears. Follow the procedure described below to install the software. Before start installing, quit any other software you are using. Capty MPEG Edit EX This application is used to edit video files (MPEG-2 format) and write them into QuickTime and a variety of formats. 1 Load the provided CD-ROM into the PC.
MasterPage: Body M5E3_InstallGuide.book Page 27 Wednesday, July 6, 2005 11:53 AM 8 Click [Agree] if you agree with the license 11Enter the Macintosh Administrator name agreement. Select a Destination screen appears. and password in [Name] and [Password] respectively, and click [OK]. Finish Up screen appears. 9 Select the desitination volume and click ● If you are not the owner, this screen will not be appeared. [Continue]. Installation Type screen appears.
MasterPage: Body M5E3_InstallGuide.book Page 28 Wednesday, July 6, 2005 11:53 AM Connections (Macintosh) Connect the USB cable to copy still images and video files in a recording medium to the PC. Viewing the Contents of a Recording Medium (Macintosh) 1 If you want to view the contents in the SD Memory Card, make sure that the card is set in the camera. PC 2 Set the camera’s power switch to the playback mode while pressing down the lock button located on the switch.
MasterPage: Body M5E3_InstallGuide.book Page 29 Wednesday, July 6, 2005 11:53 AM 4 Double-click the memory card icon on the desktop. The folders in the recording medium appear. ● Any folders or files other than those described above are also recorded in the recording medium. ● Saving the wrong kinds of files in a recording medium or deleting files or folders from a recording medium can cause problems with the operation of the camera.
MasterPage: Body M5E3_InstallGuide.book Page 30 Wednesday, July 6, 2005 11:53 AM Copying Files to the PC (Macintosh) Disconnecting the USB cable (Macintosh) Still images and video files that are stored in recording medium can be copied to the PC and played back on the PC. Before loading or unloading recording medium or turning off the PC, first disconnect the USB cable and turn off the camera. 1 Double-click the recording medium icon on the desktop. The folders in the recording medium appear.
MasterPage: Body M5E3_InstallGuide.book Page 31 Wednesday, July 6, 2005 11:53 AM Help/Readme (Macintosh) File Combination (Macintosh) Step1 Start Capty MPEG Edit EX. 1 Double click the [Macintosh HD] icon. This manual only refers to software installation and PC connection. For more details of the software, refer to its Help/Readme. 8 Capty MPEG Edit EX 1 Open the [Capty MPEG Edit EX for Everio] folder in the [Applications] folder. 2 Double-click the [Capty MPEG Edit EX for Everio] icon.
MasterPage: Body M5E3_InstallGuide.book Page 32 Wednesday, July 6, 2005 11:53 AM 4 Click [Open] to import the file. Step2 To combine two or more files, they need to first be linked in File Combination Mode. If the files will not be combined, proceed to Step 6. To switch to File Combination Mode, from the Capty MPEG Edit EX menu, 1 Click [View]. 2 Click [Combine Files]. 5 The files are arranged in playback order in the File Combination Mode window.
MasterPage: Body M5E3_InstallGuide.book Page 33 Wednesday, July 6, 2005 11:53 AM Step4 Select the file format. Normally, select MPEG (system stream) format. See Help for other file formats. 1 Select the file format, and click [Execute]. File Trimming (Macintosh) Skip to Step9 if you do not edit video files. Step5 Switching to Trimming Mode. 1 Click [View] from the Capty MPEG Edit EX menu bar. 2 Click [Trimming]. 2 Enter the file name to be saved to [Save As].
MasterPage: Body M5E3_InstallGuide.book Page 34 Wednesday, July 6, 2005 11:53 AM Step7 Editing 1 The point selected first in the trimming Step8 Saving 1 Select the trimming range processing range is displayed in the GOP list or frame list. To edit in frame units, insert a check mark to display the frame in the frame list. method. Delete trimming range ● Note that the scroll function will become slower. Deletes the trimming range and creates a new file.
MasterPage: Body M5E3_InstallGuide.book Page 35 Wednesday, July 6, 2005 11:53 AM Step9 Creating DVDs PIXELA’s “CaptyDVD/VCD Ver. 2” is recommended for creating DVDs. From CaptyDVD/VCD Ver. 2, ● There is no image quality degradation due to editing. ● Wide-screen video is supported. ● Video files in the Everio hard disk can be used without conversion. For more information, refer to PIXELA web site: http://www.pixela.co.
M5E3_InstallGuide.
LYT1468-004AEN_PAL_A4_0711.fm Page 1 Monday, July 11, 2005 12:28 PM ENGLISH Read this first! – How to handle the Hard Disk Camcorder – Please read this together with the instruction manual before using the camera. 8 When this camera is connected to PC with the USB cable 8 Make a backup of important recorded data ● ● Protect your important recorded data by copying the files to PC. It is recommended to copy it from your PC to a DVD or other recording media for storage.