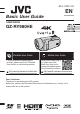
B5A-2330-00 EN Basic User Guide CAMCORDER GZ-RY980HE Detailed User Guide . . Mobile User Guide For more details on operating this product, please refer to the “Detailed User Guide” at the following website. When you are outside, refer to the “Mobile User Guide”. Mobile User Guide can be viewed with standard browser for Android tablet and iPhone. o http://manual3.jvckenwood.com/index.html/ o http://manual3.jvckenwood.com/mobile/eu/ Dear Customers Thank you for purchasing this JVC product.
Safety Precautions IMPORTANT (for owners in the U.K.) Connection to the mains supply in the United Kingdom. DO NOT cut off the mains plug from this equipment. If the plug fitted is not suitable for the power points in your home or the cable is too short to reach a power point, then obtain an appropriate safety approved extension lead or consult your dealer. BE SURE to replace the fuse only with an identical approved type, as originally fitted, and to replace the fuse cover.
Do not point the lens directly into the sun. This can cause eye injuries, as well as lead to the malfunctioning of internal circuitry. There is also a risk of fire or electric shock. CAUTION! The following notes concern possible physical damage to this unit and to the user. Carrying or holding this unit by the LCD monitor can result in dropping the unit, or in a malfunction. Do not use a tripod on unsteady or unlevel surfaces. It could tip over, causing serious damage to the unit.
ABOVE ALL 0 NEVER let anyone especially children push anything into holes, slots or any other opening in the case — this could result in a fatal electrical shock; 0 NEVER guess or take chances with electrical equipment of any kind — it is better to be safe than sorry! This product is licensed under the AVC Patent Portfolio License for the personal use of a consumer or other uses in which it does not receive remuneration to (i) encode video in compliance with the AVC standard (“AVC Video”) and/or (ii) decode
Fogging inside the Lens Models with waterproof function are airtight. When the temperature rises during recording, condensation can occur inside the lens due to the internal humidity. During recording To prevent the temperature of this unit from rising, we recommend that you use the unit in the following ways. A Avoid frequent exposure to direct sunlight. Record under the shade or use an umbrella. Best if you could keep a wet towel cover the unit. B The use of a tripod is recommended.
Contents Safety Precautions ................................. 2 Verifying the Accessories ...................... 6 Grip Belt Adjustment .............................. 6 Names of Parts and Functions ............... 7 Performing Initial Settings ...................... 8 Open the terminal cover (SD card cover) ...... 9 Recording Getting Started Further Information Charging the Battery ............................ 10 Inserting an SD Card ........................... 11 Video Recording ......................
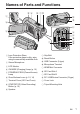
Names of Parts and Functions . 45 6 78 1 9 0 2 a 3 b (Bottom) h g c d e f i A Lens Protective Glass If the protective glass is dirty, wipe using a commercially available cloth. B Stereo Microphone C LCD Monitor D CHARGE (Charging) Lamp (p. 10) E POWER/ACCESS (Power/Access) Lamp J Grip Belt K Reset Button L USB Connector (A type) M Microphone Terminal N HDMI Mini Connector O SD Card Slot A P SD Card Slot B F Zoom/Volume Lever (p.
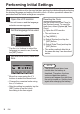
Performing Initial Settings When turning on this unit for the very first time, perform the initial settings by selecting the display language and setting the built-in clock. All other operations cannot be performed until the initial settings are complete. 1 Open the LCD monitor. 0 This unit turns on and the language selection screen appears. 2 Set the language to be used 0 Set the clock from [Date/Time] in the [System] menu. To reset the time zone, select [System]Æ[Time Zone]. A Open the LCD monitor.
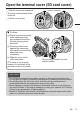
Open the terminal cover (SD card cover) A Slide the cover lock downward. 0 The cover automatically slides to the left. (Rear of Camera) B Lift the cover slowly. o To close A Flip down the cover slowly while making sure the gray waterproof seal fits into the opening at the terminals. B Press the entire cover against the camcorder with equal force and firmly attach the cover completely. C Slide the cover until it clicks into place.
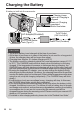
Charging the Battery A battery is built into the camcorder. CHARGE AC Adapter(Provided) To DC/USB Device Jack (Type-C) POWER/ACCES Charging Lamp Lights up: Charging in progress Goes out: Charging completed Blinks: See below To AC Outlet (100 V to 240 V) Power Cord (Provided) . CAUTION 0 0 0 0 0 0 0 0 10 The built-in battery is not charged at the time of purchase. At the time of purchase or in case of the battery is not used for a long period of time, the charging time will be longer than usual.
Inserting an SD Card Insert commercially available SD card (4 GB to 512 GB) into slot A or slot B or both slots before recording. Insert an SD card Close the LCD monitor to turn off this unit. Open the terminal cover. Insert an SD card. To remove the SD card Push the SD card inward once, then pull it out straight. Label . 0 0 Perform [Format SD Card] before using the card. Before removing the SD card, close the LCD monitor and ensure that the POWER/ ACCESS lamp goes off.
Video Recording The camera automatically adjusts the settings such as brightness and focus to suit the shooting conditions in Auto recording mode. Before recording an important scene, it is recommended to conduct a trial recording. Check if the recording mode is set to T Auto. Check if a recordable SD card is inserted. If the mode is H Manual, tap H on the touch screen, then tap T to switch. A 54min B ---min Check if the remaining recording time for slot A or slot B is displayed.
NOTE 0 0 0 0 0 0 When the camera battery is fully charged, the estimated recording time is approximately 2 hours 20 minutes (of actual recording at 4K). Do not remove SD card when the POWER/ACCESS lamp is lighted. The recorded data may become unreadable. With [Auto Power Off] operation, the camera automatically turns off if no operation is performed for 5 minutes, in order to conserve power. (The unit enters into standby mode when the AC adapter is used.
Playing Back/Deleting Files on this Unit Select and play back the recorded videos or still images from an index screen (thumbnail display). Tap F on the touch screen to set to playback mode. . The volume of the video being played can be adjusted using the zoom lever. (+: Volume up, -: Volume down) Tap E to return to recording mode. Tap A or B to select video or still image mode. Select the file to be played and tap the Play button.
Troubleshooting/Cautions Troubleshooting If you encounter problems with this unit, check the following before requesting service. 1. Refer to the “Troubleshooting” section in the “Detailed User Guide”. If you have difficulties operating the unit, refer to the detailed descriptions in the “Detailed User Guide”. http://manual3.jvckenwood.com/ index.html/ 2. This unit is a microcomputercontrolled device. Electrostatic discharge, external noise and interference (from a TV, a radio, etc.
Recording Medium 0 0 16 Be sure to follow the guidelines below to prevent corruption or damage to your recorded data. 0 Do not bend or drop the recording medium, or subject it to strong pressure, jolts or vibrations. 0 Do not splash the recording medium with water. 0 Do not use, replace, or store the recording medium in locations that are exposed to strong static electricity or electrical noise.
DO NOT leave the unit places of over 50°C … in places where humidity is extremely low (below 35 %) or extremely high (above 80 %) with the terminal cover open. … in direct sunlight. … in a closed car in summer. … near a heater. … in high places such as on a TV. Leaving the unit in high places while a cable is connected may result in a malfunction if the cable is caught and the unit falls onto the floor. 0 To protect the unit, DO NOT … drop the unit or strike it against hard objects.
Recordable Time/Specifications Approximate Video Recording Time Quality 4K 28M HD 24M 18M 0 0 4 GB 6m 16 m 19 m 25 m 16 GB 26 m 1h7m 1 h 18 m 1 h 44 m SDHC/SDXC Card 32 GB 64 GB 128 GB 512 GB 53 m 1 h 45 m 3 h 30 m 14 h 2 h 15 m 4 h 30 m 9h 36 h 10 m 2 h 37 m 5 h 15 m 10 h 30 m 42 h 10 m 3 h 30 m 7h 14 h 56 h 10 m The recording time indicated above will change depending on the recording conditions.
B5A-2330-00 Guide de l’utilisateur FR CAMÉSCOPE GZ-RY980HE Manuel d’utilisation . . Mode D'emploi Mobile Pour de plus amples détails sur le fonctionnement de ce produit, veuillez consulter le “Manuel d’utilisation” sur le site Web à l’adresse suivante. Lorsque vous êtes à l’extérieur, consultez le “Mode D'emploi Mobile”. Mode D'emploi Mobile peut être visionné avec un navigateur standard pour tablette Android et iPhone. o http://manual3.jvckenwood.com/index.html/ o http://manual3.jvckenwood.
Précautions de sécurité REMARQUES : La plaque d’identification et l’avertissement de sécurité se trouvent sous l’appareil et/ou au dos. 0 La plaque du numéro de série est située sur le dessous et/ou à l'arrière de l'appareil principal. 0 Les informations de classification et l’avertissement de sécurité de l’adaptateur secteur sont situés sur son côté supérieur et/ou son côté inférieur. ATTENTION : Une batterie au lithium-ion est intégrée à l’intérieur de l’appareil.
Ne dirigez pas l’objectif directement vers le soleil. Vous pourriez vous abîmer la vue et l’appareil pourrait être endommagé. Il y a aussi risque d’incendie ou d’électrocution. PRÉCAUTION ! Les remarques suivantes sont destinées à protéger l’utilisateur et le caméscope contre des dommages éventuels. Ne pas transporter ou saisir le caméscope par l’écran LCD, car il pourrait tomber ou s’endommager. Ne pas utiliser de trépied photographique sur des surfaces irrégulières et inclinées.
. Noter que ce caméscope est destiné à un usage privé uniquement. Toute utilisation commerciale sans autorisation est interdite. (Même si vous enregistrez un spectacle ou une exposition pour votre plaisir personnel, il est vivement recommandé de demander au préalable l’autorisation de filmer.) Marques commerciales 0 Les logos AVCHD Progressive et AVCHD Progressive sont des marques commerciales de Panasonic Corporation et Sony Corporation.
0 Ne laissez pas le caméscope tremper dans de l’eau chaude ou à 40 °C ou plus. Formation de buée à l’intérieur de la lentille Les modèles avec fonction d’étanchéité sont hermétiques. Lorsque la température monte pendant l’enregistrement, de la condensation peut se former à l’intérieur de la lentille à cause de l’humidité interne. Lors de l’enregistrement Pour éviter une élévation de la température de cet appareil, nous vous recommandons d’utiliser l’appareil comme indiqué ci-après.
Contenu Précautions de sécurité ......................... 2 Vérifier les accessoires .......................... 6 Ajustement de la dragonne .................... 6 Noms des pièces et des fonctions ......... 7 Exécution des réglages initiaux ............. 8 Ouvrez le couvercle de borne (couvercle de la carte SD) ....................................... 9 Enregistrement Démarrer Dépannage/mises en garde ................. 15 Durée d’enregistrement/Spécifications ...... 18 Chargement de la batterie ..........
Noms des pièces et des fonctions . 45 6 78 1 9 0 2 a 3 b c d e f (Vue du dessous) h g i A Vitre de protection de la lentille Si la vitre de protection est sale, nettoyez-la à l’aide d’un chiffon disponible dans le commerce. J Dragonne K Touche de réinitialisation L Connecteur USB (Type A) B Microphone stéréo M Borne de microphone C Écran LCD N Mini connecteur HDMI D CHARGE Voyant (de chargement) (p.
Exécution des réglages initiaux Lorsque vous allumez cet appareil pour la première fois, effectuez les réglages initiaux en sélectionnant la langue d’affichage et en réglant l’horloge intégrée. Il est impossible d’effectuer toutes les autres opérations avant d’avoir terminé les réglages initiaux. 1 Ouvrez l’écran LCD. 0 Cet appareil s’allume et l’écran de sélection de la langue apparaît. la langue à 2 Définissez utiliser Language 0 Réglez l’horloge depuis [Date/ Heure] situé dans le menu [Système].
Ouvrez le couvercle de borne (couvercle de la carte SD) A Faites glisser le verrou du couvercle vers le bas. 0 Le couvercle glisse automatiquement vers la gauche. B Soulevez doucement le couvercle. (Arrière de la caméra) o Pour fermer A Basculez le couvercle lentement vers le bas tout en vous assurant que le joint d’étanchéité gris s’insère dans l’ouverture aux bornes. B Appuyez sur l’ensemble du couvercle contre le caméscope avec une force uniforme et fixez fermement le couvercle complètement.
Chargement de la batterie Une batterie est intégrée au caméscope. CHARGE POWER/ACCES Adaptateur secteur(Fourni) Dans la prise de l’appareil CC/USB (Type C) . Voyant de chargement S’allume : chargement en cours S’éteint : Chargement complet Clignotant : Voir ci-dessous À la prise de l’adaptateur secteur (100 V à 240 V) Cordon d’alimentation (Fourni) ATTENTION 0 0 0 0 0 0 0 0 10 La batterie intégrée n’est pas chargée au moment de l’achat.
Insérer une nouvelle carte SD Insérez une carte SD disponible dans le commerce (4 Go à 512 Go) dans l’emplacement A ou B ou les deux emplacements avant de commencer à enregistrer. Insérez une carte SD Fermez l’écran LCD pour éteindre l’appareil. Ouvrez le couvercle de borne. Insérez une carte SD. Pour retirer la carte SD Poussez la carte SD vers l’intérieur puis tirez-la vers vous. Étiquette . 0 0 Effectuez [Formater la Carte SD] avant d’utiliser la carte.
Enregistrer des vidéos La caméra ajuste automatiquement les réglages tels que la luminosité et la mise au point en fonction des conditions de prise de vue en mode d’enregistrement automatique. Avant d’enregistrer une scène importante, il est recommandé d’effectuer un enregistrement test. Vérifiez si le mode d’enregistrement est réglé sur T Auto. Vérifiez si une carte SD enregistrable est insérée. Si le mode est sur le mode H manuel, tapez sur H sur l’écran tactile, puis sur T pour changer.
REMARQUE Lorsque la batterie de la caméra est complètement chargée, la durée d’enregistrement estimée est d’environ 2 heures 20 (d’enregistrement réel à 4K). Ne retirez pas l’adaptateur secteur lorsque le voyant POWER/ACCESS est allumé. Les données enregistrées peuvent devenir illisibles. En fonctionnement [Arret Automatique], la caméra s’éteint automatiquement si aucune manipulation n’est faite en l’espace de 5 minutes, de manière à économiser la charge.
Lecture/suppression de fichiers sur cet appareil Sélectionnez et lisez les vidéos ou photos enregistrées à partir d’un écran d’index (affichage miniature). . Tapez sur F sur l’écran tactile pour définir le mode de lecture. Le volume de la vidéo en cours de lecture peut être réglé à l’aide de la commande de zoom. (+ : Volume haut, - : Volume bas) Tapez sur E pour retourner au mode d’enregistrement. Tapez sur la touche A ou B pour sélectionner le mode vidéo ou photo.
Dépannage/mises en garde Dépannage En cas de problème avec cet appareil, veuillez vérifier les points suivants avant de demander une réparation. 1. Veuillez consulter la section “Dépannage” dans le “Manuel d’utilisation”. Si vous éprouvez des difficultés à utiliser cet appareil, veuillez consulter les descriptions détaillées dans le “Manuel d’utilisation”. http://manual3.jvckenwood.com/ index.html/ 2. Cette unité est un périphérique contrôlé par micro-ordinateur.
Support d’enregistrement 0 0 16 Veiller à suivre les directives cidessous pour éviter d’altérer ou d’endommager les données enregistrées. 0 Ne pas déformer ou laisser tomber le support d’enregistrement, ou le soumettre à une forte pression, des secousses ou des vibrations. 0 Ne pas éclabousser le support d’enregistrement avec de l’eau. 0 Ne pas utiliser, remplacer ou entreposer le support d’ enregistrement dans des endroits fortement exposés à de l’électricité statique ou à des parasites électriques.
0 NE PAS laisser l’appareil 0 Pour protéger l’appareil, NE PAS 0 Pour éviter une chute de l’appareil … dans des lieux exposés à des températures supérieures à 50°C. … dans des lieux exposés à des taux d’humidité extrêmes (en deçà de 35 % ou au-delà de 80 %) avec le couvercle de borne ouvert. … en plein soleil. … dans une voiture hermétiquement fermée en période estivale. … près d’un radiateur. … en hauteur, sur un téléviseur par exemple.
Durée d’enregistrement/Spécifications Durée d’enregistrement vidéo approximative Qualité 4K 28M HD 24M 18M 0 0 4 Go 6m 16 m 19 m 25 m 16 Go 26 m 1h7m 1 h 18 m 1 h 44 m Carte SDHC/SDXC 32 Go 64 Go 128 Go 512 Go 53 m 1 h 45 m 3 h 30 m 14 h 2 h 15 m 4 h 30 m 9h 36 h 10 m 2 h 37 m 5 h 15 m 10 h 30 m 42 h 10 m 3 h 30 m 7h 14 h 56 h 10 m La durée d’enregistrement indiquée ci-dessus change selon les conditions d’enregistrement. [28M] est disponible uniquement lorsque [Fréq.
B5A-2330-00 Grundlagen Benutzerhandbuch GE CAMCORDER GZ-RY980HE Erweitertes Benutzerhandbuch . . Mobile Benutzerhandbuch Ausführliche Informationen zur Bedienung dieses Produkts finden Sie unter „Erweitertes Benutzerhandbuch“ auf der folgenden Website. Wenn Sie unterwegs sind, siehe „Mobile Benutzerhandbuch“. Mobile Benutzerhandbuch kann über Standardbrowser für Android Tablets und iPhones eingesehen werden. o http://manual3.jvckenwood.com/index.html/ o http://manual3.jvckenwood.
Sicherheitshinweise HINWEISE: Das Typenschild und Sicherheitshinweise befinden sich an der Unter- und/oder Rückseite des Geräts. 0 Das Seriennummernschild ist unten und/ oder an der Rückseite des Hauptgeräts angebracht. 0 Das Typenschild und die Sicherheitshinweise des AC-Netzteils befinden sich an dessen Ober- und/oder Unterseite. VORSICHT: Im Inneren des Geräts befindet sich ein eingebauter Lithium-Ionen-Akku.
Niemals das Objektiv direkt auf die Sonne richten. Dies kann Augenschäden zur Folge haben und Geräteschäden verursachen. Zudem besteht Stromschlag- und Feuergefahr. VORSICHT! Die folgenden Handhabungshinweise beachten, um Kamera-Schäden und Verletzungen zu vermeiden. Die Kamera beim Transportieren niemals am LCD-Monitor fassen. Andernfalls kann die Kamera herunterfallen oder anderweitig beschädigt werden. Bei Verwendung eines Stativs auf stabile Aufstellung (kein schräger, unebener Untergrund etc.
. Berücksichtigen Sie, dass diese Kamera ausschließlich für den privaten Gebrauch vorgesehen ist. Der Gebrauch für kommerzielle Zwecke ist ohne ausdrückliche Genehmigung untersagt. (Wenn Sie bei einer öffentlichen Veranstaltung (Konzert, Ausstellung etc.) Aufnahmen machen möchten, empfehlen wir Ihnen, sich zuvor eine Genehmigung zu besorgen.) Warenzeichen 0 AVCHD Progressive und das AVCHD Progressive-Logo sind Handelsmarken der Panasonic Corporation und der Sony Corporation.
Beschlagen im Inneren des Objektivs Modelle mit der Funktion Wasserdicht sind luftdicht. Wenn die Temperatur während der Aufnahme steigt, kann eine Kondensation im Inneren des Objektivs aufgrund der internen Luftfeuchtigkeit auftreten. Während der Aufnahme Um das Ansteigen der Temperatur dieses Gerätes zu verhindern, empfehlen wir, dass Sie das Gerät wie folgt verwenden. A Vermeiden Sie häufiges direktes Einfallen von Sonnenlicht. Nehmen Sie unter Schatten oder unter einem Sonnenschirm auf.
Inhalt Sicherheitshinweise ............................... 2 Überprüfen der Zubehörteile .................. 6 Einstellung des Haltegriffs ..................... 6 Benennung der Teile und Funktionen ............. 7 Grundeinstellungen vornehmen ............. 8 Öffnen Sie die Anschlussabdeckung (SDKarten-Fach) .......................................... 9 Aufnahme Erste Schritte Fehlersuche/Vorsichtshinweise ........... 15 Aufnahmezeit/Technische Daten ......... 18 Laden des Akkus ...........................
Benennung der Teile und Funktionen . 45 6 78 1 9 0 2 a 3 b (Unterseite) h g c d e f i A Objektiv-Schutzglas Wenn das Schutzglas verschmutzt ist, reinigen Sie es mit einem handelsüblichen Reinigungstuch. I Lautsprecher J Haltegriff K Reset-Taste B Stereomikrofon L USB-Anschluss (Typ A) C LCD-Monitor M Mikrofonanschluss D CHARGE Lampe (Laden) (S. 10) N HDMI-Mini-Buchse E POWER/ACCESS Lampe (Gerät O Steckplatz für SD-Karte A Ein-Aus/Zugriff) F Zoom/Lautstärke-Regler (S.
Grundeinstellungen vornehmen Wenn Sie dieses Gerät zum ersten Mal einschalten, führen Sie die Grundeinstellungen durch, indem Sie die Anzeigesprache auswählen und die integrierte Uhr einstellen. Alle anderen Vorgänge können nicht ausgeführt werden, bis die Grundeinstellungen abgeschlossen sind. 1 Klappen Sie den LCD-Monitor auf. 0 Dieses Gerät schaltet sich ein und der Sprachauswahlbildschirm wird angezeigt.
Öffnen Sie die Anschlussabdeckung (SD-Karten-Fach) A Schieben Sie die Abdeckungsverriegelung nach unten. 0 (Rückseite der Kamera) Die Abdeckung wird automatisch nach links verschoben. B Heben Sie die Abdeckung langsam hoch. o Zum Schließen A Klappen Sie die Abdeckung langsam nach unten, während Sie sicherstellen, dass die graue wasserdichte Versiegelung in die Öffnung an den Anschlüssen passt.
Laden des Akkus Ein Akku ist im Camcorder integriert. CHARGE POWER/ACCES AC-Netzteil(Mitgeliefert) Zur DC/USBGerätebuchse (Typ C) Ladelämpchen Leuchtet: Aufladen läuft Erlischt: Ladevorgang abgeschlossen Blinkt: Siehe unten Zur Netzsteckdose (100 V bis 240 V) Netzkabel (Mitgeliefert) . VORSICHT 0 0 0 0 0 0 0 0 10 Der eingebaute Akku ist zum Zeitpunkt des Kaufs nicht geladen.
Einsetzen einer SD-Karte Setzen Sie eine handelsübliche SD-Karte (4 GB bis 512 GB) vor der Aufnahme in den Steckplatz A oder B oder in beide Steckplätze ein. Setzen Sie eine SD-Karte ein Schließen Sie den LCD-Monitor, um dieses Gerät auszuschalten. Öffnen Sie die Anschlussabdeckung. Setzen Sie eine SD-Karte ein. Entnehmen der SD-Karte Drücken Sie die SD-Karte kurz nach innen und ziehen Sie sie dann gerade heraus. Label . 0 0 Führen Sie [SD-karte Formatieren] durch, bevor Sie die Karte verwenden.
Videoaufnahme Die Kamera passt die Einstellungen, wie zum Beispiel Helligkeit und Fokus, automatisch entsprechend den Aufnahmebedingungen im Automatikaufnahmemodus an. Vor dem Aufnehmen einer wichtigen Szene sollten Sie eine Probeaufnahme durchführen. Prüfen Sie, ob der Aufnahmemodus auf T Auto eingestellt ist. Prüfen Sie, ob eine bespielbare SD-Karte eingesetzt ist. Falls der Modus auf H Manuell eingestellt wurde, berühren Sie H auf dem Touchscreen und berühren Sie anschließend T zur Umstellung.
HINWEIS 0 0 0 0 0 0 Wenn der Kamera-Akku vollständig aufgeladen ist, beträgt die geschätzte Aufnahmezeit etwa 2 Stunden 20 Minuten (der tatsächlichen Aufnahme bei 4K). Entfernen Sie die SD-Karte nicht, während die POWER/ACCESS-Lampe leuchtet. Die aufgenommenen Daten könnten unlesbar werden. Beim [Auto Power Aus]-Betrieb schaltet sich die Kamera automatisch ab, wenn für 5 Minuten keine Bedienung erfolgt ist, um Strom zu sparen.
Wiedergabe/Löschen von Dateien mit diesem Gerät Wählen Sie die aufgenommenen Videos oder Standbilder aus dem Inhaltsverzeichnis (Minibild-Anzeige) aus und geben Sie sie wieder. . Berühren Sie F auf dem Touchscreen, um den Wiedergabemodus einzustellen. Die Lautstärke des Videos, das gerade wiedergegeben wird, kann mit dem Zoom-Regler eingestellt werden. (+: Lauter, -: Leiser) Berühren Sie E, um in den Aufnahmemodus zurückzukehren. Berühren Sie A oder B, um den Video- oder Standbildmodus auszuwählen.
Fehlersuche/Vorsichtshinweise Fehlersuche Sollten Sie mit der Bedienung dieses Geräts Probleme haben, prüfen Sie bitte die folgenden Punkte, bevor Sie sich an den Kundenservice wenden. 1. Siehe Abschnitt „Fehlersuche“ im Handbuch „Erweitertes Benutzerhandbuch“. Sollten Sie mit der Bedienung des Geräts Schwierigkeiten haben, lesen Sie bitte im Handbuch „Erweitertes Benutzerhandbuch“ nach. http://manual3.jvckenwood.com/ index.html/ 2. Dieses Gerät wird von einem Mikrocomputer gesteuert.
Aufnahmemedium 0 0 16 Befolgen Sie die folgenden Richtlinien, um die Beschädigung oder den Verlust aufgenommener Daten zu vermeiden. 0 Verbiegen Sie das Aufnahmemedium nicht, und lassen Sie es nicht fallen. Setzen Sie es nicht großem Druck, Stößen oder Vibrationen aus. 0 Lassen Sie kein Wasser an das Aufnahmemedium gelangen.
0 Bei der Lagerung vermeiden Sie 0 Zum Schutz des Geräts vermeiden Sie … Orte … Orte mit Temperaturen über 50°C. mit extrem geringer (unter 35%) oder hoher (über 80%) Luftfeuchtigkeit mit geöffneter Anschlussabdeckung. … Direkte Sonneneinstrahlung. … Orte, an denen Hitzestaus auftreten können (z.B. Fahrzeuginnenraum im Sommer). … Die Nähe von Heizkörpern. … Erhöhte Orte wie beispielsweise auf einem Fernsehgerät.
Aufnahmezeit/Technische Daten Geschätzte Videoaufnahmezeit Qualität 4K HD 0 0 4 GB 16 GB 6m 26 m 28M 16 m 24M 19 m 18M 25 Min. 1 Std. 7 Min. 1 Std. 18 Min. 1 Std. 44 Min. SDHC/SDXC-Karte 32 GB 64 GB 128 GB 512 GB 1 Std. 45 3 Std. 30 53 m 14 Std. Min. Min. 2 Std. 15 4 Std. 30 36 Std. 10 9 Std. Min. Min. Min. 2 Std. 37 5 Std. 15 10 Std. 30 42 Std. 10 Min. Min. Min. Min. 3 Std. 30 56 Std. 10 7 Std. 14 Std. Min. Min.
B5A-2330-00 Beknopte gebruiksaanwijzing DU CAMCORDER GZ-RY980HE . Uitgebreide gebruikshandleiding . Gids Mobiele Gebr. Raadpleeg voor meer informatie over het gebruik van dit product de ”Uitgebreide gebruikshandleiding” op de volgende website. Raadpleeg als u buiten bent de ”Gids Mobiele Gebr.”. Gids Mobiele Gebr. kan worden weergegeven met een standaard browser voor Android tablet en iPhone. o http://manual3.jvckenwood.com/index.html/ o http://manual3.jvckenwood.
Veiligheidsmaatregelen OPMERKINGEN: Het spanningslabel en waarschuwingen voor de veiligheid zijn op het onder- en/ of achterpaneel van het hoofdtoestel aangegeven. 0 De serienummerplaat bevindt zich op de onderkant en/of achterkant van de hoofdeenheid. 0 De beoordelingsinformatie en veiligheidswaarschuwing van de ACadapter bevinden zich op de boven- en/ of onderkant. LET OP: In het toestel zit een ingebouwde lithiumion batterij.
Richt de lens niet direct naar de zon. Dit zou namelijk uw ogen kunnen beschadigen of problemen in de werking van het interne circuit kunnen veroorzaken met mogelijk brand of een elektrische schok tot gevolg. LET OP! De volgende opmerkingen zijn uitermate belangrijk en dienen beschadiging van het toestel en letsel te voorkomen. Draag de camera niet door deze aan de LCD-monitor vast te houden. De camera zou anders kunnen vallen of op een andere manier worden beschadigd.
. Vergeet niet dat deze camera bedoeld is voor privé-gebruik. Commercieel gebruik zonder toestemming is verboden. (Het is bovendien ten zeerste aan te bevelen vooraf toestemming te vragen voor het opnemen van bijvoorbeeld een show, uitvoering, expositie of toneelstuk voor persoonlijk gebruik.) Handelsmerken 0 AVCHD Progressive en AVCHD Progressive logo zijn handelsmerken van Panasonic Corporation en Sony Corporation.
Beslaan van de binnenzijde van de lens Modellen met waterdichte functie zijn luchtdicht. Wanneer de temperatuur stijgt tijdens de opname, kan zich condensatie aan de binnenkant van de lens voordoen door de inwendige vochtigheid. Tijdens opname Om de stijging van temperatuur van dit toestel te voorkomen, raden wij u aan het toestel op de volgende manieren te gebruiken. A Vermijd veelvuldige blootstelling aan direct zonlicht. Neem op in de schaduw of gebruik een paraplu.
Inhoud Veiligheidsmaatregelen ......................... 2 Het toebehoren controleren ................... 6 Afstelling van de handgreep .................. 6 Namen van onderdelen en functies ....... 7 Oorspronkelijke Instellingen Uitvoeren ..... 8 Open het afdekplaatje (SD-kaartdeksel) ............................................................... 9 Opnemen Aan de slag Oplossen van problemen/Opgelet-berichten ..... 15 Opneembare tijd/Specificaties ............. 18 De accu opladen ........................
Namen van onderdelen en functies . 45 6 78 1 9 0 2 a 3 b c d e f (Onderzijde) h g i A Beschermglas voor de lens Als het beschermglas vies is, veeg het dan af met een in de handel verkrijgbare doek. J Handgreep K Resetknop L USB-aansluiting (A-type) B Stereo-microfoon M Microfoon aansluiting C LCD-monitor N HDMI mini-connector D CHARGE (Oplaad) lampje (pag. 10) O SD-kaartslot A E POWER/ACCESS (Stroom-/ P SD-kaartslot B Toegangs-) lamp F Inzoom-/Volumeknop (pag.
Oorspronkelijke Instellingen Uitvoeren Bij het aanzetten van dit apparaat voor de allereerste keer, voer de initiële instellingen uit door de displaytaal en de ingebouwde klok in te stellen. Alle andere bewerkingen kunnen niet worden uitgevoerd tot de initiële instellingen zijn voltooid. 1 Open de LCD-monitor. 0 Dit apparaat wordt ingeschakeld en het scherm voor de taalkeuze verschijnt. de taal welke wordt 2 Stel gebruikt in 0 Stel de klok van [Datum/Tijd] in, in het [Systeem] menu.
Open het afdekplaatje (SD-kaartdeksel) A Schuif de vergrendeling naar beneden. 0 (Achterzijde van de Camera) De vergrendeling schuift automatisch naar links. B Open het deksel langzaam. o Om te sluiten A Draai het deksel langzaam naar beneden en zorg er daarbij voor dat de grijze waterdichte zegel in de opening bij de terminals past. B Druk het gehele deksel tegen de camcorder met evenredige kracht en bevestig het deksel stevig en compleet. C Schuif het deksel totdat het op zijn plaats klikt.
De accu opladen Een accu is in de camera ingebouwd. CHARGE POWER/ACCES Lichtnetadapter(bijgeleverd) Naar DC/USBapparaat aansluiting (Type-C) . Oplaadlampje Gaat branden: bezig met laden Gaat uit: Opladen gereed Knippert: Zie hieronder Naar AC-stopcontact (100 V tot 240 V) Stroomsnoer (bijgeleverd) LET OP 0 0 0 0 0 0 0 0 10 De ingebouwde accu is niet opgeladen op het moment van aankoop.
Een SD-kaart plaatsen Plaats een in de handel verkrijgbare SD-kaart (4 GB tot 512 GB) in gleuf A of gleuf B of beide gleuven voordat u gaat opnemen. Plaats een SD-kaart Sluit de LCD-monitor om deze unit uit te schakelen. Open het afdekplaatje. Plaats een SD-kaart. De SD-kaart verwijderen Druk de SD-kaart eenmaal naar binnen en trek ze vervolgens recht eruit. Label . 0 0 Voer [SD-kaart Formatteren] uit voor gebruik van de kaart.
Video-opname De camera past automatisch de instellingen zoals helderheid en focus aan om de opnameomstandigheden aan te passen in de automatische modus. Voordat u een belangrijke scène opneemt, kunt u het best eerst een proefopname maken. Controleer of de opnamemodus T op Auto is ingesteld. Controleer of een opneembare SD-kaart is geplaatst. A 54min B ---min A T Tik als de stand H Handmatig is op H op het aanraakscherm, en tik dan op T om over te schakelen.
OPMERKING 0 0 0 0 0 0 Wanneer de accu van de camera volledig is opgeladen, is de geschatte opnameduur ongeveer 2 uur en 20 minuten (aan daadwerkelijk opnemen bij 4K). Verwijder nooit een SD-kaart wanneer het POWER/ACCESS lampje brandt. De opgenomen gegevens kunnen onleesbaar worden. Met [Autom. Uitschakelen]-werking schakelt de camera automatisch uit als er gedurende 5 minuten geen handeling wordt uitgevoerd om energie te besparen.
Bestanden afspelen/wissen op dit apparaat Selecteer en speel de opgenomen video’s of stilstaande beelden af vanuit een indexscherm (thumbnail-weergave). . Tik op F op het aanraakscherm om de afspeel modus te selecteren. Tik op E om terug te keren naar de opnamestand. Het volume van de video die wordt afgespeeld, kan worden aangepast met behulp van de zoom hendel. (+: Volume omhoog, -: Volume omlaag) Tik op A of B om de video- of stilstaand beeld-stand te selecteren.
Oplossen van problemen/Opgelet-berichten Oplossen van problemen Als u problemen ondervindt met dit apparaat, controleer dan het volgende voordat u reparatie aanvraagt. 1. Raadpleeg het deel ”Probleemoplossing” in de ”Uitgebreide gebruikshandleiding”. Als u problemen ondervindt met het bedienen van dit apparaat, raadpleeg dan de gedetailleerde beschrijvingen in ”Uitgebreide gebruikshandleiding”. http://manual3.jvckenwood.com/ index.html/ 2.
Opnamemedium 0 0 16 Volg vooral goed de aanwijzingen om te voorkomen dat uw opgenomen materiaal verloren gaat of beschadigd raakt. 0 Buig het opnamemedium niet of laat het niet vallen, oefen er geen grote druk op uit en stel het niet bloot aan schokken en trillingen. 0 Laat geen waterspetters op het medium komen. 0 Gebruik of vervang het opnamemedium niet op plaatsen waar een sterke statische elektriciteit heerst of in een krachtig elektrisch veld en berg het ook niet op onder dergelijke omstandigheden.
0 Laat de camera NIET achter 0 Bescherm de camera als volgt 0 Om te voorkomen dat het toestel valt … op plaatsen waar het meer dan 50°C is. … op plaatsen waar de vochtigheid bijzonder laag (minder dan 35 %) of bijzonder hoog (meer dan 80 %) is met het afsluitdeksel open. … in direct zonlicht. … in een afgesloten auto (in de zomer). … in de buurt van een verwarmingstoestel. … hoog bovenop bijvoorbeeld een TVtoestel.
Opneembare tijd/Specificaties Geschatte video-opnametijd Kwaliteit 4K 28M HD 24M 18M 0 0 4 GB 6m 16 m 19 m 25 m 16 GB 26 m 1u7m 1 u 18 m 1 u 44 m SDHC/SDXC-kaart 32 GB 64 GB 128 GB 512 GB 53 m 1 u 45 m 3 u 30 m 14 u 2 u 15 m 4 u 30 m 9u 36 u 10 m 2 u 37 m 5 u 15 m 10 u 30 m 42 u 10 m 3 u 30 m 7u 14 u 56 u 10 m De opnametijd hierboven aangegeven zal veranderen afhankelijk van de opnameomstandigheden.