
User manual


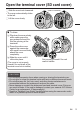

Performing Initial Settings
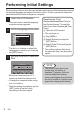
When turning on this unit for the very first time, perform the initial settings by selecting
the display language and setting the built-in clock. All other operations cannot be
performed until the initial settings are complete.
1
Open the LCD monitor.
0
This unit turns on and the language
selection screen appears.
2
Set the language to be used
.
Language
Français
Español
ᶮ㔈
日本語
English
0
Tap the 32 buttons to select the
language you want to use, then tap
the [SET] button.
3
Set the time zone, date and
time
.
UTC -- --
Initial Setting
0
Move the cursor using the 0 1
buttons to select the items to set.
0
Change the numerical value using
the 32 buttons.
0
After
the
setting is complete, tap the
[SET] button to set the clock
according to the time signal.
Resetting the Clock
Set the clock from [Date/Time] in
the [System] menu. To reset the
time zone, select [System]Æ[Time
Zone].
A
Open the LCD monitor.
0
The unit turns on.
B
Tap [MENU].
C
Select [System] and tap the
[SET] button.
D
Select [Date/Time] and tap the
[SET] button.
0
The setting method after this is
the same as step 3 as described
earlier.
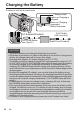
NOTE
0
The clock is reset about one
month after the battery is
depleted. Therefore, the time
zone and date/time setting
screens will appear the next time
the unit
is turned on. Set the clock
again after charging the battery.
8 EN