
User Manual


Turning on this Unit
Open the LCD monitor to turn on this unit.
To turn off the power, close the LCD monitor.
o
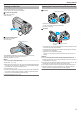
To turn on the power
Open the LCD monitor.
(Open carefully.)
.
o
To turn off the power
Close the LCD monitor.
(Close carefully.)
.
POWER/ACCESS Lamp
The POWER/ACCESS lamp goes off and the power is turned off.
The power can also be turned off from the menu.
“Operating the Menu” (A p. 97)
Memo :
0
Set Demo mode to “Off” before using.
“ Demo Mode ” (A p. 115)
0
When
“Auto Power Off” is set to “On”, this unit turns itself off automatically
to conserve power when it is not operated for 5 minutes. (When using the
AC adapter, this unit goes into standby mode.)
“ Auto Power Off ” (A p. 115)
0
If “LCD Closed Recording” is enabled, this unit does not turn off when the
LCD monitor is closed during recording or while it is connected to Wi-Fi.
(The power turns off when Wi-Fi is disconnected.)
“ LCD Closed Recording ” (A p. 115)
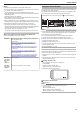
Opening the Terminal Cover (SD Card Cover)
o
To open
.
(Back of the camera)
A
Slide the cover lock downward.
0
The cover slides to the left automatically.
B
Lift the cover slowly.
o
To close
.
Not properly closed if the red mark
is visible.
A
Flip
down the cover slowly while making sure the gray waterproof seal
fits into the opening at the terminals.
B
Press the entire cover against the camera with equal force and firmly
attach the cover completely.
C
Slide the cover until it clicks into place.
(The cover is not properly closed if the red mark on the cover lock is
visible.)
Caution :
0
Ensure that the terminal cover and the gray waterproof seal are not
damaged and that there are no foreign materials (such as hair, lint, sand
or dust) adhered on the cover.
0
Stop
using the unit underwater if there are damages to the cover, etc. and
consult your JVC dealer or the nearest JVC service center.
0
Do not apply excessive force when opening/closing the terminal cover.
0
Read the “Cautions on Using Underwater” (A p. 18) before using the
camera underwater or in places exposed to water droplets.
Getting Started
5