Preliminary HD NETWORK CAMERA VN-H37U/H57U Series SD Card Operation Manual (Settings Supplement) Contents Precautions for using SD cards .................................................................................... 2 SD Cards...................................................................................................................... 3 Built-in Viewer Screen Configuration ............................................................................ 5 SD Card Playback Screen............
This manual contains instructions for the SD card recording function and operations. Precautions for using SD cards z Do not insert anything into the camera. • If anything other than an SD card is inserted into the SD card slot, it may cause a fire, electrical shock or failure of the unit. z Before turning the camera off or removing the SD card, be sure to set the SD card setting to [Disable].
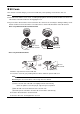
SD Cards This unit can record the images you shoot in an SD card (sold separately) inserted in the card slot. Memo: z If the SD card's switch is set to “Lock”, recording and playback cannot be performed. Make sure there is no critical data on the SD card before disengaging the lock. z If you insert the SD card in the incorrect direction, the camera or the card may be damaged. Always check that the card has been inserted in the correct direction as shown in the illustration of the SD card slot.
When using VN-H157WP 3 SD card cover 1・3 1 SD card (label side) 4 Sunshade rotation setscrew Follow the steps below to insert an SD card. 1. Loosen the screw at the bottom of the camera, and rotate the sunshade enough so that the SD card can be inserted. 2. Perform insertion (or removal) of the SD card. (If an SD card cover is attached, pull it off to remove it.) 3. Return the sunshade to its original position. 4. Fasten the screw after the adjustment.
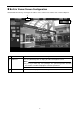
Built-in Viewer Screen Configuration Start the Built-in Viewer by entering the IP address of the camera in the address bar of Internet Explorer. ① ② No. ① Item SD Card Description Press the [SD Card] button to display the SD Card Playback Screen. Memo: z If you log in with only user privileges, the [SD Card] button becomes unselectable, and SD card playback cannot be performed. ② REC The REC icon is displayed while recording to an SD card.
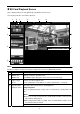
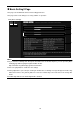
SD Card Playback Screen This is displayed when you click [SD Card] on the Built-in Viewer screen. You can play video files stored in the SD card. ① ⑥ ⑦ ⑧ ⑨ ⑩ ② ⑪ ③ ④ ⑫ ⑤ Memo: z Video recorded to an SD card cannot be output from the camera's [MONITOR] terminal. No. Item Description ① MENU ON / MENU OFF Displays / hides the operation menu. Click [MENU ON] to display the menu on the left side of the page. ② Video control menu Controls the video playback state.
No. ④ Item Event List Playback menu Description Displays a list of search results for recorded videos filtered by time and event trigger. Select the item from the displayed list that you want to play and begin playback. From/To Displayed videos will be limited to those recorded between the 2 times that you specify. Event Type Displayed videos will be limited to those of the event trigger* type that you specify.
No. ⑤ Item Export menu Description Video from the specified [From] date/time to the [To] date/time is saved to your computer. The save location can be specified in [Viewer Setup] - [Other] - [Video Export Folder] via the Built-in Viewer screen. Note: z Depending on the camera's internal recordings, a saved video may be split up as multiple files. z For using saved video files, refer to the following URL. http://www3.jvckenwood.com/english/pro/vnetworks/index.
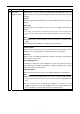
z Video control menu ① ② ③ ④ ⑤ ⑥ ⑧ ⑦ ⑨ ⑩ ⑪ ⑫ ⑮ ⑬ ⑭ No. Description No. ① Returns to the previous frame, and then pauses playback. ⑨ Advances to the most recent frame, and then pauses playback. ② Starts reverse playback. ⑩ Reverses the playback position. ③ Pauses playback. ⑪ Selects the fast-forward reverse speeds. ④ Starts playback. ⑤ Advances to the next frame, and then pauses playback. ⑫ Fast-forwards the playback position.
Basic Setting2 Page This page sets fundamental camera and encoding parameters. This page can be used during access using "admin" or "operator". Click [Basic Setting2]. ① ② ③ ④ Memo: z If you enter the following URL directly into the address bar of Internet Explorer, you can open the [Basic Setting2] page without going through the Built-in Viewer. http://192.168.0.2/cgi-bin/display.cgi?basicmenu2.html z Press the [OK] button to enable the new settings.
No. Item ① Camera ID ② Scenefile ③ Lens Type ④ Encode Description Refer to the "Instructions (Setting)" of the supplied CD-ROM. Select the frame size for each screen of JPEG and H.264 from the following six patterns. ■Selectable distribution size Frame Size Frame Rate Communication speed Bit rate I Frame Interval H.264 High 1920×1080 30 fps 1920x1080 30 fps 8 Mbps CBR 30 frames H.
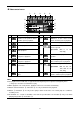
SD Card Record Page This page sets SD card recording settings. This page can be used during access using "admin" or "operator". Click [Advanced Settings] and [SD Card Record]. ① ② ③ ④ ⑤ ⑥ Memo: z If the status is "Read only" or "No insert", nothing can be selected other than the [OK] button or the [Cancel] button. z When recording to FTP and you attempt to perform SD card recording settings, the display changes to a dialog for interrupting FTP recording and starting SD card recording is displayed.
No. ① Item SD Card Description [Set values : Use, Disable] Check "Disable" and press the [OK] button to automatically set recording to OFF and stop recording. Check "Use" and press the [OK] button to enable all the SD card recording-related check boxes. Memo: z Video recorded to an SD card can be played via the SD card playback screen that is displayed by clicking the [SD Card] button on the Built-in Viewer screen. () Page 6) z Encoding settings cannot be changed while recording to an SD card.
No. ② Item Format Description This button is for executing a format of the SD card. [Status : Unformatted, Formatting, Formatted, ---] "---" is displayed when the SD card status display is not "Use". "Unformatted" is displayed when the SD card is not formatted, or when an unsupported class of SD card that cannot be formatted is inserted. The [Execute] button cannot be pressed (and becomes grayed out) when the SD card status display is not "Use".
No. ③ Item Record Status Description [Set values : ON, OFF] [Status : No Recording, Recording] This is only enabled when the SD card status is "Use" and the format status is "Format complete". When recording, the status changes to [Recording]. When recording is stopped, the status changes to [Stopped]. When only alarm recording is selected, the status is [Stopped] at times other than when the alarm is engaged.
No. ⑤ Item Description Alarm Settings Trigger1 Select the 1st trigger to perform an action.
No. ⑨ Item Encode Setting Description When the Read Status is "ON", the setting for Encode Setting cannot be changed. To change the settings, select "OFF" for the recording item, push the [OK] button to stop recording, and then configure settings. If you set the recording item to "ON" and push the [OK] button when the encoding setting has not been set, the "Select an encoding setting." dialog is displayed and recording does not start. [Encode Setting] Encoder No.
Recording Time for SD Card Recording Function z Recording time table Available recording time for each SD card Setting Pattern Encoding details for SD card recording size [in hours] 4 GB 8 GB 16 GB 32 GB 1920x1080, 5fps, 1024kbps, CBR, 5 I Frame Interval 5 12 25 52 1280x720, 5fps, 768kbps, CBR, 5 I Frame Interval 7 15 34 70 Setting Pattern 5 1280x720, 5fps, 384kbps, CBR, 5 I Frame Interval 12 27 58 120 Setting Pattern 6 640x360, 5fps, 256kbps, CBR, 5 I Frame Interval 19 42 92 18
Additional Cautions z Cautions for setting the detection function You cannot set motion detection, audio detection, and tampering detection at the same time. An error message is displayed when one detection function setting is already enabled and you try to select another. Check the content of the error message, set the already-enabled detection function to "OFF", and then reconfigure the detection function.
Troubleshooting Check the following items if you cannot record to an SD card. z Format the SD card via the camera. () Page 14) z Disengage the lock on the SD card. z Use an SD card that is compatible with this camera. () Page 4) z Follow the instructions in [SD Card Record Page] () Page 12) to enable SD card recording settings.