ENGLISH CONTENTS SAFETY FIRST 2 Safety Precautions ................................... 2 INSTALLING YOUR NEW RECORDER Mini DV/S-VHS VIDEO CASSETTE RECORDER HR-DVS2EU 4 Basic Connection .................................... 4 S-VIDEO Connection .............................. 5 INITIAL SETTINGS 6 Auto Set Up ............................................ 6 Preset Download ..................................... 8 Language .............................................. 10 On-Screen Displays ..............
EN SAFETY FIRST Safety Precautions The rating plate and the safety caution are on the rear of the unit. WARNING: DANGEROUS VOLTAGE INSIDE WARNING: TO PREVENT FIRE OR SHOCK HAZARD, DO NOT EXPOSE THIS UNIT TO RAIN OR MOISTURE. CAUTION 䡲 When you are not using the recorder for a long period of time, it is recommended that you disconnect the power cord from the mains outlet. 䡲 Dangerous voltage inside. Refer internal servicing to qualified service personnel.
EN 3 For Italy: "It is declared that this product, brand JVC, conforms to the Ministry Decree n. 548 of 28 Aug.'95 published in the Official Gazette of the Italian Republic n. 301 of 28 Dec.'95" The STANDBY/ON current on and off. " button does not completely shut off mains power from the unit, but switches operating " shows electrical power standby and " " shows ON.
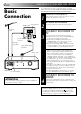
EN INSTALLING YOUR NEW RECORDER It's essential that your video recorder be properly connected. Follow these steps carefully. THESE STEPS MUST BE COMPLETED BEFORE ANY VIDEO OPERATION CAN BE PERFORMED. Basic Connection Aerial terminal Back of TV TV Aerial Cable 21-pin SCART connector 1 2 3 a– Disconnect the TV aerial cable from the TV. b– Connect the TV aerial cable to the ANTENNA IN jack on the rear panel of the recorder.
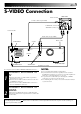
EN 5 S-VIDEO Connection Aerial terminal Back of TV S-Video cable (not provided) S-VIDEO IN connector AUDIO IN connectors Aerial or Cable Audio cable (not provided) Mains outlet S OUT ANTENNA IN ANTENNA ANTENNE IN ENTREE AV1 (L-1) IN/OUT ENTREE/SORTIE OUT S SORTIE (DV/VHS) AUDIO (DV/VHS) L OUT SORTIE SAT CONTROL CONTROLEUR SAT R OUT SORTIE AV2 (L-2) IN/DECODER ENTREE/DECODEUR Back of Recorder ANTENNA OUT AUDIO OUT RF Cable (provided) ● To Connect to A TV With S-VIDEO/AUDIO IN Connector
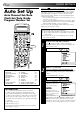
EN INITIAL SETTINGS When the button on the recorder/remote control is pressed for the first time to power on the recorder after you plug the mains power cord into a mains outlet, the Country Set display will appear on the TV screen and the recorder's front display panel. By simply selecting your country*, the Auto Set Up function sets the tuner channels, clock** and Guide Program numbers automatically.
EN 3 SELECT LANGUAGE Press OK. The Language Set display appears on the front display panel and/or on the screen. If you are referring to the front display panel Press %fi to select your language code. Language Code ENGLISH : 01 DEUTSCH : 02 FRANCAIS : 03 ITALIANO : 04 CASTELLANO : 05 NEDERLANDS SVENSKA NORSK SUOMI DANSK : 06 : 07 : 08 : 09 : 10 (Ex.
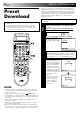
EN INITIAL SETTINGS (cont.) When you connect the recorder and your TV via fully-wired 21-pin SCART cable (墌 pg. 4), you can set the recorder's tuner channels by downloading preset data from your TV instead of using the Auto Set Up function (墌 pg. 6). After downloading is completed, the recorder sets the clock and Guide Program number automatically. For details, refer to the instruction manual for your TV. Preset Download Perform steps 1 to 3 of "Auto Set Up" on page 6 and 7 before continuing.
EN 9 Results of Auto Set Up/Preset Download appear on the front display panel A B C When both auto channel set and auto clock set have been completed successfully the correct current time will be displayed after the OK button is pressed in step 4 on page 7 or in step 1 on page 8. When auto channel set has been completed successfully but auto clock set has not, "1" (channel position) will be displayed after the OK button is pressed in step 4 on page 7 or in step 1 on page 8.
EN INITIAL SETTINGS (cont.) This recorder offers you the choice to view on-screen messages in 10 different languages. Though Auto Set Up selects the language automatically (墌 pg. 9), you can change the language setting manually using this procedure as required. Language Turn on the TV and select the AV mode. 1 2 3 Press %fi to move the highlight bar (pointer) to "AUTO CH SET", then press OK or #. 1 2 1 2 3 4 5 6 3 7 8 9 4 4 . ACCESS MAIN MENU Press MENU.
EN You can choose whether or not to have various operational indicators appear on screen, by setting this function ON or OFF. Messages appear in the selected language (墌 pg. 9 or 10). On-Screen Displays Turn on the TV and select the AV mode. 1 2 1 2 3 4 5 6 3 7 8 9 4 4 1 3 1 2 3 Press MENU. 4 The default setting is "ON", so if you want on-screen displays, leave the setting as it is and go to step 5.
EN INITIAL SETTINGS (cont.) Power Save Mode You can reduce the power consumption while the recorder is turned off. TURN ON THE RECORDER 1 Press 2 3 Press MENU. Turn on the TV and select the AV mode. . ACCESS MAIN MENU SCREEN ACCESS MODE SET SCREEN Press %fi to move the highlight bar (pointer) to "MODE SET", then press OK or #.
SATELLITE RECEIVER CONTROL EN 13 Installing Satellite Controller Satellite Receiver 1 Control Setting The following procedure is required if you receive satellite channels through a satellite receiver. Approximately 20 seconds before the SHOWVIEW timer programming (墌 pg. 34) or Express timer programming (墌 pg. 36) starts, the recorder sets its input mode to "L-2" and automatically switches the satellite receiver’s channels using the provided Satellite Controller.
EN SATELLITE RECEIVER CONTROL (cont.) 3 ACCESS INITIAL SET SCREEN Press %fi to move the highlight bar (pointer) to “INITIAL SET”, then press OK or #. 1 MAIN MENU MODE SET VHS MODE SET DV MODE SET AUTO CH SET MANUAL CH SET OUTPUT/INPUT SET INITIAL SET 2 NUMBER [5∞] = [MENU] : EXIT 1 2 3 4 5 6 3 7 8 9 4 4 MENU 0 1 3 OK 2 4 ACCESS SAT CONTROL SET SCREEN Press %fi to move the highlight bar (pointer) to “SAT CONTROL SET”, then press OK or #.
EN 6 1 2 NUMBER 1 2 3 4 5 6 3 7 8 9 4 4 3 SELECT SATELLITE RECEIVER’S CHANNEL FOR TESTING Press the appropriate NUMBER keys to enter one of the channel positions on the satellite receiver, then press OK. SAT CONTROL SET SAT PROG : – – – ● You can select the channel position [0–9] = : TEST between 1 to 999. [MENU] : EXIT ● After pressing OK, the recorder enters the Test mode.
EN T-V Link Functions When you connect the recorder and your TV via fully-wired 21-pin SCART cable (墌 pg. 4), the following functions are available. You can use these functions only with the TV offering T-V Link, etc.* For details, refer to the instruction manual for your TV. * Compatible with TVs offering T-V Link, EasyLink, Megalogic, SMARTLINK, Q-Link, DATA LOGIC or NexTView LINK via fullywired 21-pin SCART cable. The degree of compatibility and available functions may differ by system.
INFORMATION ON COLOUR SYSTEM * SECAM signals will be recorded as MESECAM on this recorder; MESECAM is the designation for tapes with SECAM signals that have been recorded on a MESECAM-compatible PAL video cassette recorder. (VHS Deck Only) 2 3 4 5 6 3 7 8 9 4 4 1 2 Press MENU. 3 Press %fi to move the highlight bar (pointer) to "VHS MODE SET", then press OK or #. .
EN PLAYBACK Basic Playback 1 ● VHS deck The recorder power comes on automatically. The counter is reset to 0:00:00. DV deck First turn on the recorder and load the cassette. If the recorder is turned off, the recorder’s power does not come on when a Mini DV cassette is inserted. ● VHS deck If the record safety tab has been removed, playback begins automatically. DV deck If the erase protection switch is set to "SAVE", playback begins automatically.
EN Still search Reverse y Pl a sea SE U PA JOG s Slow motio n ard Forwrch SHUTTLE la Re p ve e rs v e rs e Re low y Playback Features PL AY 19 NOTES: ● Refer to the SHUTTLE ring illustration above as you read the following procedures. ● When using the JOG dial during playback on the DV deck, turn the JOG dial slowly.
EN EJ EC T EJECT PLAYBACK (cont.) High-Speed (Turbo) Search During playback or still, turn the SHUTTLE ring all the way to the right for forward high-speed search, or to the left for reverse high-speed search. Releasing SHUTTLE resumes still picture playback. OR SHUTTLE PR PLAY 1 ACTIVATE HIGH-SPEED SEARCH During playback or still, press FF for forward highspeed search, or REW for reverse high-speed search. To resume normal playback, press PLAY.
EN 21 Instant ReView (VHS Deck Only) Manual Tracking (VHS Deck Only) Simply by pressing a single button, the recorder power comes on, rewinds, and begins playback of the last timer-recorded programme. If you have several programmes recorded, you can easily access any of them. Your video recorder is equipped with automatic tracking control. During playback, you can override this and adjust the tracking manually by pressing the PR buttons.
EN PLAYBACK (cont.) Repeat Playback (VHS Deck Only) Video Stabilizer (VHS Deck Only) Your video recorder can automatically play back the whole tape 100 times repeatedly. You can automatically correct vertical vibrations in the picture when playing back unstable recordings made on another recorder. * The default setting is "OFF". START PLAYBACK 1 Press PLAY. 2 Press PLAY and hold for over 5 seconds, then release.
EN Digital 3R (VHS Deck Only) Digital 3R picture system applies edge correction to the luminance signal to enhance detail. 1 2 ACCESS MAIN MENU SCREEN Press MENU. ACCESS VHS MODE SET SCREEN Move the highlight bar (pointer) to "VHS MODE SET" by pressing %fi, then press OK or #. [5∞] = [MENU] : EXIT 3 4 SELECT DIGITAL 3R SET MODE Move the highlight bar (pointer) to "DIGITAL 3R" by pressing %fi, then press OK or # to set to "ON".
EN PLAYBACK (cont.) Tape Position Indicator (VHS Deck) The tape position indicator appears on screen when, from the Stop mode, you press FF, REW or perform an Index Search. The position of "5" in relation to "0" (beginning) or "+" (end) shows you where you are on the tape. "O.S.D." ( pg. 11) must be set to "ON", or the indicator will not appear. NOTE: 3 0 Depending on the type of tape used, there may be times when the indication is not correct.
EN Soundtrack Selection (DV Deck) The DV recording deck is capable of recording two soundtracks (L and R) and will play back the one you select. During Playback Pressing AUDIO on the remote control changes the soundtrack being played back as follows: TRACK On-Screen Display L R L USE For stereo or Bilingual tapes For main audio of Bilingual tapes R For sub audio of Bilingual tapes Sound Mode Selection (DV Deck) 1 Press MENU to access the Main Menu screen.
EN RECORDING VHS Deck Basic Recording 1 2 3 4 Press VHS. 5 Press and hold RECORD and press PLAY on the remote control, or press RECORD on the recorder. The VHS record indicator ( ) lights. RECORD EJECT Turn on the TV and select the AV mode. ST P O PAUSE PR +/ – PL AY VHS VHS record indicator VHS 1 2 1 NUMBER 2 3 4 5 6 3 7 8 9 4 4 SP/LP/EP 0 1 LOAD A CASSETTE Insert a VHS (or S-VHS) cassette with the record safety tab intact. 3 ● The recorder power comes on automatically.
EN 27 RECORD EJECT DV Deck P O ST 1 2 3 4 5 Press DV. PAUSE PR +/ – PL AY DV DV record indicator DV 1 2 NUMBER 1 2 3 4 5 6 3 7 8 9 4 4 1 ● Turn on the recorder before loading a cassette. SELECT DV DECK CHOOSE A PROGRAMME Press PR +/– or the NUMBER keys to select the channel you wish to record. SET TAPE SPEED Press SP/LP/EP ( ). Check the SP/LP indicator on the recorder display panel to confirm the selected tape speed.
EN RECORDING (cont.) Record One Programme While Watching Another Recording Features 1 1 SELECT CHANNEL TO WATCH Once recording is in progress, all you need to do is to set the channel controls on the TV for the station you wish to view. ● The programme selected with the TV’s channel controls appears on the TV screen while the one selected with the recorder's PR buttons is recorded on the tape. ● If a decoder is connected to the recorder ( pg.
EN Retake (VHS Deck Only) You can cut out unnecessary parts of a TV programme while you're recording it. End of programme Programme Unnecessary part Beginning of programme Unnecessary part Programme Recorded part Go back to end of programme to cut out unnecessary part ENGAGE RECORD-PAUSE MODE 1 2 Press PAUSE during recording. 3 Press PLAY when you wish to resume recording.
EN RECORDING (cont.) Super VHS ET (S-VHS ET) — Recording on VHS cassettes with S-VHS quality (VHS Deck Only) VH SS ET You can record in SP mode on VHS tapes with S-VHS picture quality. Tapes recorded using this function can be played back on a recorder equipped with the S-VHS ET function. ● You can activate the S-VHS ET function only before you start recording on a VHS cassette. ● Before recording, make sure that "B.E.S.T." is set to "ON". ( pg.
EN 31 Elapsed Recording Time Indication (VHS Deck Only) To Record Stereo And Bilingual Programmes (A2) You can check the exact time of a recording. ● VHS deck Stereo programmes are automatically recorded in stereo on the Hi-Fi audio track (with the normal audio track recording mixed L and R channel sound). Bilingual programmes are automatically recorded in bilingual on the Hi-Fi audio track. The main soundtrack will be recorded on the normal audio track.
EN RECORDING (cont.) B.E.S.T. Picture System (VHS Deck Only) RECORD PL AY PAUSE Turn on the TV and select the AV mode. The B.E.S.T. (Biconditional Equalized Signal Tracking) system checks the condition of the tape in use during recording and playback, and compensates to provide the highest-possible recording and playback pictures. The default setting for both recording and playback is "ON". Preparation TURN ON THE RECORDER 1 Press 2 Press MENU.
EN Recording 1 START RECORDING Press and hold RECORD and press PLAY on the remote, or press RECORD on the recorder. DURING B.E.S.T. B.E.S.T. COMPLETE Playback The recorder assesses the quality of the tape once you initiate playback. 1 START PLAYBACK Press PLAY. ● The recorder adjusts the playback picture quality based on the quality of the tape in use. ● B.E.S.T. is active during Auto Tracking. "BEST" appears blinking on the recorder’s display panel.
EN TIMER RECORDING SHOWVIEW Timer 3 Programming ® Before performing the SHOWVIEW Timer Programming: ● Make sure that the recorder's built-in clock is set properly. ● Select the recording deck by pressing VHS or DV. ● Insert a VHS (or S-VHS) cassette with the safety tab in place, or a Mini DV cassette with the erase protection switch set to "REC". ● Turn on the TV and select the AV mode.
EN IMPORTANT Satellite Receiver Users Make sure the channel position number you wish to record is displayed; if not, see "SHOWVIEW System Setup" on page 67 and set the Guide Program number for that SHOWVIEW number correctly. To timer-record a satellite broadcast using the SHOWVIEW system: Perform "Satellite Receiver Control Setting" ( pg. 13). Perform steps 1 – 8. In step 4, the display panel shows "L2" for the preset position. In step 6, you cannot set "VPS/PDC" to "ON".
EN TIMER RECORDING (cont.) Express Timer Programming Before performing Express Timer Programming: ● Make sure that the recorder's built-in clock is set properly. ● Select the recording deck by pressing VHS or DV. ● Insert a VHS (or S-VHS) cassette with the safety tab in place, or a Mini DV cassette with the erase protection switch set to "REC". ● Turn on the TV and select the AV mode.
EN 6 ENTER CHANNEL POSITION Press PR +/–. VHS – P1 – START 21:00 STOP 22:00 = SP DATE 25.12 [+/–] = [PROG] : EXIT VPS/PDC OFF TV PROG 1 ARD [0] : SAT 7 8 9 Satellite Receiver Users To timer-record a satellite broadcast using Express Timer Programming: Perform "Satellite Receiver Control Setting" ( pg. 13). Perform steps 1 – 10. In step 6, press the NUMBER key "0" to change "TV PROG" to "SAT". The display panel shows "L2" for the preset position.
EN TIMER RECORDING (cont.) Check, Cancel And Replace Programmes 1 2 Press 1 2 VPS/PDC 1 2 3 4 5 6 3 7 8 9 4 4 SP/LP/EP 0 1 3 DISENGAGE TIMER MODE Press ‰ (TIMER), then press . ACCESS PROGRAM CHECK SCREEN/DISPLAY . VHS ● The programme check screen or display appears for the deck (VHS or DV) being selected. 1 2 3 4 5 6 START 8:00 10:00 11:30 STOP 10:00 10:45 13:00 CH 3 2 1 DATE 24.12 25.12 25.
EN 39 When programmes overlap each other If "PROGRAM OVERLAPPED" appears, you have another programme overlapping the programme you have just made. The Program Check screen appears and conflicting programmes will start blinking. VHS PROGRAM OVERLAPPED 1 2 1 2 3 4 5 6 3 7 8 9 4 4 SP/LP/EP 0 1 PROG 3 EX. Programme 1 (you have just made) and Programme 4 overlap each other on the VHS deck. OK 2 PR+/– START+/– /– E+ AT D ST O P+ /– START STOP CH DATE 1 8 : 00 10 : 00 3 24 . 12 2 25 .
EN TIMER RECORDING (cont.) Auto Timer When the Auto Timer is set to ON the timer is automatically engaged when the recorder power is turned off and automatically disengaged when the recorder is powered back on. 1 2 1 2 1 2 3 4 5 6 3 7 8 9 4 4 ACCESS MODE SET SCREEN Press %fi to move the highlight bar (pointer) to "MODE SET", then press OK or #. MENU 0 1 ACCESS MAIN MENU SCREEN Press MENU.
EN 41 Auto SP→LP Timer (VHS Deck Only) If, when timer-recording in SP mode, there is not enough tape to record the entire programme, the recorder automatically switches to LP mode to allow complete recording. For Example . . .
EN SPECIAL FEATURES Remote A/B/C/D Code Switching Remote Control Functions The remote control is capable of controlling four JVC video recorders independently. Each of recorders can respond to one of four codes (A, B, C or D). The remote control is preset to send A code signals because your video recorder is initially set to respond to A code signals. You can easily modify your video recorder to respond to B, C or D code signals.
EN 43 TV Multi-Brand Remote Control Your remote control can operate the basic functions of your TV set. In addition to JVC TVs, other manufacturer’s TVs can also be controlled. LCD panel TV/CABLE/SAT 1 TV/VCR 2 NUMBER 1 2 3 4 5 6 3 7 8 9 4 4 1 OK 3 2 2 STOP TV +/– Press TV/CABLE/SAT to switch the display to "TV" and keep pressing the button down until "TV-_ _" appears. Enter your TV's brand code using the NUMBER keys, then press OK. (Refer to the chart below.
EN SPECIAL FEATURES (cont.) Satellite Receiver MultiBrand Remote Control Your remote control can operate the basic functions of your satellite receiver set. In addition to JVC satellite receivers, other manufacturer’s satellite receivers can also be controlled.
EDITING EN Preparation For Editing (VHS Deck Only) Picture Control This feature helps you to adjust the playback picture quality according to your preference. *The default setting is "AUTO." 2 1 2 3 4 5 6 3 7 8 9 4 4 1 2 Move the highlighted bar (pointer) to "VHS MODE SET" by pressing %fi, then press OK or #. 3 Move the highlighted bar VHS MODE SET (pointer) to "PICTURE B. E. S. T.
EN EDITING (cont.) DUB DV VHS Tape Dubbing Dubbing An Entire Cassette Because this recorder includes both a VHS deck and a DV deck, you can easily use it for dubbing without connecting any other equipment. LOAD CASSETTES 1 Insert a VHS (or S-VHS) cassette and a Mini DV cassette. 2 Press → when you want playback on the DV deck and recording on the VHS deck. The dubbing direction (DV →) indicator lights.
EN You can dub selected scenes on a tape, starting and stopping wherever you wish. VH S V D PA U SE Normal Dubbing PLAY 47 START 1 2 Press → when you want playback on the DV deck and recording on the VHS deck. The dubbing direction (DV →) indicator lights. SELECT DUBBING DIRECTION OR RD CO RE P O ST Press ← when you want playback on the VHS deck and recording on the DV deck. The dubbing direction (← VHS) indicator lights.
EN EDITING (cont.) 64-program Editing Memory (8 programmes x 8 scenes) By using the Random Assemble Editing function, you can select up to 8 scenes from a previously recorded Mini DV cassette and automatically dub them onto a VHS cassette. Random Assemble Editing is possible only when dubbing from the DV deck to the VHS deck. V D R. A .E D IT VHS STOP RECORD Random Assemble Editing IN/OUT DUB PL PAUSE AY START 1 2 3 4 1 2 2 3 4 5 6 7 8 3 9 5 4 4 0 1 SELECT DV DECK Press DV.
EN 6 VHS DV LOCATE EDIT-OUT POINT Press PLAY to start playback. Find the point where you want the edited scene to end, then press PAUSE. Then, press IN/OUT. The edit-out point appears on the screen. P1 1 2 3 4 5 6 7 8 IN OUT 0 : 3 1 : 0 2→ 0 : 5 4 : 0 0 → → → → → → → 1 2 1 2 3 4 5 6 3 7 8 9 4 4 AY PL PAUSE RECORD P O ST NOTES: ● When Random Assemble Editing doesn't work, press → of the DUB button, then perform Random Assemble Editing again. ● To cancel the registered scene, press .
EN EDITING (cont.) Edit From A Camcorder VHS 1 A 2 3 NOTES: ● All necessary cables can be obtained from your dealer. ● You can also use another video recorder as the player instead of a camcorder. ● When you select "EDIT" to dub tapes in step 4, be sure to select "AUTO" (or "NORM" when "B.E.S.T." is set to "OFF") after you finish dubbing the tapes.
EN A If the camcorder has no S-VIDEO output connector... VIDEO input Recorder Video Cable (not provided) B If the camcorder has an S-VIDEO output connector...
EN EDITING (cont.) You can use your video recorder as the source player or as the recording deck. Edit To Or From Another 1 Video Recorder With C connection ... ● When using your recorder as the recording deck, set "L-1 INPUT" to "S-VIDEO" and "L-2 SELECT" to "A/V" (墌 pg. 58). ● When using your recorder as the source player, set "L-1 OUTPUT" to "S-VIDEO" (墌 pg. 58).
EN A B TV Receiver (AV mode) Player Your recorder 21-pin SCART Cable (provided) Recorder Your recorder 21-pin SCART Cable (provided) 53 TV Receiver (AV mode) 21-pin SCART Cable (not provided) 21-pin SCART Cable (not provided) Another recorder Another recorder Recorder C TV Receiver (AV mode) Player Recorder S-Video Cable (not provided) Your recorder 21-pin SCART Cable (provided) 21-pin SCART Cable (not provided) Another recorder Player NOTES: ● All necessary cables can be obtained from
EN EDITING (cont.) A. DUB Audio Dubbing VHS Audio Dubbing Audio dubbing replaces the normal audio sound of a previously recorded tape with a new soundtrack. Audio dubbing is not possible with a cassette recorded in EP mode. Normal audio track Pre-recorded tape Video/Hi-Fi audio track Audio-dubbed tape CD Player etc. CD Player etc.
EN 5 6 Engage the audio component's Play mode, then press PLAY to start the tape in your recorder. Audio dubbing begins at this point. 7 Press STOP to stop the tape in your recorder, and engage the audio component's Stop mode. 1 2 3 4 5 6 3 7 8 9 4 4 0 1 3 2 ENGAGE AUDIO DUBBING Press A. DUB. AUDIO2 1 55 PLAY PAUSE ● Your recorder enters the Audio Dubbing Pause mode. (" " blinks, " " and " " light up on the front display panel.
EN EDITING (cont.) Insert Editing Recorder Your recorder VHS Insert Editing Insert Editing replaces part of the recorded scene with new material. Both the picture and Hi-Fi audio soundtrack are replaced with new ones, while the normal audio soundtrack remains unchanged. If you wish to change the normal audio track as well, use the audio dubbing function simultaneously. Use your video recorder as the recorder. Insert editing is not possible with a cassette recorded in EP mode.
SHUTTLE PA U SE STOP EN JOG PLAY IN SE A.DUB RT 4 1 57 LOCATE END POINT (VHS DECK ONLY) Load the recording cassette into your recorder, and play it back to determine the edit-out point (the end of the segment to be replaced) using the SHUTTLE ring or the JOG dial, or pressing @ # and PAUSE. RESET THE COUNTER (VHS DECK ONLY) 5 6 Press 0000 to change the counter display to "0:00:00". 7 Press INSERT. 8 Load the source cassette and play back the segment that is to be inserted.
EN EDITING (cont.) L-1 OUTPUT/INPUT Setting The AV1 (L-1) IN/OUT connector accepts and delivers either a composite signal (regular video signal) or a Y/C signal (a signal in which the luminance and chrominance signals are separated). Set "L-1 OUTPUT" and "L-1 INPUT" to the appropriate mode depending on the type of appliance connected to the recorder's AV1 (L-1) IN/OUT connector. Press MENU to access the Main Menu screen.
EN 59 VHS F-1 INPUT Setting Set "VHS F-1 INPUT" to the appropriate mode depending on the connector (VIDEO or S-VIDEO input connector) being used on the front panel. Press MENU to access the Main Menu screen. Press %fi to move the highlight bar (pointer) to "OUTPUT/INPUT SET", then press OK or OUTPUT/INPUT SET #. L-1 OUTPUT VIDEO Press %fi to move the highlight bar (pointer) to "VHS F-1 INPUT". L-1 INPUT VIDEO Press OK or # to select "VIDEO" or "S-VIDEO".
EN SYSTEM CONNECTIONS Connection To A Satellite Receiver Aerial connector Simple Connections This is an example of simple connection if your TV has one 21-pin AV input (SCART) connector. Connect the satellite receiver to the AV2 (L-2) IN/DECODER connector, then connect the AV1 (L-1) IN/OUT connector to the TV's connector. NOTES: ● Set "L-2 SELECT" to "A/V". (墌 pg.
EN Perfect Connections NOTES: This is an example of recommended connection if your TV has two 21-pin AV input (SCART) connectors. ● Set "L-2 SELECT" to "A/V". (墌 pg. 58) ● To record a programme via the satellite receiver, select L-2 mode by pressing NUMBER keys and/or PR so that "L-2" appears on the display panel. ● To receive a scrambled broadcast, descramble the signal with the satellite receiver. ● For details, refer to the instruction manual for the satellite receiver and decoder.
EN SYSTEM CONNECTIONS (cont.) Connecting/ Using A Decoder TV Receiver TV Aerial Cable RF Cable (provided) AV1 (L-1) IN/OUT AV2 (L-2) IN/DECODER Decoder The AV2 (L-2) IN/DECODER connector can be used as an input terminal for an external decoder (descrambler). Simply connect a decoder and you can enjoy the variety of programming that is available through scrambled channels. 1 2 3 SELECT INPUT MODE Set "L-2 SELECT" to "DECODER". (墌 pg.
EN 63 These instructions enable you to connect your video recorder to your Hi-Fi stereo system (if you have one) and listen to the soundtrack through the stereo.
EN SYSTEM CONNECTIONS (cont.) When you edit from the DV deck to the VHS deck (or from the VHS deck to the DV deck), you can enter a title to a scene by connecting a video titler. Connecting To A Video Titler 1 S OUT 2 AV2 (L-2) IN/DECODER 21-pin SCART Cable (provided) 3 S-Video Cable (not provided) MAKE CONNECTIONS Connect the recorder and the video titler as shown in the illustration in the left column. PREPARE PLAYING DECK Insert a cassette for playback and make the title you want to display.
EN VHS DV 1 2 1 2 3 4 5 6 3 7 8 9 4 4 0 1 3 2 PLAY RECORD 7 8 9 65 START PLAYBACK Press DV or VHS for the playing deck, then press PLAY. START RECORDING Press DV or VHS for the recording deck, then press RECORD at the point from where you want to start recording. ENTER TITLE Enter a title at the point where you want the title to be displayed. NOTES: ● For the operation of the video titler, refer to its instruction manual.
EN SYSTEM CONNECTIONS (cont.) Connecting To A Printer DV Your recorder AY PL DV IN/OUT DV cable (not provided) To DV IN connector Digital printer DV 1 2 1 2 3 4 5 6 3 7 8 9 4 4 0 1 2 PLAY 3 You can make printouts of video images by connecting the GV-DT1/GV-DT3 Digital Printer (sold separately) to the DV IN/OUT connector. MAKE CONNECTIONS 1 2 Connect the printer’s DV IN connector to the recorder’s DV IN/OUT connector. 3 Press PLAY. SELECT DECK Press DV.
SUBSIDIARY SETTINGS EN 67 SHOWVIEW® System Setup IMPORTANT Normally, Auto Set Up ( pg. 6), Preset Download ( pg. 8) or Auto Channel Set ( pg. 68) sets the Guide Program Numbers automatically. You need to set the Guide Program Numbers manually only in the following cases.
EN SUBSIDIARY SETTINGS (cont.) IMPORTANT Tuner Set Perform the following steps only if — — Auto Channel Set has not been set correctly by Auto Set Up function or by Preset Download ( pg. 6, 8). — you have moved to a different area or if a new station starts broadcasting in your area. Turn on the TV and select the AV mode. Your recorder needs to memorize all necessary stations in channel positions in order to record TV programmes.
EN 6 1 2 1 2 3 4 5 6 3 7 8 9 4 4 MENU 0 1 3 OK 2 PERFORM AUTO CHANNEL SET Press OK twice. AUTO SET ● You can set up the recorder's tuner also PLEASE WAIT by Preset Download ( pg. 8). + + + 0 ● The Auto Set screen appears, and remains [MENU] : EXIT on screen while the recorder searches for receivable Beginning End stations. As Auto Channel Set progresses, the " " mark on the screen moves from left to right. Wait until the screen as shown in step 7 appears.
EN SUBSIDIARY SETTINGS (cont.) 4 SELECT BAND Press %fi to change the band between CH (regular) and CC (cable), then press #. PR CH ID FINE DECODER 12 CH01 – – – – +/– OFF [5∞] : SELECT [ ] : CURSOR += : OK [MENU] : EXIT ∞ ∞ 1 2 NUMBER 1 2 3 4 5 6 3 7 8 9 4 4 MENU 0 1 The blueback screen and the programme currently being broadcast by the selected channel appear alternately for 8 seconds each.
EN Delete A Channel Perform steps 1 and 2 of "Storing Channels Manually" on page 70 to access the Confirmation screen before continuing. 1 2 3 SELECT ITEM Press %fi @ # until the item you want to delete begins blinking. DELETE CHANNEL Press . ● The item directly beneath the cancelled one moves up one line. ● Repeat steps 1 and 2 as necessary. CLOSE CONFIRMATION SCREEN Press MENU.
EN SUBSIDIARY SETTINGS (cont.) Set Stations (A) Set station names that are registered in your recorder. Perform steps 1 and 2 of "Storing Channels Manually" on page 70 to access the Confirmation screen before continuing. 2 1 2 3 4 5 6 3 7 8 9 4 4 MENU 0 1 2 3 OK 2 3 5 ACCESS MANUAL CHANNEL SET SCREEN Press OK twice. SELECT NEW STATION Press # until the station name (ID) begins blinking, then press %fi until the new station’s name (ID) you want to store begins blinking.
EN 73 Set Stations (B) Set station names other than the ones registered in your recorder. Perform steps 1 and 2 of "Storing Channels Manually" on page 70 to access the Confirmation screen and then perform step 1 and 2 of "Set Stations (A)" on page 72 before continuing. 1 2 1 2 3 4 5 6 3 7 8 9 4 4 Press # until the first letter of the station name begins blinking.
EN SUBSIDIARY SETTINGS (cont.
EN 75 Fine-Tuning Channels Already Stored Perform steps 1 and 2 of "Storing Channels Manually" on page 70 to access the Confirmation screen before continuing. 1 2 1 2 3 4 5 6 3 7 8 9 4 4 2 1 Press %fi @ # until the channel you want to tune begins blinking. 2 3 Press OK twice. The Manual Channel Set screen appears.
EN SUBSIDIARY SETTINGS (cont.) IMPORTANT Clock Set If you performed Auto Set Up ( pg. 6), Preset Download ( pg. 8) or Auto Channel Set ( pg. 68), without ever having set the clock previously, the recorder's built-in clock is also set automatically. Perform the following steps only if — — Auto Clock Set has not been performed correctly by Auto Set Up, Preset Download or Auto Channel Set. or — the recorder's memory backup has expired.
EN 6 1 2 1 2 3 4 5 6 3 7 8 9 4 4 1 2 3 OK SET JUST CLOCK The default setting is "OFF". Set as desired by pressing %fi, then press OK or #. ● For the Just clock function, "Just Clock" on page 76. ● If you set to "OFF", you can disregard the next step as you won’t be able to receive regular clock adjustments. SET CLOCK DATA SOURCE CHANNEL POSITION 7 The recorder is preset to receive clock setting and adjustment data from channel position 1.
EN TROUBLESHOOTING Before requesting service for a problem, use this chart and see if you can repair the trouble yourself. Small problems are often easily corrected, and this can save you the trouble of sending your video recorder off for repair. POWER SYMPTOM POSSIBLE CAUSE CORRECTIVE ACTION 1. No power is applied to the recorder. ● The mains power cord is disconnected. Connect the mains power cord. 2. The clock is functioning properly, but the recorder cannot be powered.
EN 79 RECORDING SYMPTOM POSSIBLE CAUSE CORRECTIVE ACTION ● "SOUND MODE" on the DV Mode Set Menu had been set to "16BIT" at the original recording. ● The tape speed had been set to LP (DV cassette) or EP (VHS/S-VHS cassette) at the original recording. Set "SOUND MODE" to "12BIT" at the original recording ( pg. 25). 6. Monitoring the audio-dubbed sound is not possible during audio dubbing using the DV deck. ● This is normal. Monitor the sound using the connected devices. 7.
EN TROUBLESHOOTING(cont.) OTHER PROBLEMS SYMPTOM POSSIBLE CAUSE CORRECTIVE ACTION 1. Whistling or howling is heard from the TV during camcorder recording. ● The camcorder’s microphone is too close to the TV. ● The TV’s volume is too high. Position the camcorder so its microphone is away from the TV. Turn the TV’s volume down. 2. When scanning channels, some of them are skipped over. ● Those channels have been designated to be skipped. If you need the skipped channels, restore them ( pg. 70).
QUESTIONS AND ANSWERS EN 81 PLAYBACK TIMER RECORDING Q. What happens if the end of the tape is reached during playback or search? A. The tape is automatically rewound to the beginning. Q. " " and "‰" remain lit on the display panel. Is there a problem? A. No. This is a normal condition for a timer recording in progress. ○ ○ ○ ○ ○ ○ ○ ○ ○ ○ ○ ○ ○ ○ ○ ○ ○ ○ ○ ○ ○ ○ ○ ○ ○ ○ ○ ○ ○ Q. Can the video recorder indefinitely remain in the still mode? A. No.
EN INDEX FRONT VIEW 12 3 5 6789 0 ! @ 4 # S-VHS ET DV DV VHS DUB COPIE INSERT VIDEO VHS A.DUB L –AUDIO– R R.A.EDIT START S-VIDEO PR IN/OUT DV IN/OUT ENTREE/SORTIE DV $ % ^ &*( ) 1 STANDBY/ON Button pg. 6 2 Infrared Beam Receiving Window 3 DV EJECT Button pg. 18 4 Mini DV Cassette Loading Slot 5 DV Button pg. 18 6 STOP Button pg. 18 7 PLAY Button pg. 18 8 PAUSE Button pg. 19 9 RECORD Button pg. 26, 27 0 VHS Button pg. 18 ! VHS Cassette Loading Slot @ S-VHS ET Button pg.
EN REAR VIEW 1 ANTENNA ANTENNE IN ENTREE 2 AV1 (L-1) IN/OUT 3 ENTREE/SORTIE OUT S SORTIE (DV/VHS) AUDIO (DV/VHS) L SAT CONTROL CONTROLEUR SAT OUT SORTIE R AV2 (L-2) OUT SORTIE 4 IN/DECODER ENTREE/DECODEUR 5 6 1 ANTENNA IN Connector pg. 4 2 AV1 (L-1) IN/OUT Connector pg. 4, 52, 60 – 62 3 S OUT Connector pg. 5 4 ANTENNA OUT Connector pg. 4 7 5 AV2 (L-2) IN/DECODER Connector pg. 52, 60 – 62 6 SAT CONTROL Connector pg. 13 7 AUDIO OUT (L/R) Connectors pg.
EN INDEX (cont.) REMOTE CONTROL TV CABLE/SAT DV VHS 1 LCD PROG AUDIO – –:– – TV/VCR 2 1 4 VPS/PDC 2 3 5 6 3 DAILY/QTDN. WEEKLY/HEBDO 7 8 0000 AUX 9 4 4 MENU 0 ENTER/ENTREE 1 PROG 30 SEC OK 3 2 START DEBUT STOP FIN DATE PR EXPRESS + TV PR + TV 1 2 3 4 5 6 7 8 9 0 ! @ # $ % ^ & * TV – T V PR – ( ) q w e r t y u i o p Q W E R T Y Buttons with a small dot on the left side of the name can also be used to operate your TV. ( pg. 43) 1 LCD Panel pg.
EN 85 How To Use The remote control can operate most of your video recorder's functions, as well as basic functions of TV sets and satellite receivers of JVC and other brands. ( pg. 43, 44) ● Point the remote control toward the sensor window. ● The maximum operating distance of the remote control is about 8 m. NOTES: ● When inserting the batteries, be sure to insert in the correct directions as indicated under the battery cover.
EN GENERAL Power requirement SPECIFICATIONS : AC 220 V – 240 V`, 50 Hz/60 Hz Power consumption Power on : 33 W Power off : 7.9 W Temperature Operating : 5°C to 40°C Storage : –20°C to 60°C Operating position : Horizontal only Dimensions (WxHxD) : 435 mm x 124 mm x 391 mm Weight : 6.
MEMO
EN Auto Set Up – referring to the display panel BEFORE YOU START PLEASE MAKE SURE THAT: 䡲 The TV aerial cable is connected to the ANTENNA IN jack on the rear panel of the video recorder. 䡲 The video recorder's mains power cord is connected to a mains outlet. 䡲 The video recorder is turned off. 䡲 Load batteries into the remote control. 1 Press 2 Press %fi (remote) to select the international telephone country code. (recorder/remote). International Telephone Country Code (Ex.) DEUTSCHLAND is selected.